Interface and Application programming

1. First attempts with processing
I try processing to make a game that could be run on my final project. What I wanted to do was to pass from the first image to the sencond image by pressing the button from the Led+Button board we made this week.
I have been able to do this by pressing a key. Here is the processing file (working code):
// The Reas and Fry Processing  book ( pages 103-113) help me to wrote this void setup.

//image
PImage img;


//font
PFont font;
//image


void setup() {

  //el espacio de dibujo
  size(250, 260);
 noStroke();

 //strokeWeight(4);
  background(242,204,47);

  smooth();
  img = loadImage("gatotrans.png");
    image (img, 0, 0);


}

void draw() {
  if (keyPressed== true) {
    fill (246,31,160);
    ellipse (125, 230, 40, 40);
    text("NO", 150, 250);
    fill (129, 130, 87);
    text("YES", 30, 250);


}else { //la fuente a utilizar, el color y lo que se escribe
  font= loadFont("PoplarStd-48.vlw");
  textFont(font);
fill (242,204,47);

  //fill (102,122,227);
  text( "IS THE CAT IN ", 20, 150);
  fill (255);
  text(" THE HOUSE?", 20, 200);
  strokeWeight(6);
stroke (174, 221, 00);

//ellipse (125, 150, 80, 80);

  //img = loadImage("sunflower.jpg");  // an alternative image

 // largePoint = min(width, height) / 20;


  //image


  // center the image on the screen
 // left = (width - img.width) / 2;
  //top = (height - img.height) / 2;
  //image
  //float pointillize = map(mouseX, 0, width, smallPoint, largePoint);
  //int x = int(random(img.width));
  //int y = int(random(img.height));
  //color pix = img.get(x, y);
  //fill(pix, 128);
  //ellipse(left + x, top + y, pointillize, pointillize);
}


}
2.Processing and the hello (led) + button board
Below there is an example of a simple read data from the serial port, that changes the color of a rectangle when a switch connected to a Wiring or Arduino board is pressed and released. This example works with the Wiring / Arduino program that follows below.
          /**
 * Simple Read
 *
 * Read data from the serial port and change the color of a rectangle
 * when a switch connected to a Wiring or Arduino board is pressed and released.
 * This example works with the Wiring / Arduino program that follows below.
 */


import processing.serial.*;

Serial myPort;  // Create object from Serial class
int val;      // Data received from the serial port

void setup()
{
  size(200, 200);
  // I know that the first port in the serial list on my mac
  // is always my  FTDI adaptor, so I open Serial.list()[0].
  // On Windows machines, this generally opens COM1.
  // Open whatever port is the one you're using.
  String portName = Serial.list()[0];
  myPort = new Serial(this, portName, 9600);
}

void draw()
{
  if ( myPort.available() > 0) {  // If data is available,
    val = myPort.read();         // read it and store it in val
  }
  background(255);             // Set background to white
  if (val == 0) {              // If the serial value is 0,
    fill(0);                   // set fill to black
  }
  else {                       // If the serial value is not 0,
    fill(204);                 // set fill to light gray
  }
  rect(50, 50, 100, 100);
}
3. Final set up
The code for the hello (led) + button board. (we are not using the led)
1. We take the code from the hello button 45 and change the "defines" to make it work on our board:
#define input_port PORTA
#define input_direction DDRA
#define input_pin (1 << PA3)
#define input_pins PINA
#define serial_port PORTA
#define serial_direction DDRA
#define serial_pin_out (1 << PA7)
As our board works with an Attiny 44 and the hello.button.45.c code is for an Attiny 45:
2. Changing the main loop at the end of the code:
Button down ---> (&serial_port, serial_pin_out, '0') and Button up --->(&serial_port, serial_pin_out, '1')
          while (1) {
      //
      // wait for button down
      //
      while (0 != pin_test(input_pins,input_pin))
         ;
      put_char(&serial_port, serial_pin_out, '0');
      //
      // wait for button up
      //
      while (0 == pin_test(input_pins,input_pin))
         ;
      put_char(&serial_port, serial_pin_out, '1');
      }
   }
Finally, the code for the hello (led) + button board. (hello.button.44.c)
 // Some changes to make it work on a board with attiny 44 by Sara Alvarellos. June 2013. Based on Neil's code:
//
// hello.button.44.c
//
// button hello-world
//    9600 baud FTDI interface
//
// Neil Gershenfeld
// 10/31/10
//
// (c) Massachusetts Institute of Technology 2010
// Permission granted for experimental and personal use;
// license for commercial sale available from MIT.
//

#include
#include

#define output(directions,pin) (directions |= pin) // set port direction for output
#define input(directions,pin) (directions &= (~pin)) // set port direction for input
#define set(port,pin) (port |= pin) // set port pin
#define clear(port,pin) (port &= (~pin)) // clear port pin
#define pin_test(pins,pin) (pins & pin) // test for port pin
#define bit_test(byte,bit) (byte & (1 << bit)) // test for bit set
#define bit_delay_time 100 // bit delay for 9600 with overhead
#define bit_delay() _delay_us(bit_delay_time) // RS232 bit delay
#define half_bit_delay() _delay_us(bit_delay_time/2) // RS232 half bit delay

#define input_port PORTA
#define input_direction DDRA
#define input_pin (1 << PA3)
#define input_pins PINA
#define serial_port PORTA
#define serial_direction DDRA
#define serial_pin_out (1 << PA7)

void put_char(volatile unsigned char *port, unsigned char pin, char txchar) {
   //
   // send character in txchar on port pin
   //    assumes line driver (inverts bits)
   //
   // start bit
   //
   clear(*port,pin);
   bit_delay();
   //
   // unrolled loop to write data bits
   //
   if bit_test(txchar,0)
      set(*port,pin);
   else
      clear(*port,pin);
   bit_delay();
   if bit_test(txchar,1)
      set(*port,pin);
   else
      clear(*port,pin);
   bit_delay();
   if bit_test(txchar,2)
      set(*port,pin);
   else
      clear(*port,pin);
   bit_delay();
   if bit_test(txchar,3)
      set(*port,pin);
   else
      clear(*port,pin);
   bit_delay();
   if bit_test(txchar,4)
      set(*port,pin);
   else
      clear(*port,pin);
   bit_delay();
   if bit_test(txchar,5)
      set(*port,pin);
   else
      clear(*port,pin);
   bit_delay();
   if bit_test(txchar,6)
      set(*port,pin);
   else
      clear(*port,pin);
   bit_delay();
   if bit_test(txchar,7)
      set(*port,pin);
   else
      clear(*port,pin);
   bit_delay();
   //
   // stop bit
   //
   set(*port,pin);
   bit_delay();
   //
   // char delay
   //
   bit_delay();
   }

int main(void) {
   //
   // main
   //
   // set clock divider to /1
   //
   CLKPR = (1 << CLKPCE);
   CLKPR = (0 << CLKPS3) | (0 << CLKPS2) | (0 << CLKPS1) | (0 << CLKPS0);
   //
   // initialize pins
   //
   set(serial_port, serial_pin_out);
   output(serial_direction, serial_pin_out);
   set(input_port, input_pin); // turn on pull-up
   input(input_direction, input_pin);
   //
   // main loop
   //
   while (1) {
      //
      // wait for button down
      //
      while (0 != pin_test(input_pins,input_pin))
         ;
      put_char(&serial_port, serial_pin_out, '0');
      //
      // wait for button up
      //
      while (0 == pin_test(input_pins,input_pin))
         ;
      put_char(&serial_port, serial_pin_out, '1');
      }
   }
Final processing file running
When we press the button on the board the word "Yes" on the screen becomes white!!
   //Interface Aplication programming

//image
PImage img;

//font
PFont font;
//image
/**
 * Simple Read from the other example mix here
 */

import processing.serial.*;

Serial myPort;  // Create object from Serial class
int val;      // Data received from the serial port

void setup() {

  //el espacio de dibujo
  size(250, 260);
  noStroke();

  //strokeWeight(4);
  background(242,204,47);

  smooth();
  img = loadImage("gatotrans.png");
    image (img, 0, 0);
  //esta es la parte de conectar con el arduino---------------------//esta es la parte de conectar con el arduino---------------------
  String portName = Serial.list()[0];
  myPort = new Serial(this, portName, 9600);
  //esta es la parte de conectar con el arduino--------------------- //esta es la parte de conectar con el arduino--------------------- //esta es la parte de conectar con el arduino---------------------
  font= loadFont("PoplarStd-48.vlw");
  textFont(font);
}

void draw() {
    fill (242,204,47);
  //fill (102,122,227);
    text( "IS THE CAT IN ", 20, 150);
    fill (255);
    text(" THE HOUSE?", 20, 200);
    strokeWeight(5);
    stroke (174, 221, 00);
    fill (246,31,160);
    ellipse (125, 230, 40, 40);

  if ( myPort.available() > 0) { //If data is available
    val = myPort.read(); // read it and store it in val
  }

  if (val == 0){
    fill (0);
    text("NO", 150, 250);
    fill (129, 130, 87);
    text("YES", 30, 250);
  } else { //la fuente a utilizar, el color y lo que se escribe
    fill(255,255,255);
    text("YES",30,250);
  }
}
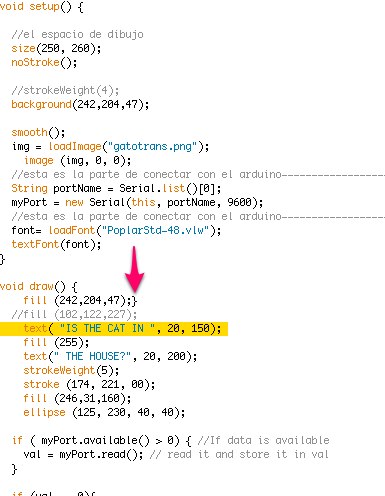
Things I have learnt
I had more than once the "mixing active and static modes" error in processing. There is a" }" indicated on the image that should be removed. I found a very good answer to this problem at stackoverflow.com:
Processing runs in two separate modes: static or active Static mode simply means it's a list of instructions/calls to existing functions (e.g. draw a bunch of lines then exit) Active mode uses the setup() and draw() calls and runs continuously (gets updated every 'frame'). Even you though you are using comments, you are defining methods(cortToPolar,lawCos) inside those comments and Processing encounters those which is why you're getting the error.