Embedded Programming
Week 4 Assignment
Assignment Overview
Week 4: Embedded Programming. Personal work is documented first, then group work — including a toolchain comparison between the Raspberry Pi 5B and Arduino UNO R4 WiFi.
👤 Personal Work
Personal assignment content to be added.
👥 Group Work
Team assignment for Week 4: compare development workflows on two representative platforms — a Linux single-board computer and a microcontroller board.
Part 1 — Raspberry Pi 5B vs Arduino UNO R4 WiFi: Toolchain & Workflow Comparison
This section contrasts an application-processor + OS platform (Raspberry Pi 5B) with a microcontroller (MCU) platform (Arduino UNO R4 WiFi). Both use Arm® cores, but their roles, memory models, and programming workflows differ fundamentally.
1. Architecture Comparison
| Dimension | Raspberry Pi 5B | Arduino UNO R4 WiFi |
|---|---|---|
| Platform class | Single-board computer (SBC) — application processor | Microcontroller board — embedded MCU system |
| Main processor | Broadcom BCM2712 — quad-core Arm Cortex-A76 @ up to 2.4 GHz | Renesas RA4M1 — Arm Cortex-M4 @ 48 MHz (+ ESP32-S3 coprocessor for Wi-Fi/BLE) |
| Typical RAM | 4 GB or 8 GB LPDDR4X (system memory) | 32 KB SRAM (on-chip); 256 KB Flash program memory |
| Operating system | Full Linux (Raspberry Pi OS / Debian-based) | No general-purpose OS; bare-metal firmware (Arduino core) runs directly on MCU |
| Program model | Multi-process, virtual memory, filesystem, networking stack in kernel | Single firmware image; reset → bootloader → setup() / loop() |
| GPIO access | Via OS drivers / libraries (e.g. lgpio, gpiozero) — not direct register bit-banging in user space by default |
Direct peripheral register access through Arduino API / HAL |
| Real-time behavior | Best-effort; preemptive multitasking — not hard real-time | Deterministic, low-jitter control loops suitable for sensing & actuation |
| Typical use cases | Vision, networking, databases, web servers, ML inference, desktop-like apps | Sensor reading, motor/PWM control, low-power I/O, rapid prototyping |
Summary: The Pi 5B is a computer that runs Linux; the UNO R4 WiFi is a device that runs one firmware program. Choose the Pi when you need OS services and compute; choose the MCU when you need predictable, low-level hardware interaction.
2. Toolchain & IDE
| Category | Raspberry Pi 5B | Arduino UNO R4 WiFi |
|---|---|---|
| Primary IDEs | VS Code, Thonny, Geany; terminal + SSH | Arduino IDE 2.x, Arduino Web Editor, PlatformIO (optional) |
| Languages | C/C++, Python 3, Rust, others via apt |
C/C++ (Arduino sketch syntax), limited Python via MicroPython ports (not default on R4) |
| Compilers / build | gcc / g++, cmake, make, pip |
arm-none-eabi-gcc (via Arduino build system / arduino-cli) |
| Build orchestration | Native compile on Pi, or cross-compile on host PC | Arduino CLI / IDE invokes board core + linker scripts for RA4M1 |
| Libraries | System packages (apt), PyPI, system headers |
Arduino Libraries Manager, vendor cores (Renesas UNO R4 core) |
| Debug | gdb, strace, logs, journalctl |
Serial Monitor, optional debugger (SWD) with external probe |
| Official resources | Raspberry Pi documentation | Arduino UNO R4 WiFi docs |
3. Code Compilation & Deployment Workflow
On the Pi, you deploy programs to a running OS. On the UNO R4, you flash firmware into MCU memory and the chip reboots into that image.
Raspberry Pi 5B workflow
- Initial setup: Use Raspberry Pi Imager to write Raspberry Pi OS to microSD (or NVMe).
- Boot: Power on → firmware/GPU loader → Linux kernel → userspace (systemd).
- Develop: SSH or desktop session; edit source (Python/C++) on the Pi or remotely.
- Build:
gcc/g++/cmakeor run Python directly — no cross-flash step for interpreted code. - Deploy: Copy binary/script to filesystem; install deps with
apt/pip; run from shell or register as asystemdservice. - Update: Replace files or packages; reboot only if kernel/drivers change.
Arduino UNO R4 WiFi workflow
- Setup: Install Arduino IDE 2.x + Arduino UNO R4 Boards core (Renesas).
- Develop: Write sketch (
.ino) —setup()runs once,loop()repeats. - Compile: IDE invokes
arduino-builder→ preprocess sketch →arm-none-eabi-gcc→ linked.elf/.bin. - Upload: USB-C connection; tool (e.g. bossac) writes image to internal Flash via on-board bootloader.
- Run: MCU resets; firmware starts from reset vector — no OS in between.
- Debug: Serial Monitor @ 115200 baud for
Serial.print()output.
| Workflow stage | Raspberry Pi 5B | Arduino UNO R4 WiFi |
|---|---|---|
| “Burn” / install | OS image → storage device (SD/NVMe) | Firmware binary → MCU Flash (repeat per sketch upload) |
| Program lifetime | Process ends; OS keeps running | Firmware runs until power-off or re-flash |
| Dependency model | Shared libraries on filesystem | Statically linked into single binary |
| Typical iteration | Edit → build/run → observe logs (seconds) | Edit → Verify/Upload → board resets (seconds) |
4. When to use which platform
- Use Raspberry Pi 5B when the task needs a filesystem, network services, cameras/USB devices, higher compute, or running existing Linux tools.
- Use Arduino UNO R4 WiFi when the task needs simple, fast I/O, low power, always-on control loops, or tight coupling to pins/peripherals.
- Combined systems: Pi for “brain” (logic, UI, networking) + MCU for “reflexes” (motors, sensors) via UART/I2C/USB — a common Fab Academy pattern.
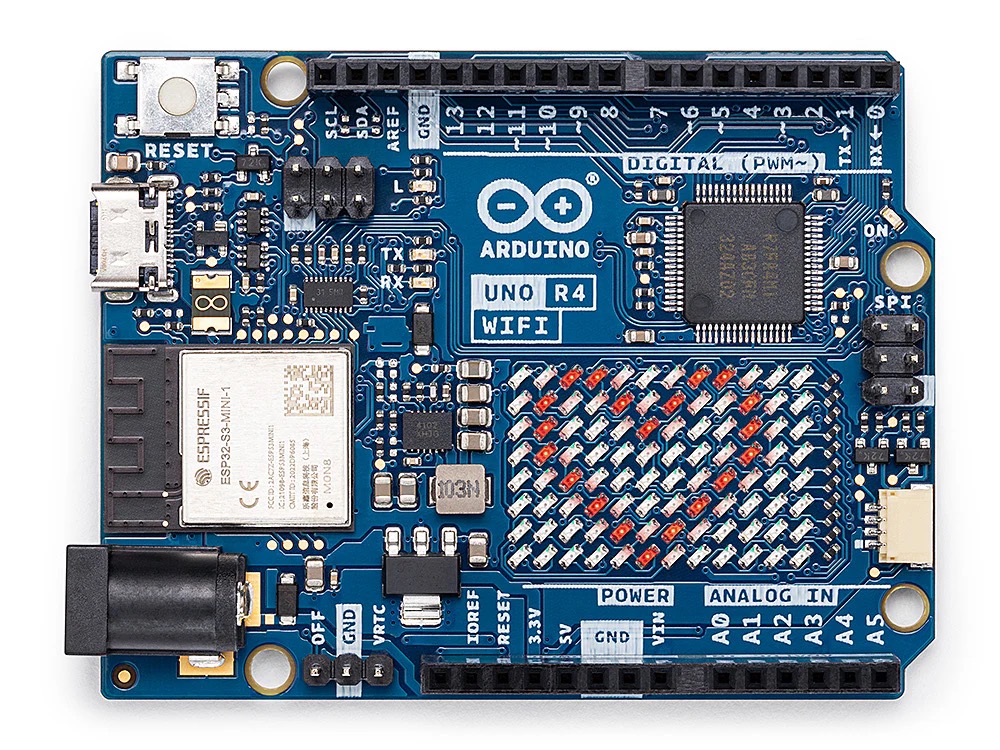
Part 2 — Arduino UNO R4 WiFi: Board Research & Specifications
The Arduino UNO R4 WiFi merges the processing power of the Renesas RA4M1 with the wireless connectivity of the ESP32-S3-MINI-1. It maintains 5V logic and the classic UNO form factor while introducing an integrated 12×8 LED matrix and a Qwiic connector for rapid prototyping. See Official Datasheet.
Technical Specifications
| Feature | Specification | Data Source |
|---|---|---|
| Name | Arduino UNO R4 WiFi | Arduino Datasheet |
| Microcontroller | Renesas RA4M1 (Arm® Cortex®-M4) | RA4M1 User's Manual |
| Connectivity | ESP32-S3-MINI-1 (Wi-Fi® + Bluetooth®) | Arduino Docs |
| Operating Voltage | 5V | Arduino Docs |
| Input Voltage (VIN) | 6–24V | Arduino Store |
| GPIO Pins | 20 | Arduino Pinout |
| Digital / PWM Pins | 14 Digital / 6 PWM | UNO R4 WiFi Cheat Sheet |
| Analog Input Pins | 6 | RA4M1 Hardware Spec |
| DAC (Analog Out) | 1 (12-bit) | RA4M1 Hardware Spec |
| I2C / Qwiic Ports | 1 (Standard) + 1 (Qwiic Connector) | Arduino Cheat Sheet |
| UART / SPI / CAN | 1 UART / 1 SPI / 1 CAN Bus | RA4M1 Peripheral Map |
| Flash Memory | 256 KB (RA4M1) | RA4M1 User's Manual |
| SRAM | 32 KB (RA4M1) | RA4M1 User's Manual |
| EEPROM | 8 KB (Data Flash) | RA4M1 Memory Map |
| Clock Speed | 48 MHz (Main Core) | Arduino Docs |
References
- Arduino Official Docs (docs.arduino.cc):
- Arduino Official Store (store.arduino.cc):
- Arduino Support & Help Center (support.arduino.cc):
- Renesas Official Specifications:
Key Architectural & Integrated Features
- Dual-Core Architecture: Uses a 32-bit Arm® Cortex®-M4 with built-in Floating Point Unit (FPU), offering 3× the clock speed of the UNO R3. [Source: Arm® Architecture Docs]
- Integrated Wireless: Wi-Fi® 802.11 b/g/n and Bluetooth® 5.0 (LE) via ESP32-S3 coprocessor, enabling native Arduino Cloud integration. [Source: Arduino IoT Cloud Support]
- 12×8 LED Matrix: Built-in grid of 96 red LEDs for animations, scrolling text, or sensor data visuals. [Source: Arduino UNO R4 WiFi Cheat Sheet]
- Qwiic Connector: Industry-standard I2C connector for plug-and-play sensor integration (Qwiic/STEMMA QT ecosystem). [Source: Arduino Hardware Design]
- Real-Time Clock (RTC): Built-in RTC for time-sensitive logging; VRTC pin for backup battery, OFF pin for power management. [Source: RA4M1 RTC Peripheral Spec]
- USB-C & HID Support: USB-C port with Human Interface Device (HID) emulation—board can act as keyboard or mouse. [Source: Arduino USB Stack]
- Runtime Diagnostics: Error-catching mechanism that identifies runtime crashes and highlights the specific line of code in the Serial Monitor. [Source: Arduino IDE 2.0/Support]