Moulding and Casting
Overview of week 13
Group Assignment
- Review the safety data sheets for each of our molding and casting materials
- Make and compare test casts with each of them
- Compare printing vs milling molds
Individual Assignment
- Design a mold around the process we'll be using, produce it with a smooth surface finish that does not show the production process, and use it to cast parts.
Group Assignment :
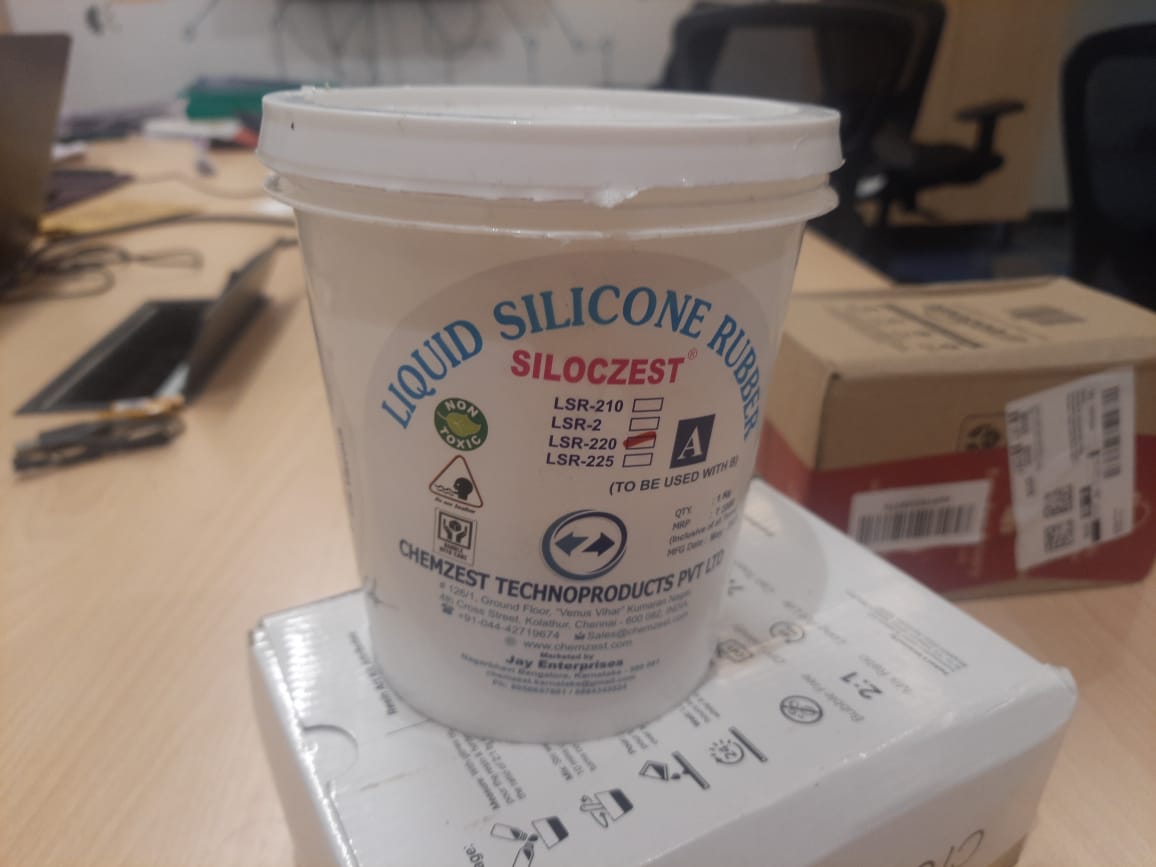
I referred to each material’s datasheet to understand the correct mixing ratios, curing times, and safety precautions.
Individual Assignment :
Hero shot
Moulding and Casting
Moulding
Moulding is a manufacturing process used to shape materials like plastic, metal, or rubber by placing them into a hollow cavity. The material is heated, injected or pressed into the mould, and then cooled to form a solid shape. It is widely used in mass production due to its efficiency and repeatability. The quality of the mould directly affects the accuracy and surface finish of the final product.
Types
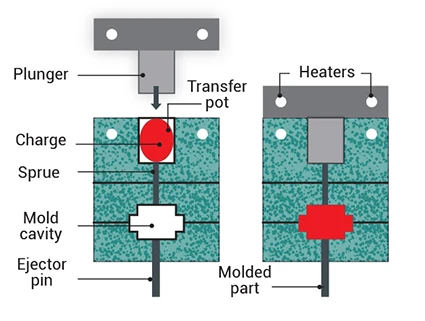
Injection moulding
Molten plastic is injected into a mould to form complex plastic parts.

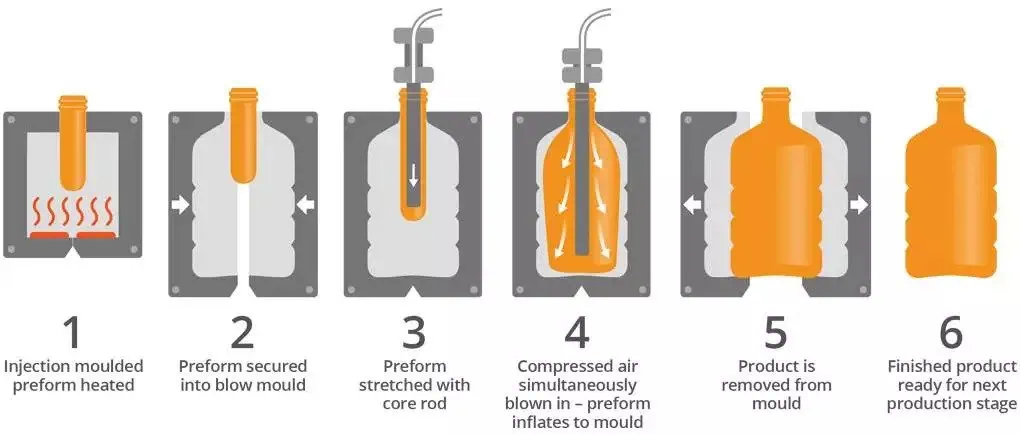
Blow moulding
Used for making hollow plastic parts like bottles using air pressure.
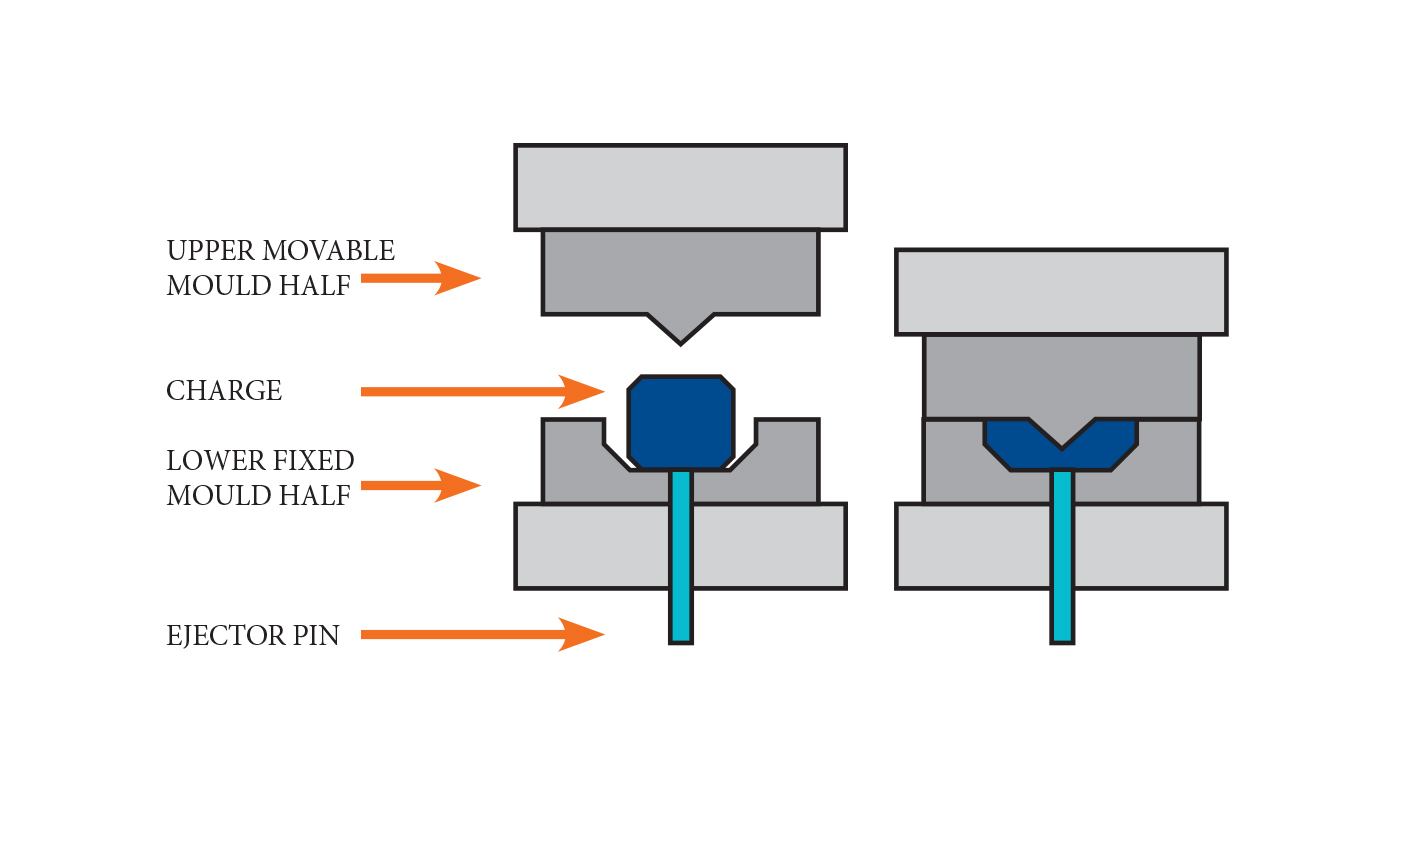
Compression molding
Preheated material is placed into a heated mould and compressed into shape.
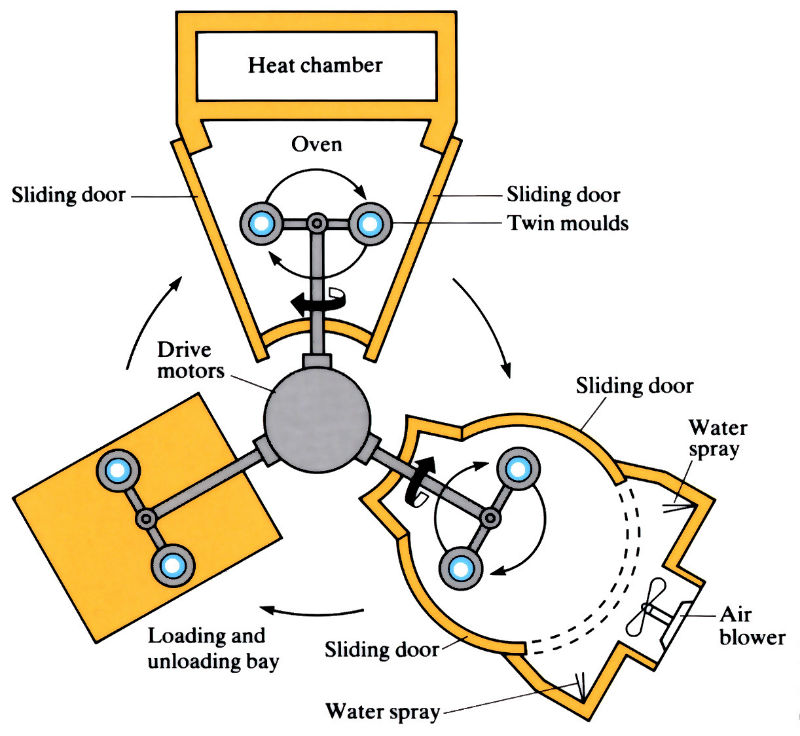
Rotational molding
Mould is rotated in multiple axes to coat and form hollow plastic products.
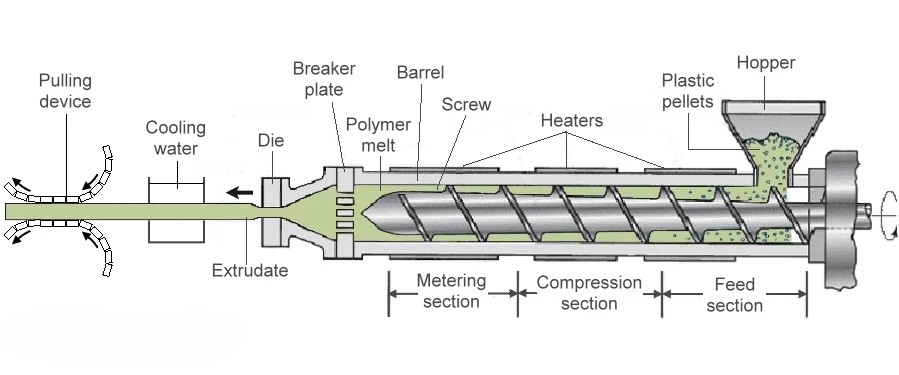
Extrusion moulding
Material is forced through a die to form long shapes like pipes and tubes.
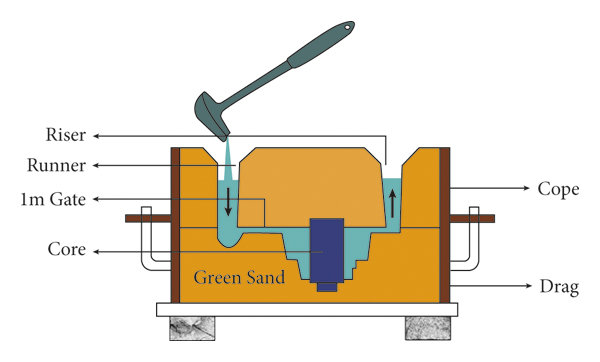
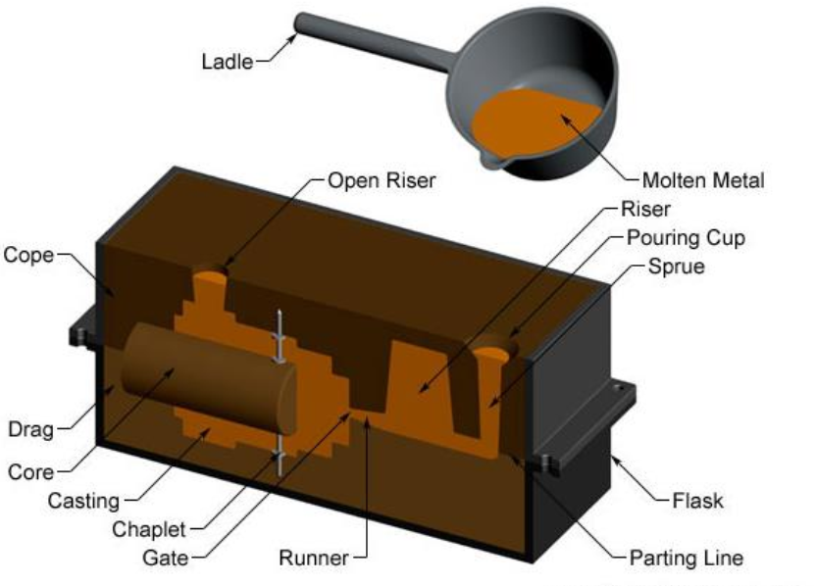
Sand Moulding
Uses sand to create moulds for metal casting (common in foundries)
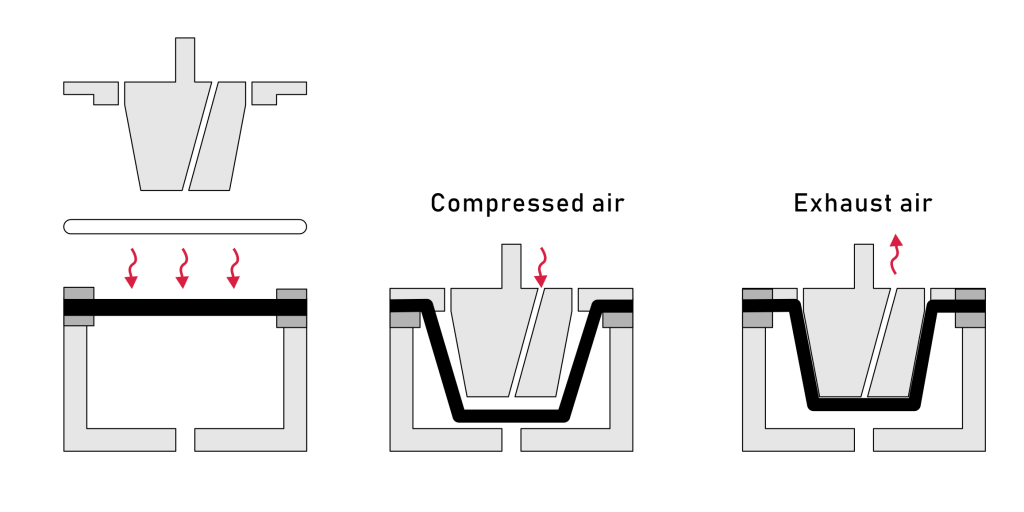
Vacuum forming
Heated plastic sheet is shaped over a mould using vacuum pressure.
Transfer moulding
Material is heated, then transferred into a mould cavity (used for electronics)
Casting
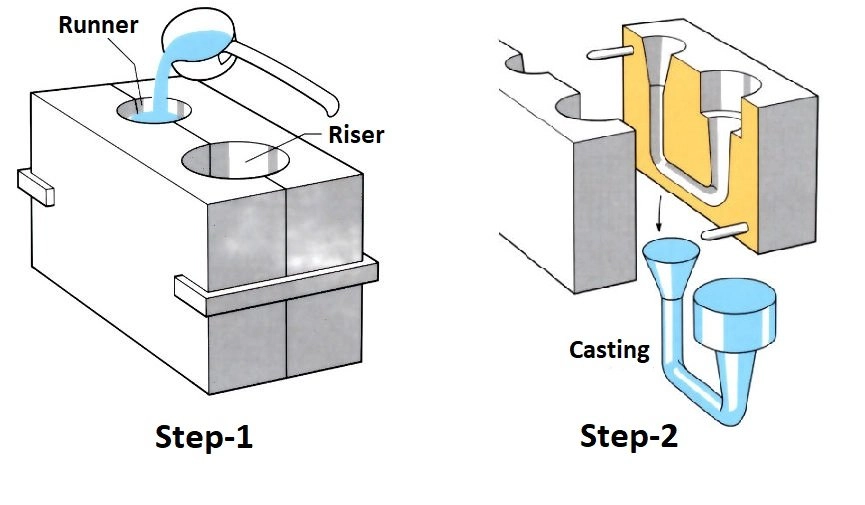
Casting is a manufacturing process where molten metal is poured into a mould cavity to take its shape upon cooling and solidification. It is one of the oldest and most versatile methods for making complex metal parts.
Types
Sand Casting
Uses a sand-based mould, ideal for large, simple castings and quick production.
Die Casting
Forces molten metal under high pressure into a metal mould for high precision and smooth finishes.
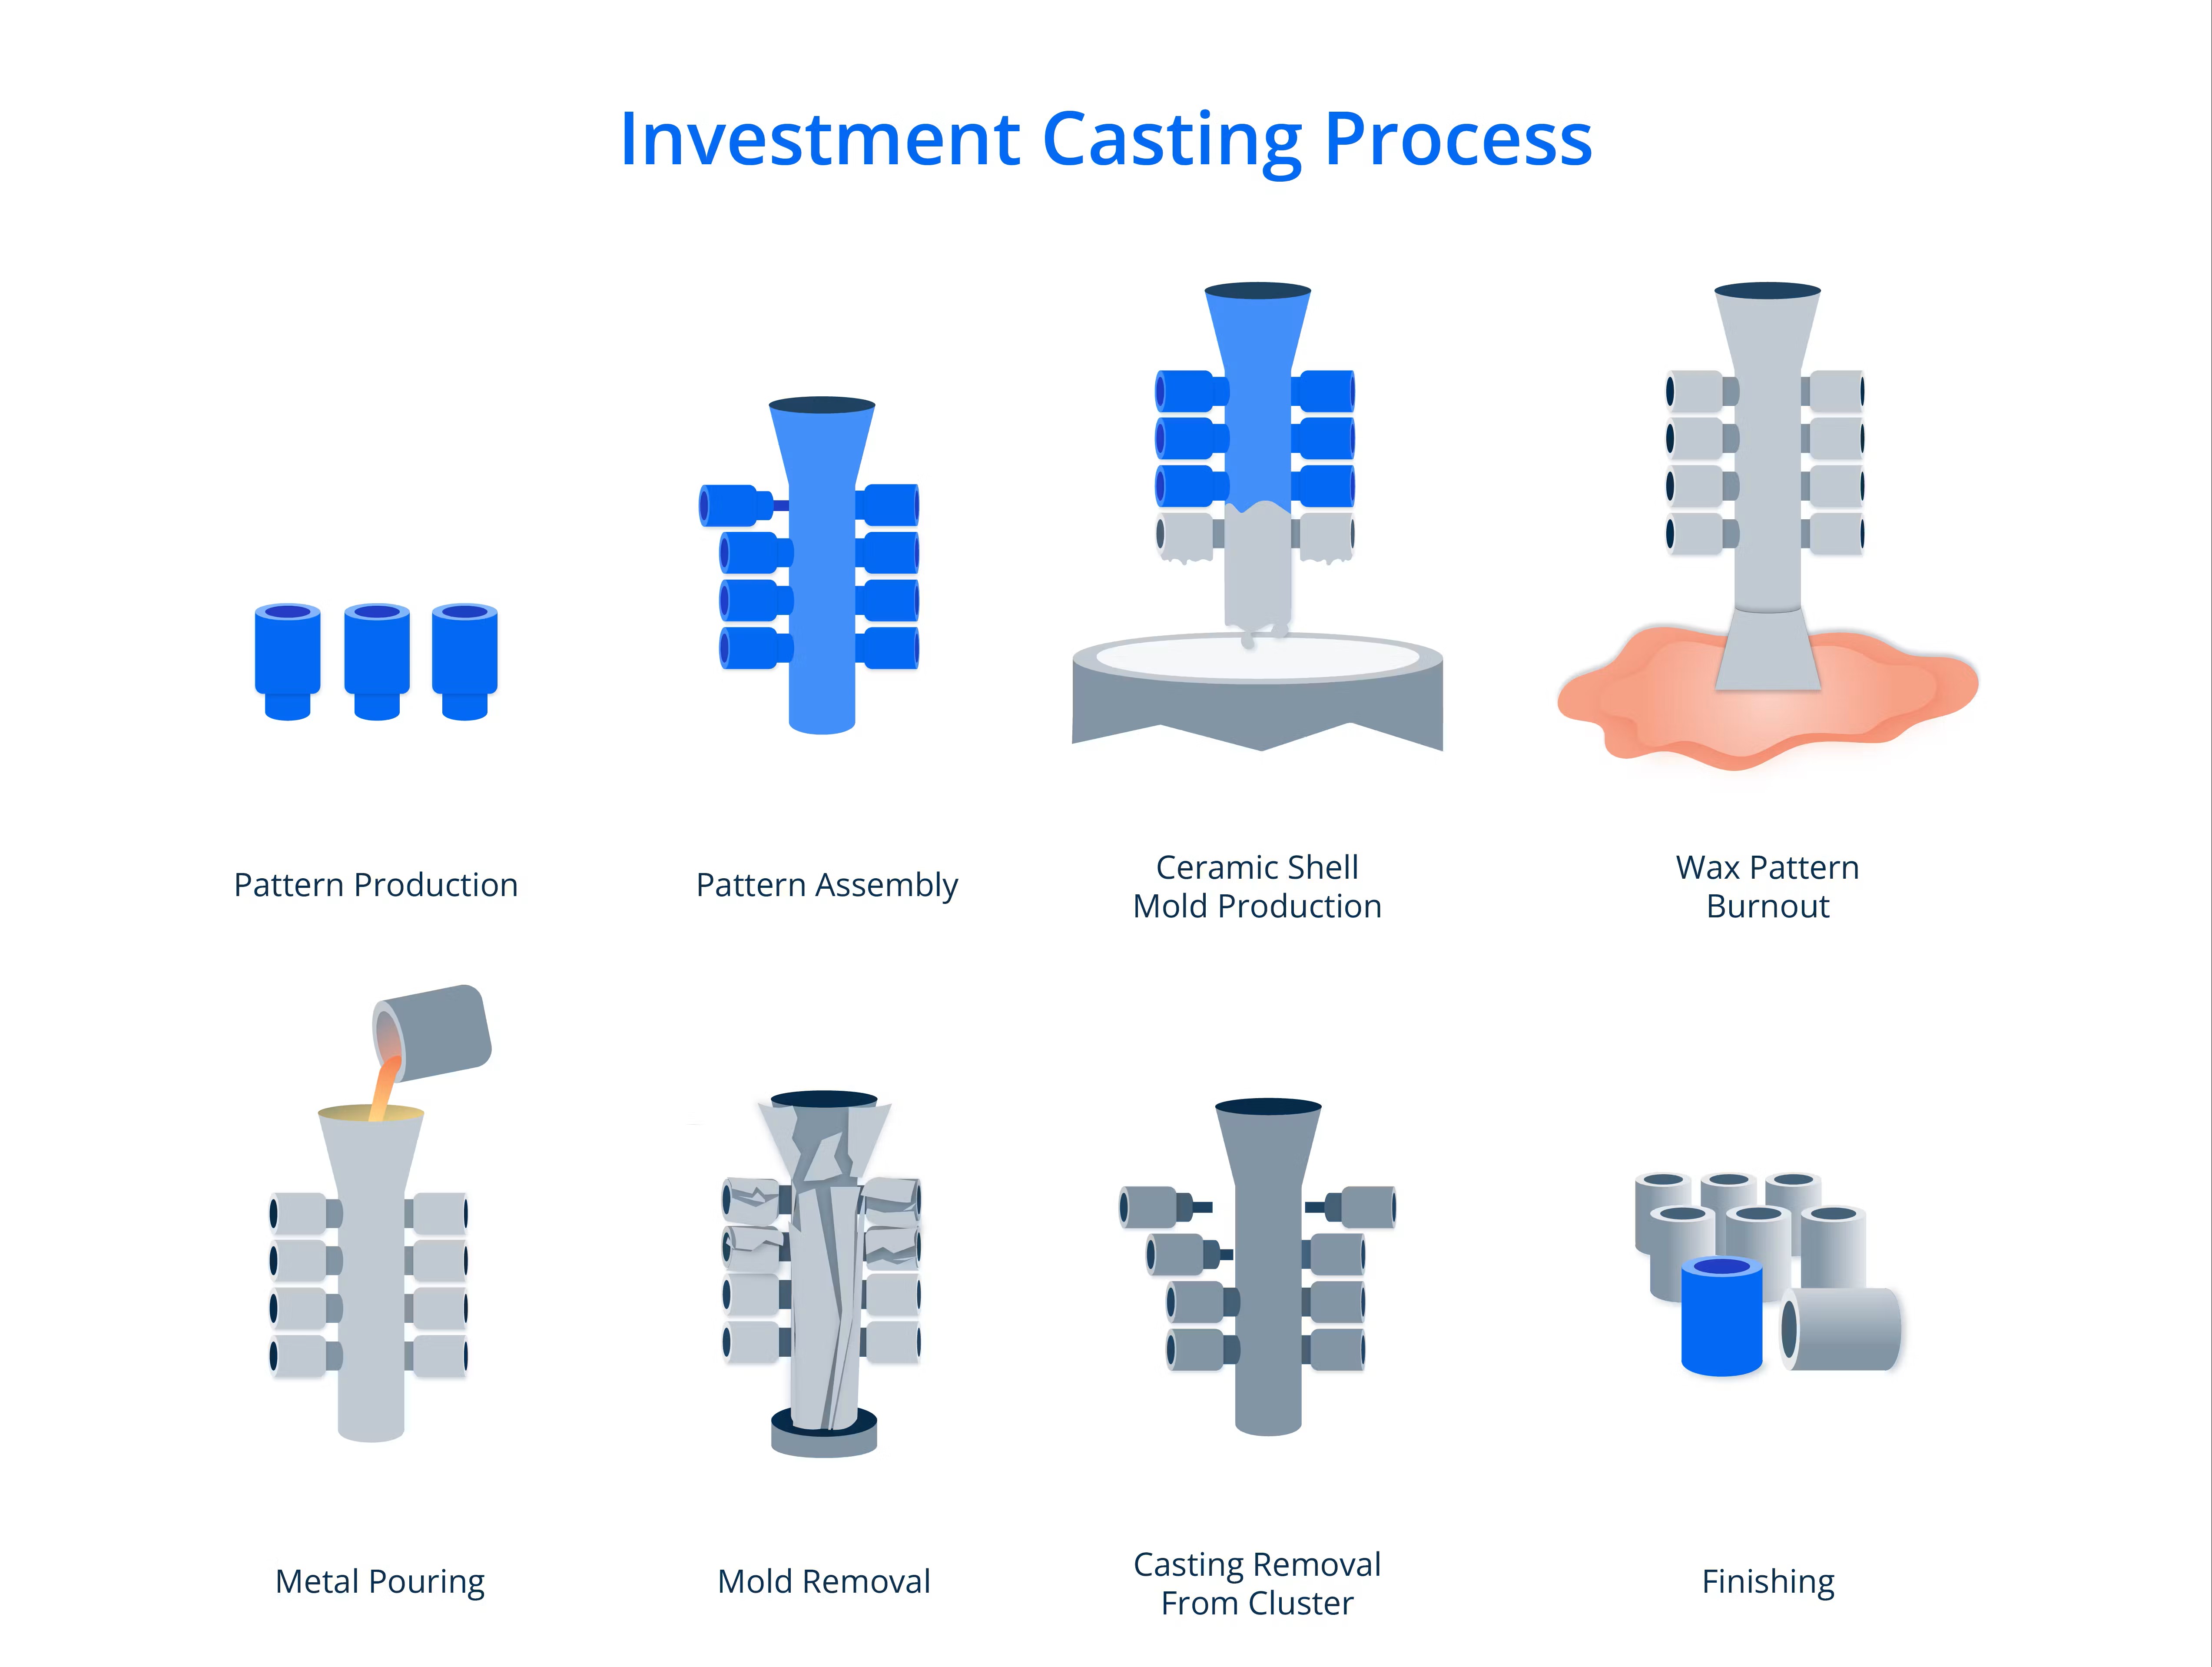
Investment Casting
Involves a wax pattern covered by ceramic, yielding high-detail, intricate parts.
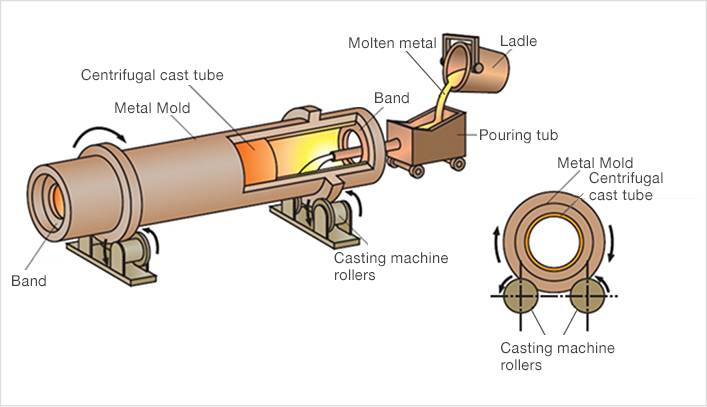
Centrifugal Casting
Rotates the mould to evenly distribute the molten metal, effective for cylindrical parts.
Fused Deposition Modeling (FDM) :
3D Design
Fusion 360
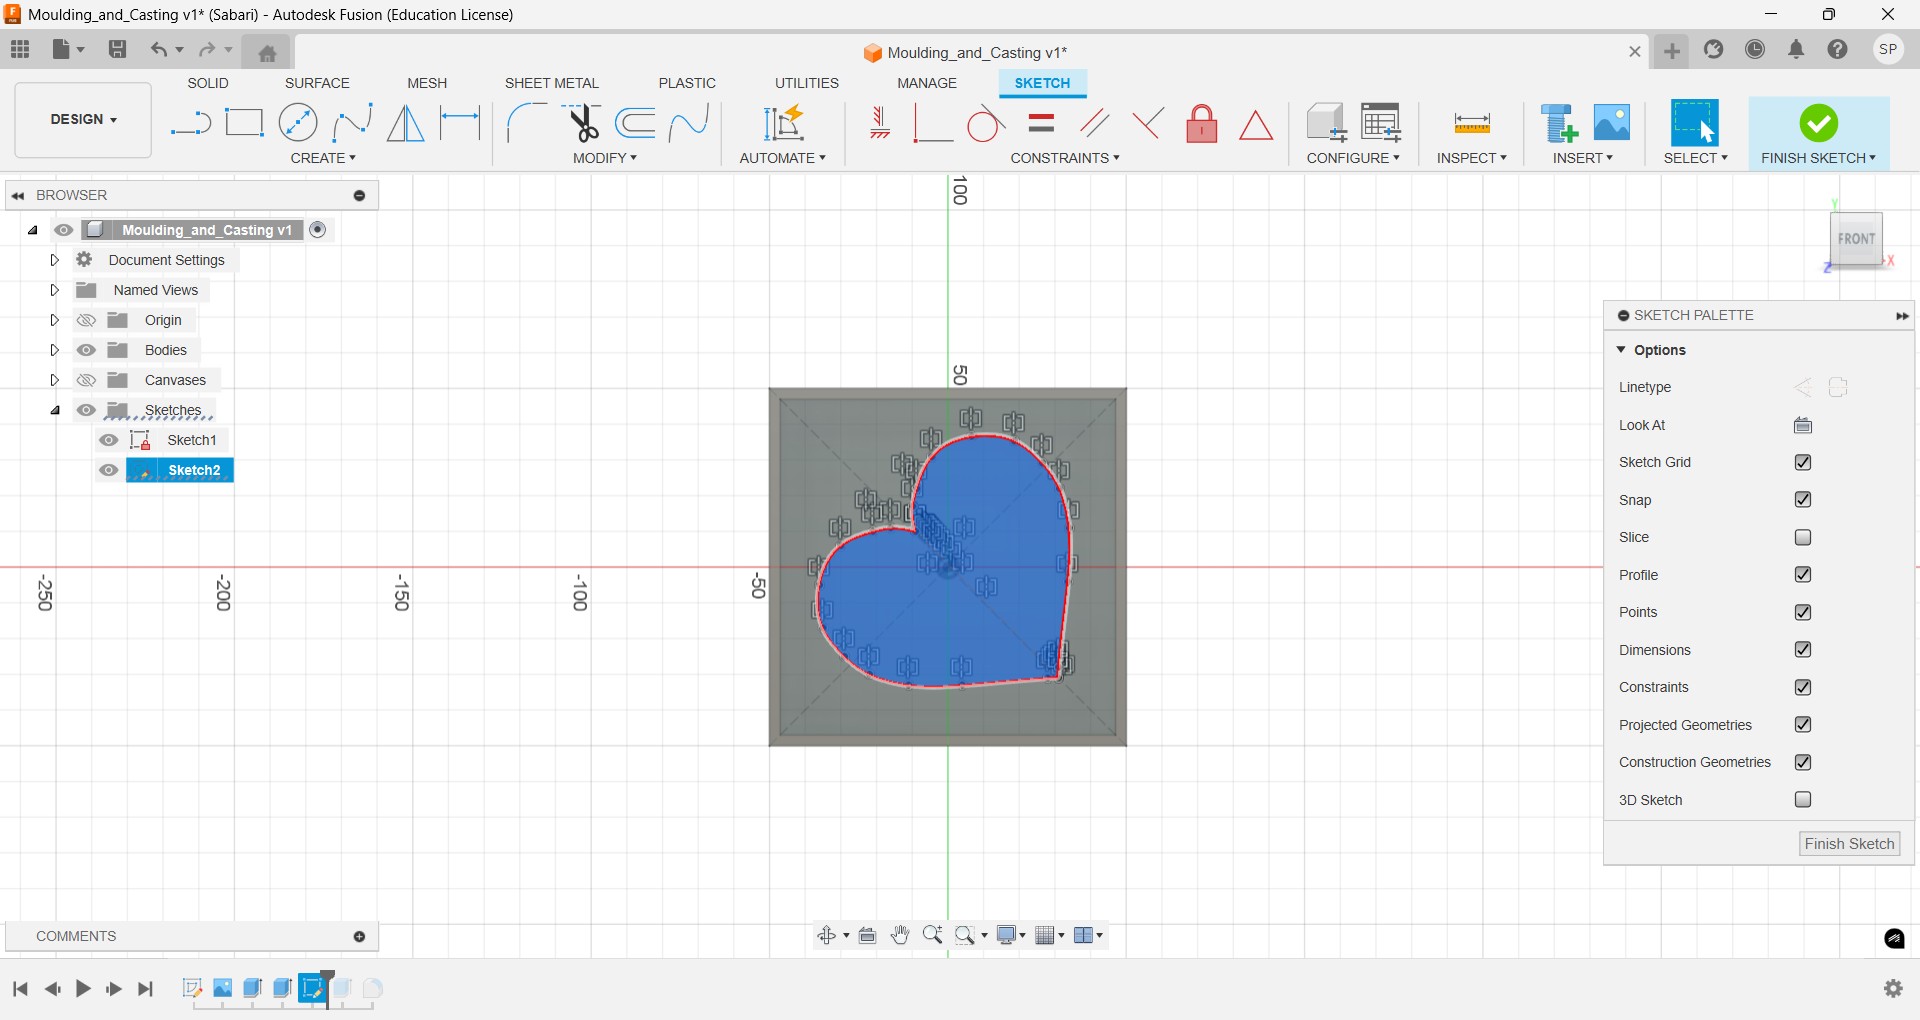
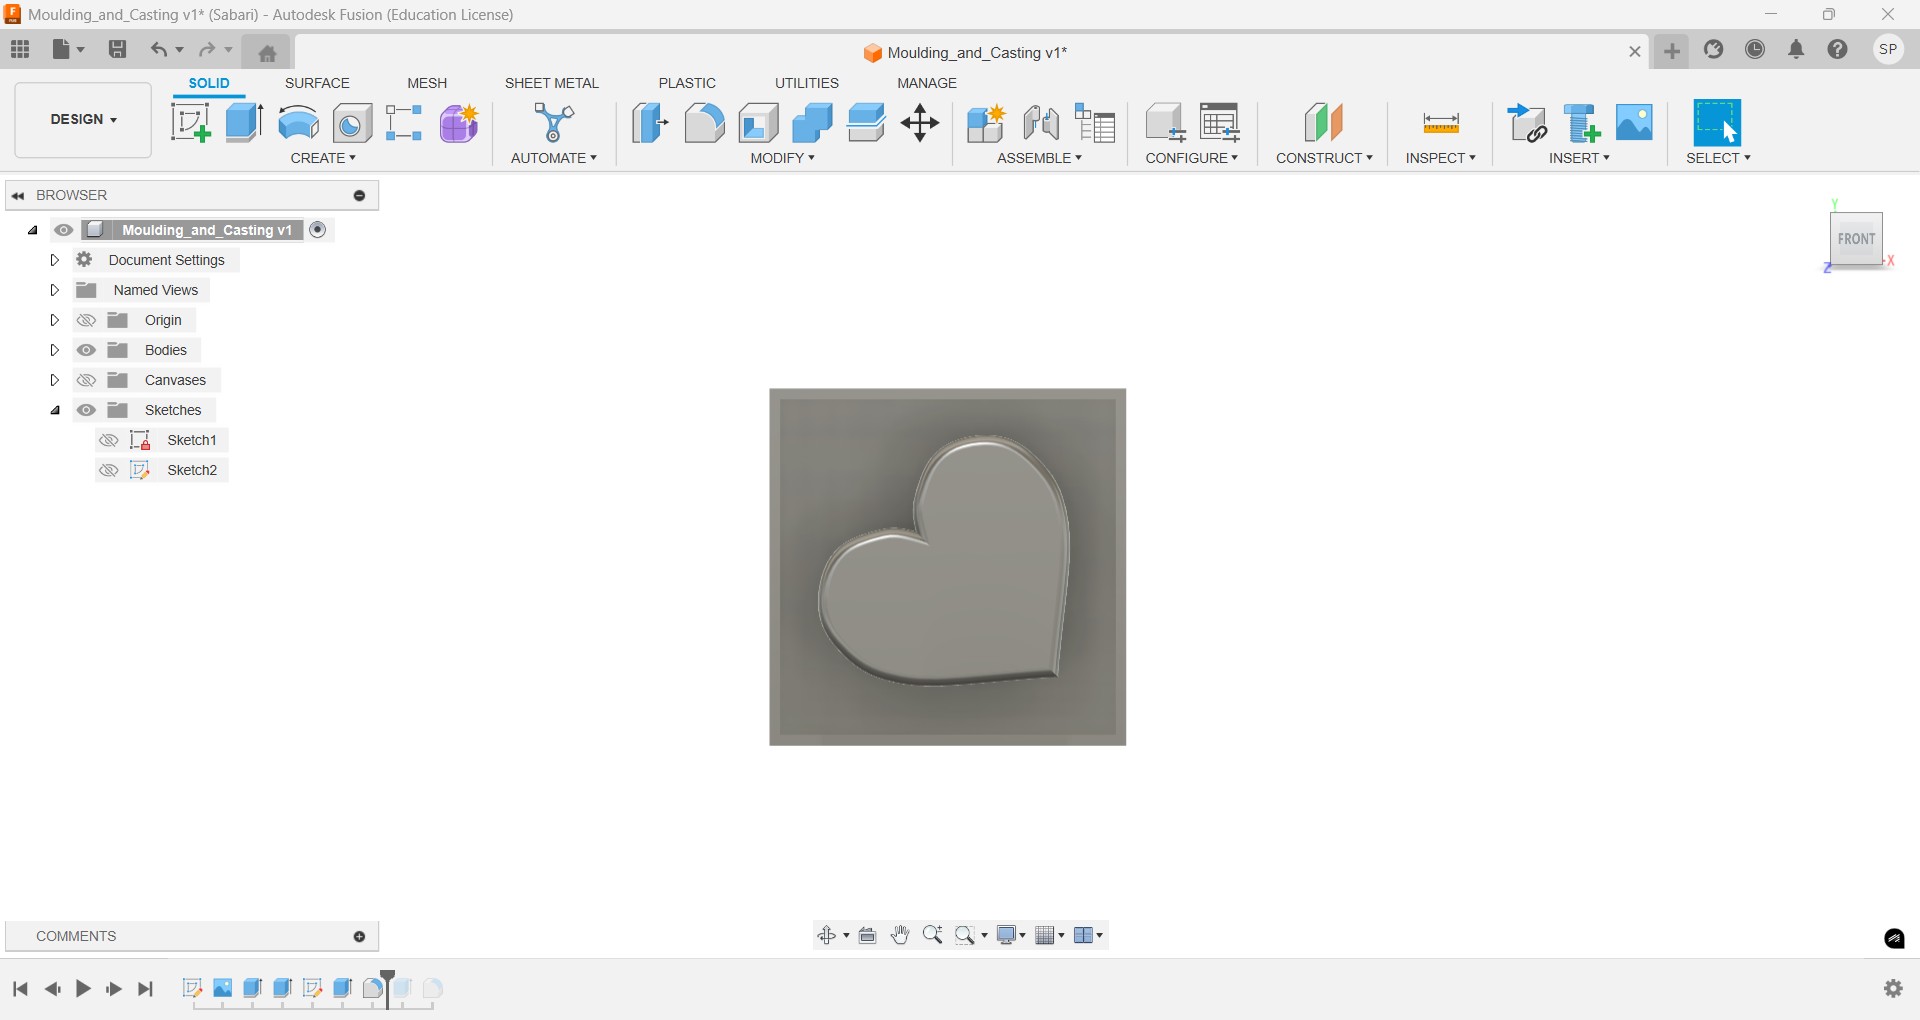
I start my assignment in 3D design, I create the sketch and give the dimensions respectively. For the dimension I using the parametric, if any changes need in future.
To draw the heart desing properly I take one reference image from online and attached it through canva option.


Then by using the extruder command I extrude it upto my required lenght which is I set in the parametersnand draw the line of heart by the help of reference image on above the extruder body.
Slicing
After done everything I moved to do slicing so I uses the Flash print software, I load the STL file in the software.

I uses the PLA material - Nozzle temp : 205 degree celcius, Bed temp : 55 degree celcius, Infill pattern - Hexagon, Infill density : 15 %
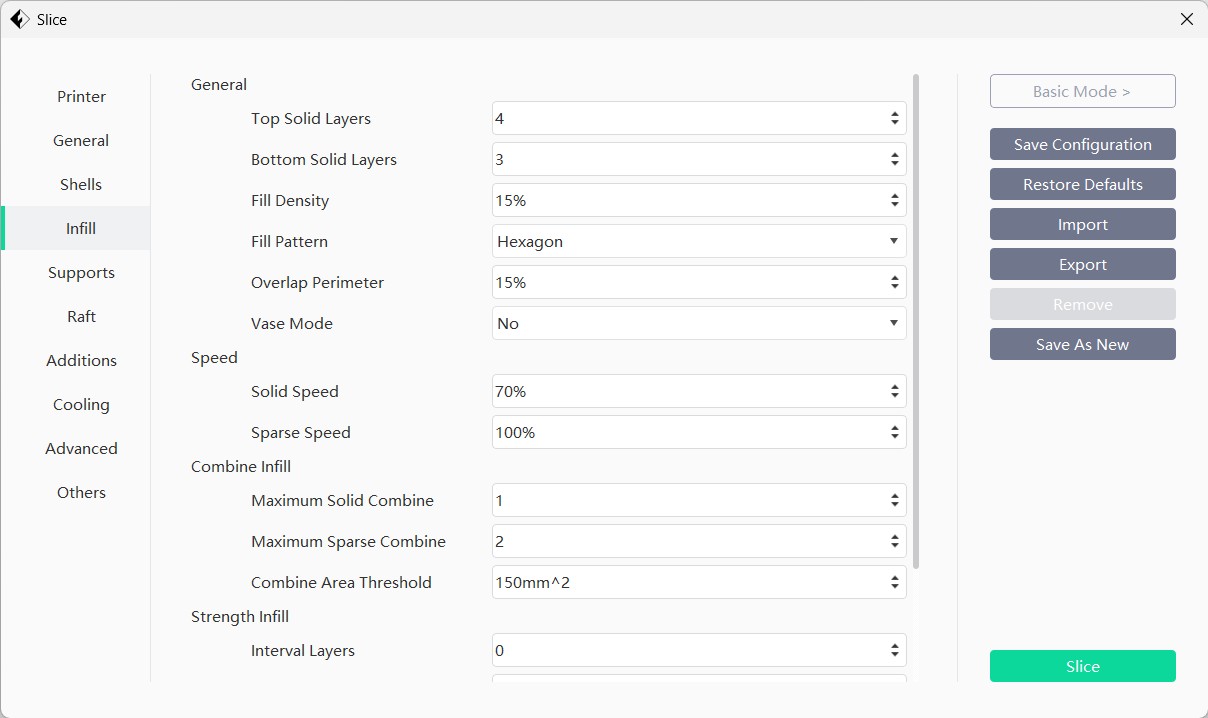
Then I slicing it, opent the preview tap and check the printing time as well, it look lie it will take around 5 hrs.
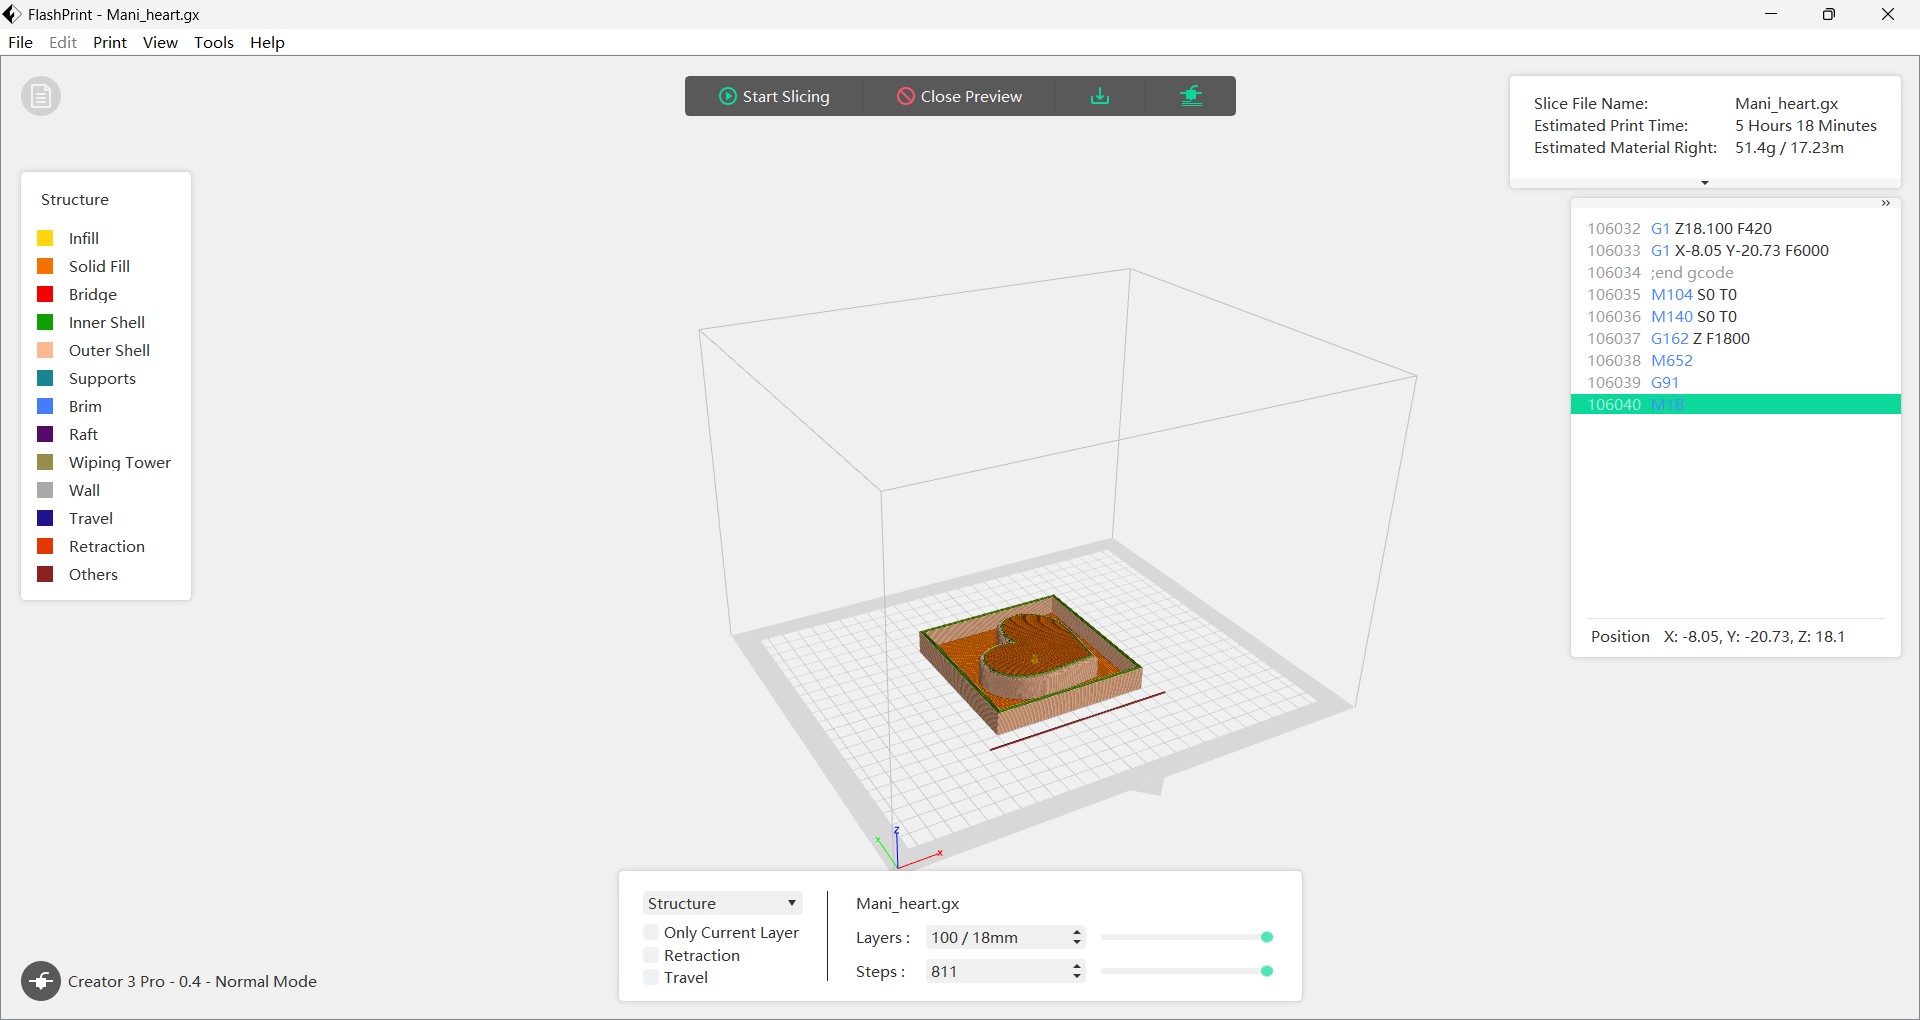
Then I download it into the gcode file.
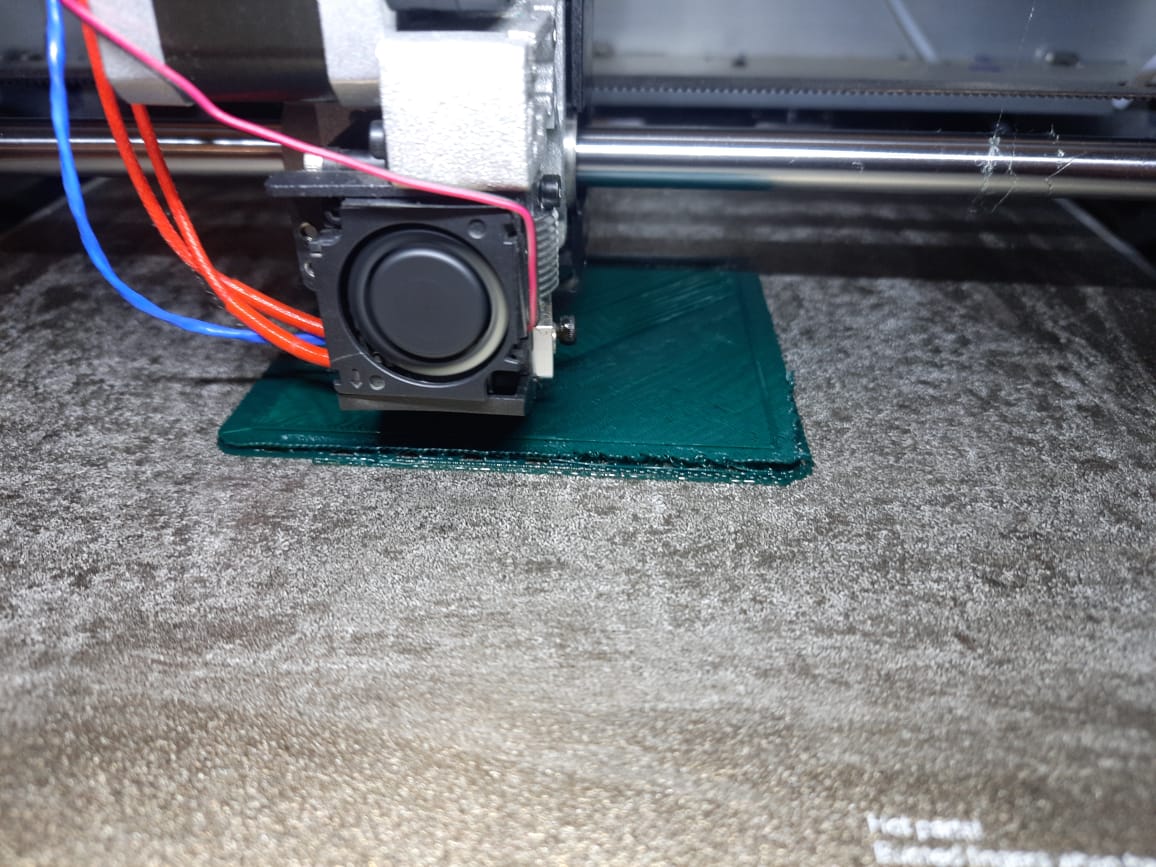
3D Printing
I import the gcode into the 3D printer, and start it
Moulding Process
To prepare the mold, the initial step involved determining the required quantity of silicone for the negative mold. This was achieved by filling the 3D-printed cavity with water and measuring the volume used. The measured water volume provided an accurate estimate of the silicone material needed for casting.
The water was then transferred into a measuring beaker to determine its volume precisely. This step ensured an accurate calculation of the silicone required for mold making. Based on the measured volume, the silicone mixture was prepared accordingly to achieve a proper fill, avoiding both excess and shortage.
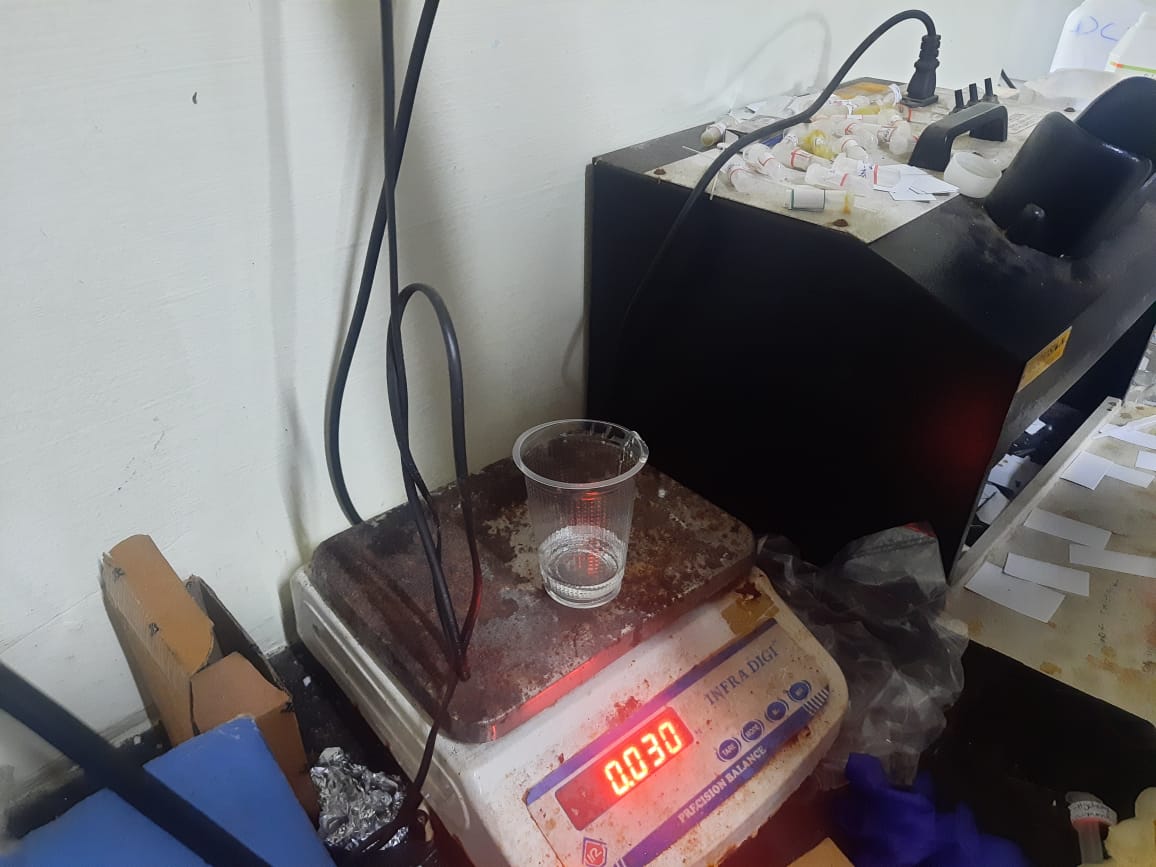
Prior to measuring the water volume, the beaker was tared by recording its empty weight. This ensured that only the actual volume of water was measured accurately. After taring, the water from the mold cavity was poured into the beaker to determine the precise amount of silicone required.
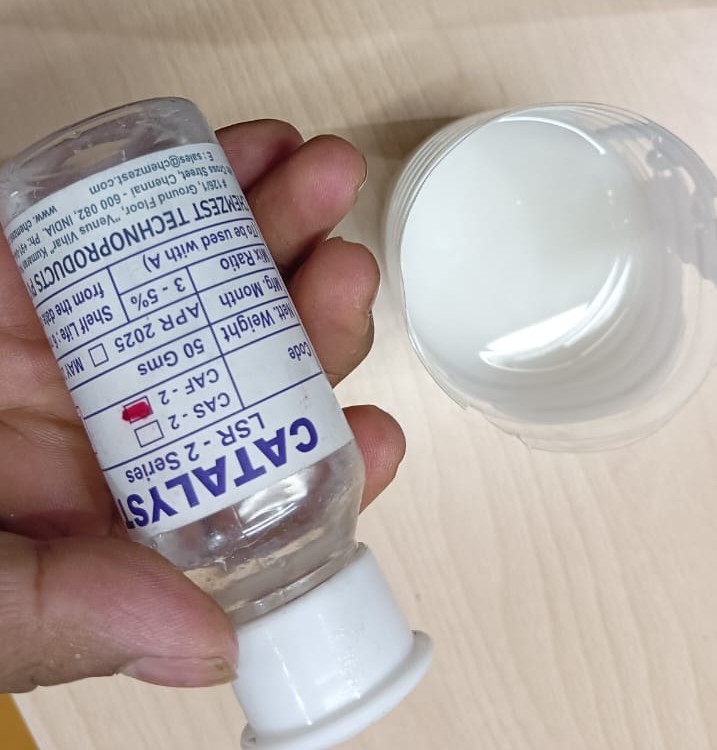
Using the measured volume and an online silicone mold calculator, I calculated the required amounts of silicone base and catalyst. The calculator provided the precise ratio and quantities needed for both components based on the water volume. This ensured accurate mixing and proper curing, resulting in a durable, bubble-free mold.
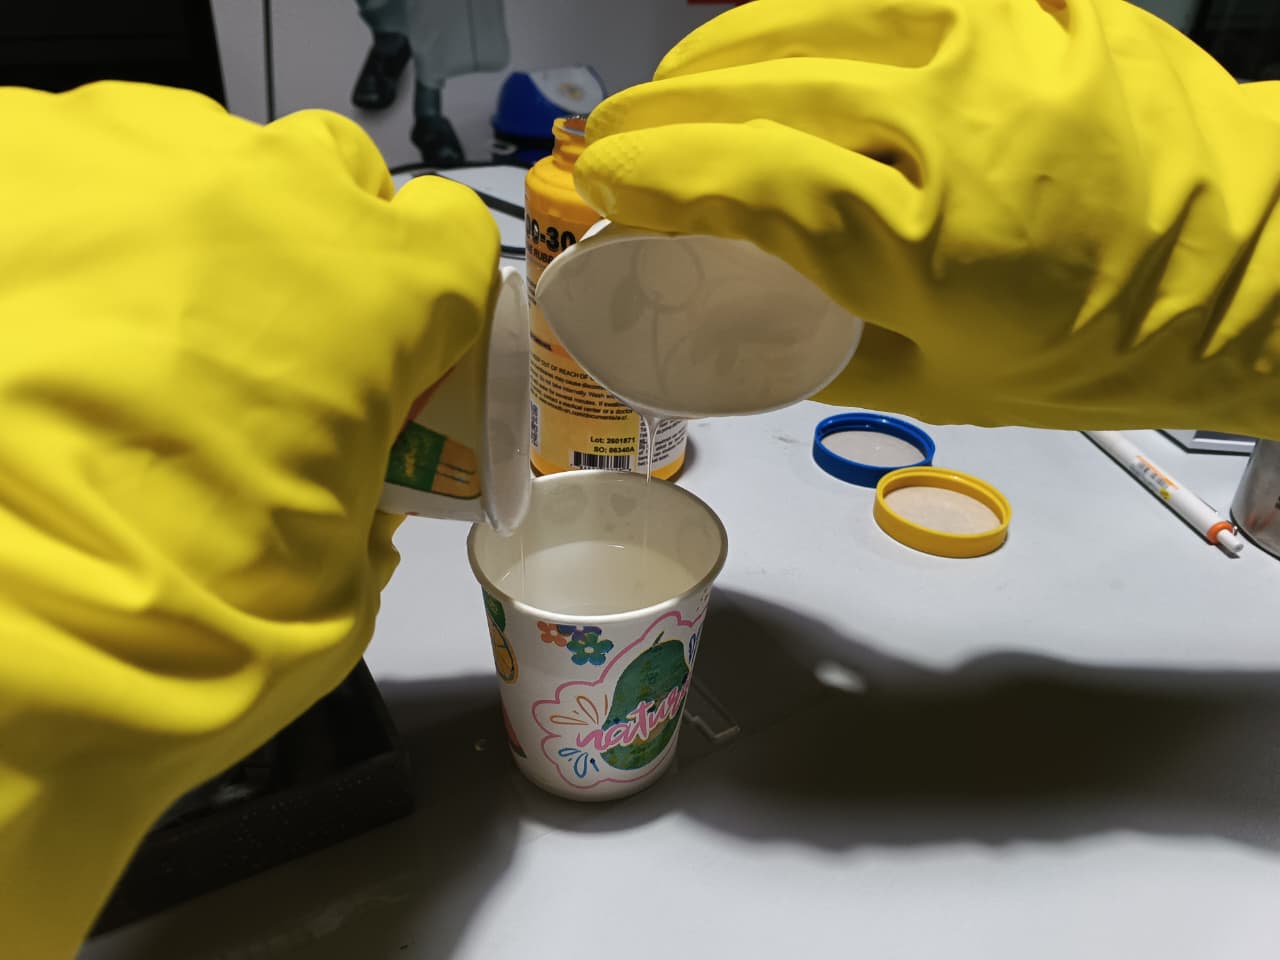
The silicone base and catalyst were slowly poured into a plastic beaker to begin the mixing process.
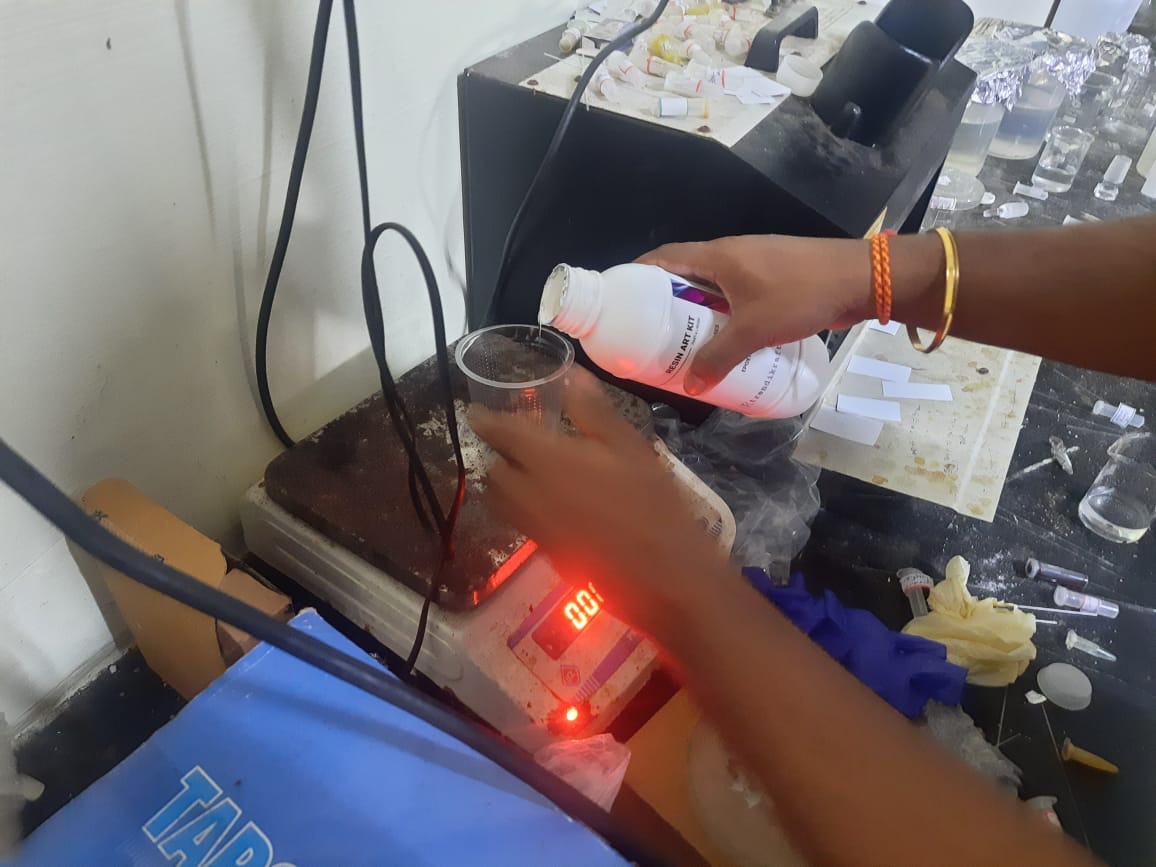
After pouring the silicone base, the plastic beaker was tared again to zero the scale, ensuring accurate measurement of the catalyst. Based on the required ratio, 2 grams of catalyst were added. This precise measurement was essential for proper curing and for producing a strong, detailed negative silicone mold.
Then adding the catalyst, the silicone was thoroughly mixed to ensure an even and consistent blend, which is essential for uniformly activating the curing process. The mixture was stirred slowly to minimize the formation of air bubbles and was allowed to settle before being poured into the mold.
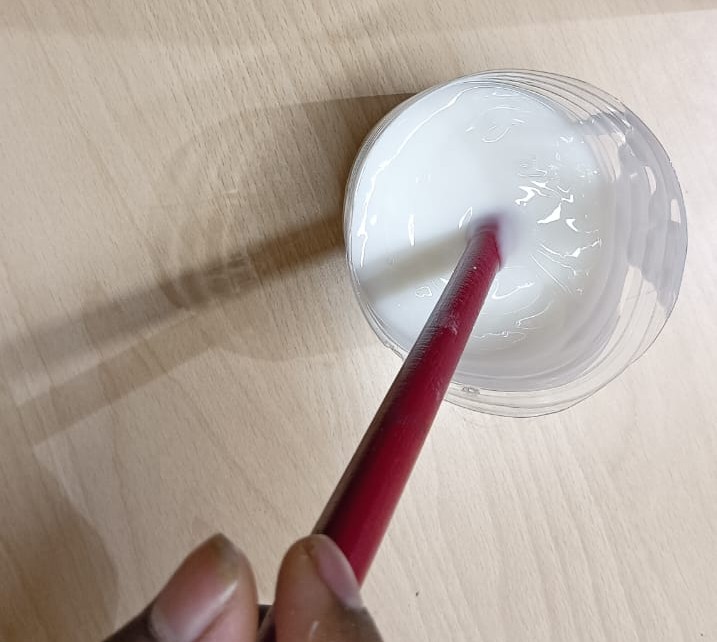
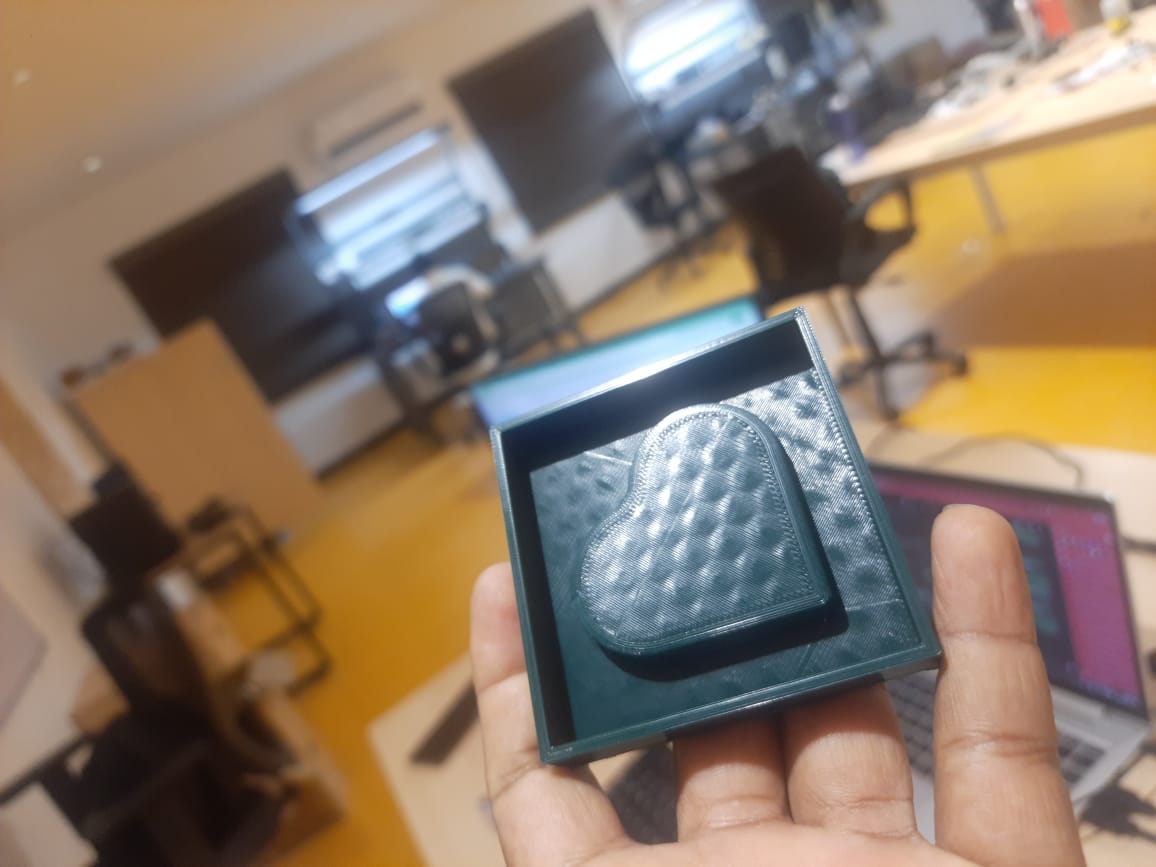
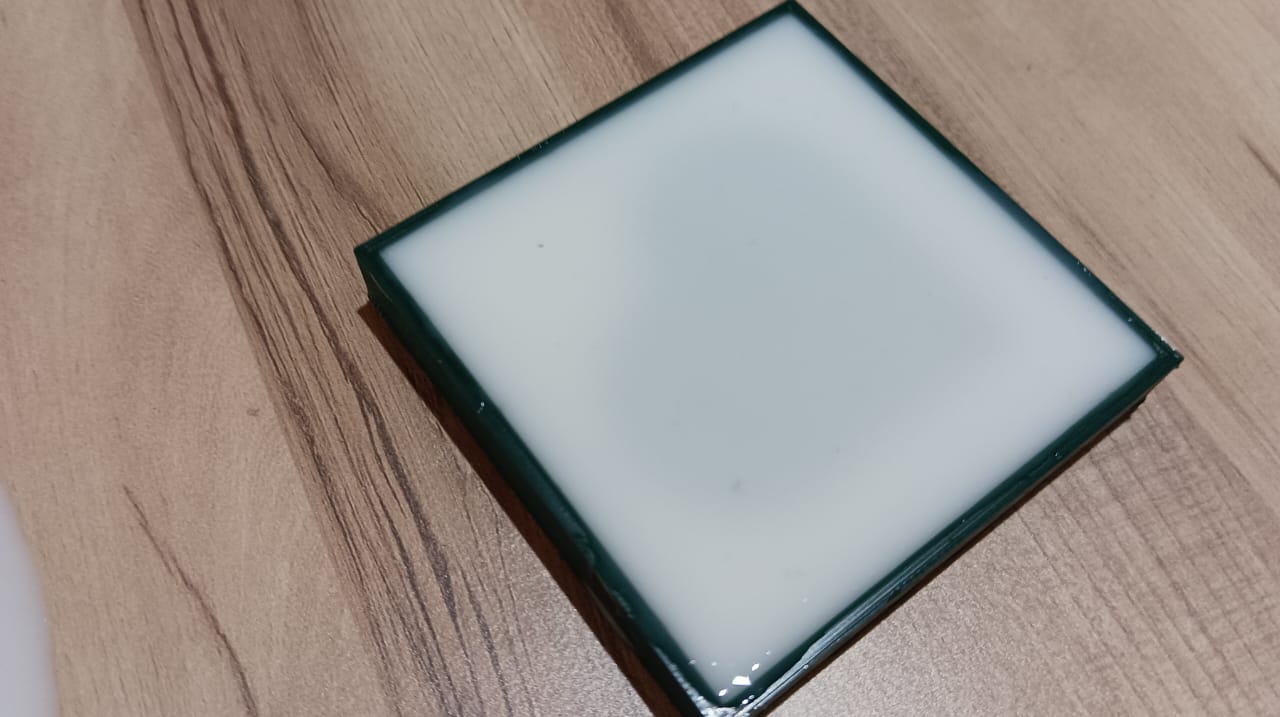
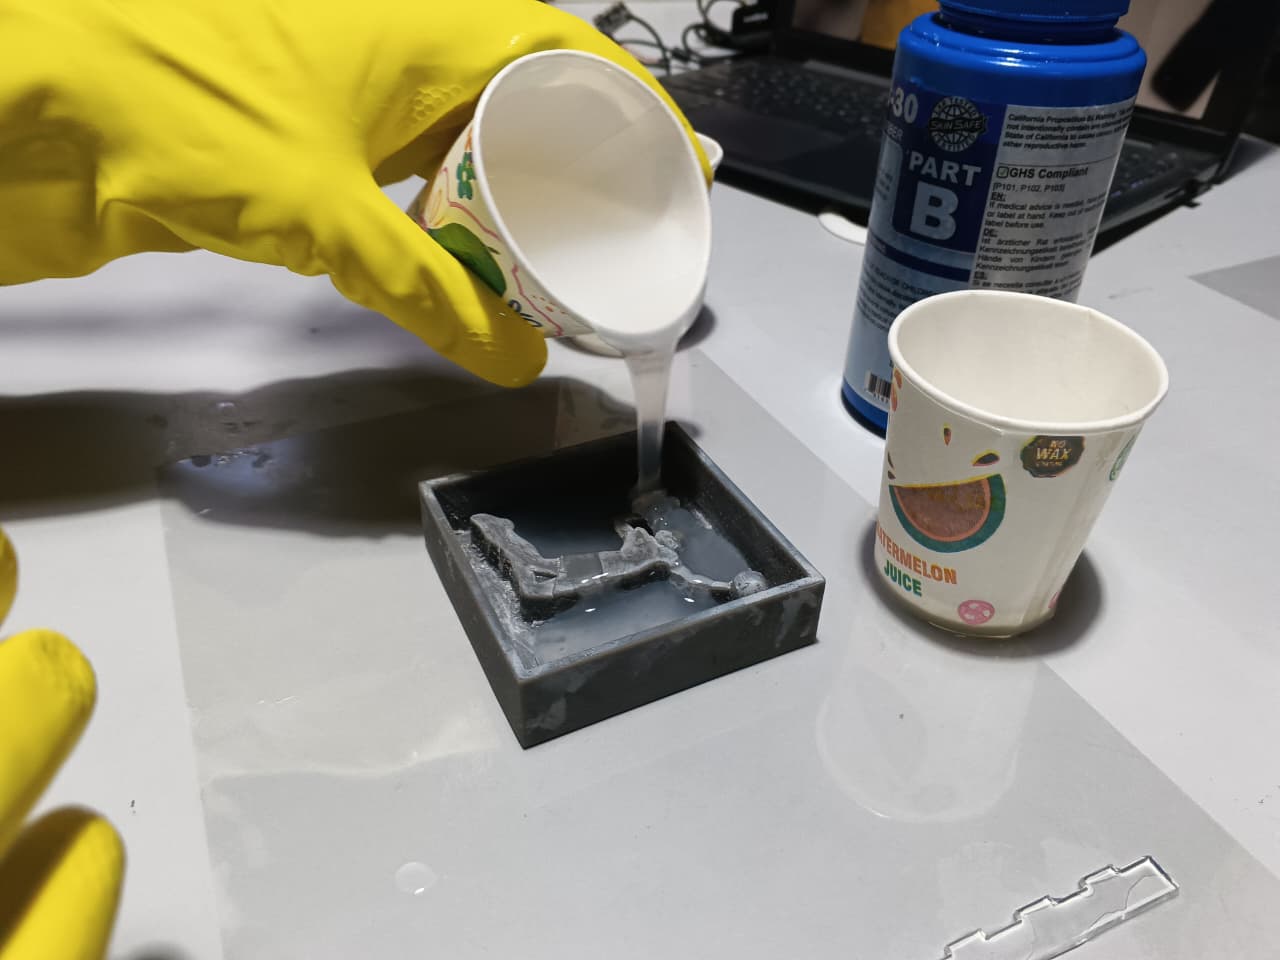
A release agent was applied to the 3D-printed mold cavity prior to pouring to facilitate easy demolding. The mixed silicone was then carefully poured into the cavity, starting from one side to allow the material to flow evenly and enable air bubbles to escape naturally. This approach ensured that the silicone captured all the fine details of the mold.
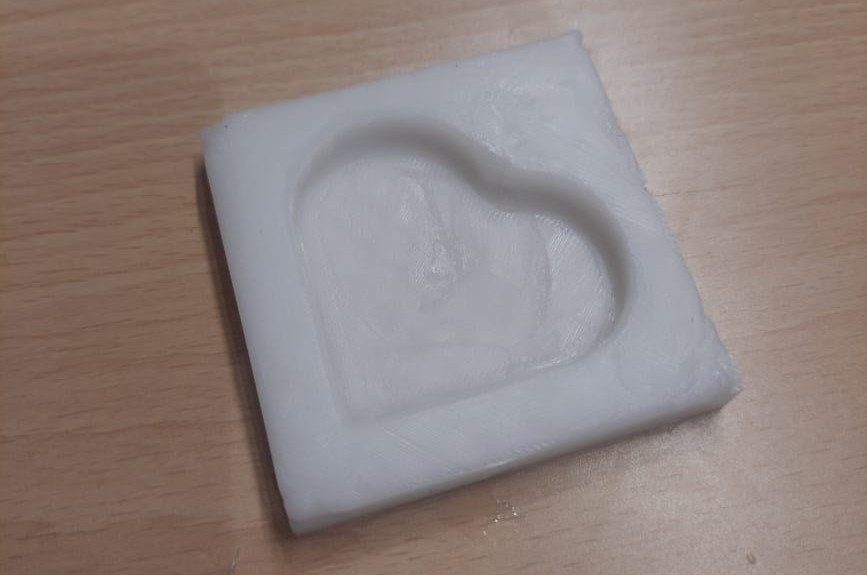
Once the curing process was complete, the silicone mold set perfectly, exhibiting a clean and detailed finish. The surface was smooth, and all features from the 3D-printed mold were accurately replicated. The final product was a high-quality negative mold, suitable for casting chocolate or other materials.
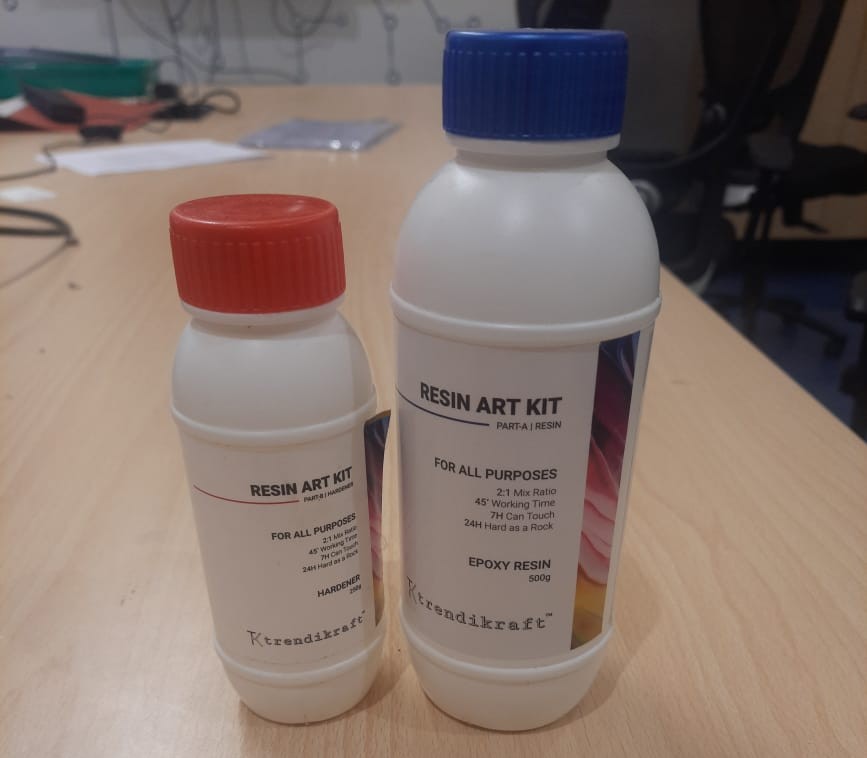
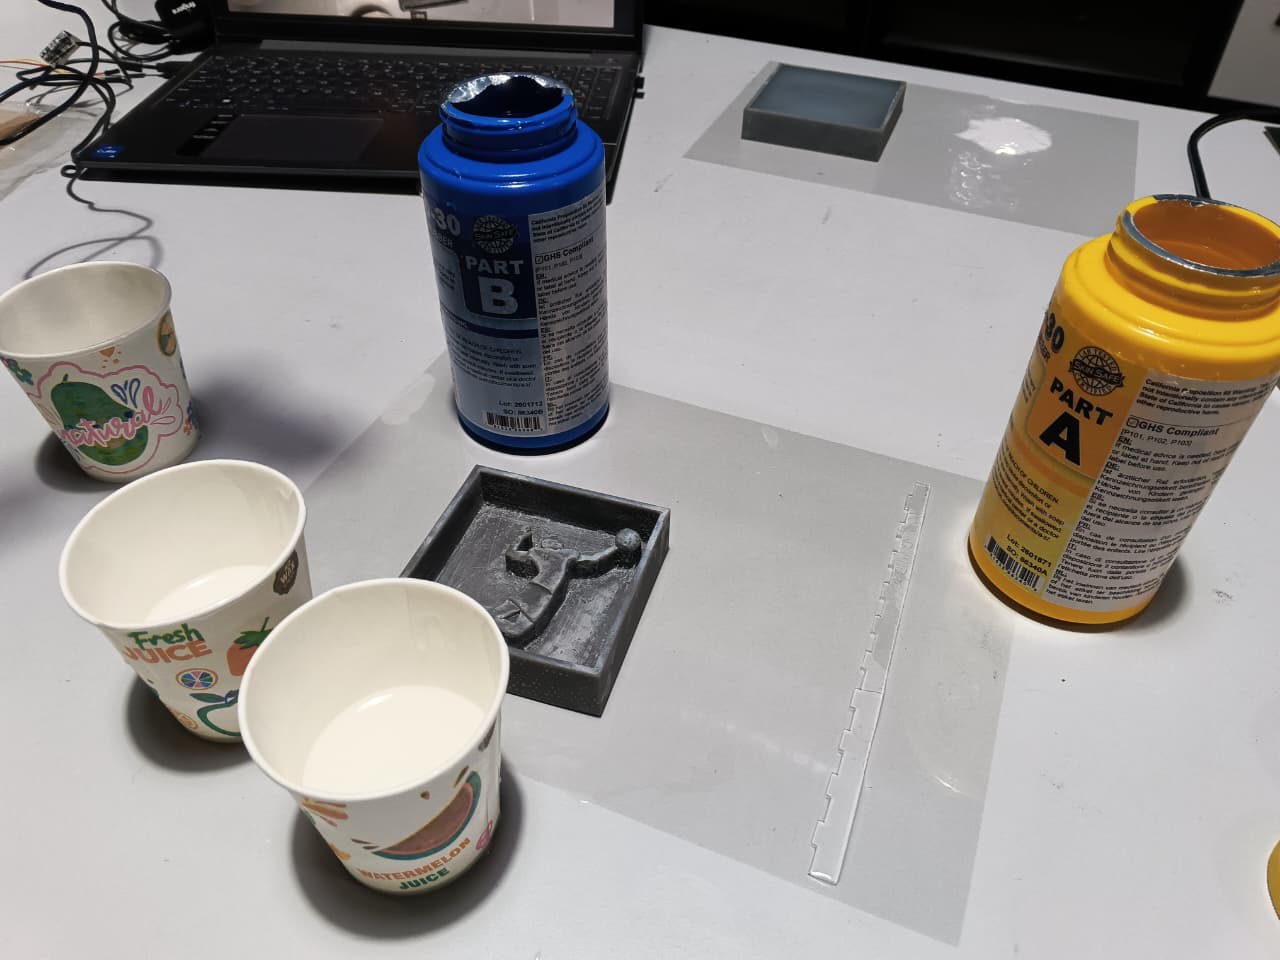
The 250 ml beaker was tared again prior to measuring the resin to ensure accurate weight, excluding the beaker’s mass. This step was essential for precise mixing with the hardener. The resin quantities were then calculated based on a 2:1 mixing ratio (Part A: Resin, Part B: Hardener). After measuring the required amount of Part A, half that quantity of Part B was added. Maintaining this precise ratio is critical to achieving proper curing, optimal strength, and clarity in the final cast
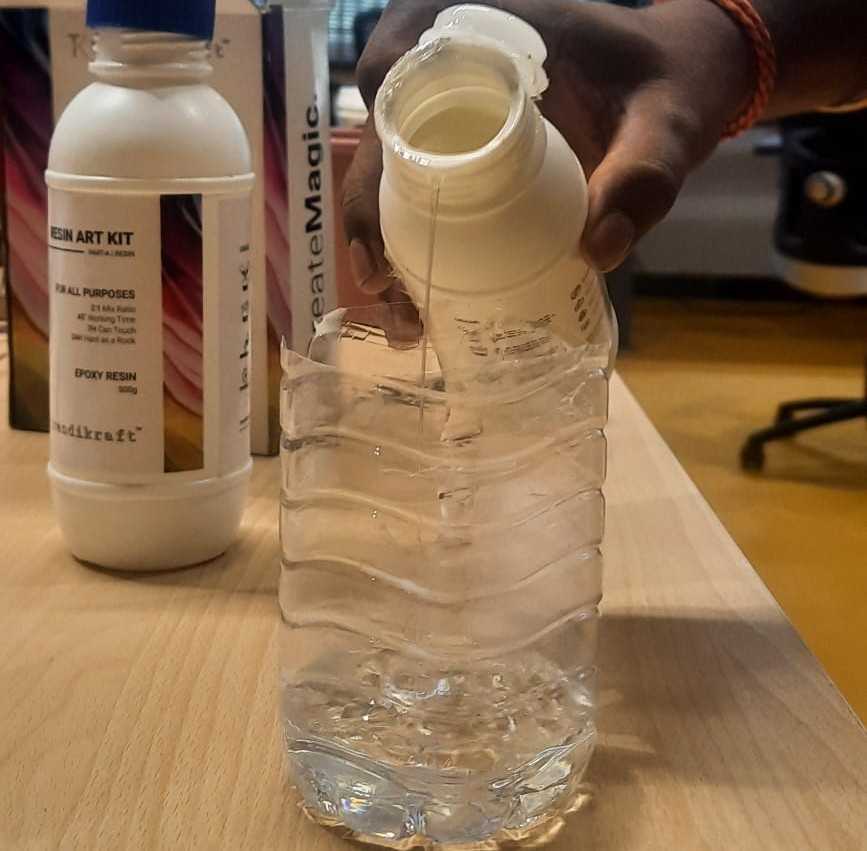
Part A (resin) was added in double the quantity of Part B (hardener), adhering to the specified 2:1 mixing ratio. This ensures the correct chemical reaction required for proper curing. Accurate measurement is essential to prevent issues such as incomplete curing or a tacky surface finish.
After measuring Part A (resin), Part B (hardener) was added in the correct proportion—exactly half the amount of Part A—maintaining the 2:1 mixing ratio required for proper curing.
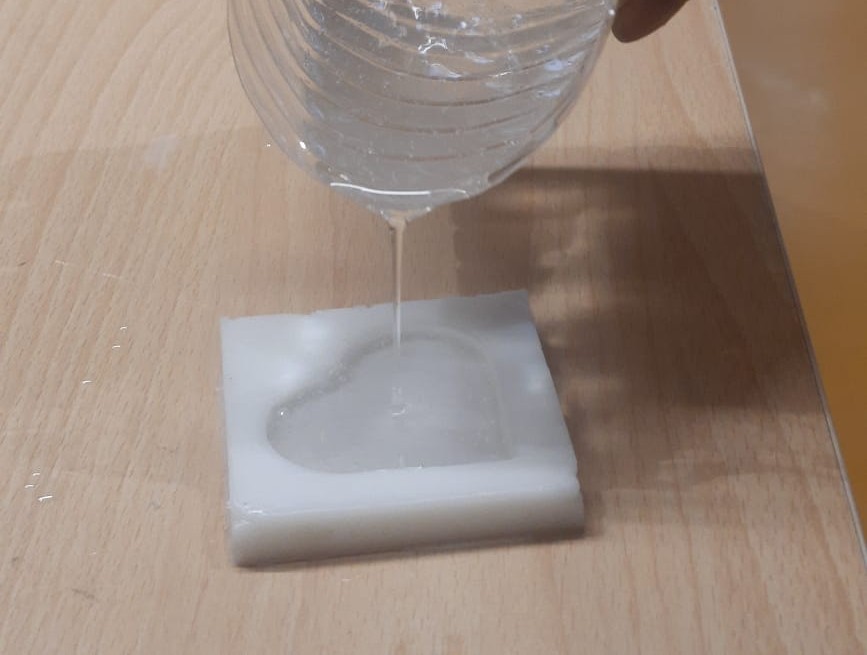
The mixed resin was then slowly poured into the cured silicone mold, beginning from one side to promote even flow and minimize air bubble formation. Care was taken to ensure the resin filled all the intricate details of the mold cavity accurately.
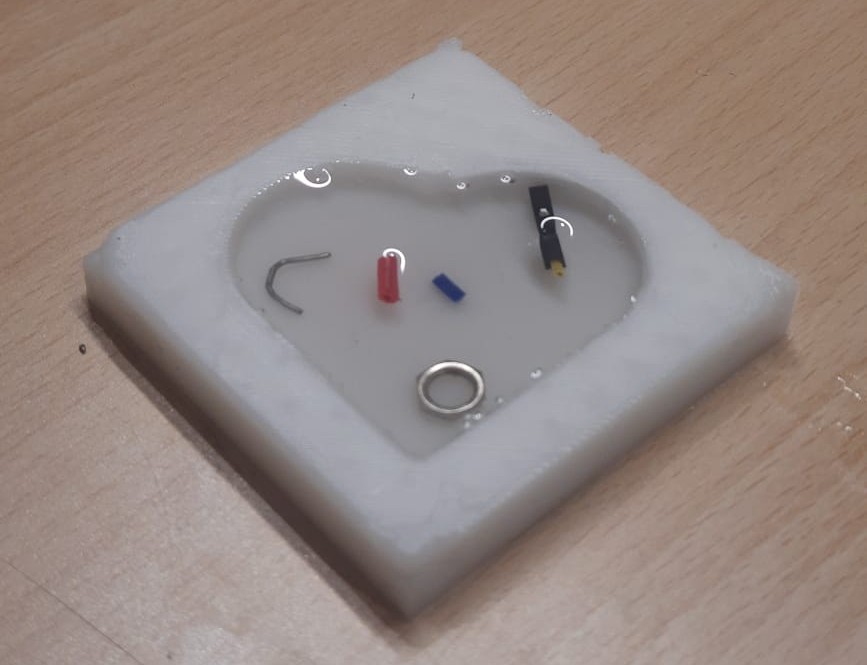
The resin was then left to rest and cure undisturbed for the recommended duration, allowing it to solidify completely. This step is essential to ensure that the final cast achieves optimal strength, clarity, and accurately retains the intended shape.
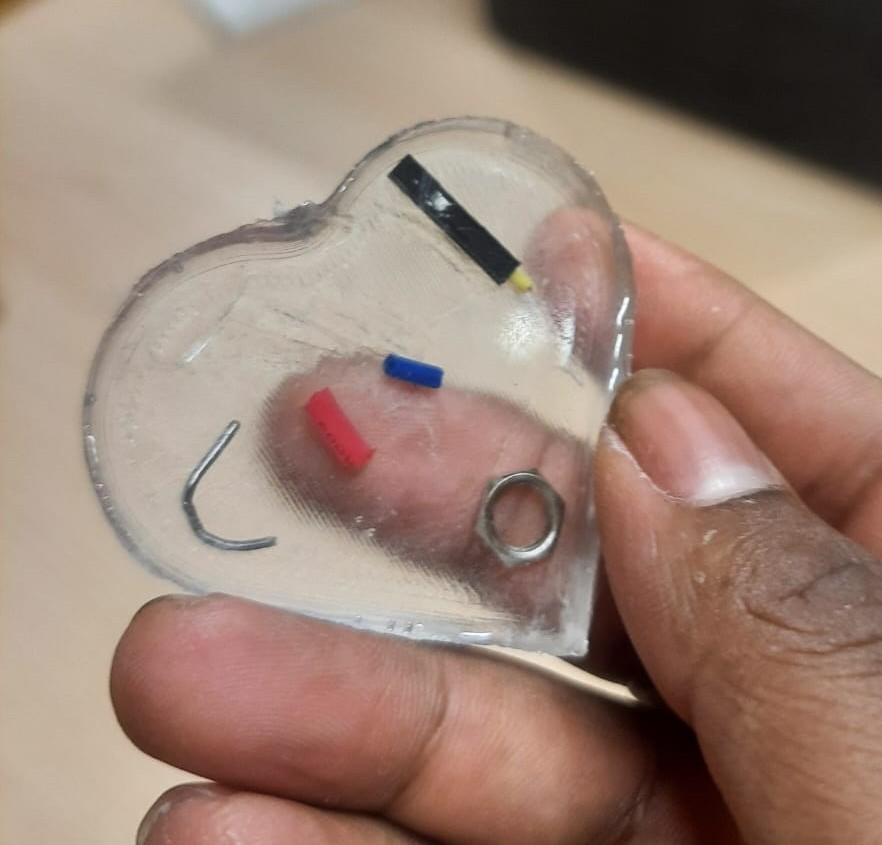
Once the resin had fully cured, it was carefully demolded from the silicone mold. The casting emerged with smooth surfaces and finely captured details, accurately reflecting the mold’s design. The final product was solid, well-formed, and demonstrated the effectiveness of both the mold preparation and casting process.
Stereolithography (SLA) :
Improvement from Initial Mold Design
During the initial molding and casting attempt, the master mold was fabricated using FDM 3D printing. Although the mold was functional, the printed layer lines were clearly visible on the mold surface. These layer marks were transferred to the final casted part, resulting in a rough surface finish and reduced detail quality. Based on the observations from the first attempt, I decided to improve the mold quality by producing the master mold using SLA resin printing. Since SLA printing provides significantly higher resolution and smoother surfaces compared to FDM printing, it was expected to improve the quality of the silicone mold and the final casting.3D Design
Fusion 360
For the Stereolithography (SLA) 3D, I used Fusion 360 to design a new model specifically intended for resin printing.
Since SLA technology is capable of producing highly detailed and complex geometries with excellent surface finish and dimensional accuracy, I wanted to create a design that could take advantage of these capabilities.
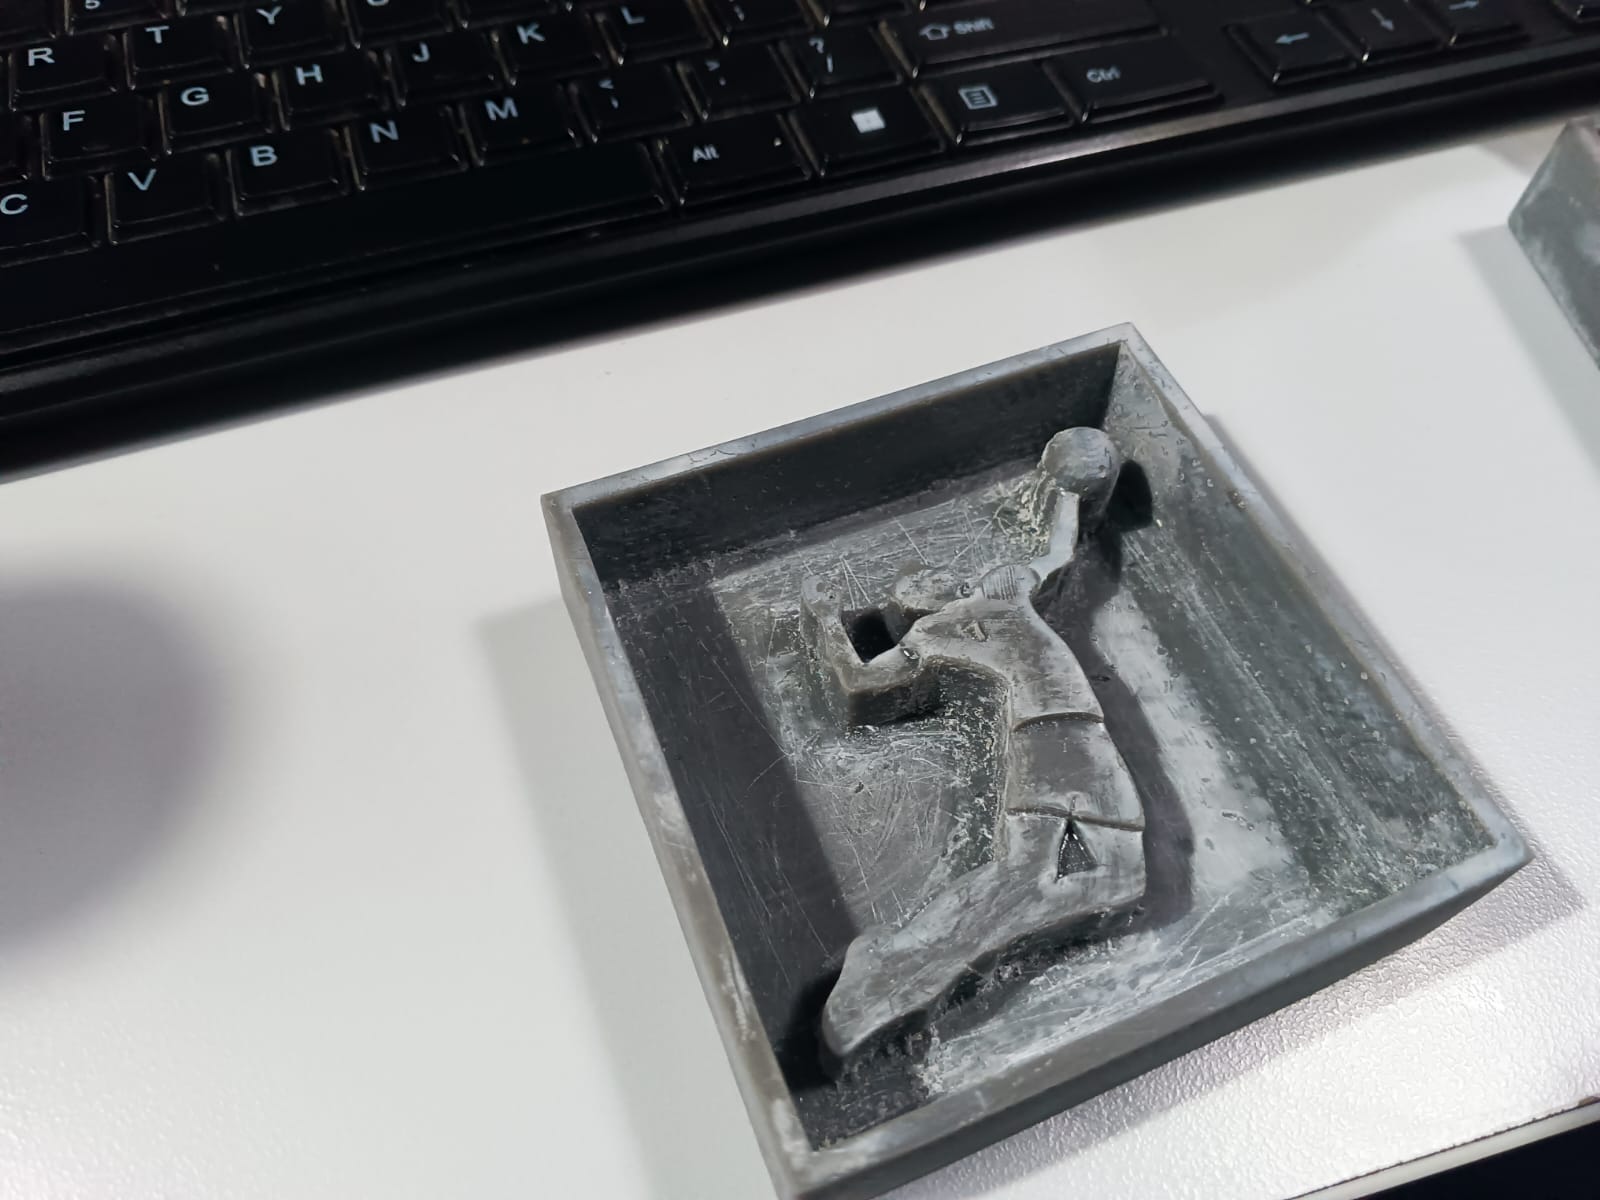
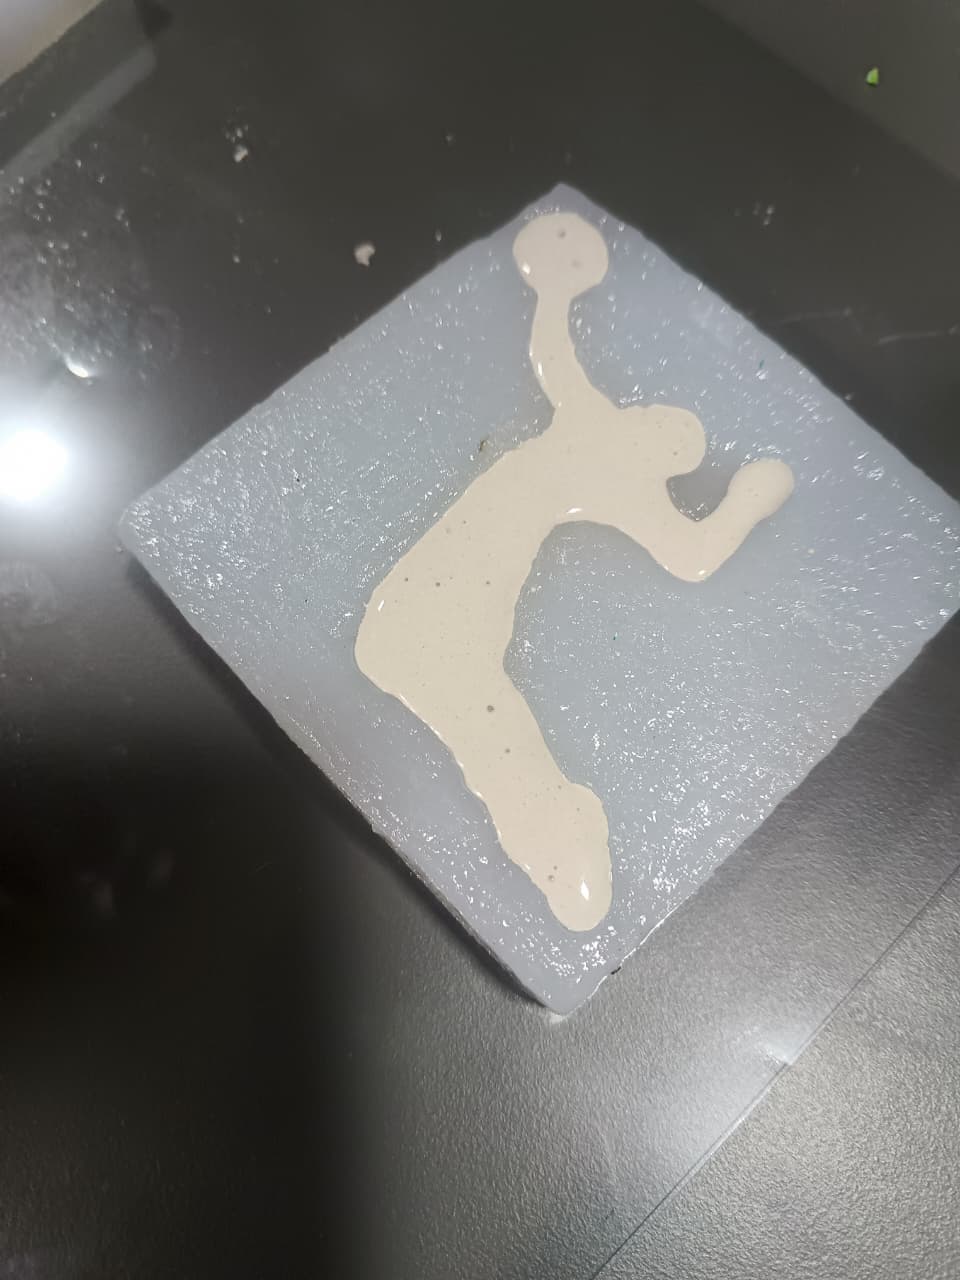
Initially, I did not have a specific idea for the model. While exploring possible concepts, I decided to create a design related to volleyball, a sport that I was actively involved in during my college years as a university-level Libero player.
To develop the design, I searched online for volleyball-related references and selected an image that could be converted into a three-dimensional model. The reference image was then imported into Fusion 360 and scaled to the desired size for modeling.Here is the link of reference image - LINK

After positioning the image, a sketch was created on the reference plane. Using sketch curves and spline tools, I traced the outer profile of the selected image to recreate its shape within the CAD environment.
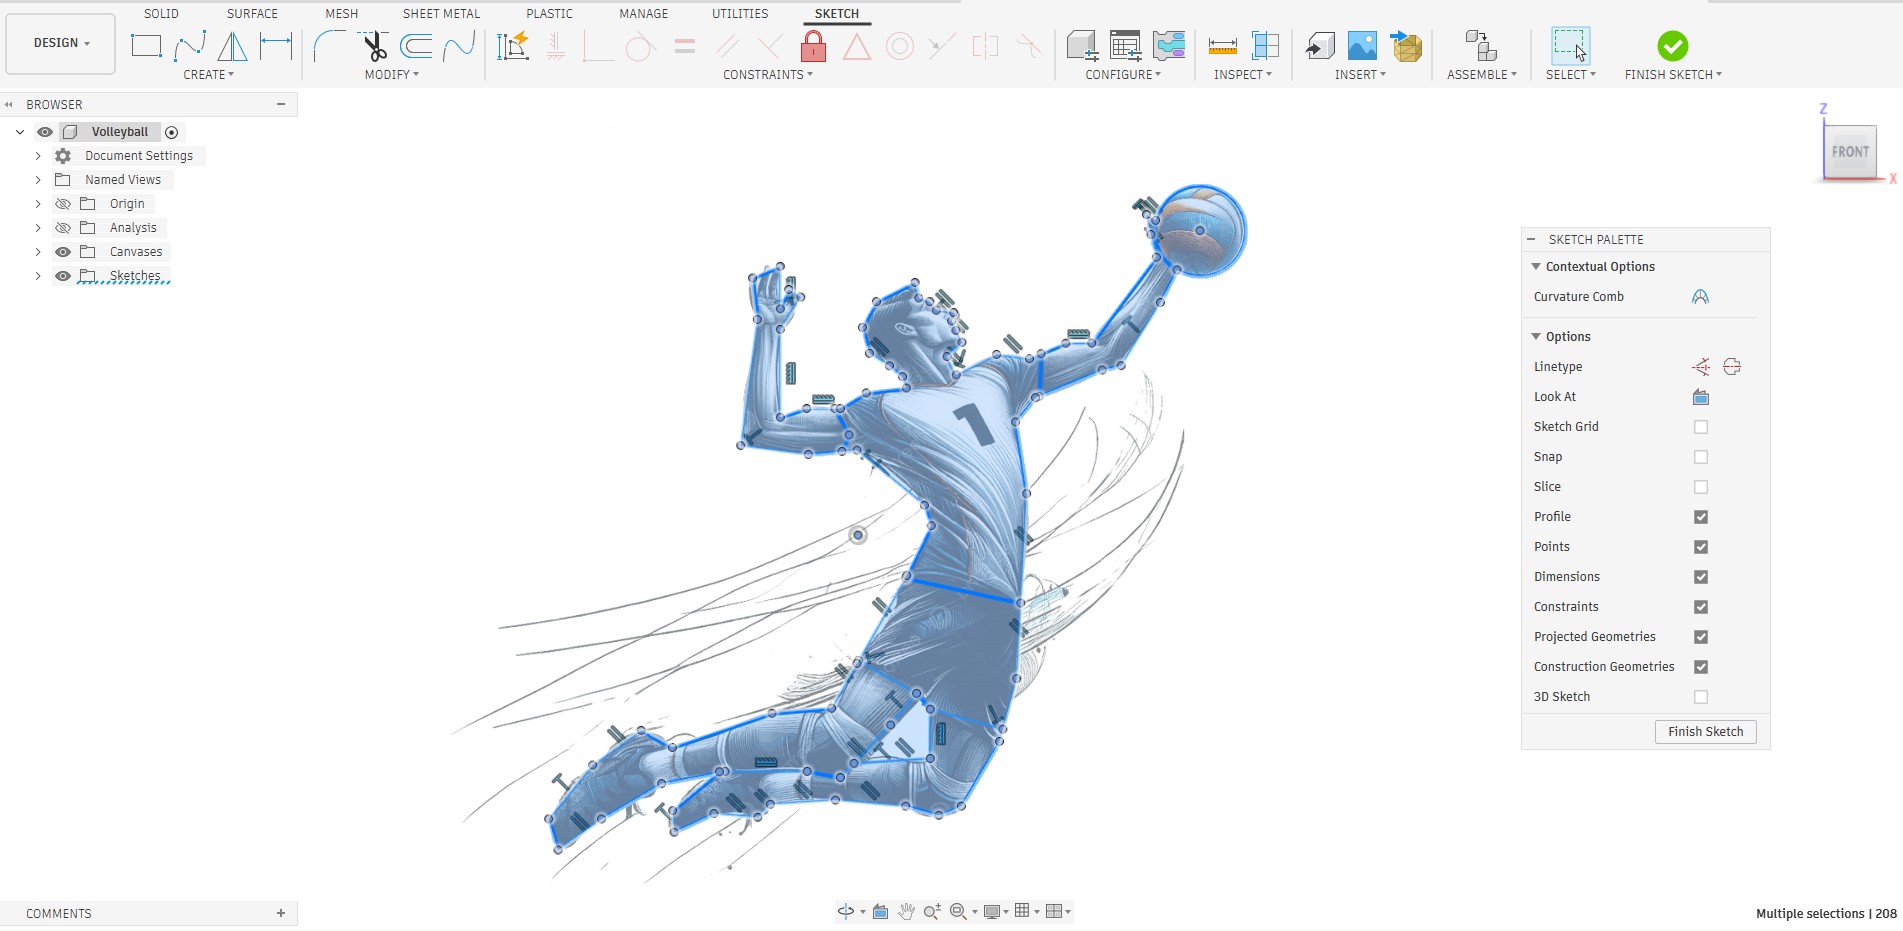
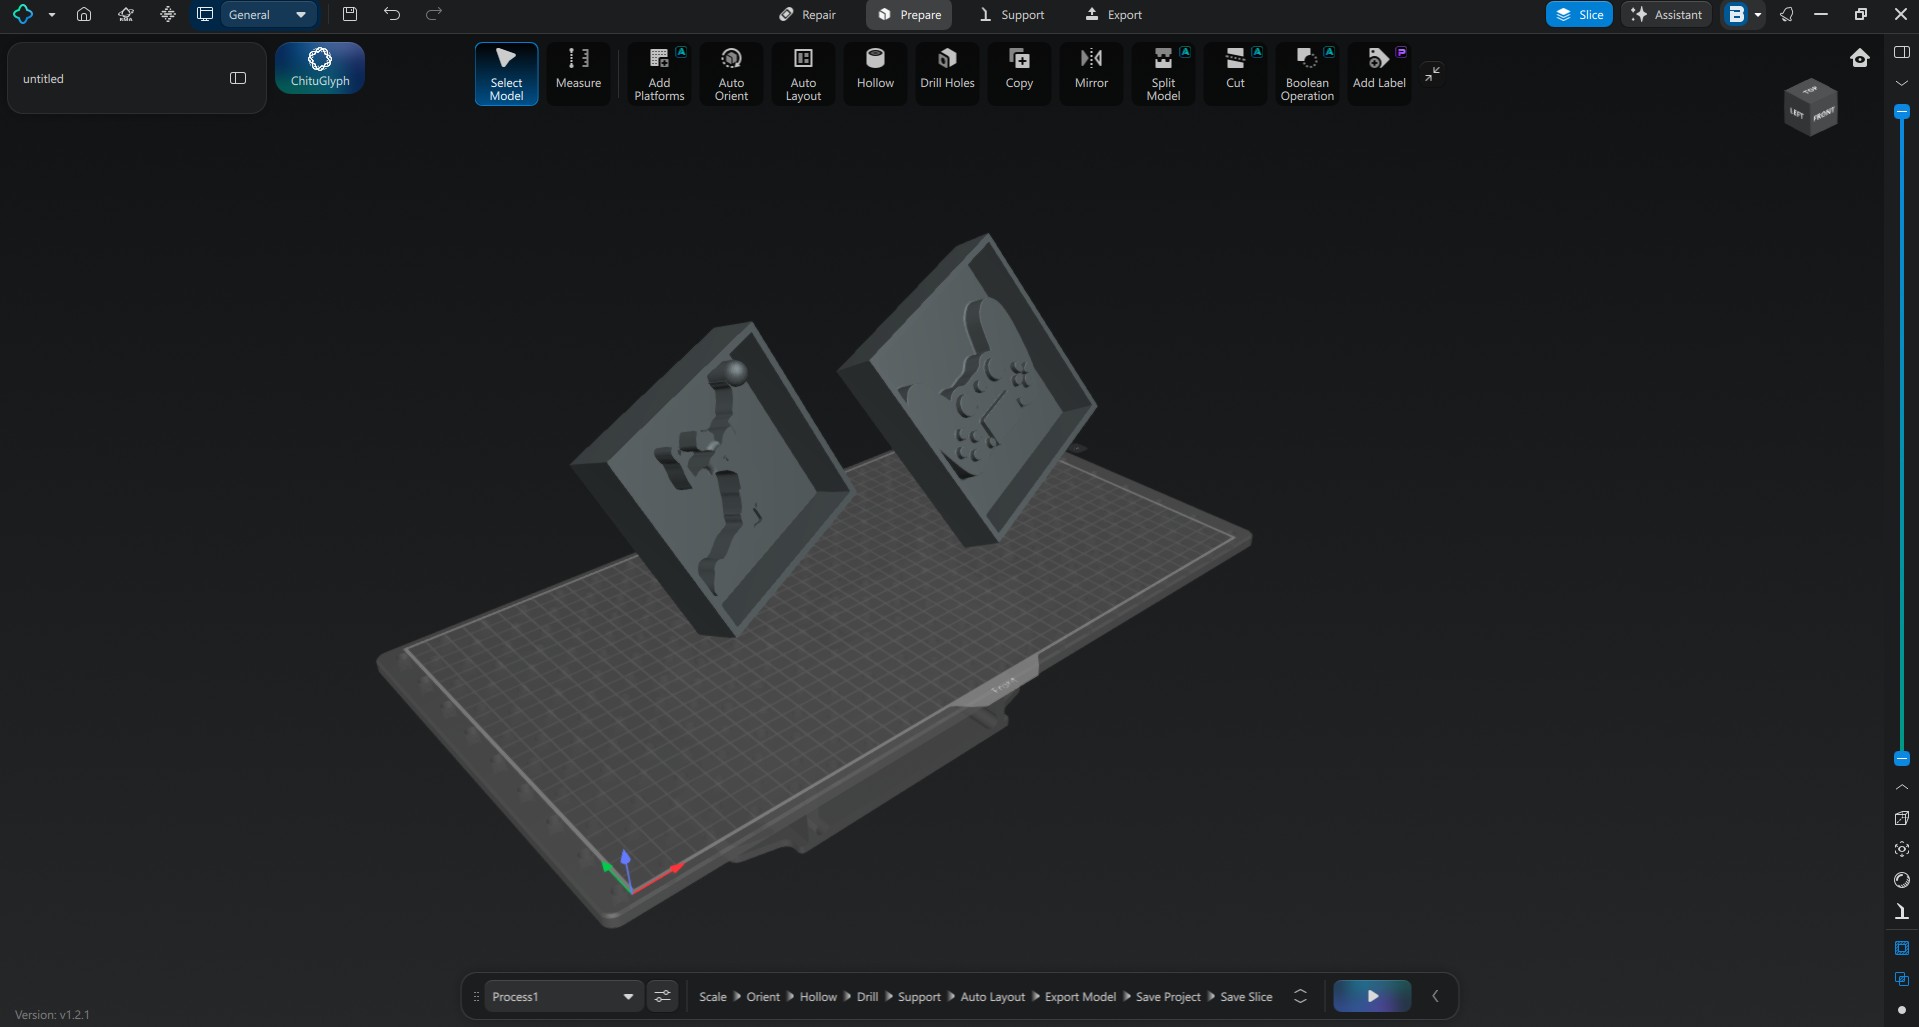
Once the sketch profile was completed, the geometry was converted into a three-dimensional form using the extrusion feature. Additional modifications were made to refine the shape and achieve the desired appearance.
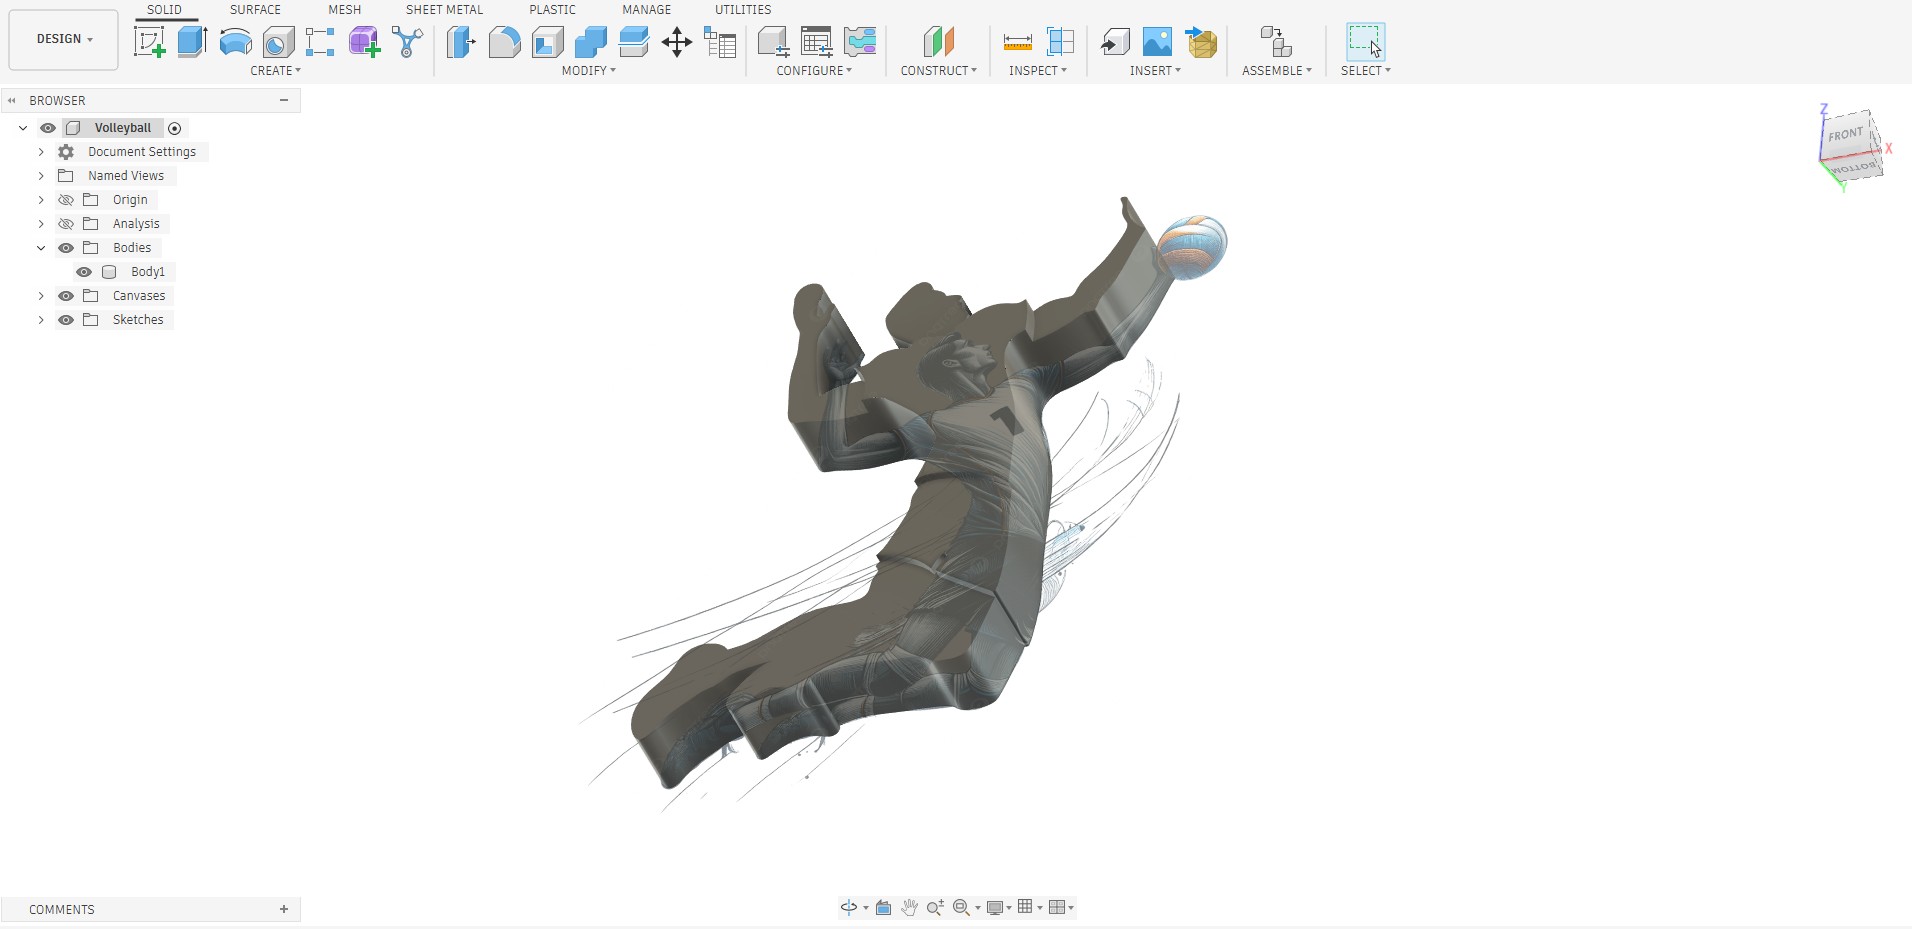
To represent the volleyball, a spherical feature was created and positioned appropriately within the design. The dimensions and placement of the sphere were adjusted to match the proportions of the overall model and maintain visual balance.
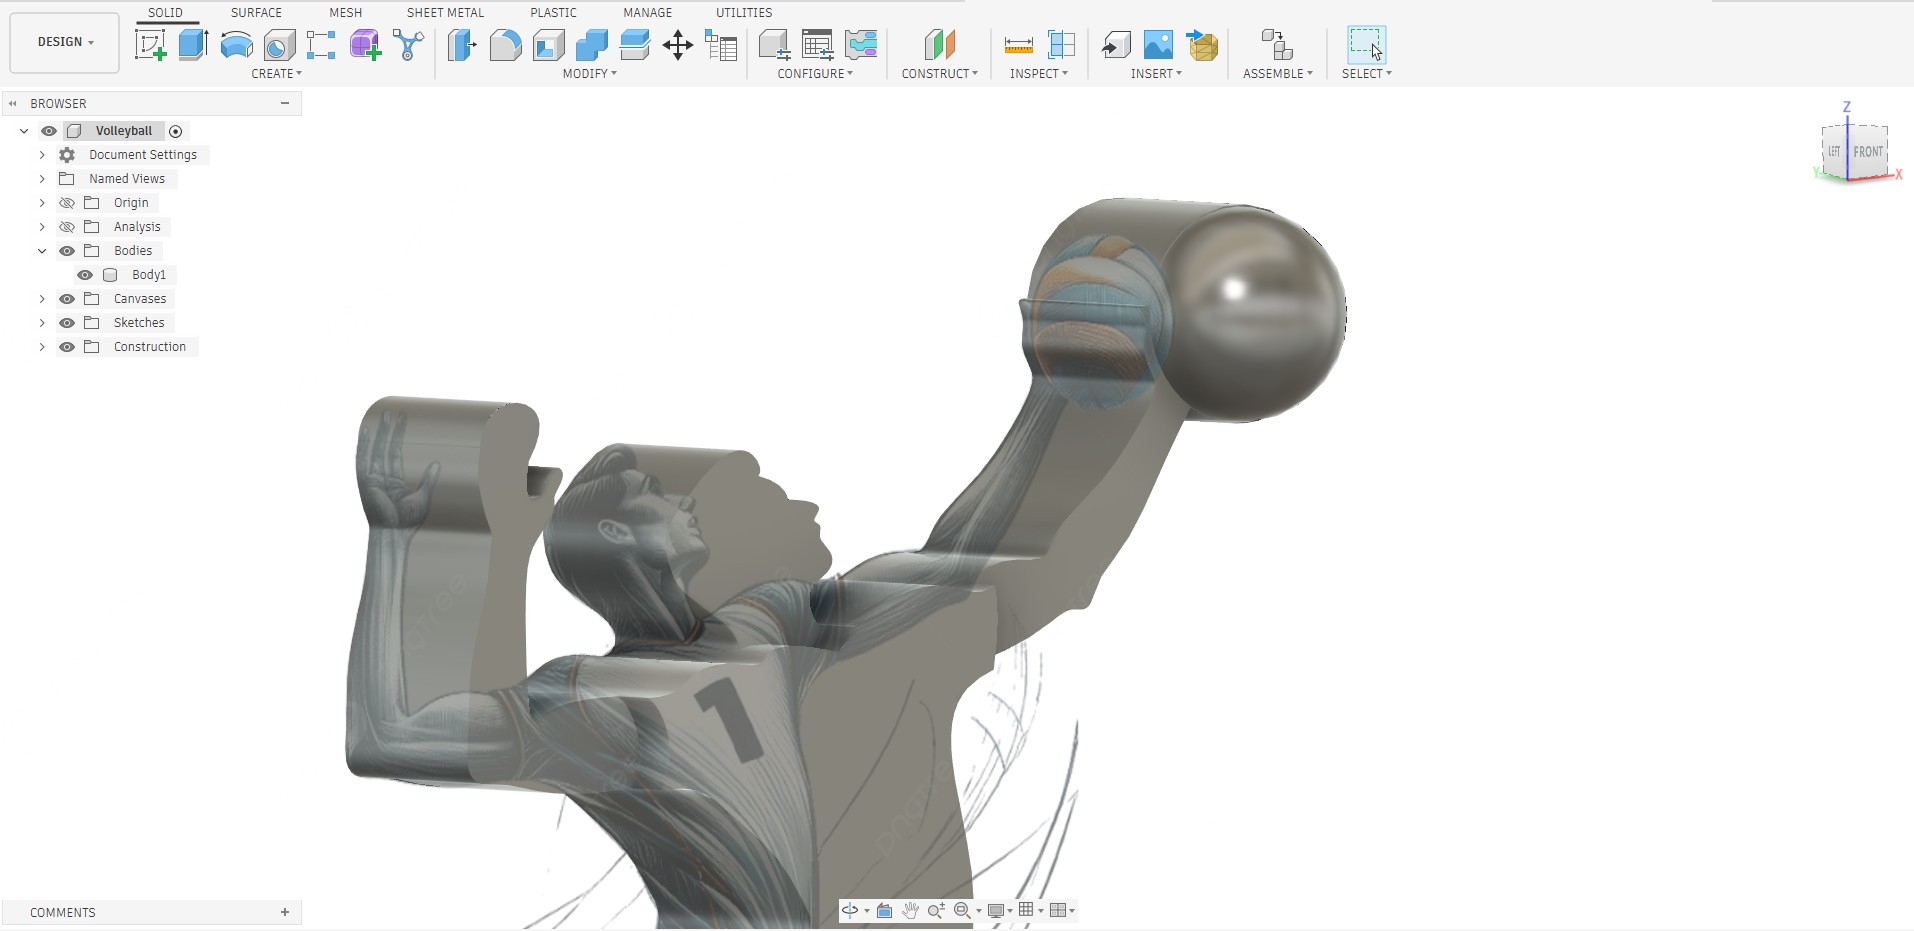
After completing the primary model, additional wall features were designed around the geometry to create a mold cavity. These walls were intended to contain the molding material during the molding and casting process and ensure proper material flow within the mold.
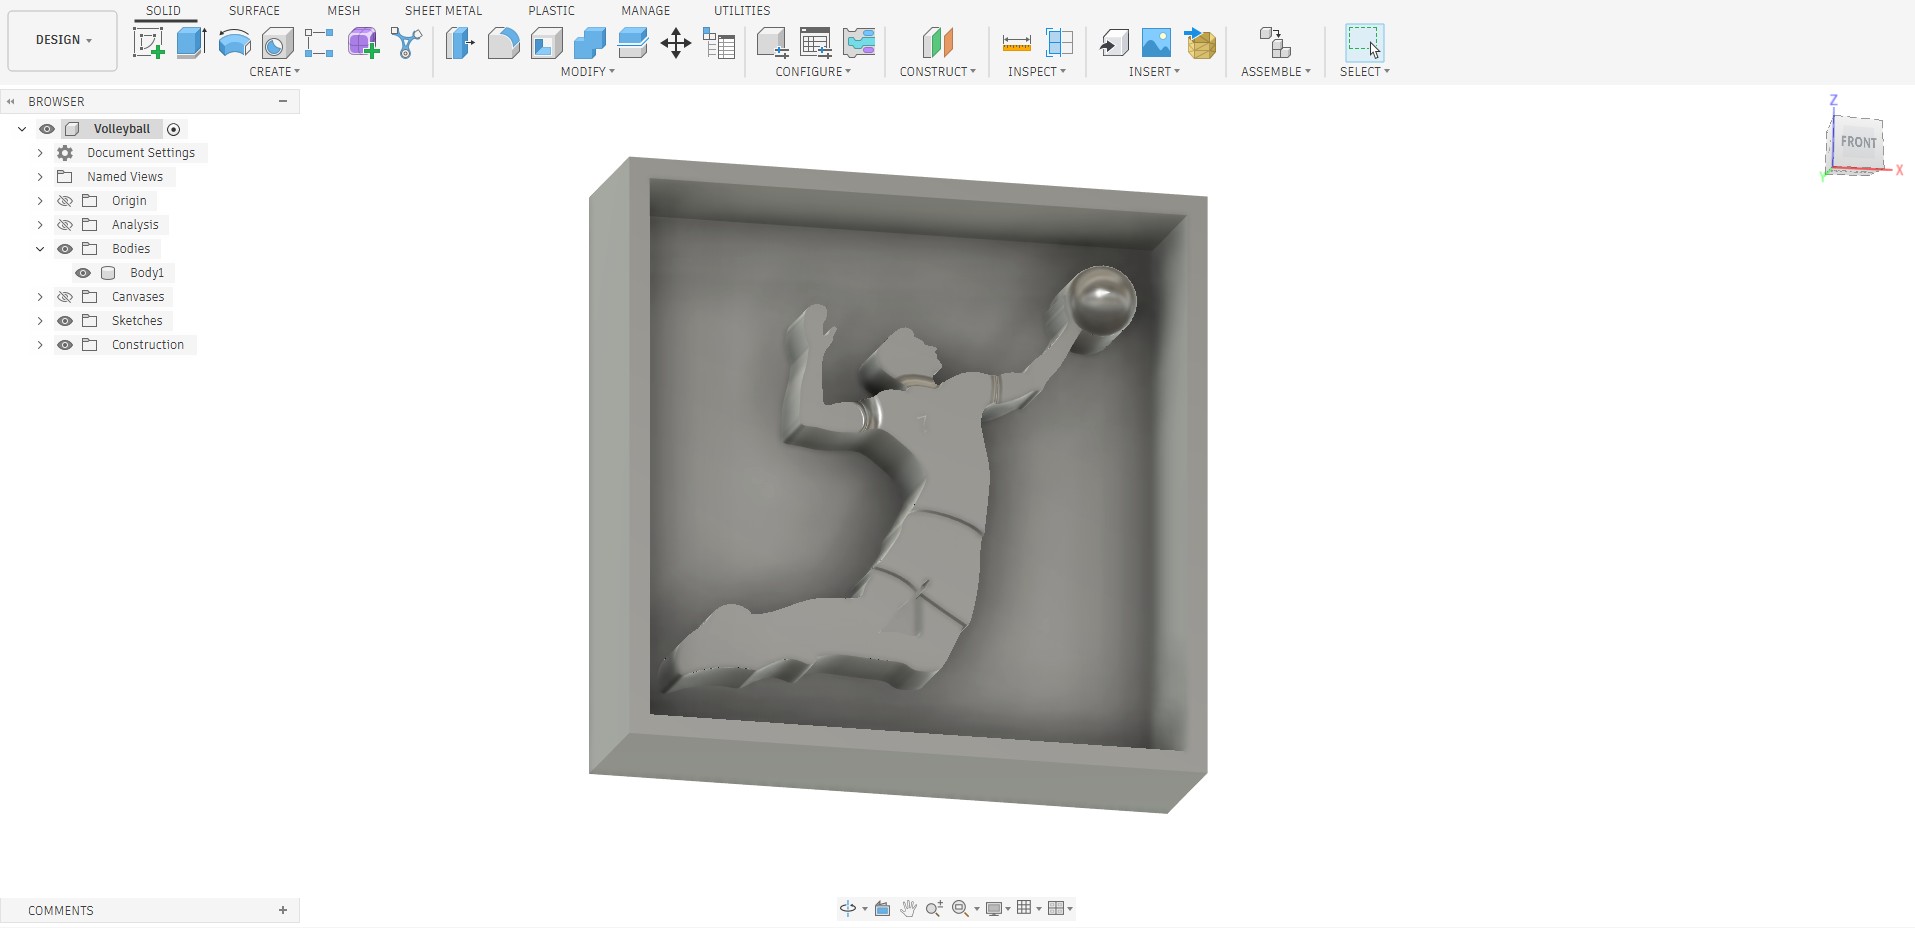
The mold geometry was reviewed and finalized to ensure that it could be fabricated successfully using SLA printing technology.
Once the design was completed, the model was exported in STL format for the next stage of the workflow. The exported file was then prepared for SLA 3D printing and subsequent molding and casting operations.
Slicing
After completing the mold design in Fusion 360, I exported the model as an STL file and prepared it for fabrication using Stereolithography (SLA) resin printing technology. Since an SLA resin printer was not available in our laboratory, I used an external SLA printing machine to 3D printing the design part.
Chitubox
CHITUBOX is a slicing software widely used for SLA, DLP, and LCD resin 3D printers. It converts a 3D model into printable layers and generates the machine file required by the printer. The software provides tools for model orientation, support generation, hollowing, island detection, and slicing analysis to improve print success.
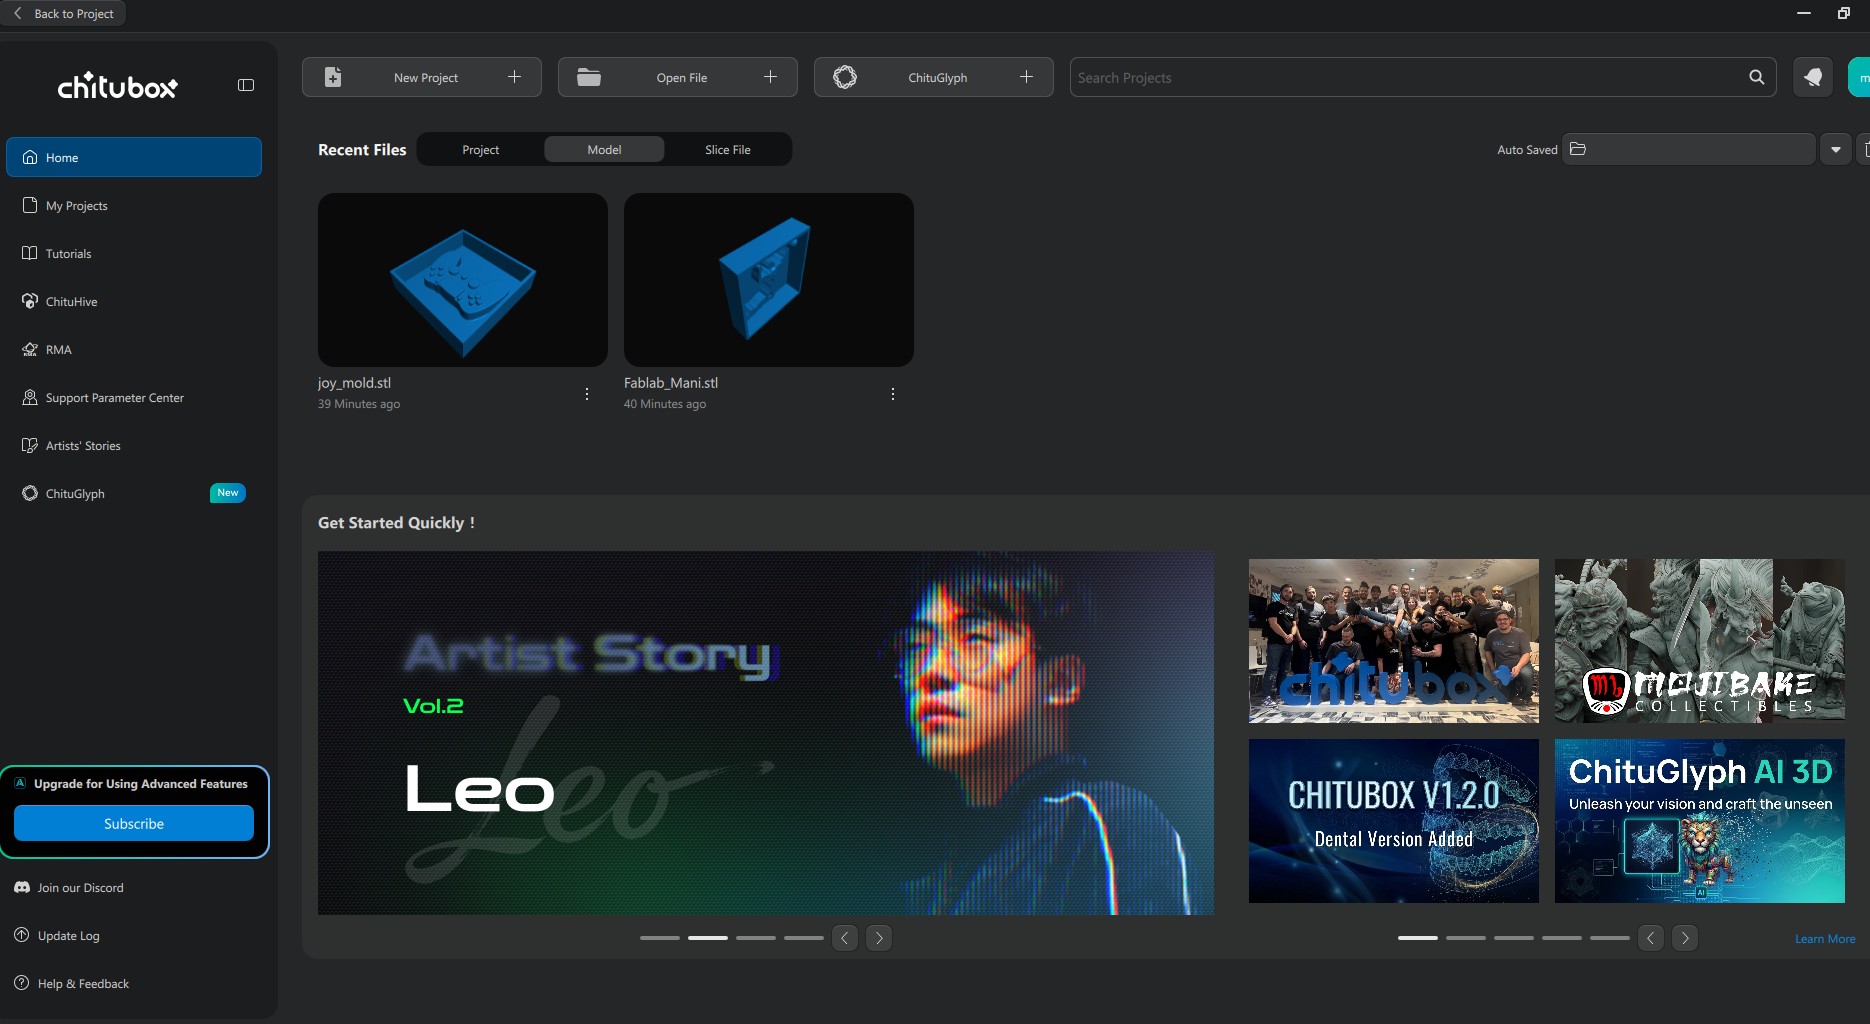
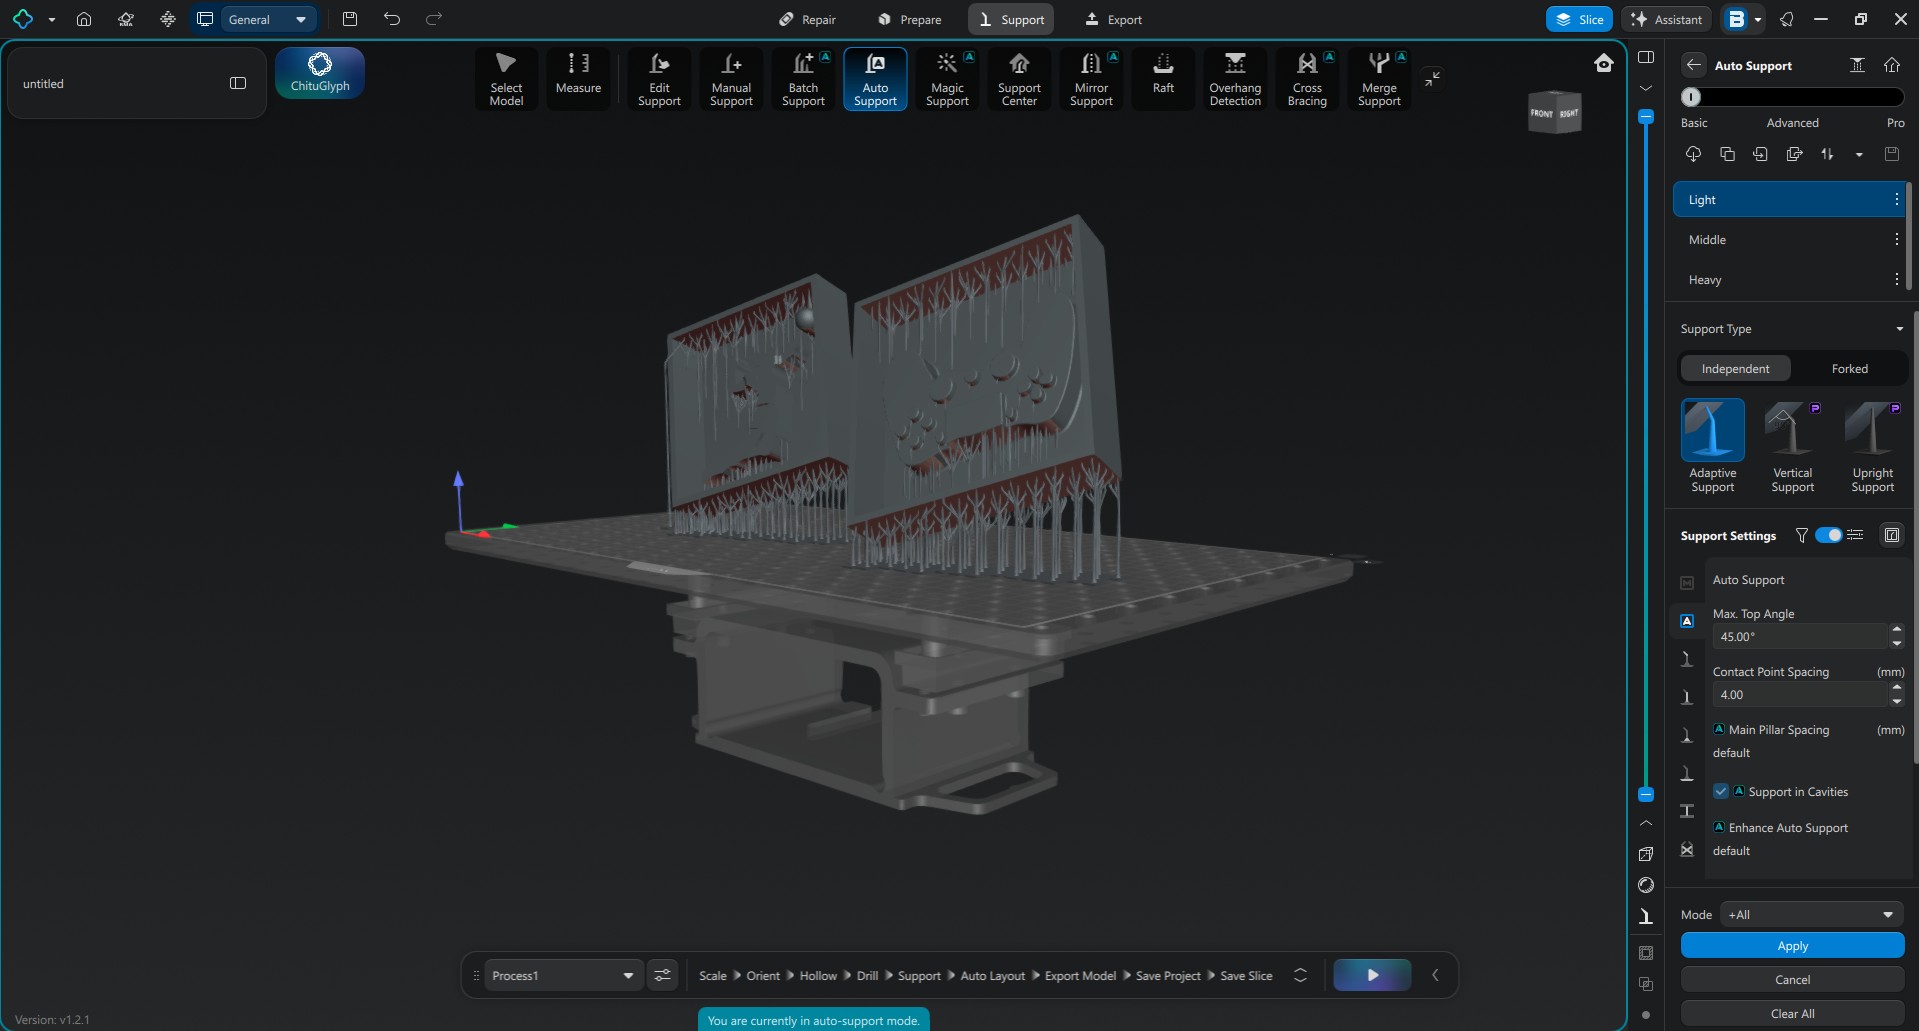
I used CHITUBOX software to prepare the model for the SLA printing process. The exported STL file was imported into CHITUBOX, where I reviewed the model orientation and printing parameters.
One of the important considerations in SLA printing is part orientation. To reduce suction forces between the printed part and the resin tank, and to improve overall print reliability, I positioned the model at an angle of approximately 30–45 degrees rather than placing it flat on the build platform.
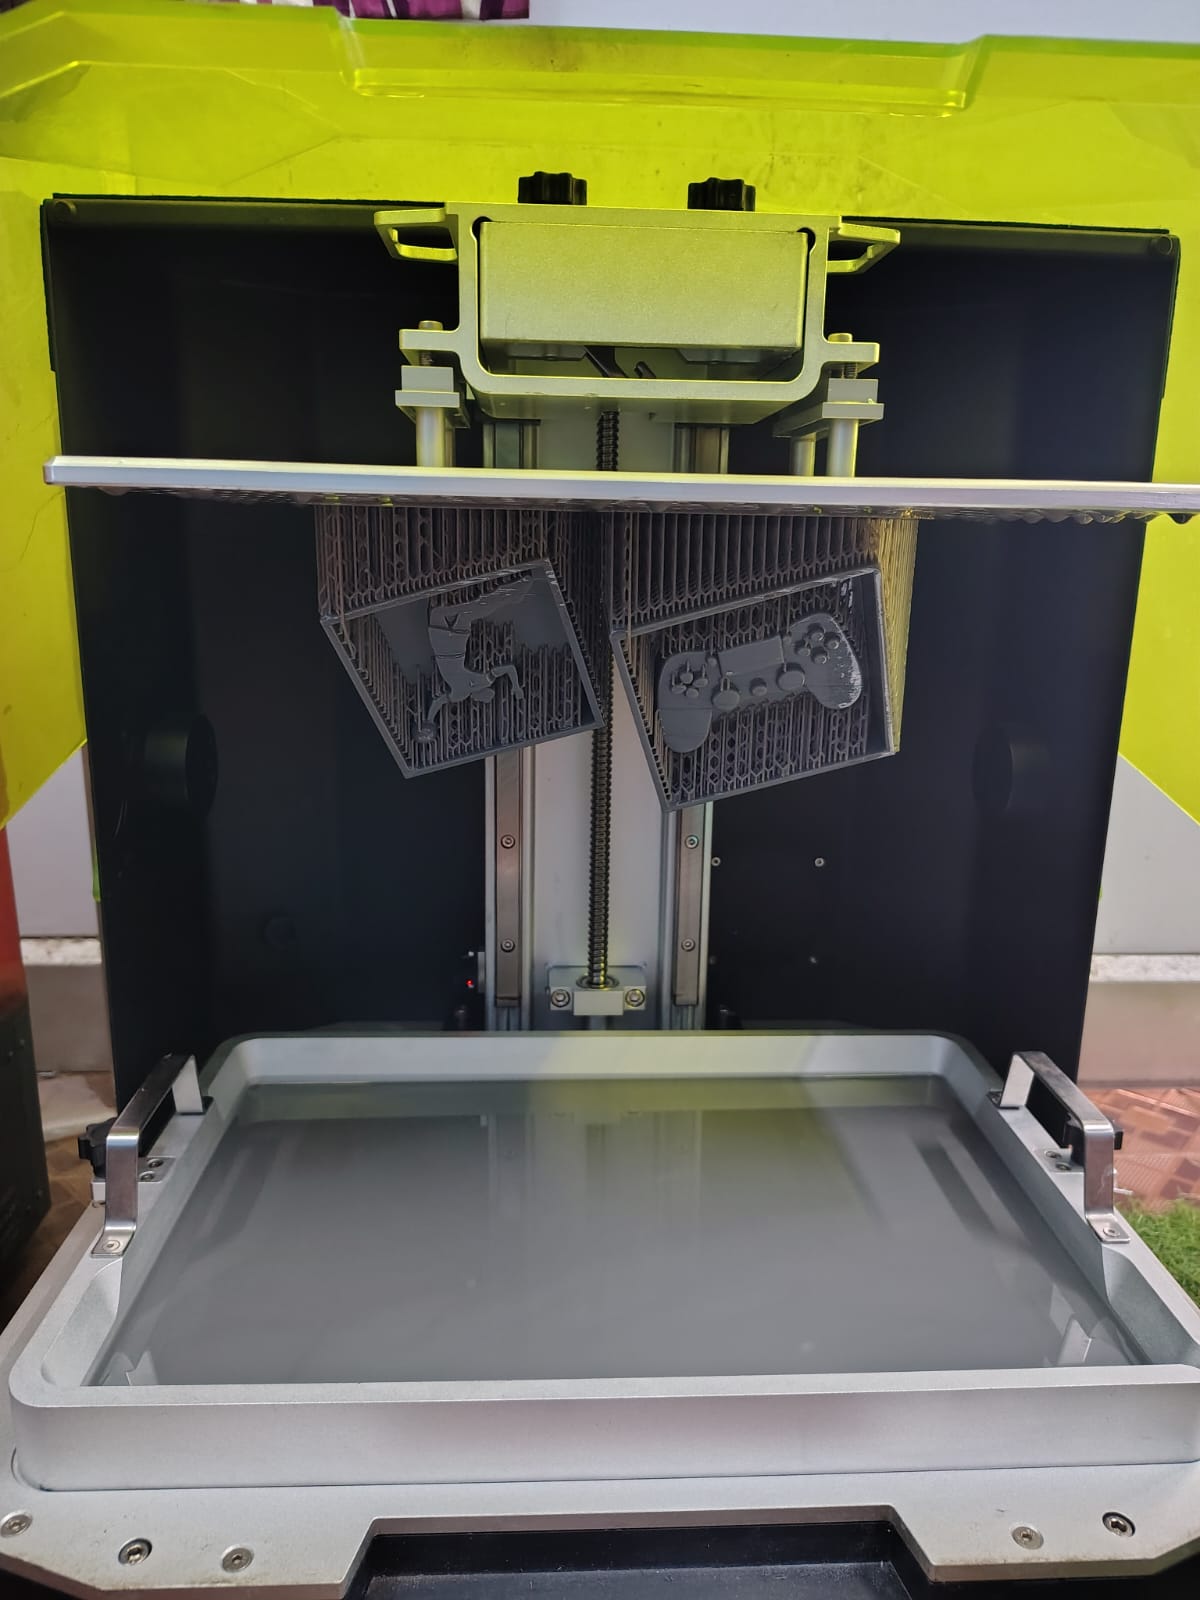
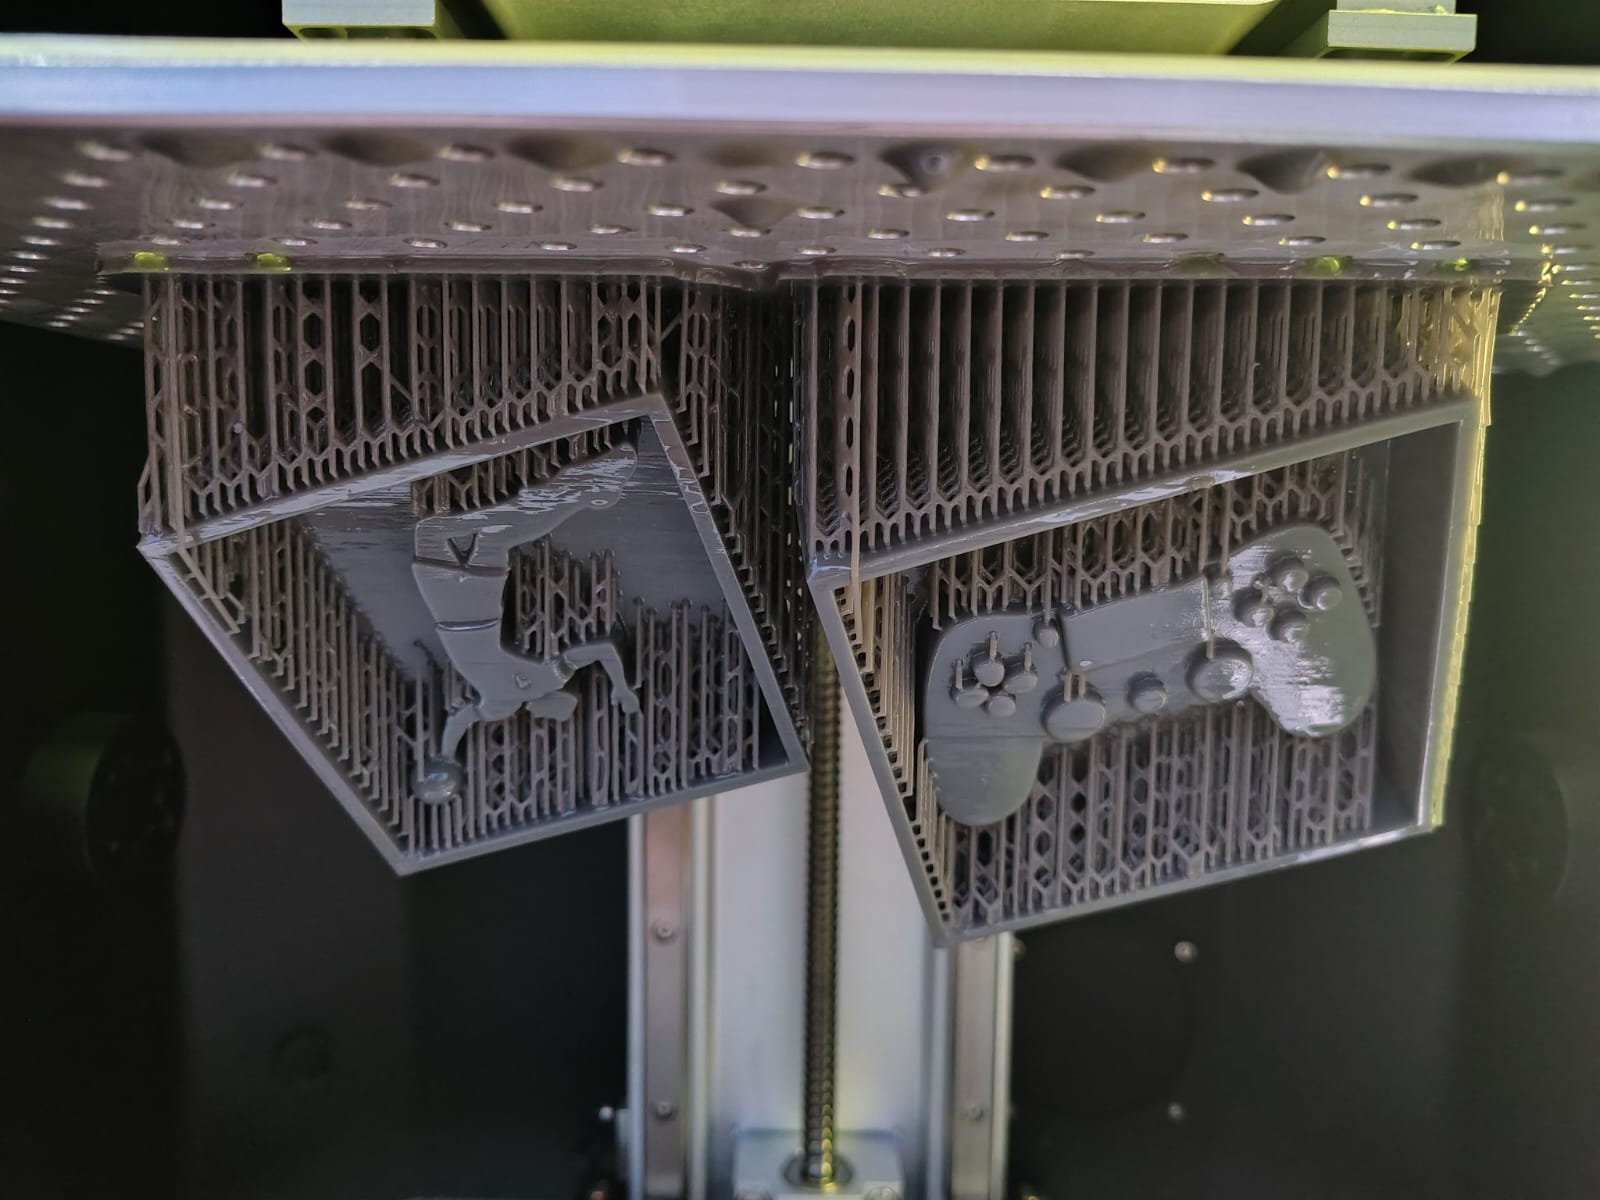
To optimize printing time and material usage, my mold design was printed together with a design created by my Fab Academy colleague on the same SLA printer build plate. Arranging multiple parts within a single print job improved the utilization of the available printing area and reduced the overall machine setup time.
Both models were prepared and positioned appropriately within the build volume before the slicing process
For detailed information regarding that design and its molding and casting workflow of my colleague work, please refer to the following documentation page:
Muheshkumar – Molding and Casting Documentation
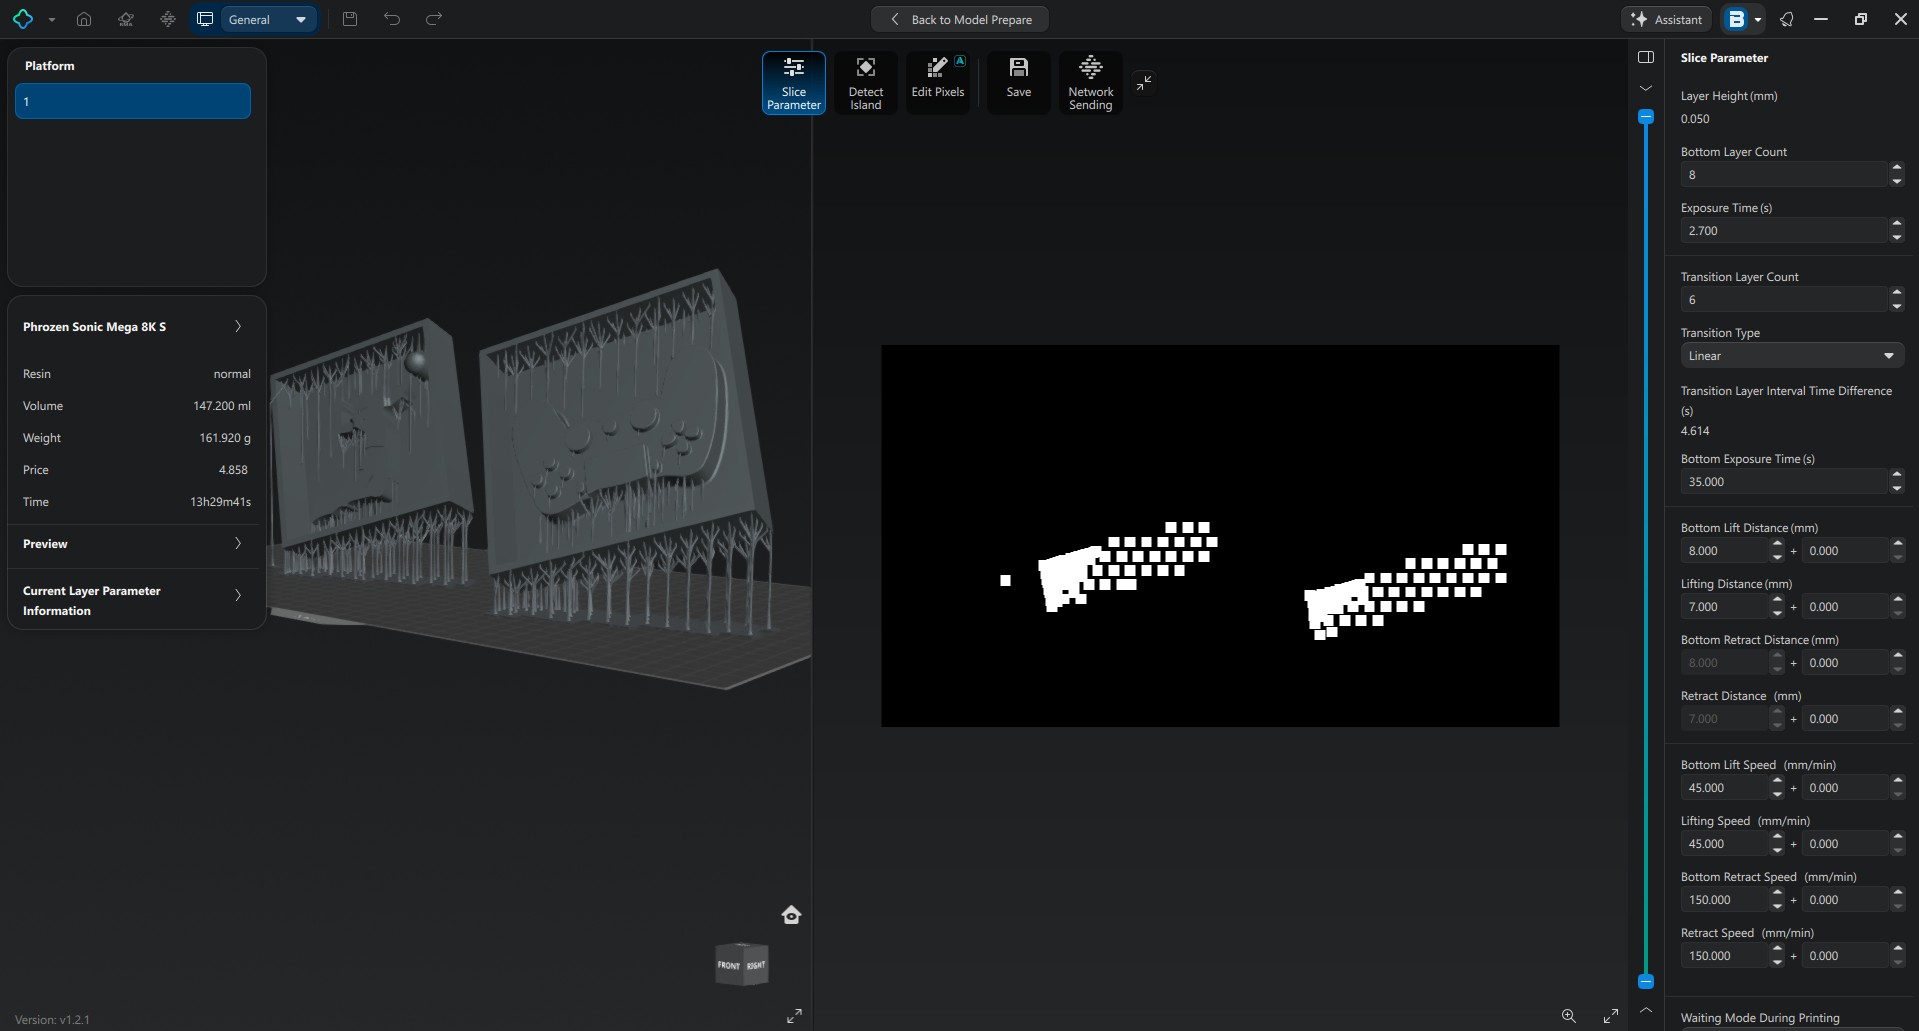
After selecting the orientation, I configured the basic slicing parameters. A layer height of 0.05 mm was selected, as it provides a good balance between printing time and surface quality while maintaining the fine details required for the mold.
The exposure settings were reviewed according to the resin manufacturer's recommendations. Special attention was given to the bottom layer exposure settings to ensure strong adhesion between the printed part and the build plate during the initial stages of the print.
Once the print settings were finalized, support structures were generated to support the overhanging sections of the model. Medium supports were selected to provide adequate stability while minimizing support marks on the final part.
After generating the supports, I inspected the model for unsupported islands and reviewed the layer-by-layer preview provided by CHITUBOX. This verification process helped ensure that each layer would print correctly and that no unsupported regions would cause print failures.
After completing the slicing process, the final print file was exported and transferred to the external SLA resin printer. The printer was then prepared with the required resin material, and the printing process was started.
3D Printing
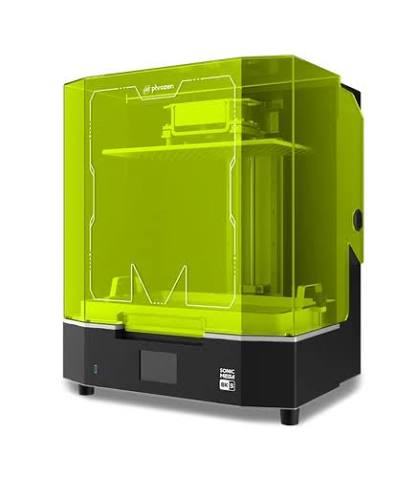
For the resin printing process, we used the Phrozen Mega 8K SLA resin printer. After preparing and slicing the model, we proceeded with printing the design using this machine to achieve the high resolution and surface quality required for the mold.
The Design was successfully 3D printed by SLA Printer.
Moulding Process
Material Used – Ecoflex Silicone Rubber
For producing the flexible mold, I used Ecoflex Silicone Rubber Part A and Part B. Ecoflex is a platinum-cure silicone rubber commonly used in mold-making applications due to its flexibility, durability, and ability to accurately reproduce fine details from the master pattern.
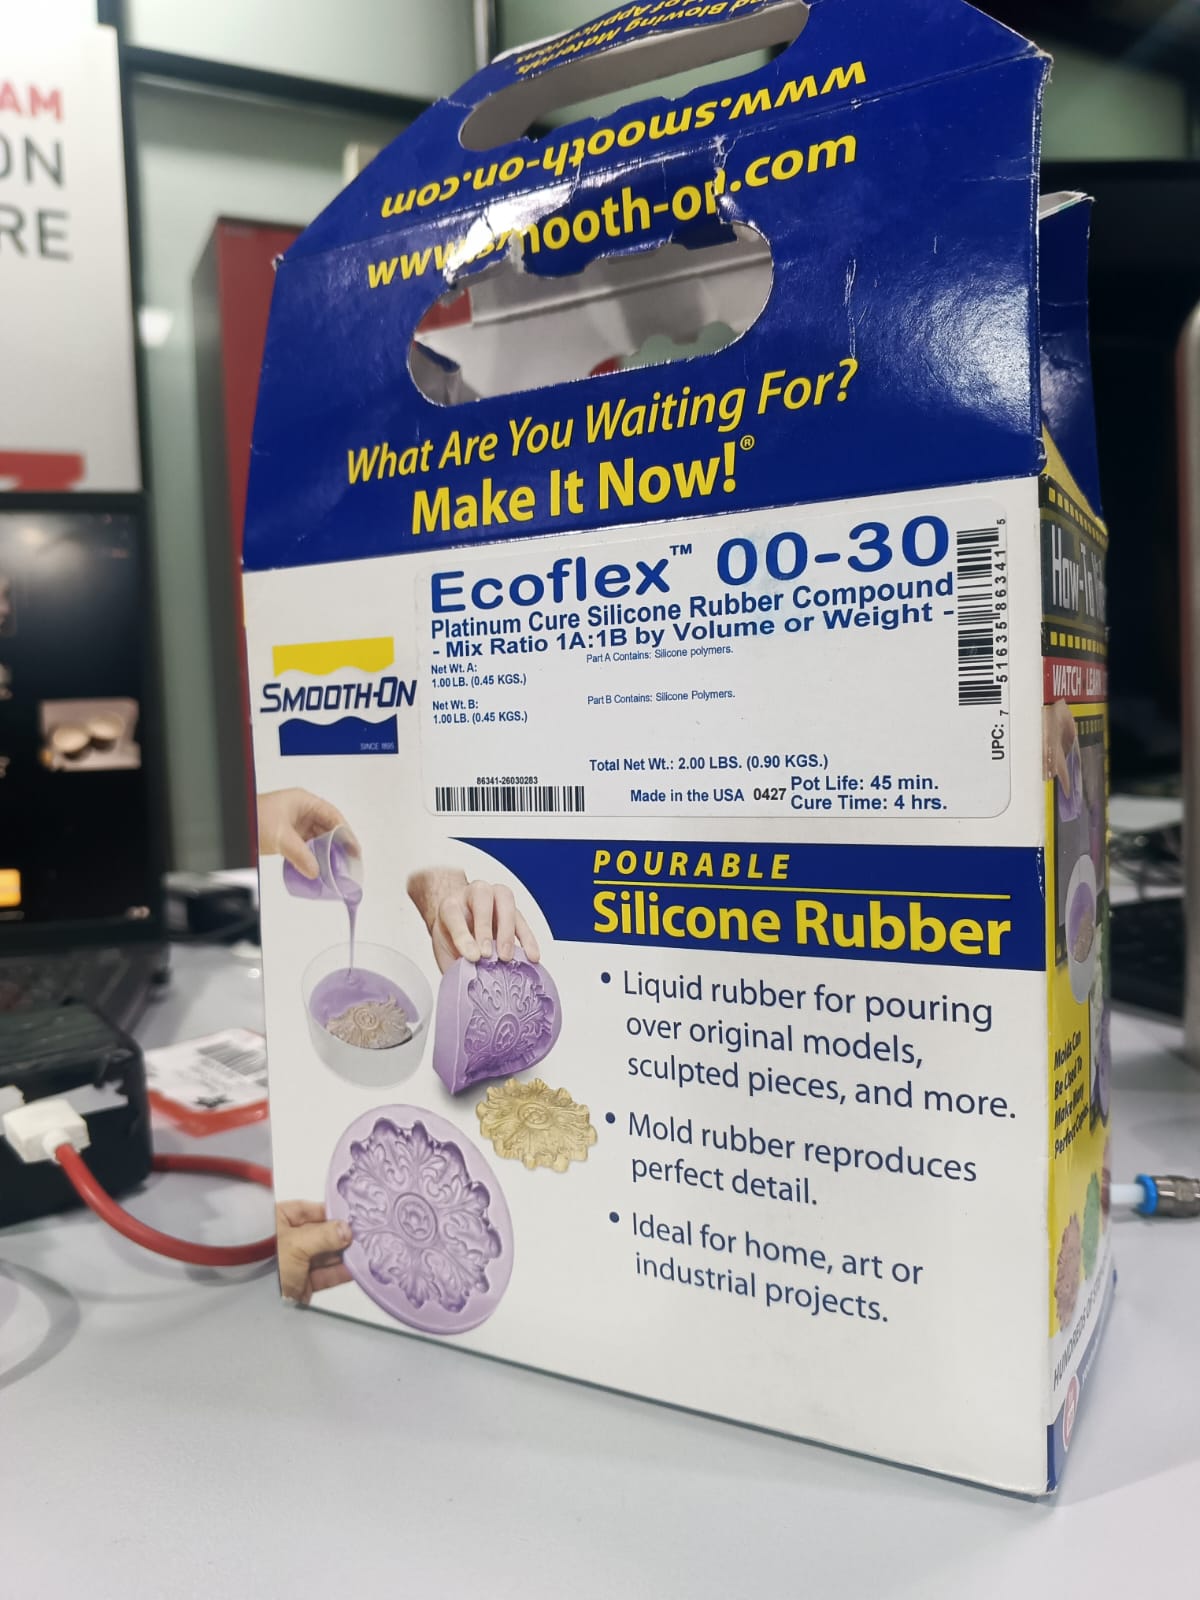
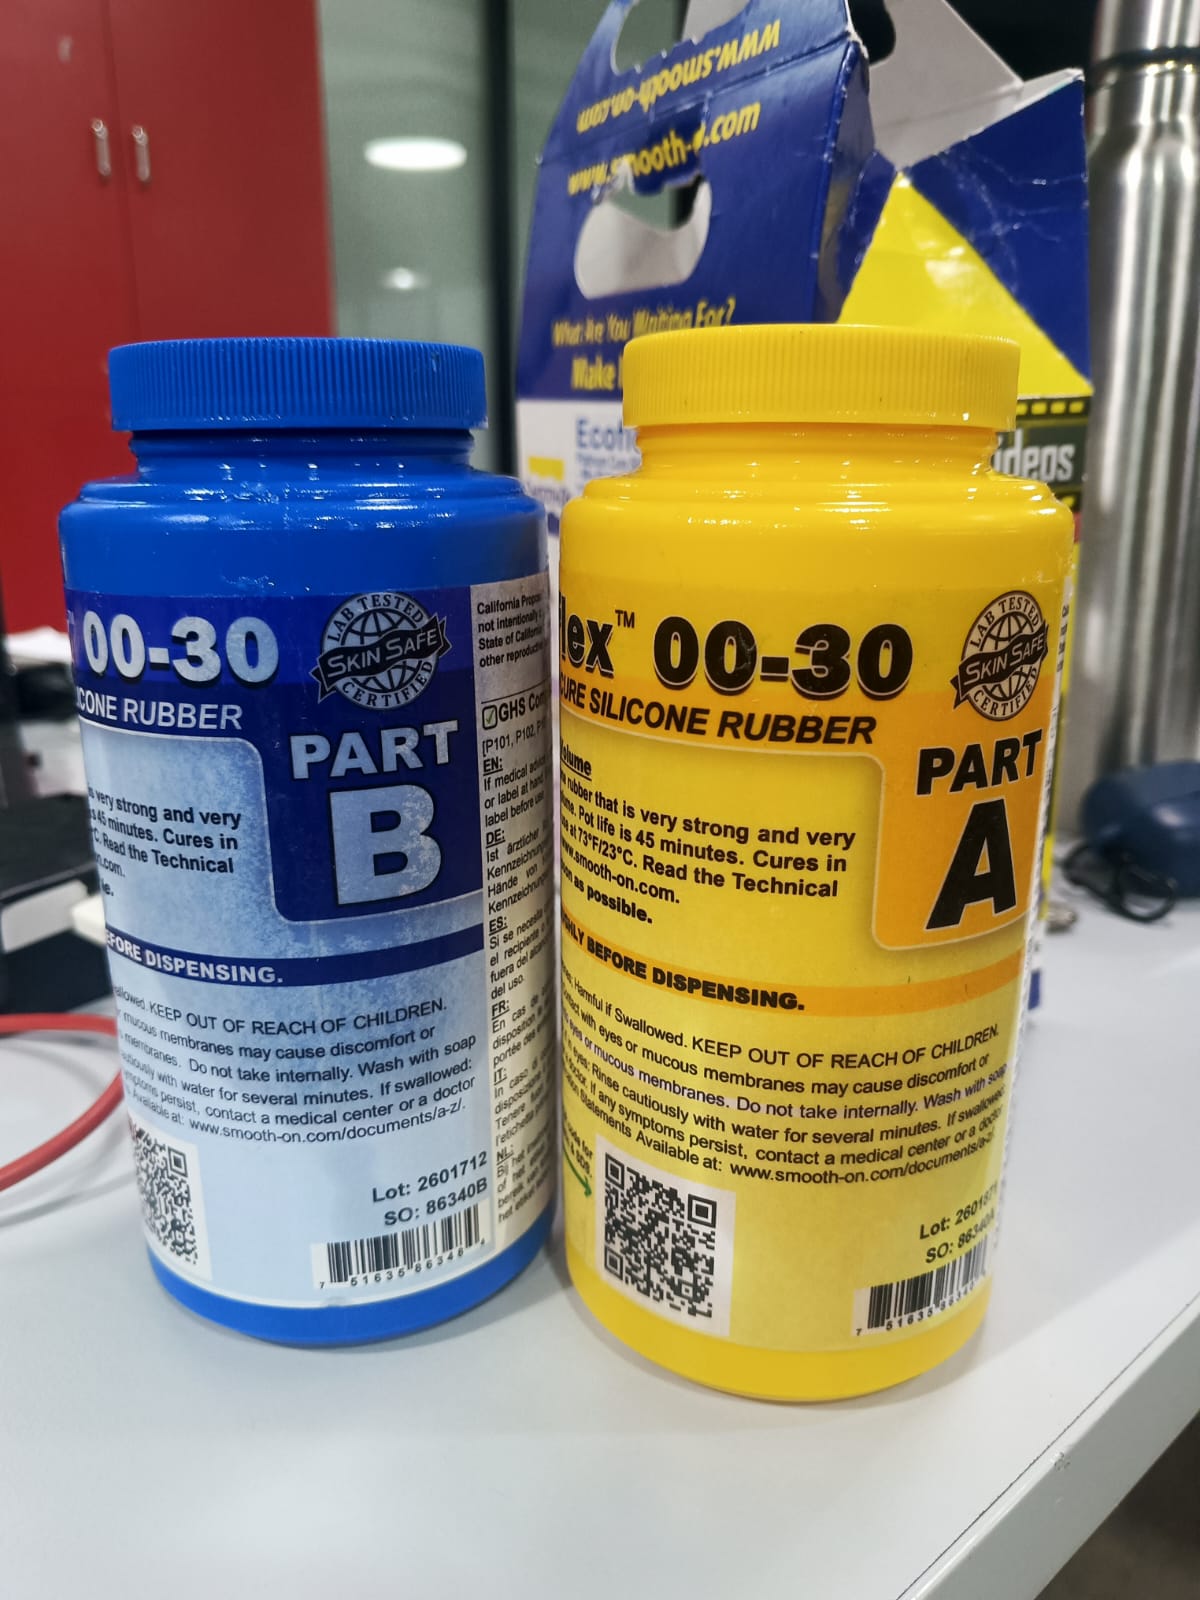
The material requires a mixing ratio of 1:1 between Part A and Part B. Before beginning the molding process, I reviewed the technical datasheet and safety guidelines to understand the recommended mixing, handling, and curing procedures.
| Property | Value |
|---|---|
| Material Type | Platinum-Cure Silicone Rubber |
| Mix Ratio | 1A : 1B |
| Pot Life | Approximately 30 Minutes |
| Cure Time | Approximately 4 Hours |
| Hardness | Shore 00-30 |
| Color | Translucent |
| Application | Mold Making and Casting |
Silicone Mold Preparation
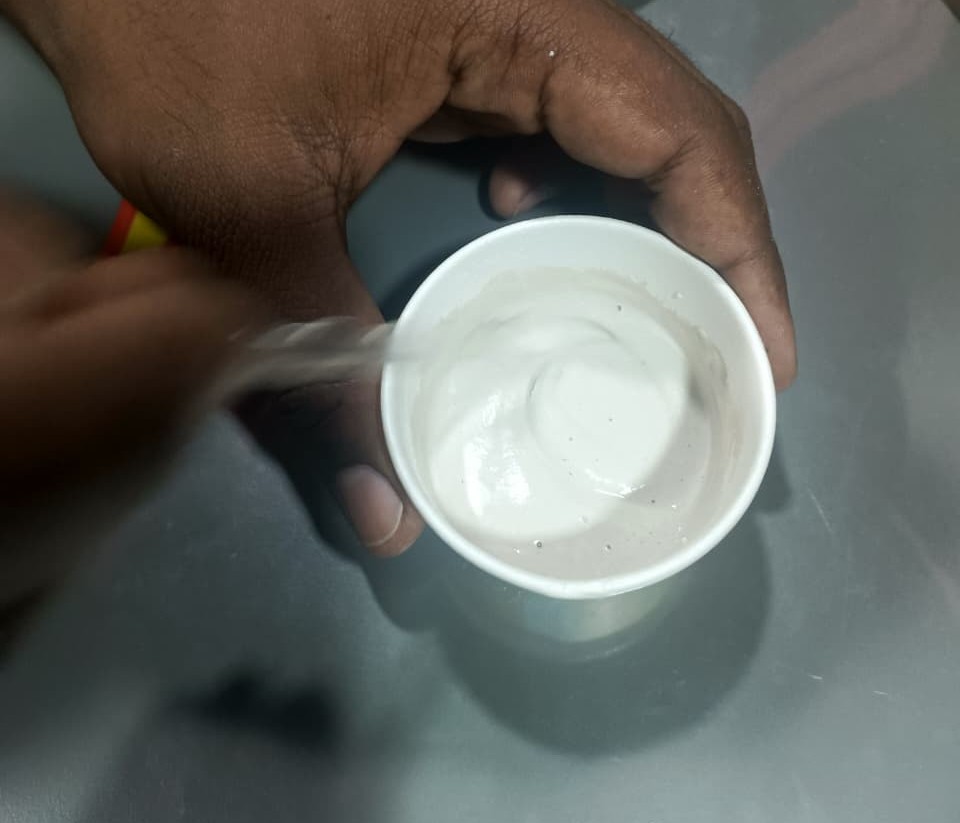
After completing the SLA resin-printed master mold, I prepared the Ecoflex silicone mixture for mold fabrication. Equal quantities of Part A and Part B were measured according to the recommended 1:1 ratio and poured into a mixing container.
Both components were mixed thoroughly in 210 ml paper cup until a uniform consistency was achieved. Special care was taken to stir the material slowly to minimize the formation of trapped air bubbles, which could affect the quality and accuracy of the final mold.
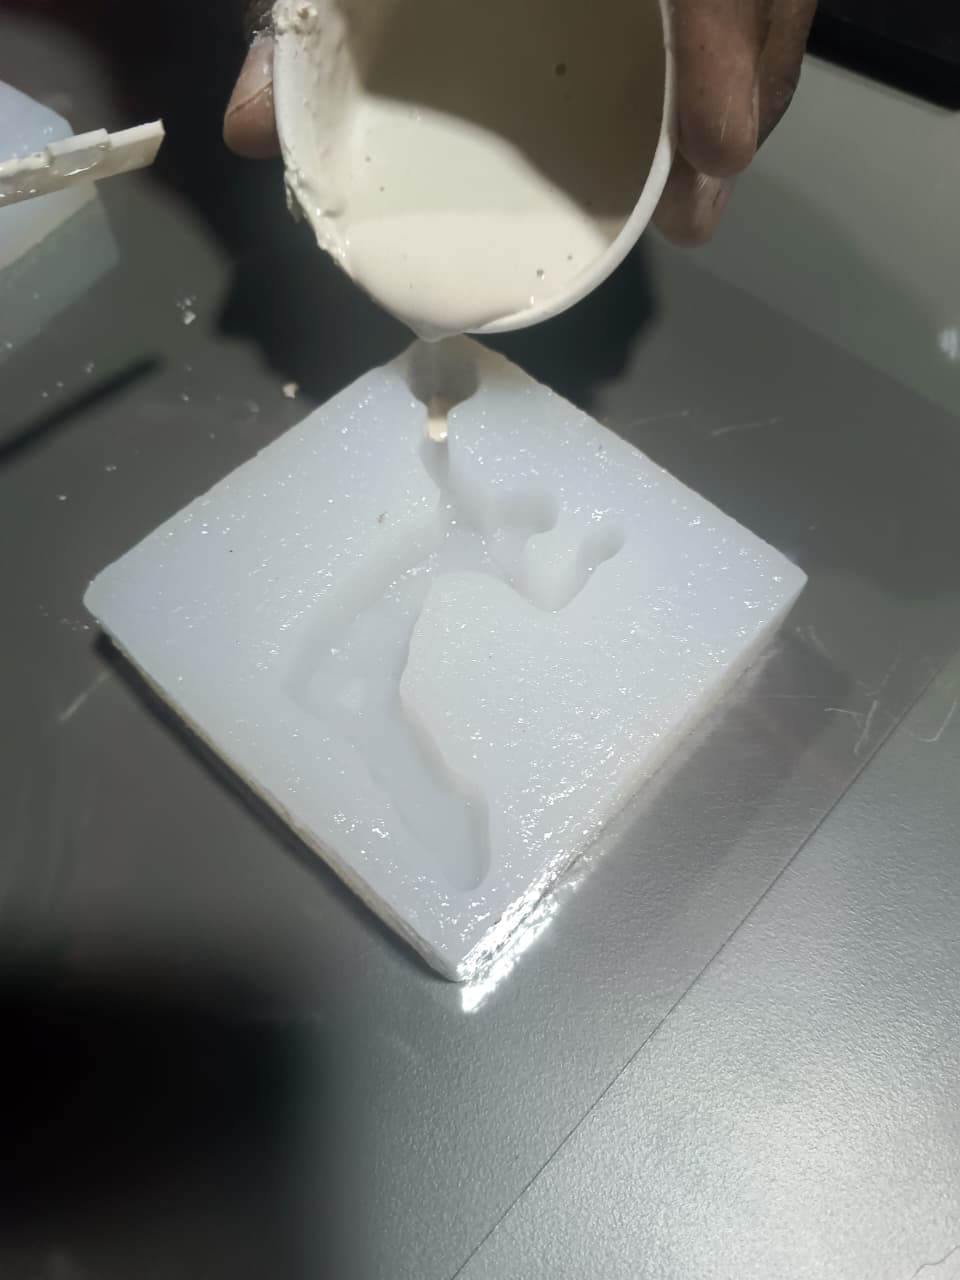
Silicone Pouring and Curing
Once the silicone mixture was prepared, it was carefully poured into the SLA resin-printed mold cavity. The pouring process was performed gradually to allow the material to flow evenly into all regions of the mold.
To remove trapped air and improve the replication of fine details, the mold was gently tapped on the work surface. This encouraged any air bubbles to rise to the surface and ensured complete filling of the cavity.
The filled mold was then left undisturbed at room temperature for approximately 12 hours to allow complete curing of the silicone material.
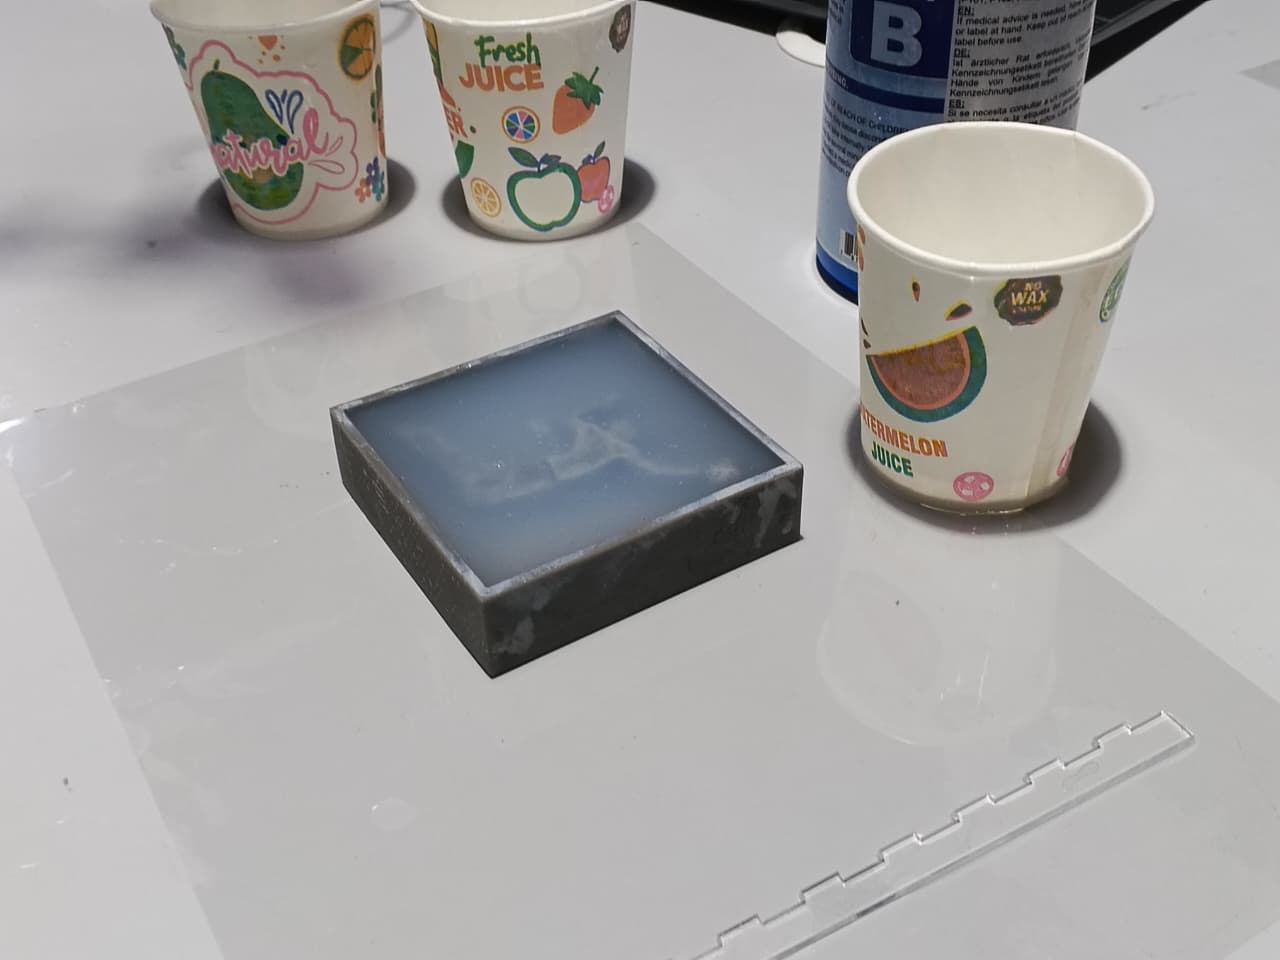
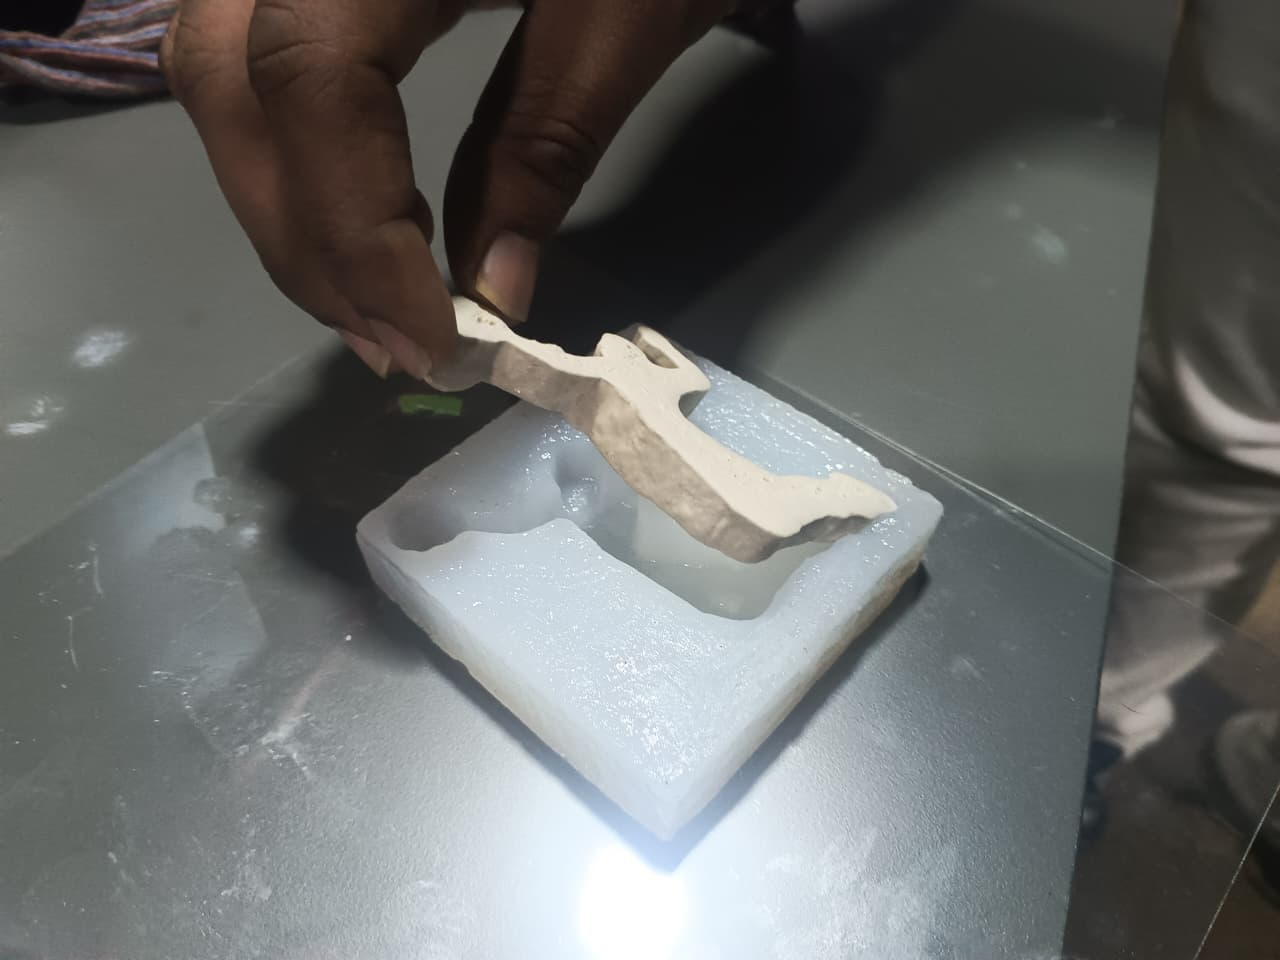
After curing, the silicone mold was carefully separated from the SLA resin master mold and inspected. The resulting mold successfully captured the geometry, fine features, and smooth surface finish of the original resin-printed design.
Plaster of Paris (POP) Casting
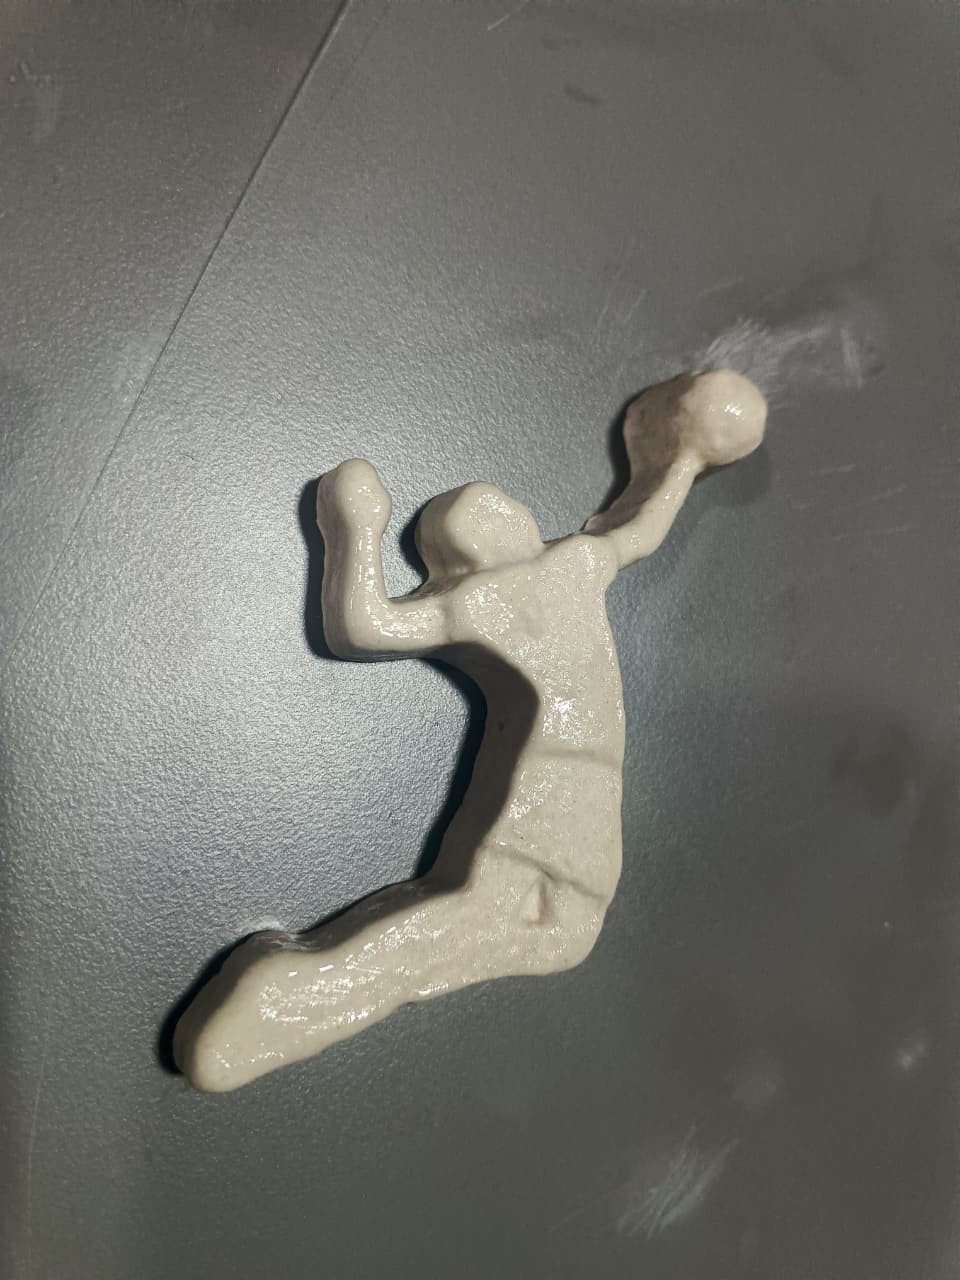
After successfully producing the silicone mold, I proceeded with the casting process using Plaster of Paris (POP) as the casting material.
Approximately three-fourths of a cup of POP powder was mixed with one-fourth cup of water. The mixture was stirred thoroughly until a smooth and uniform consistency was obtained.
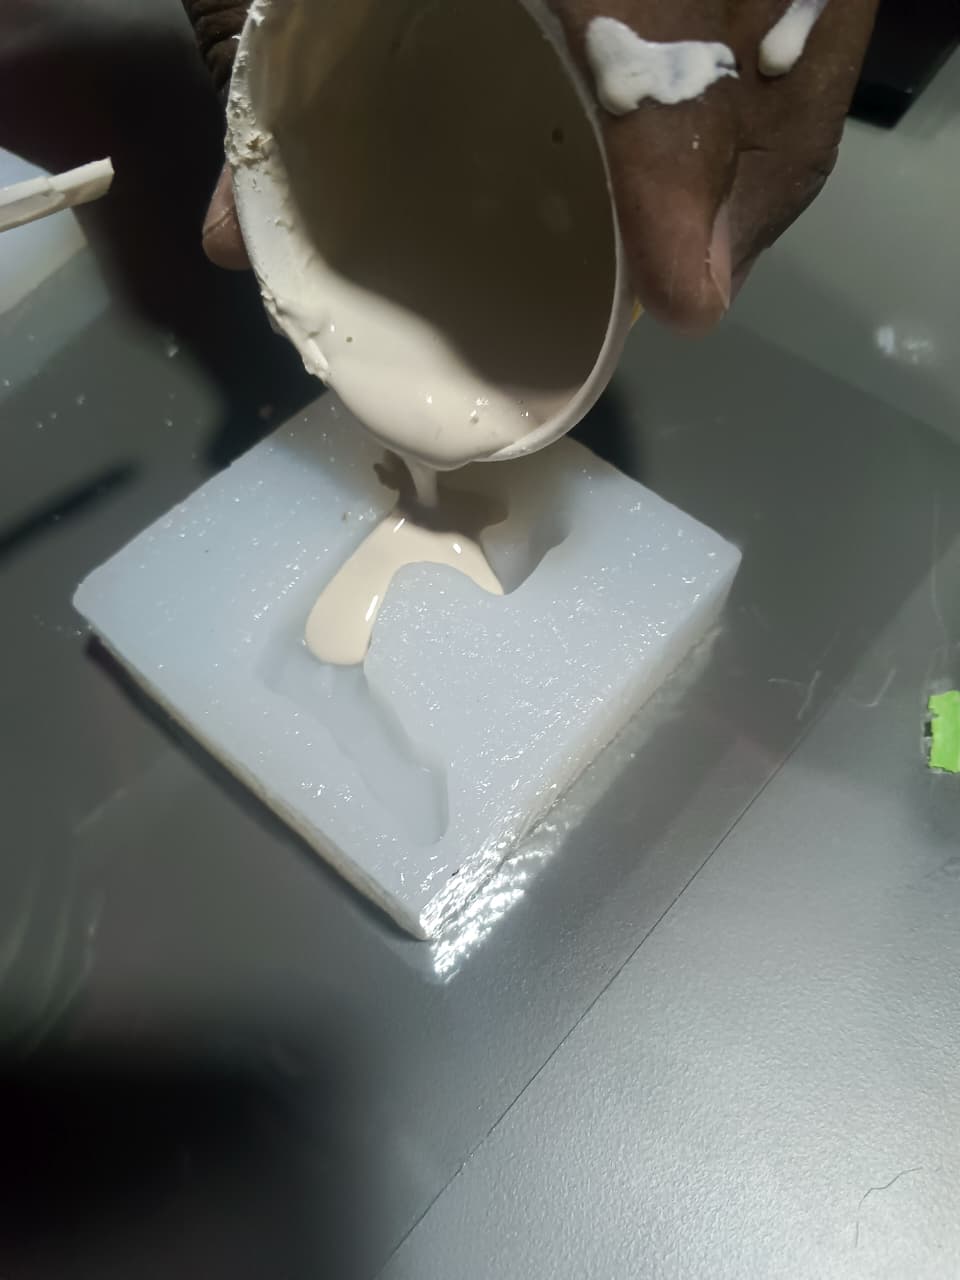
The prepared POP mixture was carefully poured into the silicone mold cavity and distributed evenly throughout the mold. The mold was then left undisturbed for approximately two hours to allow the material to cure and solidify completely.
After the curing process was completed, the casted component was carefully removed from the silicone mold. The flexibility of the silicone mold enabled easy demolding while preserving the details of the casted part.
Final outcome
I checked the final outcome cast part, it came good with correct dimension matches
A few minor surface imperfections were observed on the casted part. These imperfections were likely caused by small trapped air bubbles and slight variations during the molding and curing processes.
Conclusion
Learning outcomes
- Learnt about what are the types are available in Moulding and Casting
- Know more about pro and cons of them individually
- For the design rules of moulding how much draft angle we will give it
- Gained knowledge on utilizing FDM and SLA 3D printing techniques for parent material fabrication and production
- Understood the method of estimating silicone volume using water displacement for precise mold preparation
- Gained hands-on experience in using silicone mold calculators to determine accurate base-to-catalyst ratios
Reference Files
Here is my 3D design and Mould calculator