Week 5
3D Scanning and Printing
Week Outline
- Wednesday: Global Class on 3D Scanning and Printing.
- Thursday: Local Classes on 3D Printing Theory, and FDM and DLP Practice.
- Friday: Local Classes on 3D Scanning Theory and Practice and 3D Printing Biomaterials Practice. I 3D modelled my Rubik's cube to 3D print.
- Sunday: I caught up with my documentation and sliced my Rubik's cube for printing.
- Tuesday: I designed my simple vase and vase assembly on Rhino.
- Friday: I 3D printed my Rubik's cube and re-designed it for re-printing.
- Wednesday: I sliced my modified Rubik's cube for re-printing and caught up with my documentation.
- Thursday: I re-printed my Rubik's cube.
Global Class
For this week, Neil started the class with a comparison between subtractive and additive processes. He discussed the benefits and constraints of 3D printing. He also talked about the different materials that can be used, some of their properties, and what some of them are best for. He then elaborated on some design rules, and why they are taken into consideration when printing. He also discussed multiple processes within the 3D printing scope. Afterwards he showed different machines that have been developed for multiple projects and with different ideas in mind. Then, Neil went into detail about the different formats for files used to 3D print. He shared some softwares to look at the in-between of CAD and the printer's software. He finished by discussing 3D scanning techniques and machines.
Local Classes
3D Printing Theory
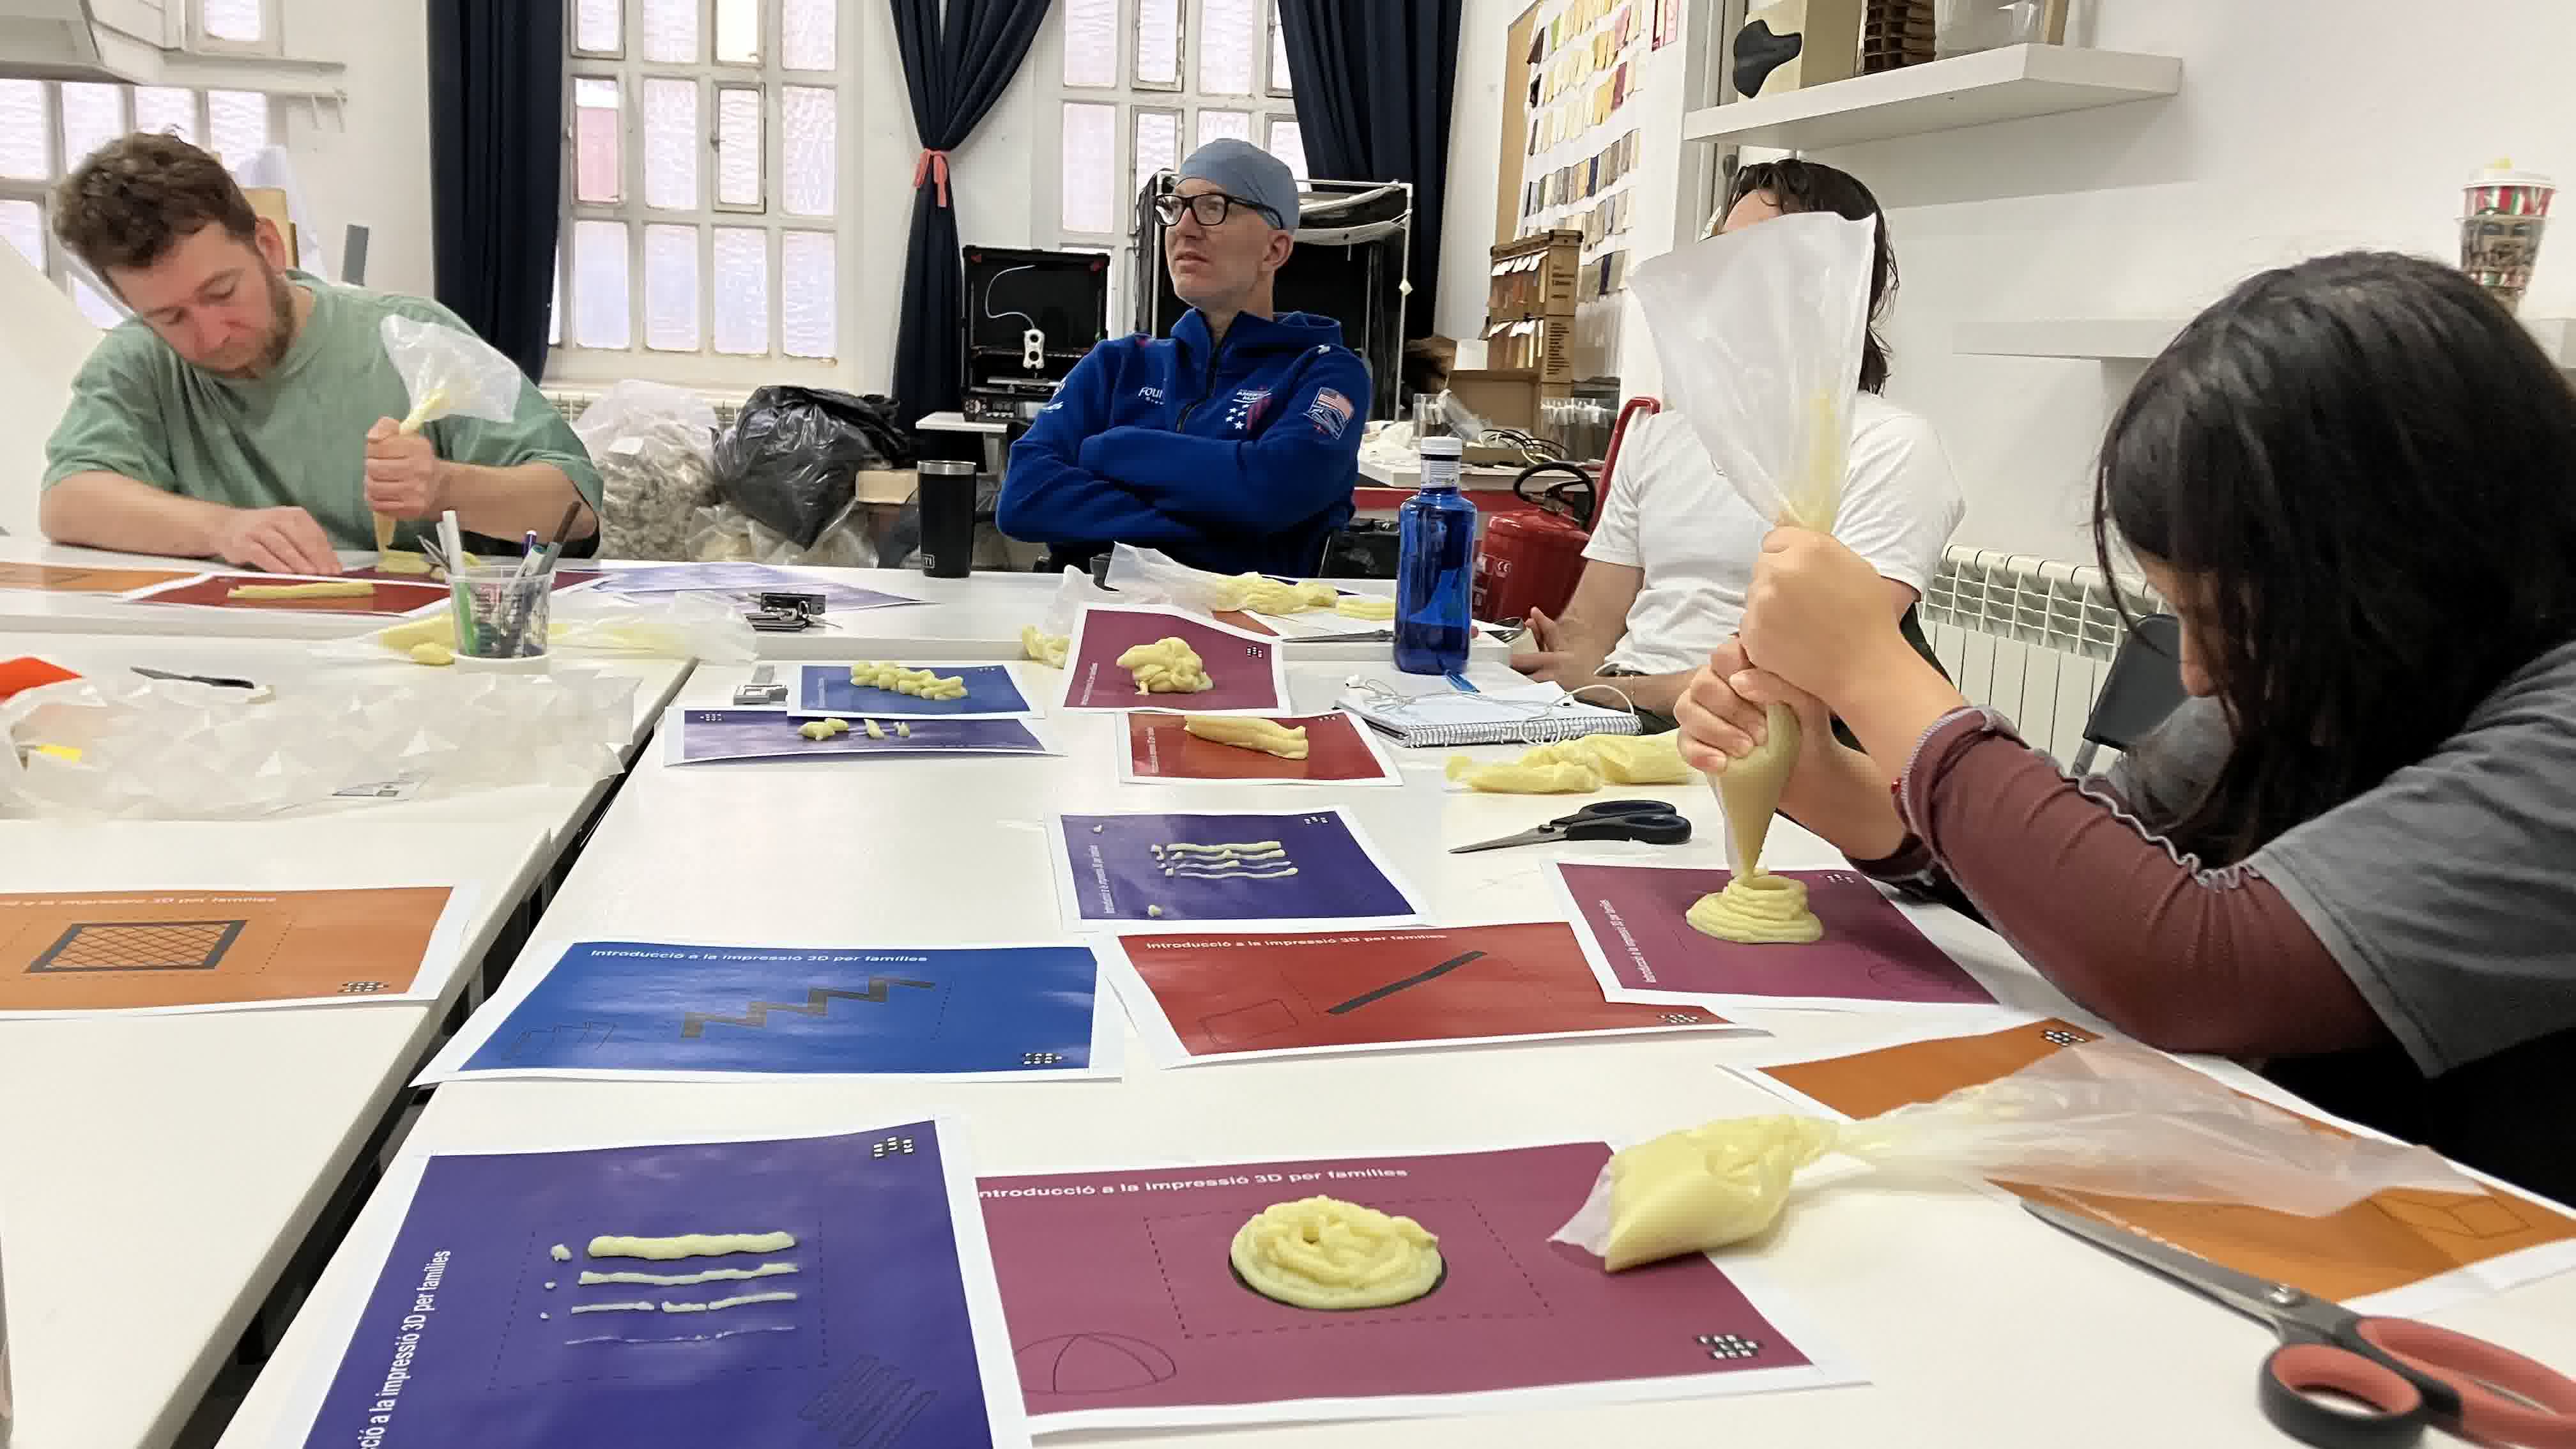
Julia started our class with an activity that had us trying to "print" different structures with mashed potato. This helped us get a better grasp of how machines and materials work when printing.
Then we dove straight into the theory. She started by giving us a little bit of background on the history of 3D printing. Afterwards, she did a comparison between additive and subtractive materials. She then introduced the different 3D printing technologies and discussed some of the most common ones. Then, she introduced us to the printing workflow. She talked about layer height, shell, infill, piece orientation, load directionality, and supports. She also gave us some tips and parameter recommendations. She discussed different materials and went more in depth into the materials commonly used in our lab. She discussed file formats and focused on STL and OBJ. She finished the class by showing us multiple examples of 3D prints with different machines, materials, and techniques.
3D Printing Practice
FDM
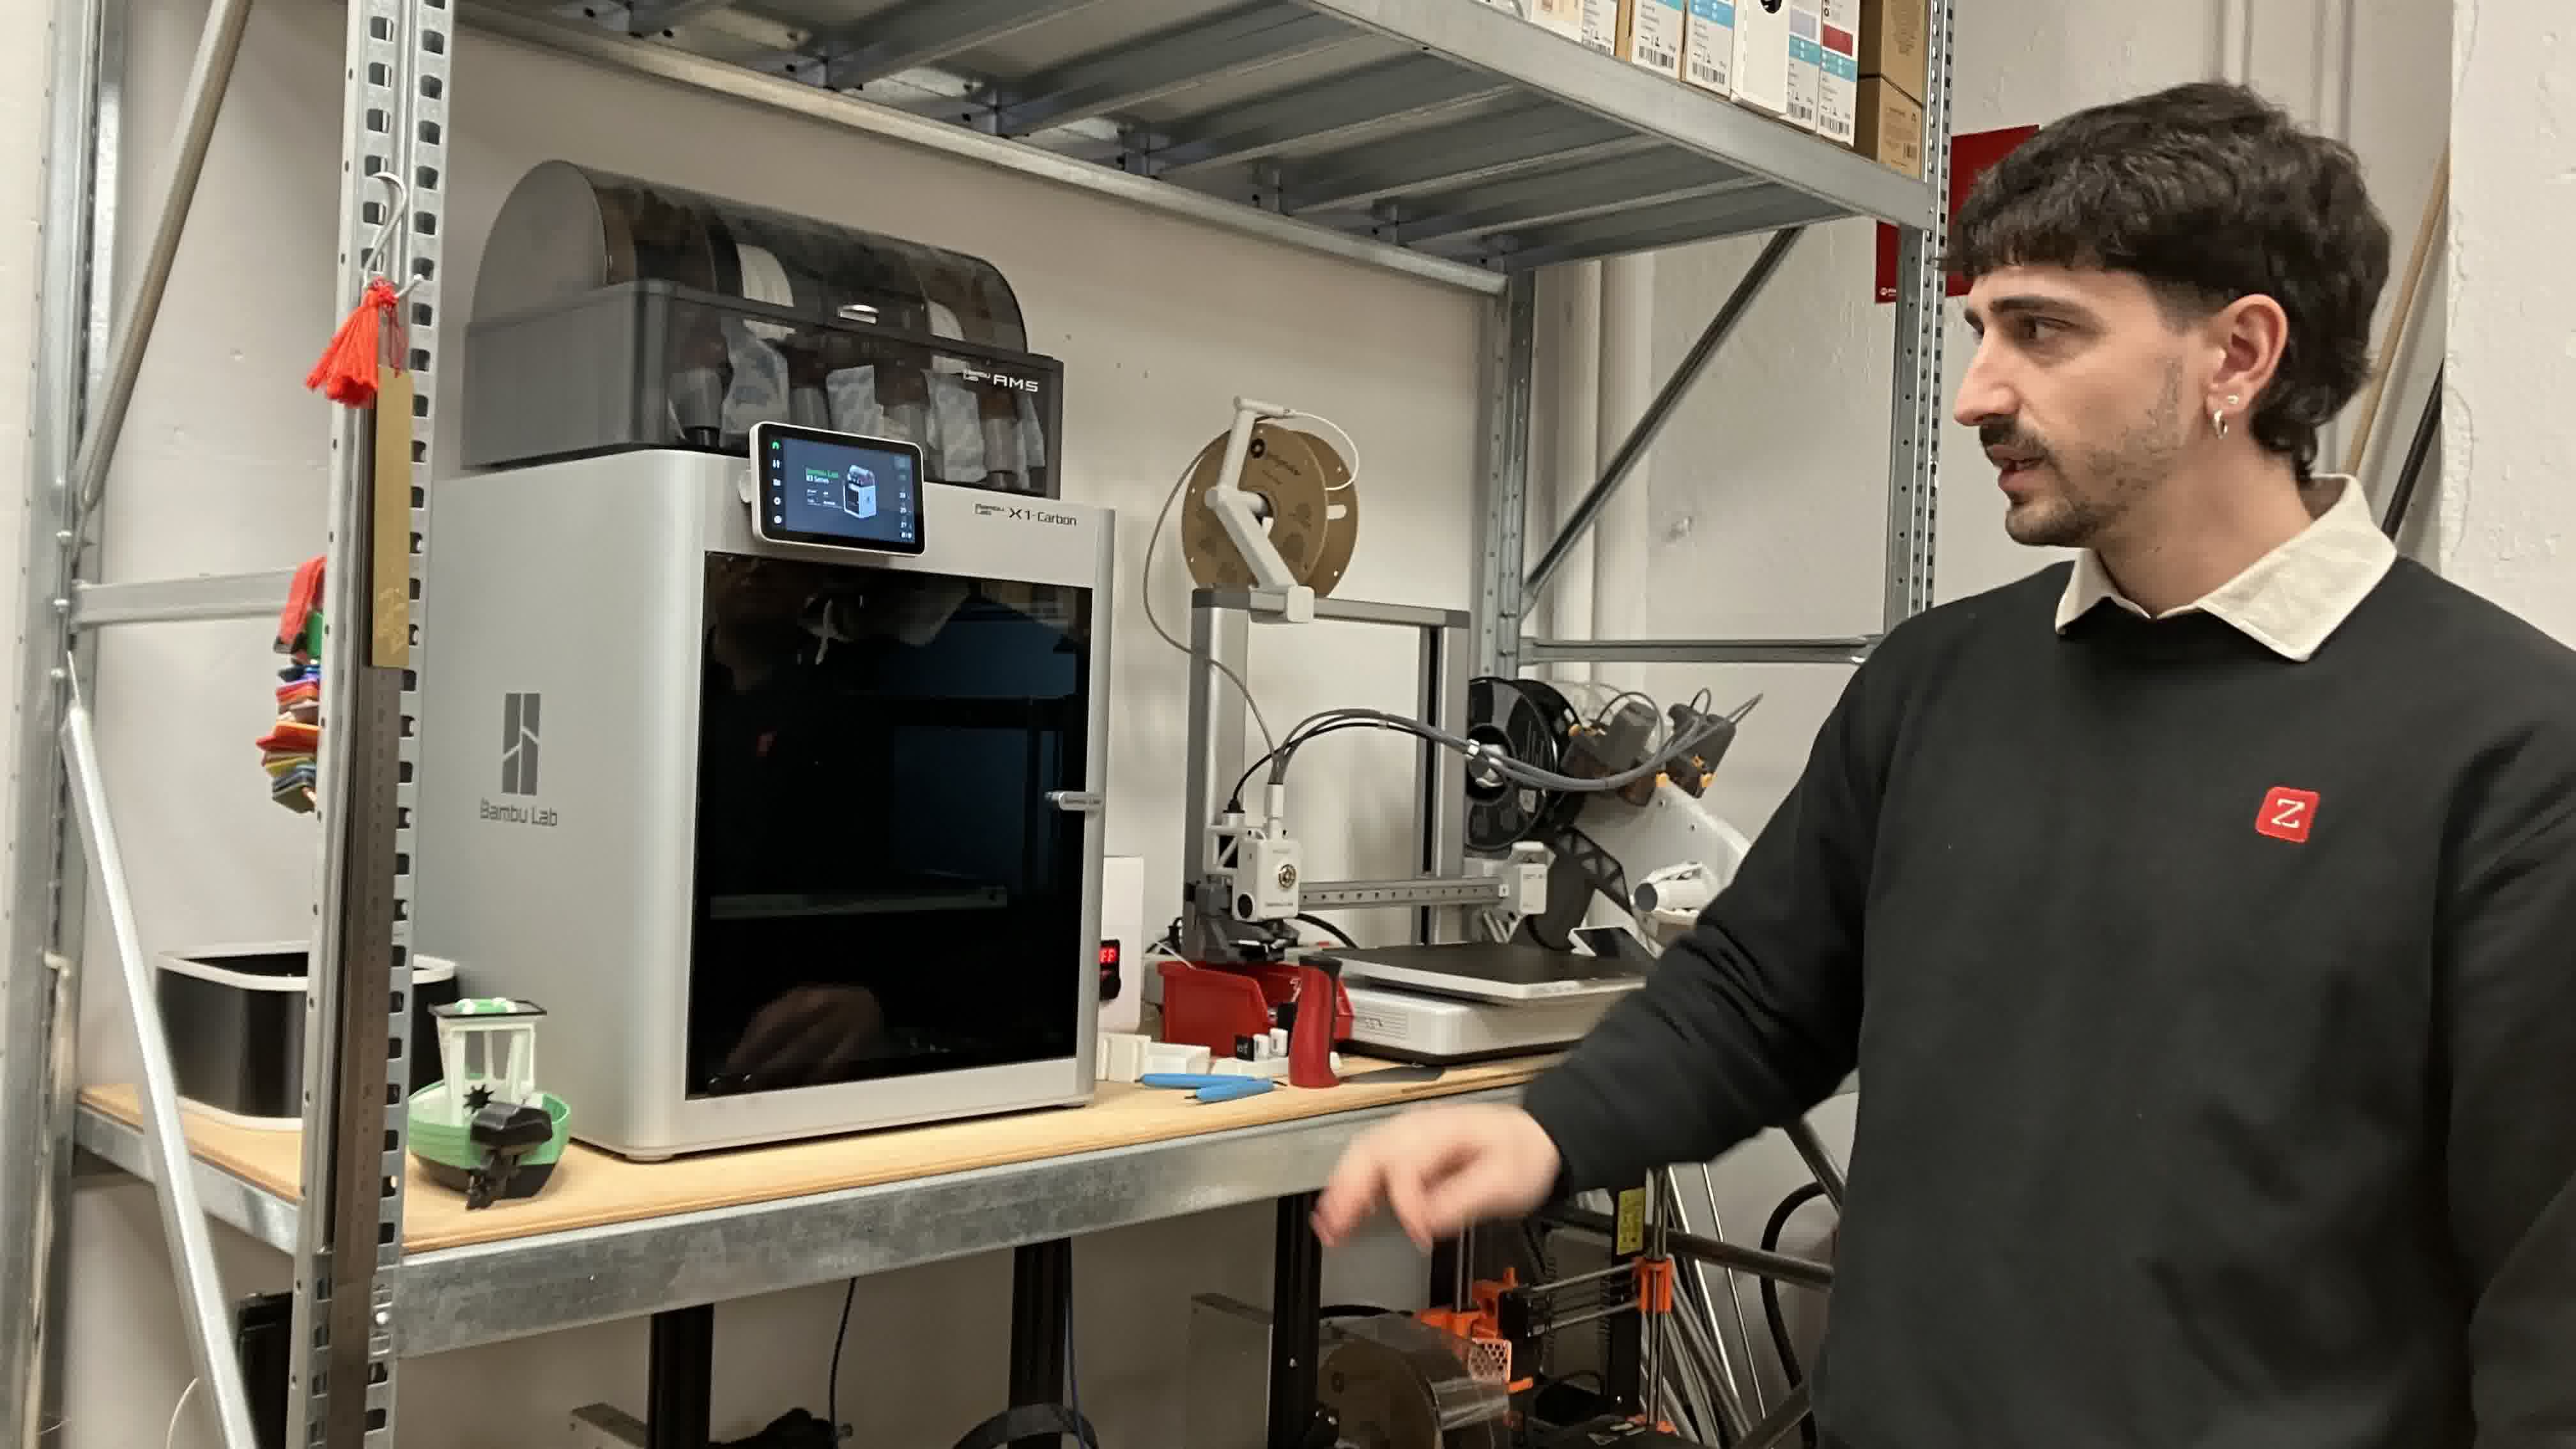
To print a piece using FDM technology (fillament extrusion), Didac ran us through the workflow of:
- Exporting a file to print (from Fusion and Rhino), or downloading a file to print (from Thingiverse).
- Setting up the printer and material parameters on Bambu Studio.
- Importing the file.
- Arranging the layout of the piece(s).
- Setting up the process parameters.
- Quality
- Strength
- Support
- Slicing the plate and check properties.
- Exporting the plate sliced file into an SD card.
- Inserting the SD card into BambuLab X-1 Carbon printer.
- Selecting the file on the printer screen.
- Selecting the printing parameters.
- Printing the file.
DLP
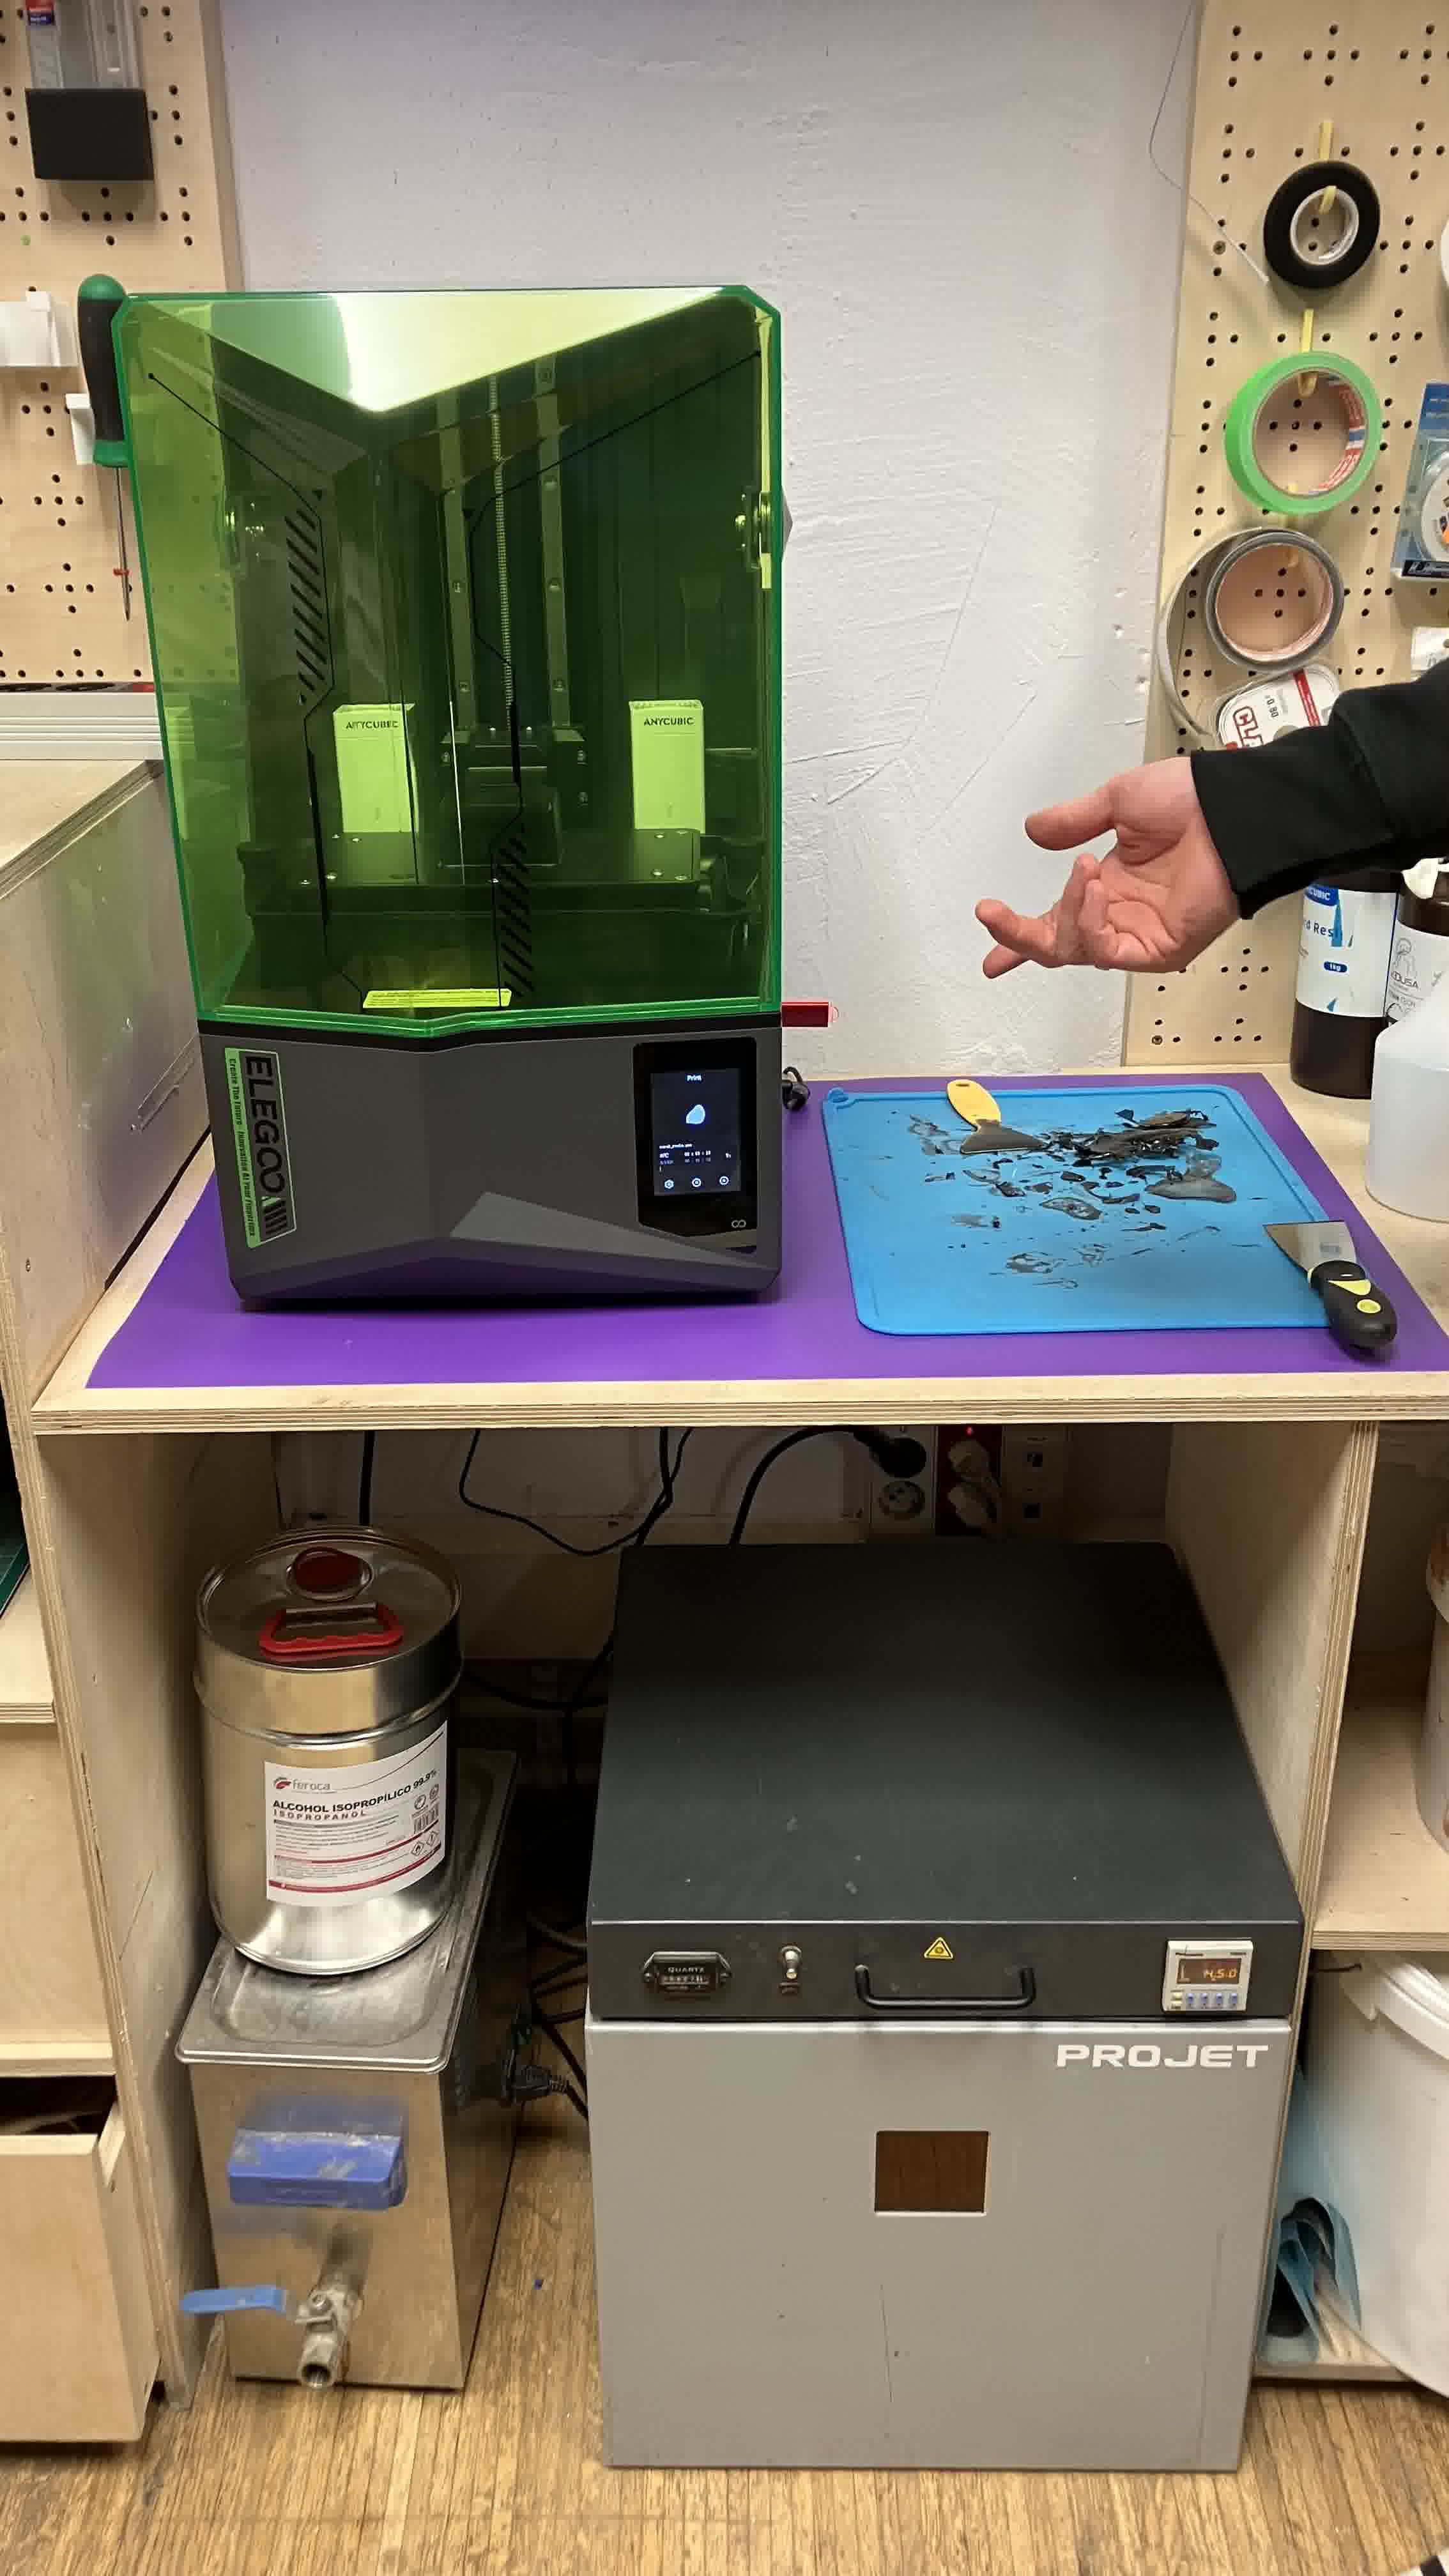
To print a piece using DLP technology (resin light projection), Didac ran us through the workflow of:
- Downloading a file to print.
- Selecting resin printing on Lychee Slicer.
- Selecting printer and resin parameters.
- Importing the file.
- Arranging the layout of the piece(s).
- Preparing piece(s) by creating supports and a raft.
- Exporting slices to file into a USB stick.
- Inserting the usb stick into the eleego printer.
- Using a brush to check the tank for dry pieces and to mix the resin.
- Using a piece of paper to check the platform for dry pieces.
- Selecting the file to print on the printer screen.
- The machine callibrates itself and then prints.
- Removing the piece after the machine is done printing.
- Cleaning the piece with isopropilic alcohol.
- Letting the piece dry.
- Curing the piece with UV lights.
Biomaterials
To print a piece using extrusion technology, but with biomaterials instead of filament, Josep showed us how to use the two printers that our lab has modified for the purpose. He started by showing us the modified pieces that were added to the printers and explaining to us how they work. He showed us how to use the Repetier Software to modify our prints live. Then, he showed us how to use the Mamba and Grasshopper Plug-ins on Rhino to create our files. He finished the class by printing the piece pictured below using mashed potatoes.
3D Scanning Theory
Josep started by giving us examples of what can be done with 3D scanning, and then going into an in depth explanation of what it is. He gave us a brief history of it and dove into basic topics. Then, he introduced us to different scanning technologies and softwares and went in depth into how they work, their strengths and weaknesses, and how and when to use them.
3D Scanning Practice
Josep showed us how to use the Revo Scan scanner and software. Then, Julia showed us how to use the Kinect scanner and software. We tried out both scanners by scanning volunteers.
Assignments
1. Test the design rules for your 3D printer(s) as a group.
The documentation of the work we did can be found here.
2. Design and 3D print an object that could not be made subtractively.
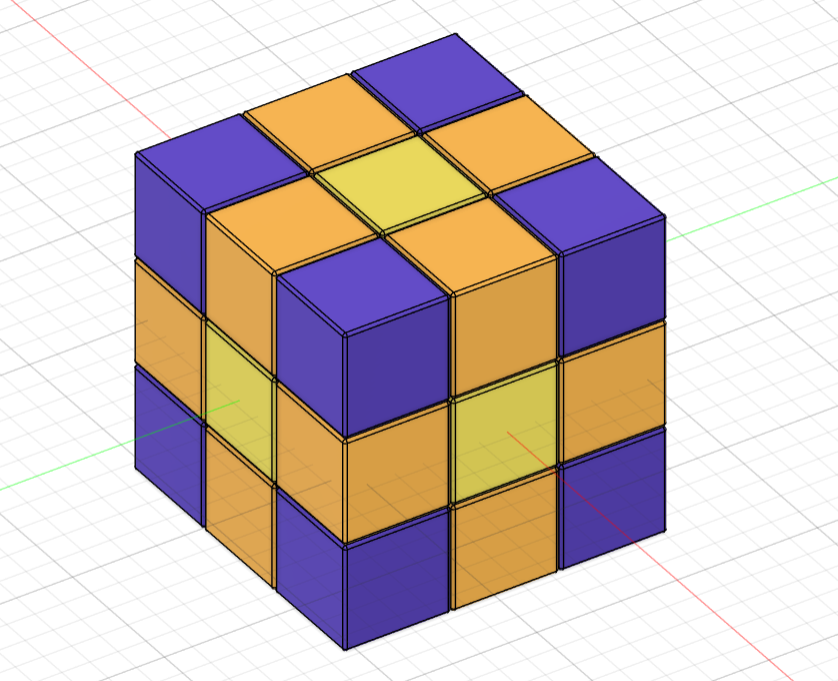
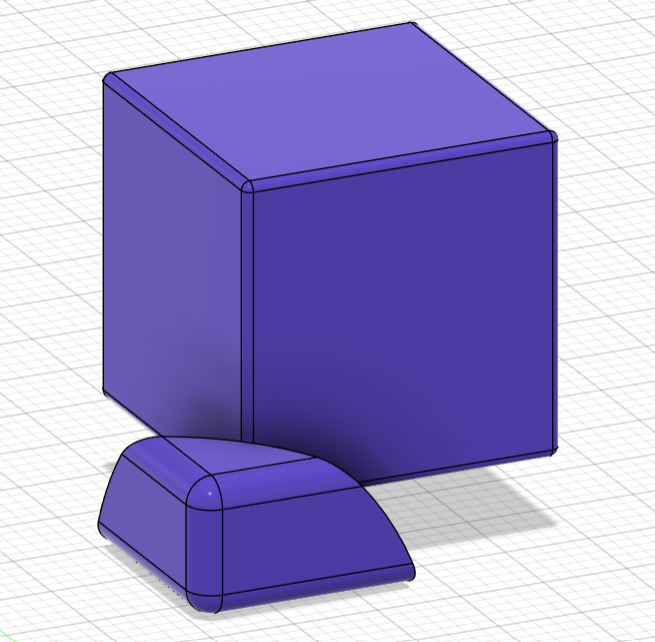
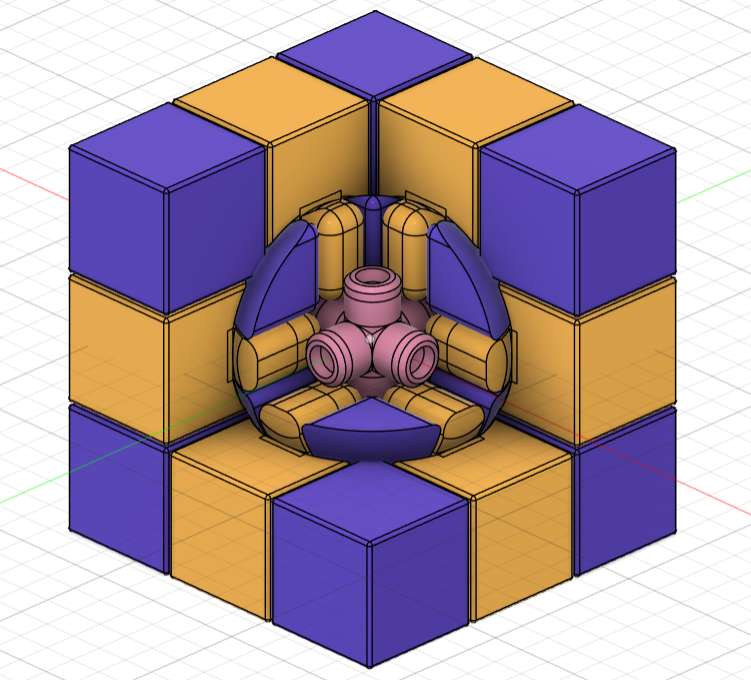
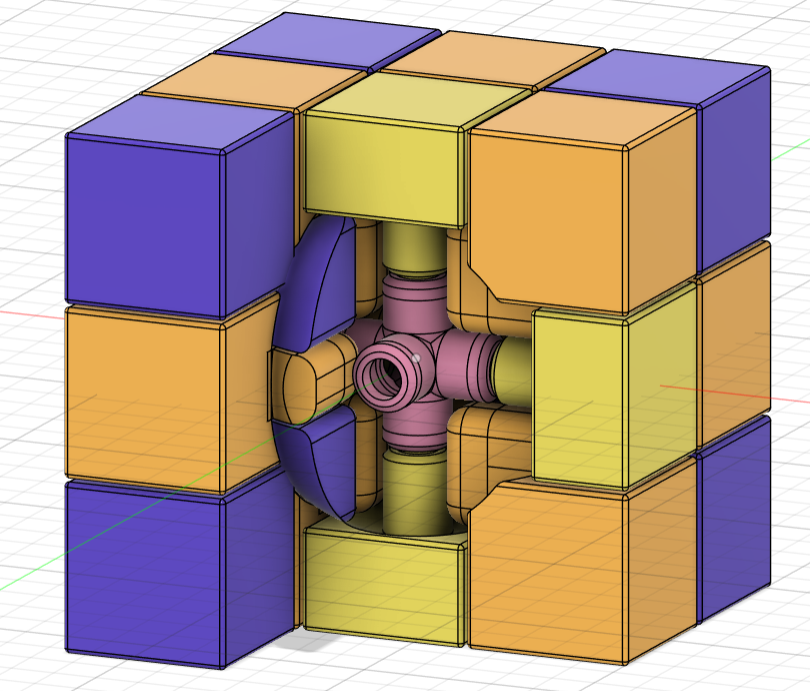
Rubik's Cube
I had been wanting to do a Rubik's Cube since week 3, and this was finally my chance! The only point were I was indecisive was whether to print the cube in place or to print all the pieces separately and then assemble it. I didn't want to risk ruining the whole piece if my clearances weren't good enough, but in the end I decided it would add another level of difficulty to the assignment and I went for it.
3D Modelling in Fusion
I used this design and this design as initial references. I also found this Harvard student who took Neil's "How to Make (Almost) Anything" course and also did a Rubik's Cube for the 3D printing week. Ultimately, I ended up doing my design from scratch and using the original cube dimensions from this paper. The design process went as follows:
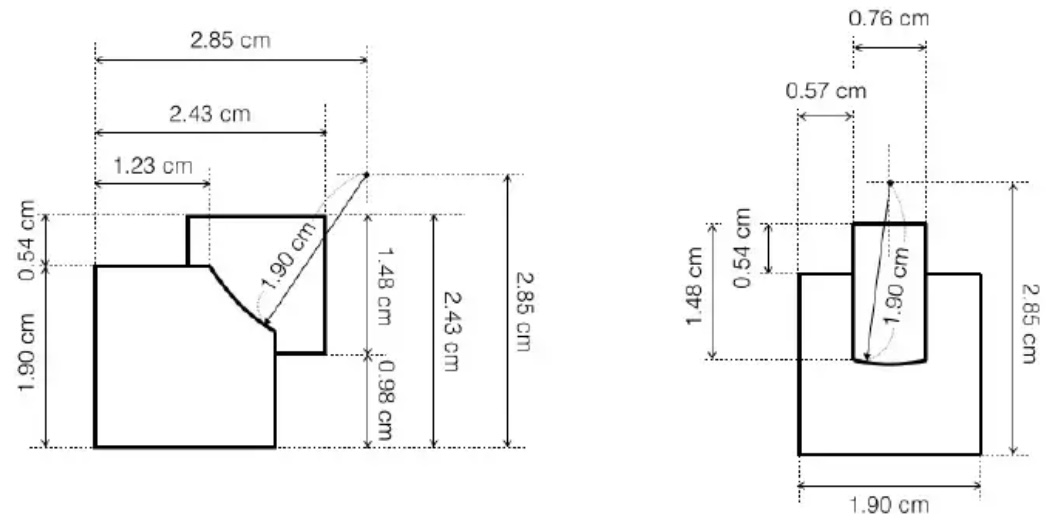
- Using these dimensions:
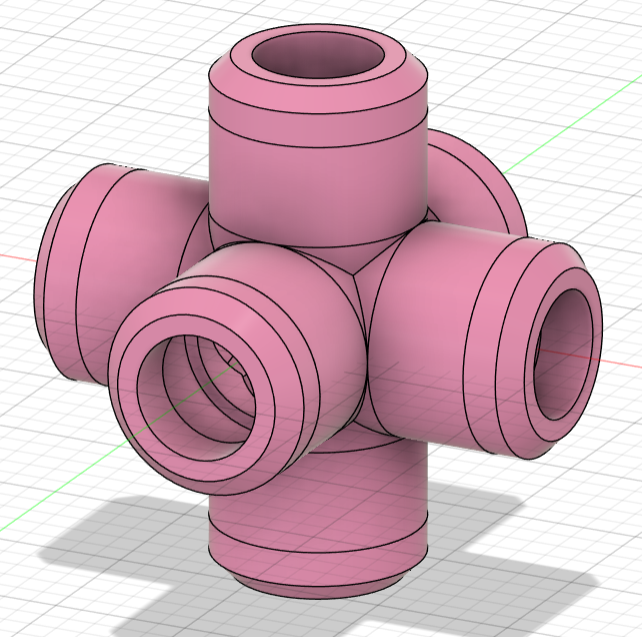
created 3 cylinders and aligned them so that they would match the referenced figure.
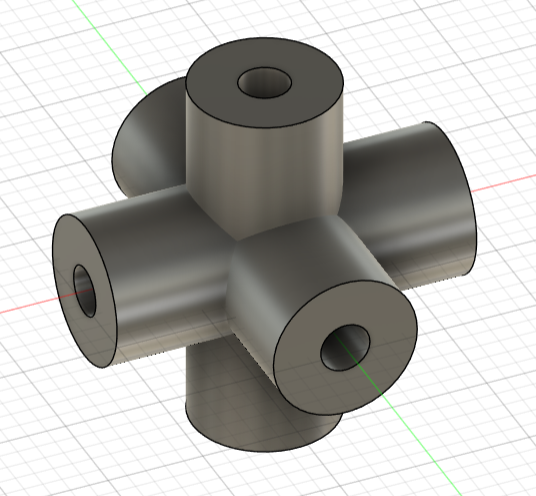
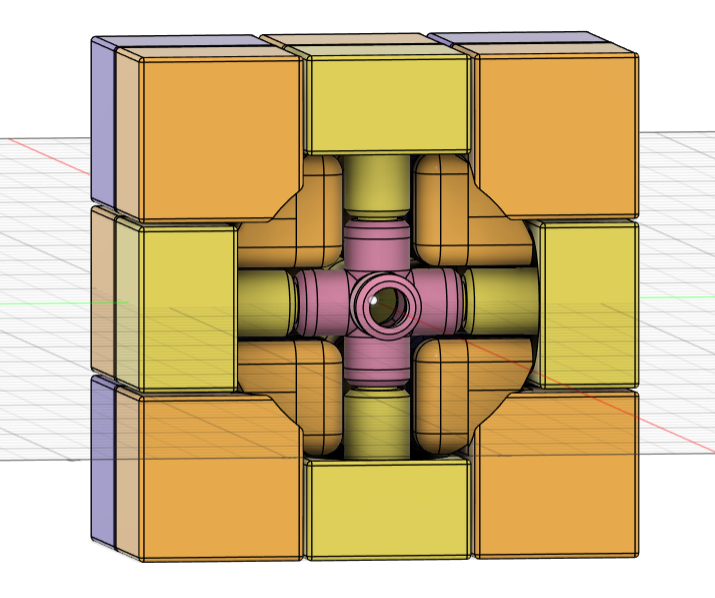
- Created a 38mm diameter sphere around the core of the cube.
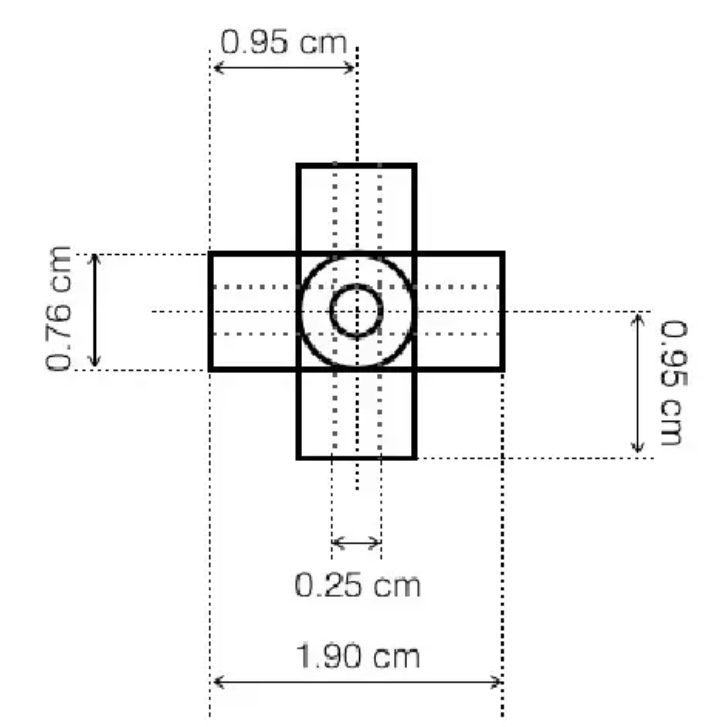
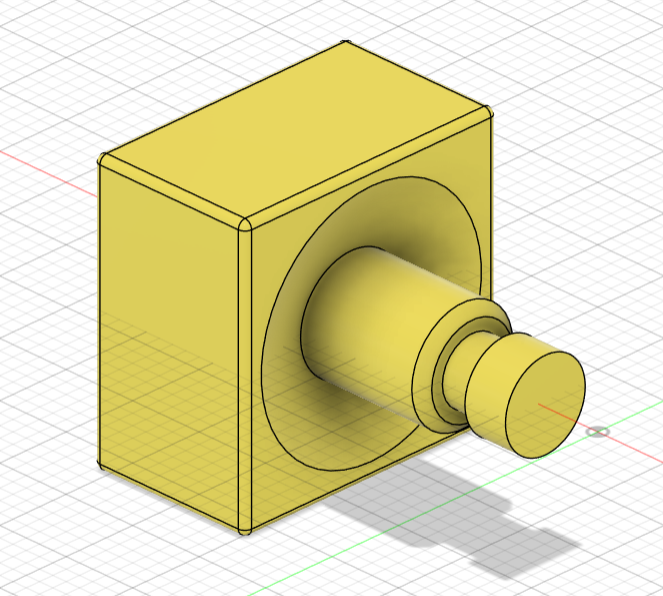
- Using these dimensions:
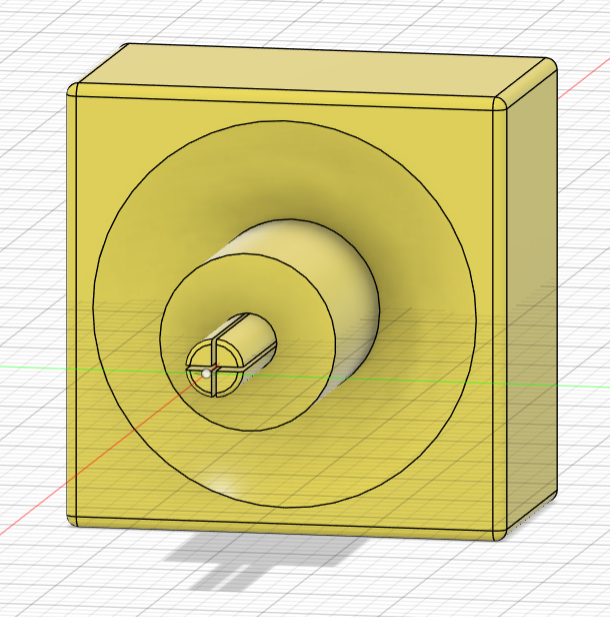
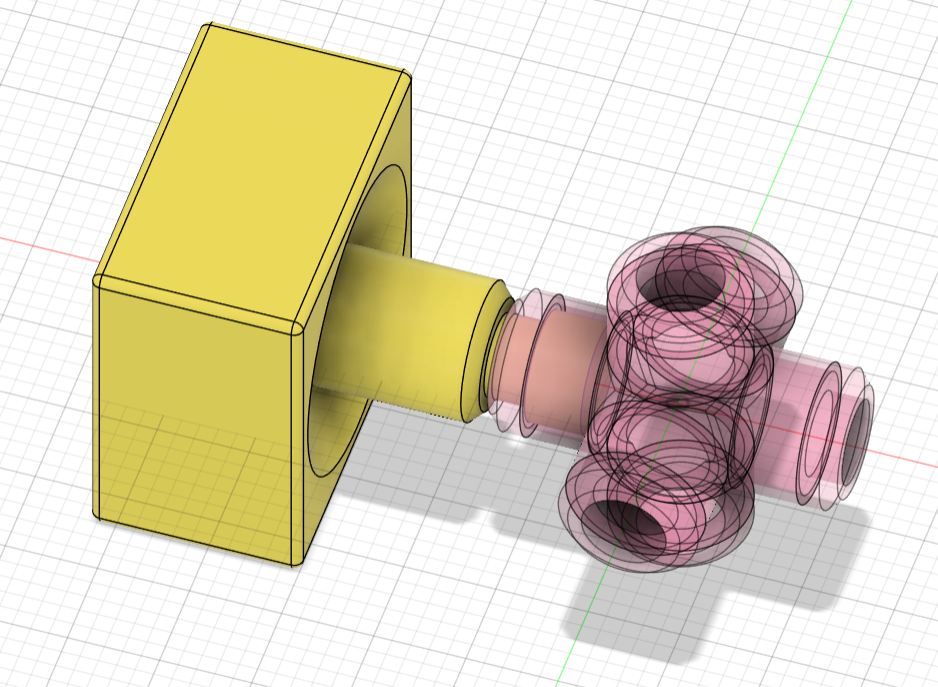
created a sketch with a square for the block piece, a circle for the stem, and another circle divided in 4 areas por the pin going into the core. Then extruded all the sketch parts as separate bodies to make the piece and created a boundary fill between the square and the core sphere to give it the concave shape.
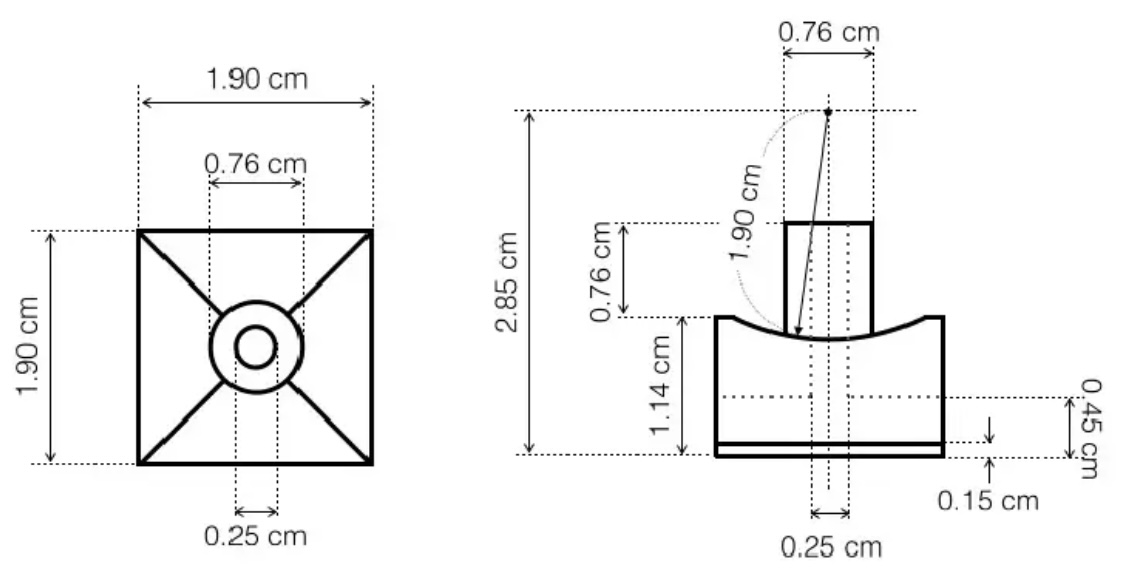
- Using these dimensions:
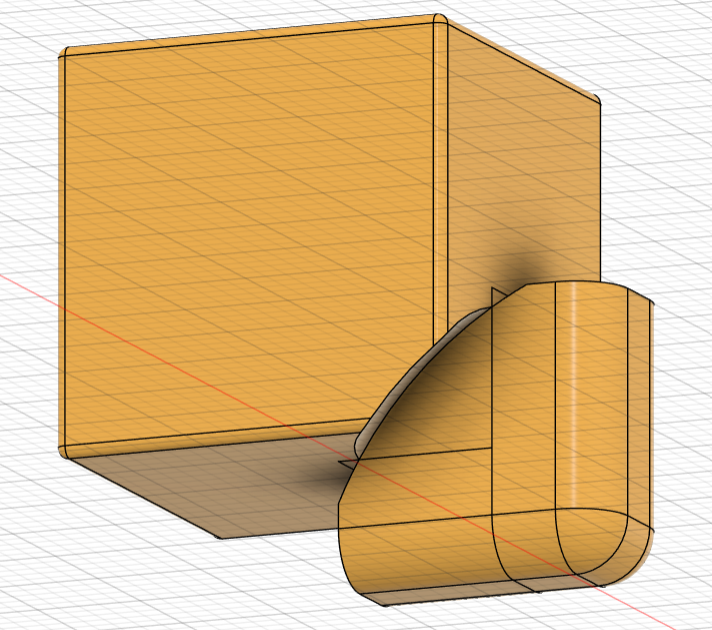
created a sketch with two squares. Then extruded both squares as separate bodies to make the piece and created a boundary fill between each square and the core sphere to give them the concave shape and remove extra material.
- Using these dimensions:
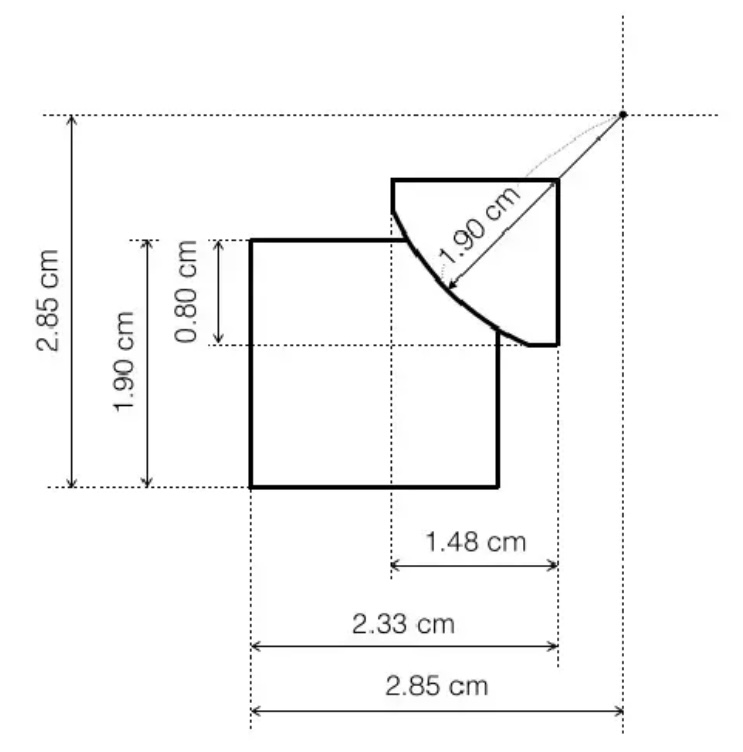
created a sketch with two squares. Then extruded both squares as separate bodies to make the piece and created a boundary fill between the small square and the core sphere to give it the concave shape and remove extra material.
- Created an array of all the components with the respective amount of pieces I needed for each (6 center pieces, 12 edge pieces, 8 corner pieces).
- Aligned all components with joints that separated every piece by 0.25mm to give enough clearance between the objects for printing.
- Removed the core sphere object so it wouldn't accidentally get printed as part of the assembly.
- Exported the file.
The file for the 3D model can be found here.
Slicing in Bambu Studio
Since I was printing on a Bambu A1 printer, I used the Bambu Studio software to slice my cube for printing:
- Selected the Bambu Lab A1 0.4 Nozzle printer.
- Selected Generic PLA filament, as I knew that is what I was going to use for printing.
- Selected 0.12mm Fine @ BBL A1 system preset.
- Imported the file with my Rubik's Cube.
- Changed the bottom surface pattern to monotonic line.
- Changed the sparse infill density to 10%.
- Left all other pre-set values.
- Sliced the plate and made sure everything looked ok.
- Exported the plate sliced file into a micro SD card.
The file for the sliced up plate can be found here.
3D Printing in Bambu A1 with PLA
- Inserted the micro SD card into the printer.
- Selected the file to print.
- Loaded up the filament.
- Put hairspray on the base plate and made sure it was set up properly.
- Printed.
- Waited 4.5hrs.
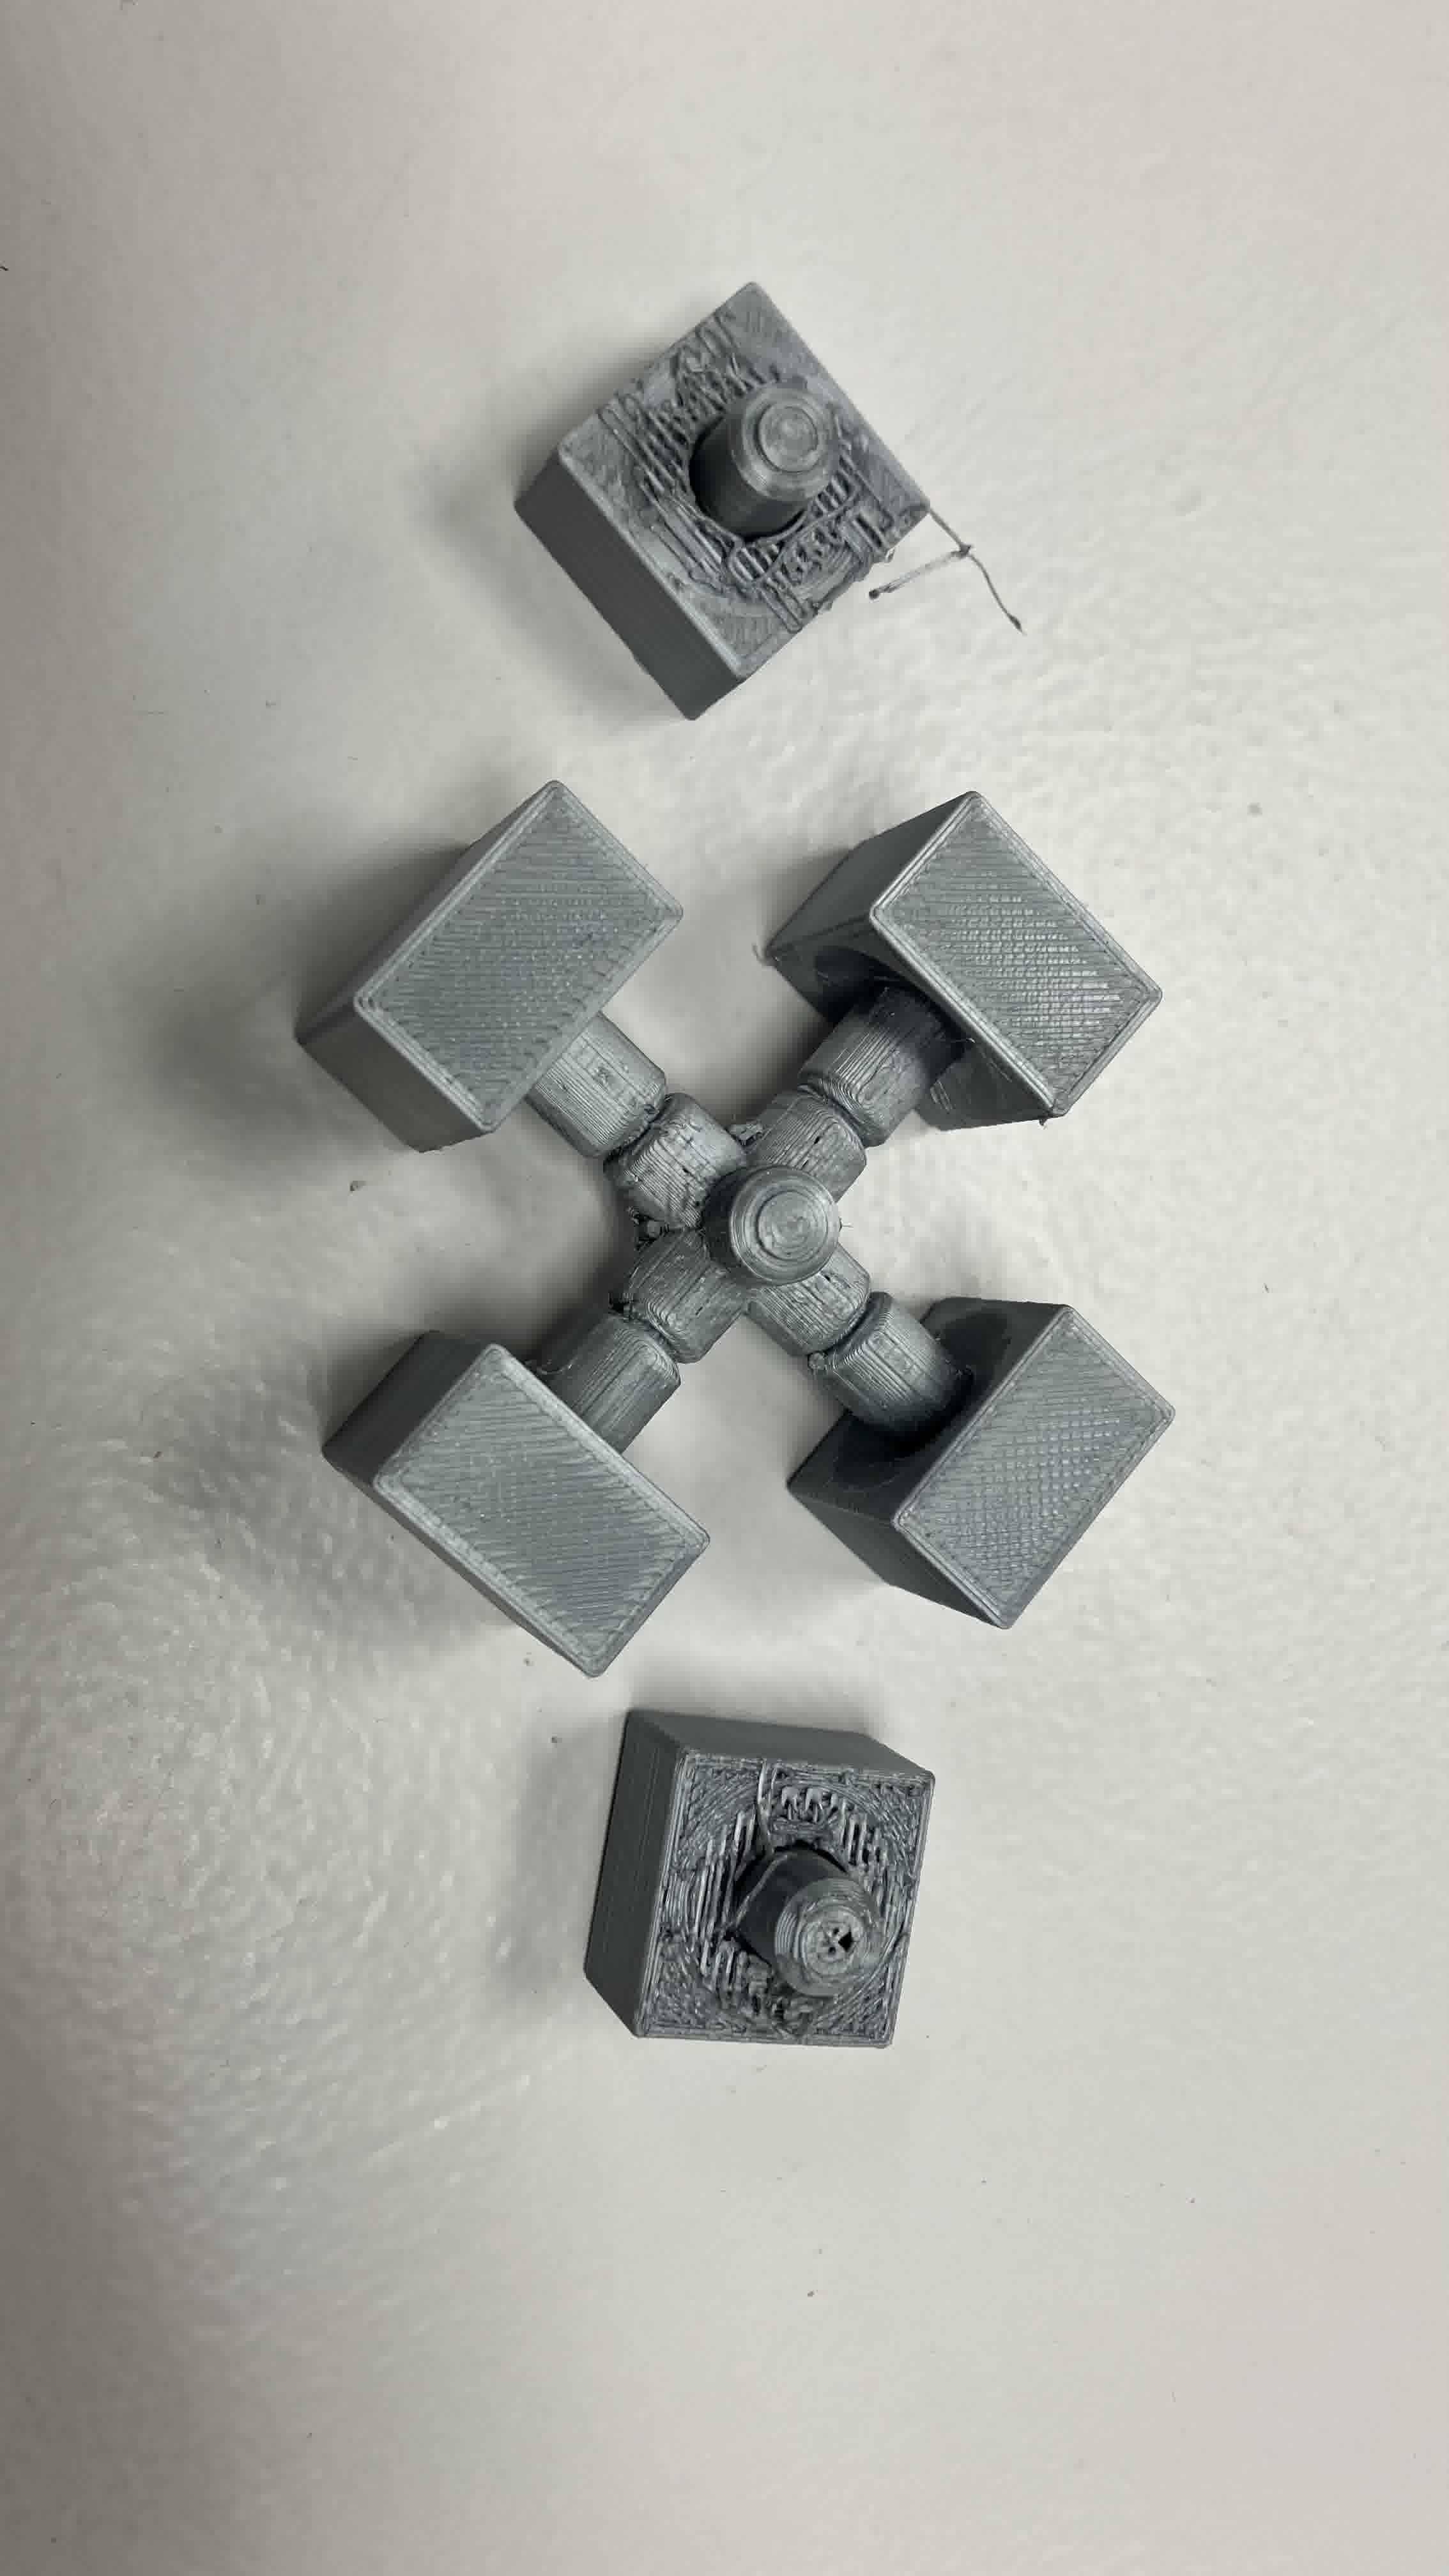
And it worked! At first. Kind of. Sort of. Let's back up:
Something happened during printing. A gust of wind. A small earthquake contained just within the printer. A glitch in the matrix. Who knows. But the print shifted at one point. One tiny horizontal millimeter. Despite it all, this was not the main issue. So what was?
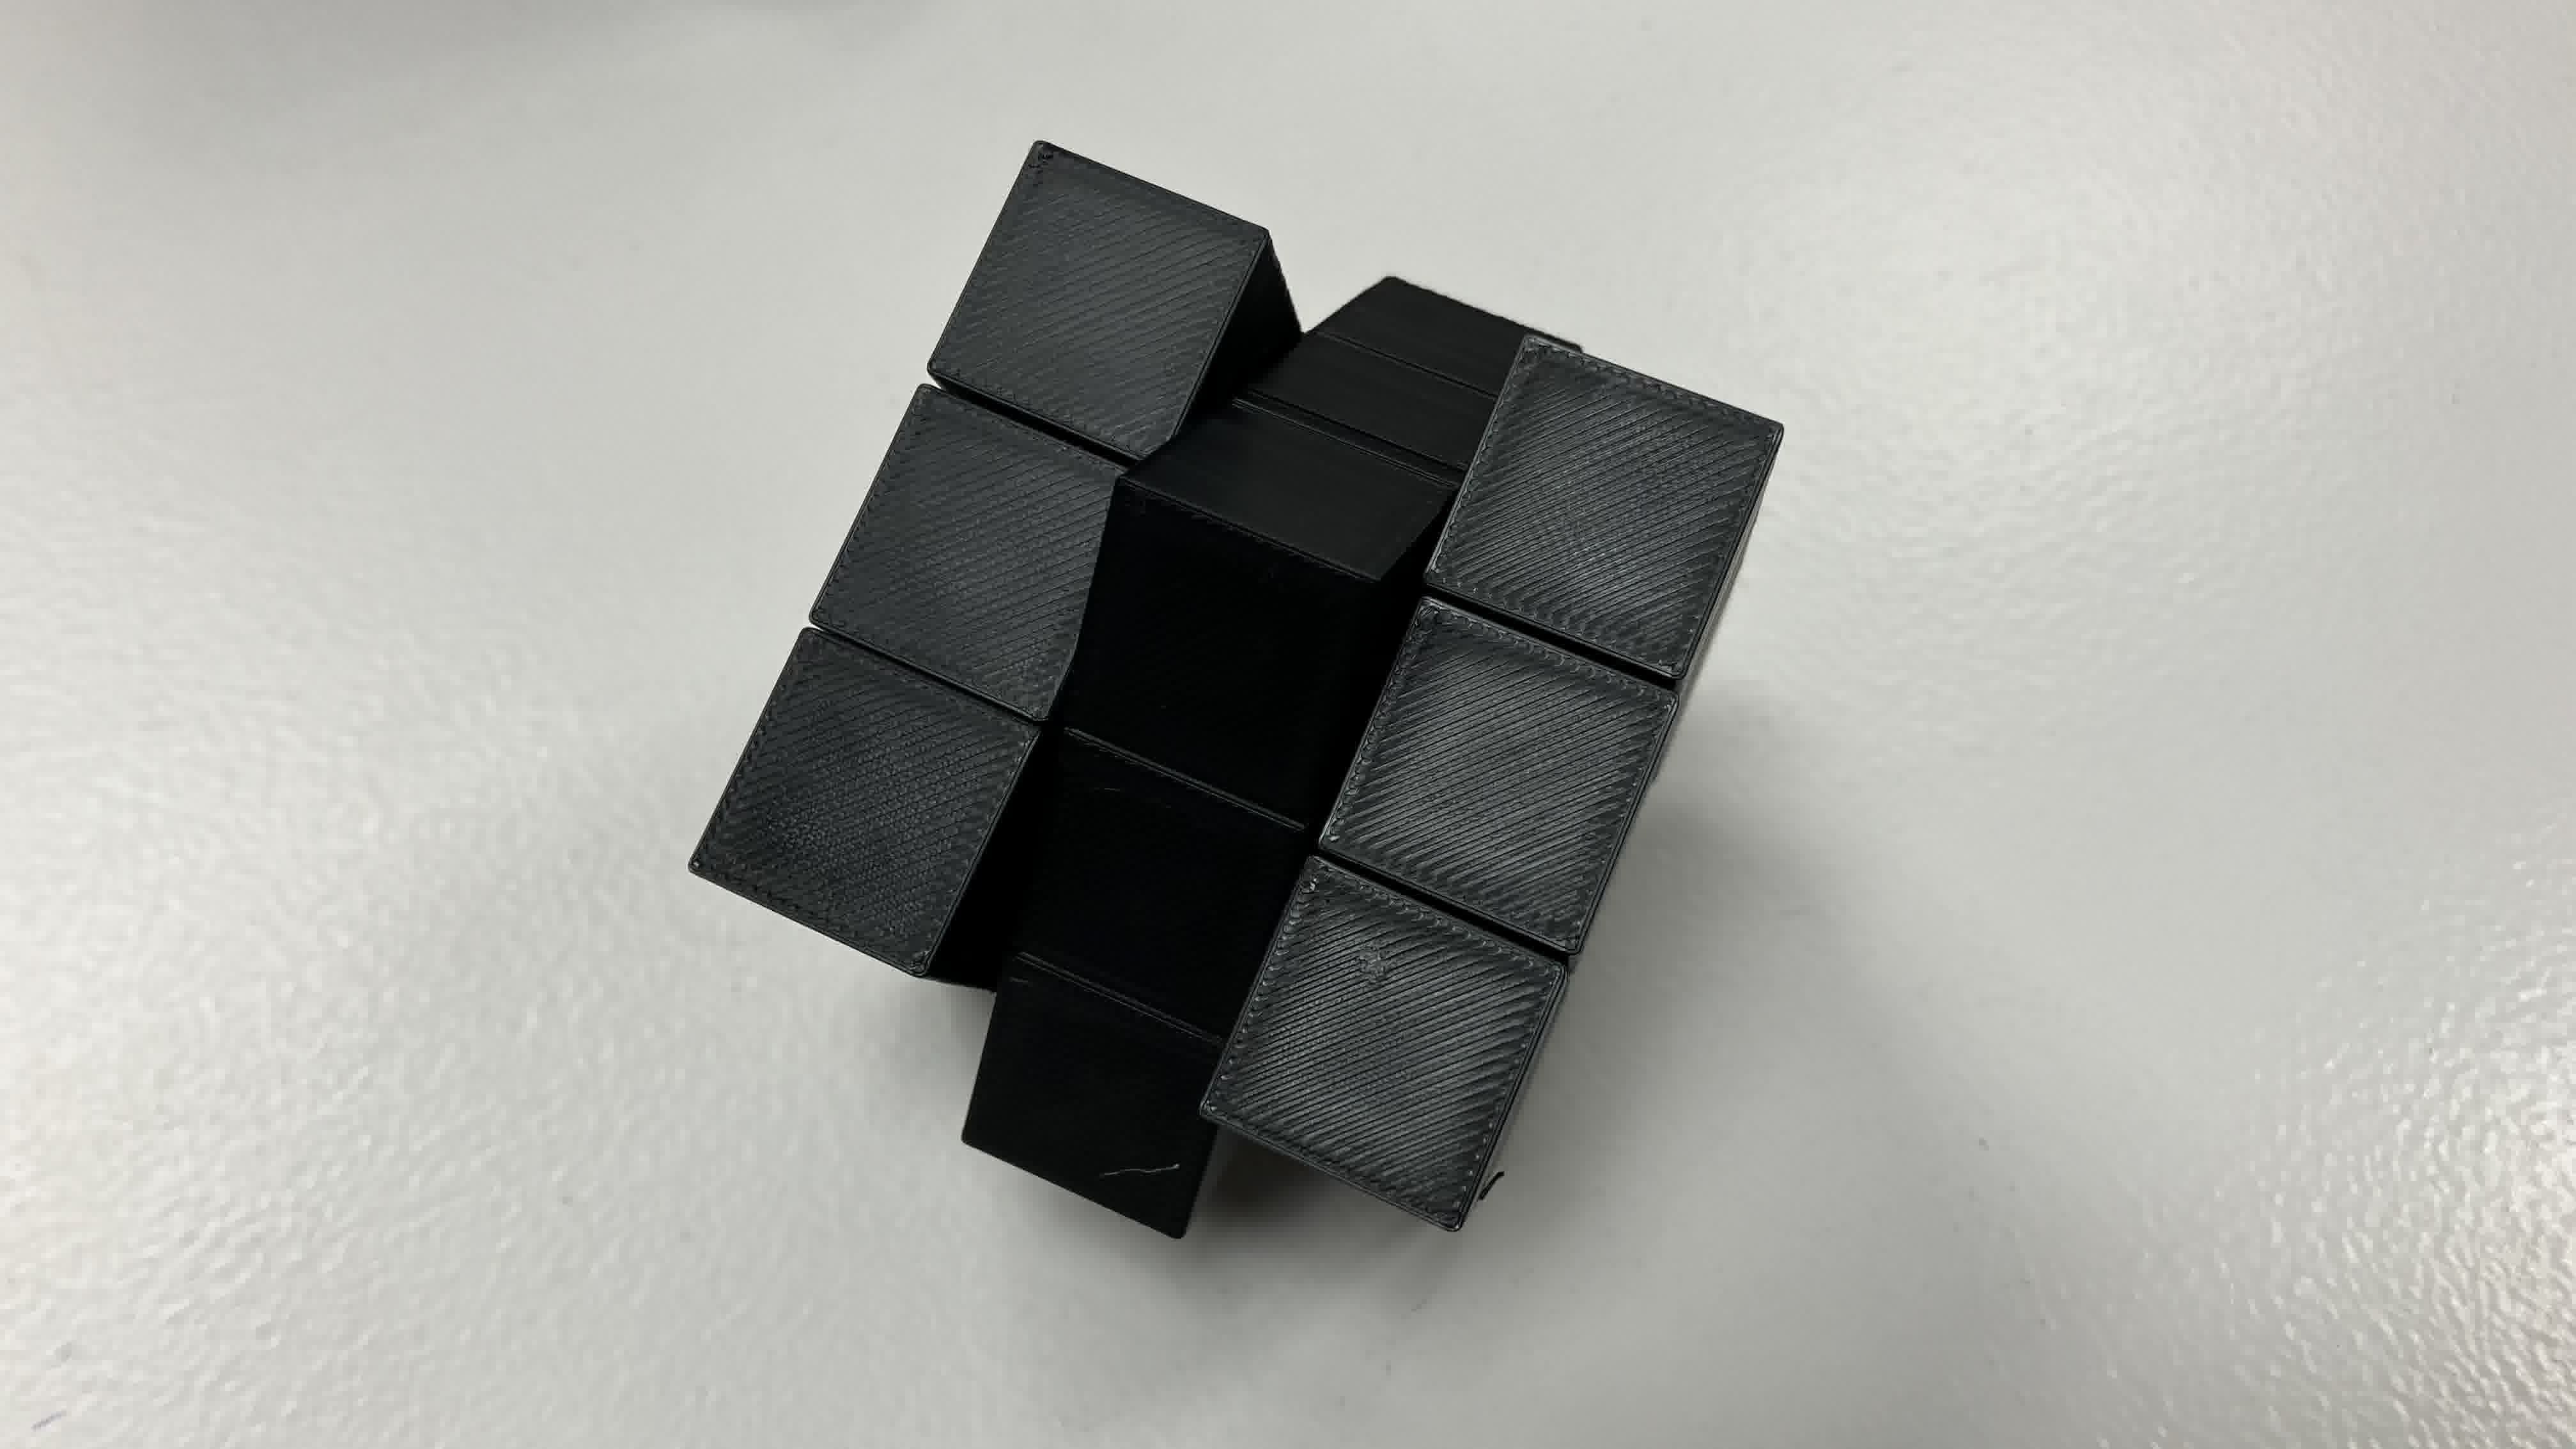
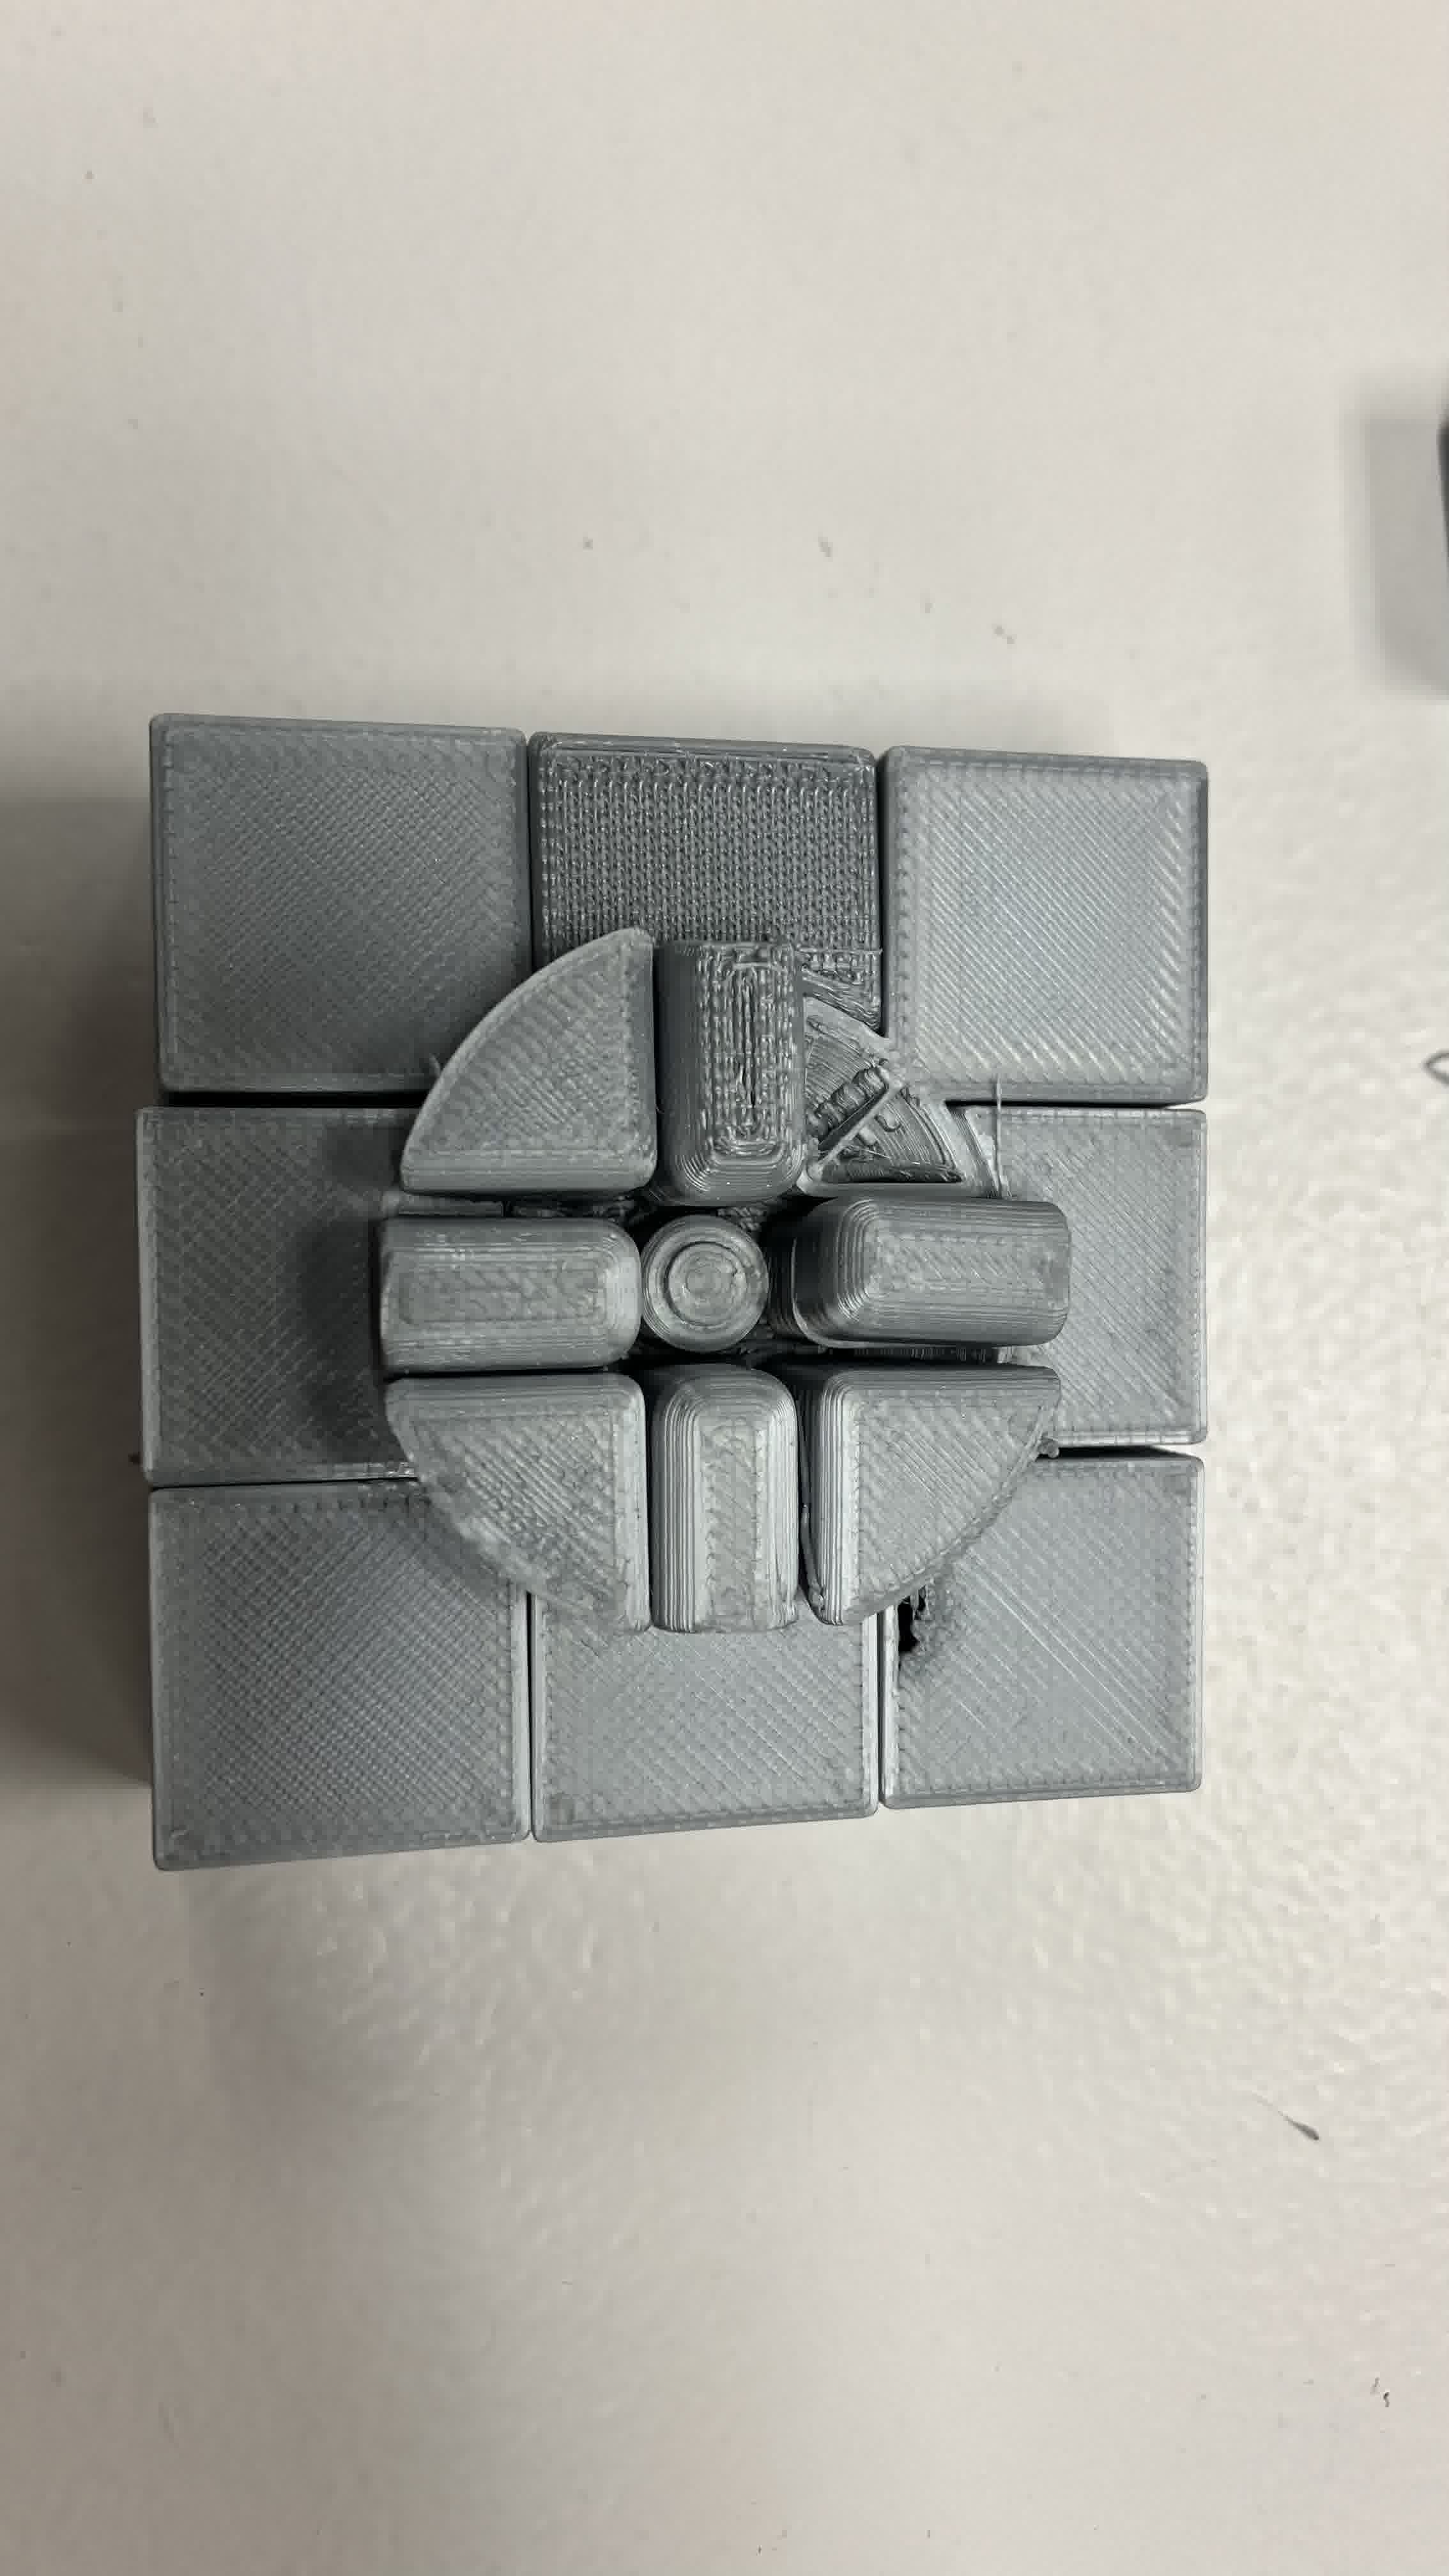
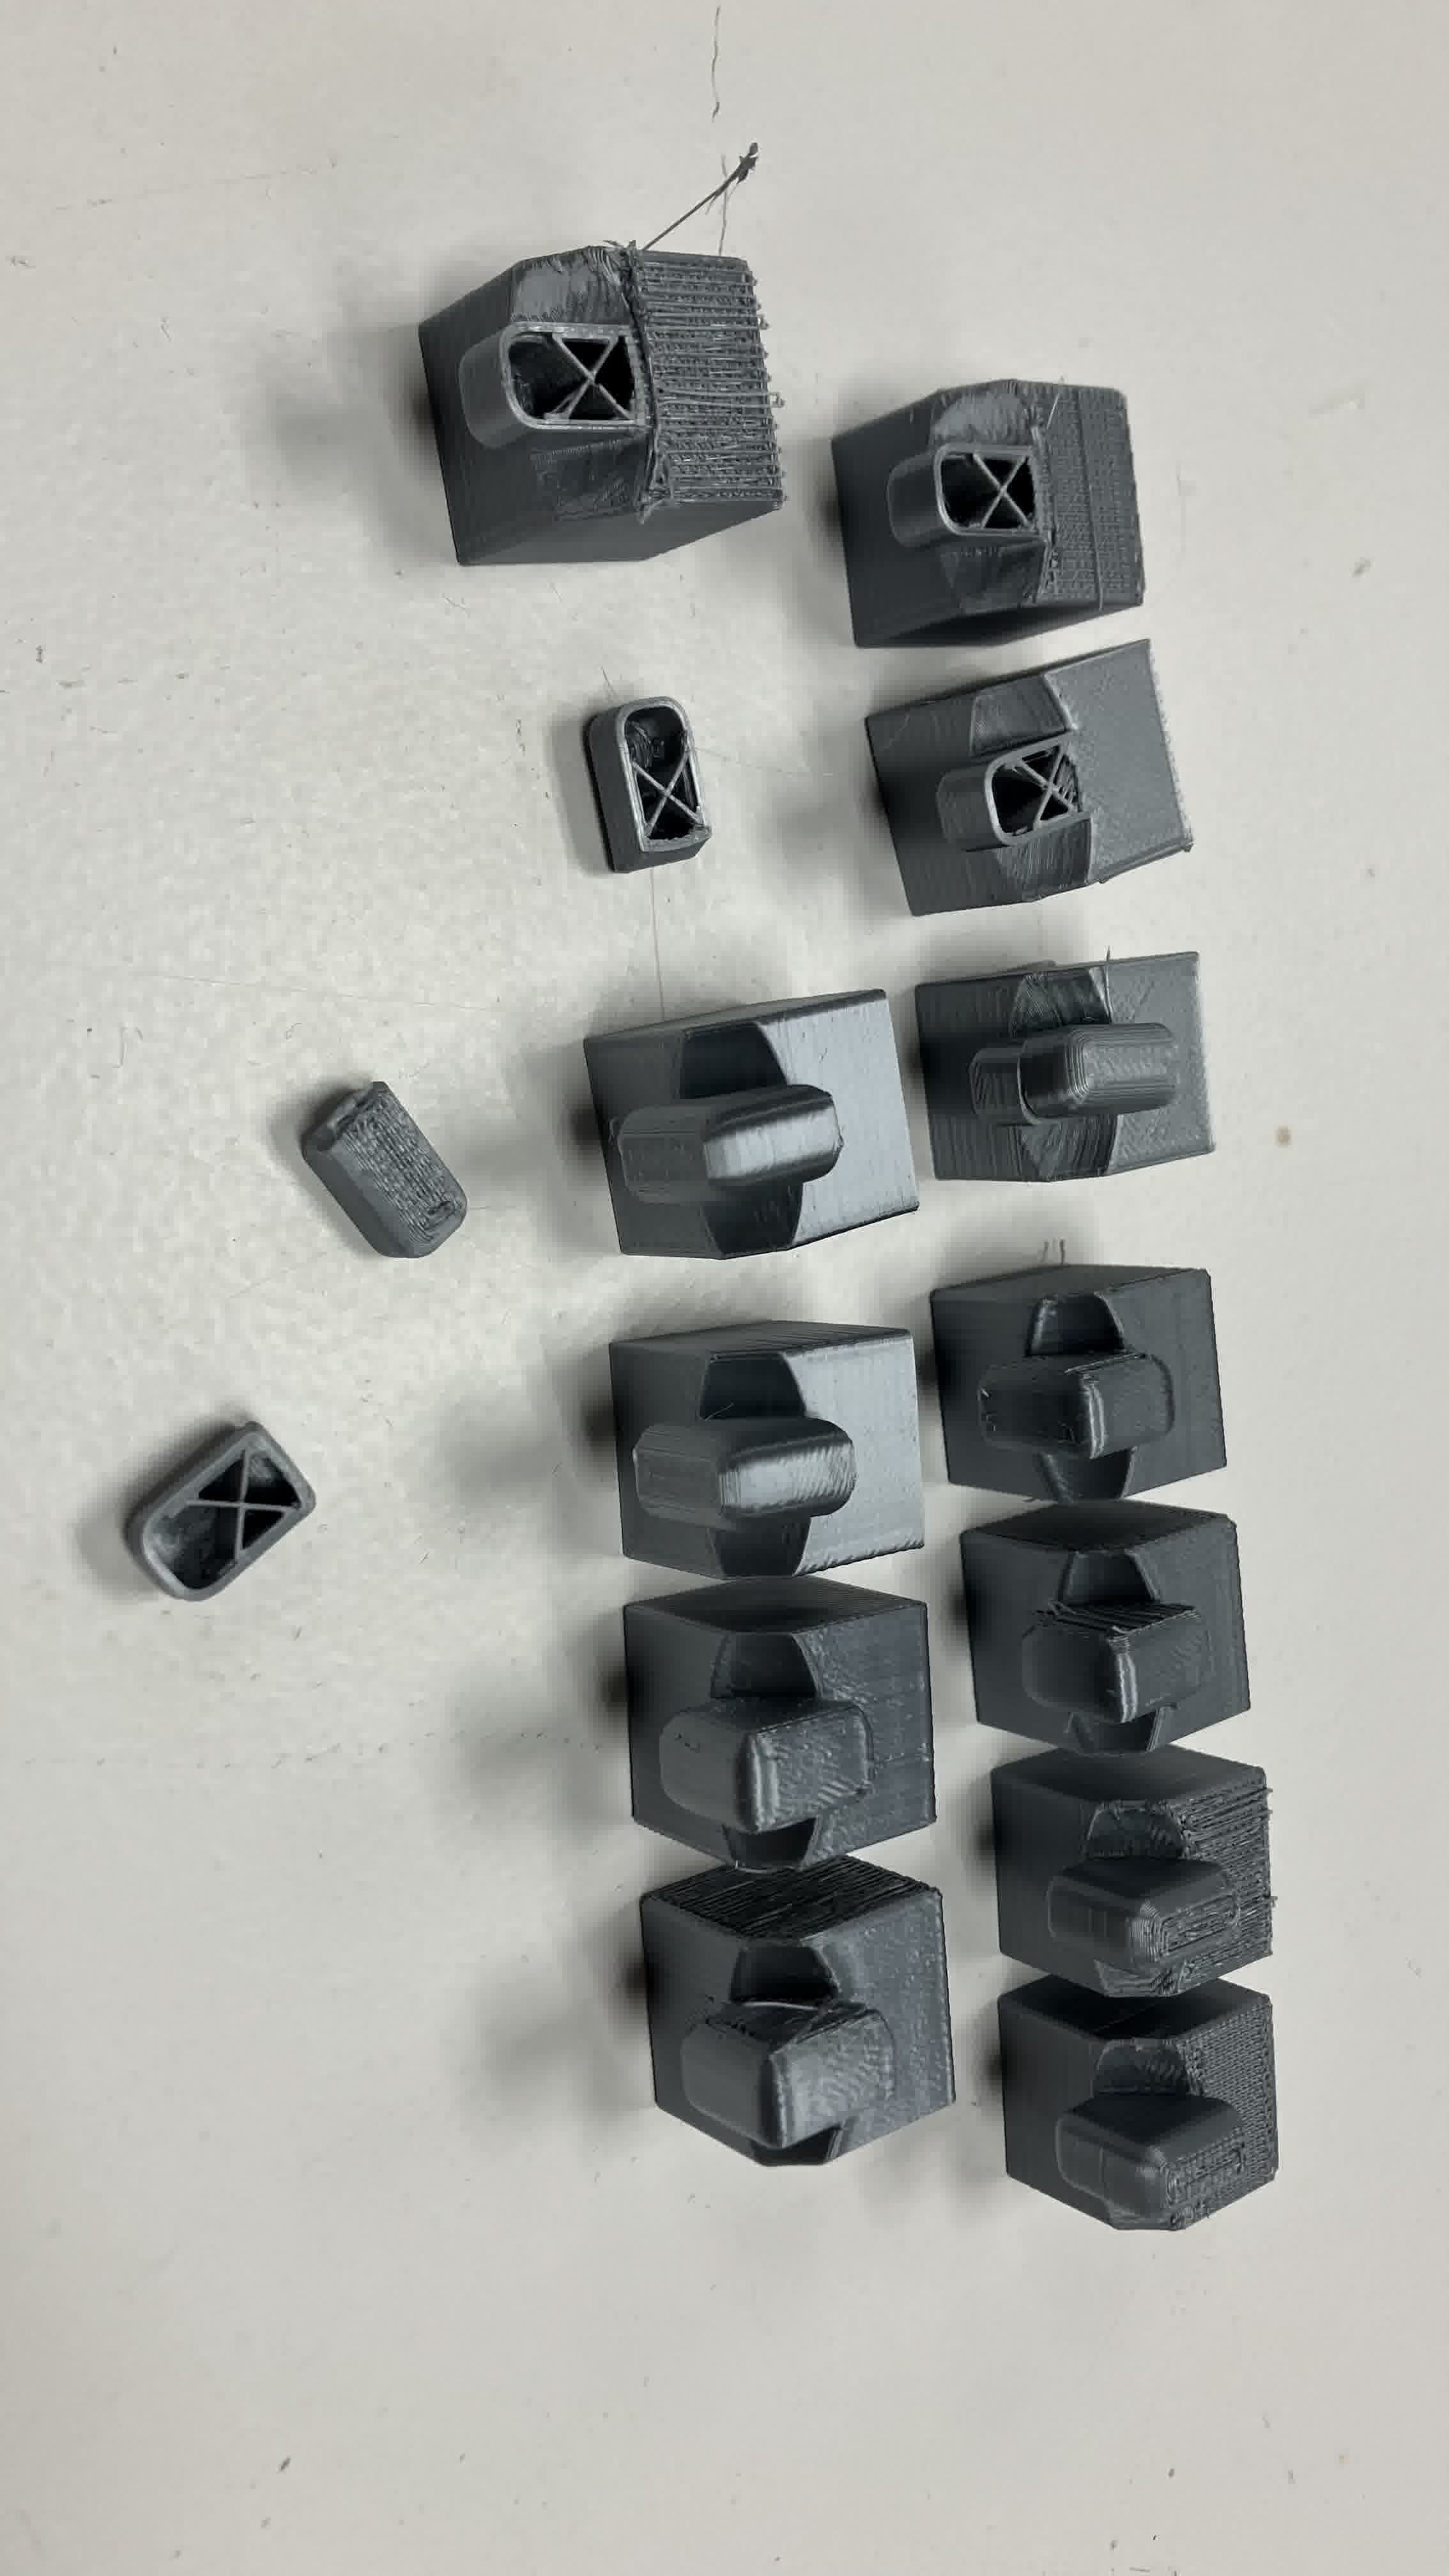
Once the print finished and I got the cube out, I noticed the vertical spacings between rows were fine, but the horizontal spacings between rows had fused together. So I could move some rows but not others. After a lot of turning and twisting in the only directions I could, one of the center pieces broke. I managed to expose one layer of the inside of the cube and noticed what my mistake had been.
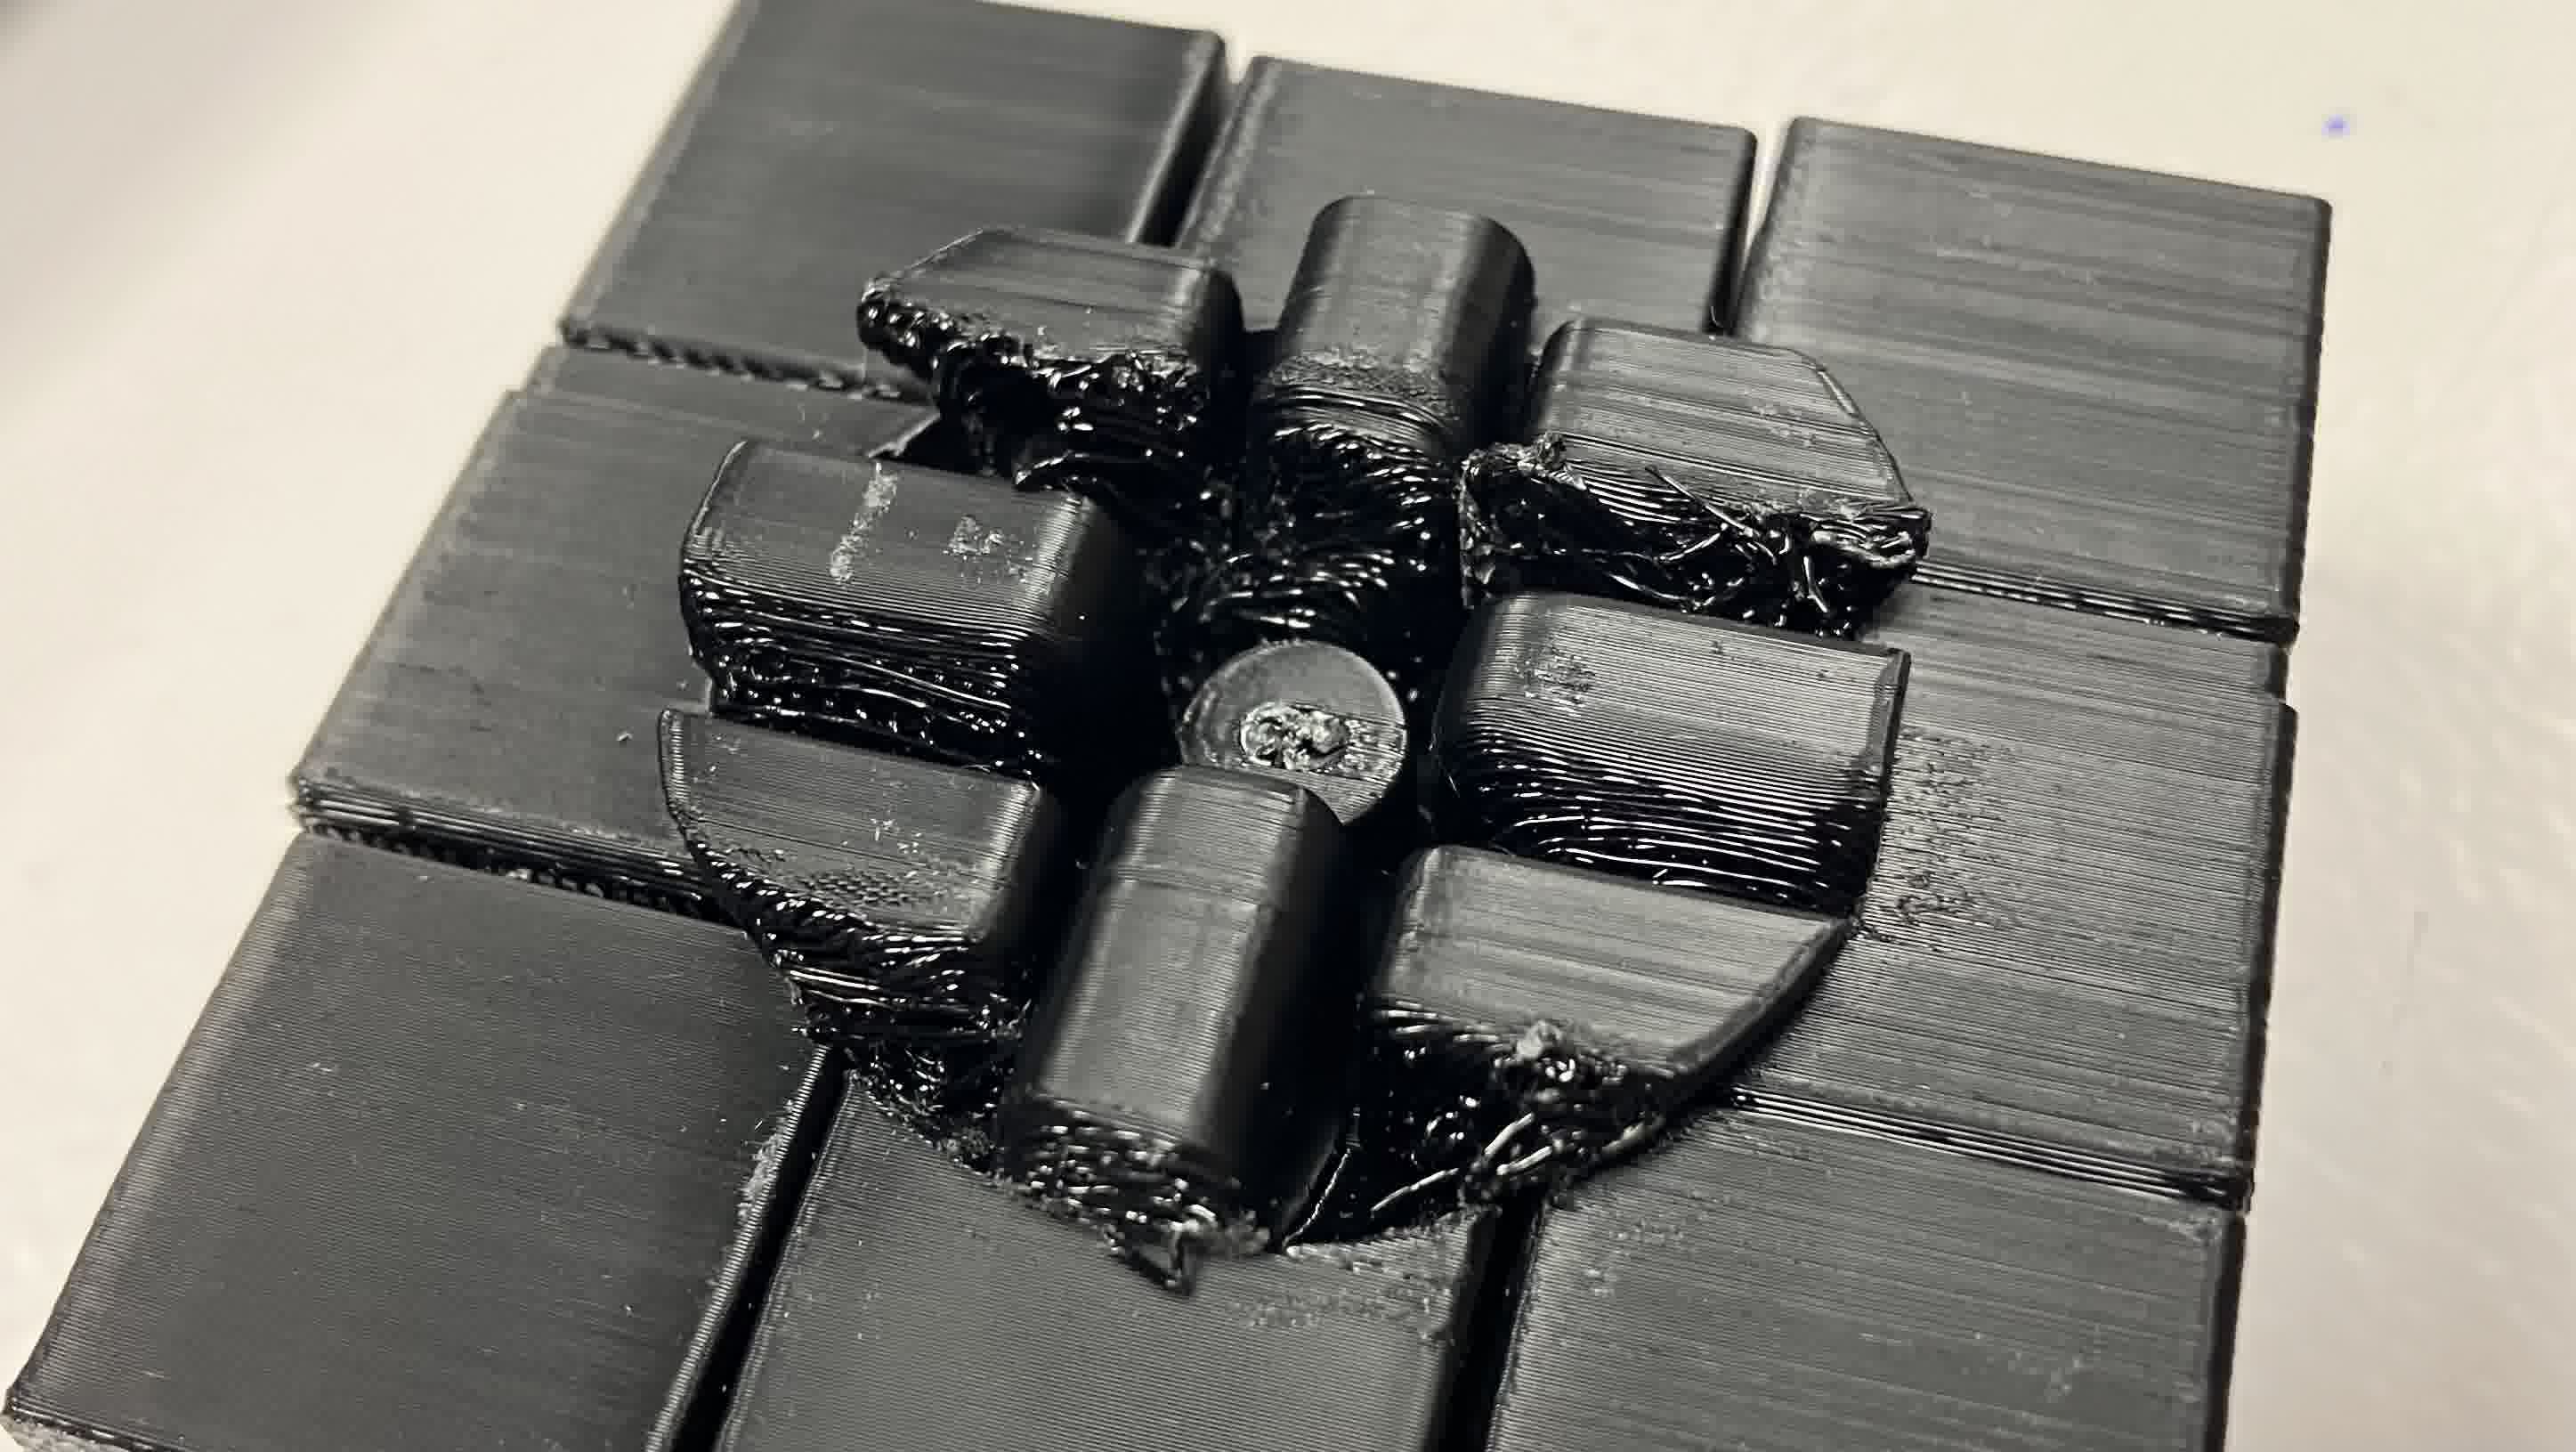
As you can clearly see above, I left too much of a clearance between the pieces inside the cube, so I got a whole lot of spaghetti fused together. No wonder it was a battle to rotate! I also made the center shaft too small and didn't leave enough clearance with the core piece, so they fused together.
3D Re-Modelling in Fusion
After meticulously tearing the whole cube apart to know what went wrong where, I went back to Fusion:
- Redesigned the center and core pieces so that the connecting parts were bigger and had bigger clearance. I changed the center piece from a 4 part shaft to a single shaft that prevents the piece from sliding out thanks to a groove in the core piece.
- Doubled the clearance between all pieces to prevent fusions by changing the joints from 0.25mm to 0.5mm.
- Redesigned the inside part of all the pieces so that when assembled together, they had less clearance.
The file for the 3D modified model can be found here.
Re-Slicing in Bambu Studio
Since I was printing on a Bambu A1 printer again, I used the Bambu Studio software again to slice my cube for printing:
- Selected the Bambu Lab A1 Carbon 0.4 Nozzle printer.
- Selected Generic PLA filament, as I knew that is what I was going to use for printing.
- Selected 0.12mm Fine @ BBL A1 system preset.
- Imported the file with my modified Rubik's Cube.
- Changed the initial layer height to 0.12mm.
- Changed the only one wall on top surfaces to not applied.
- Changed the top shell thickness to 0.5mm.
- Changed the bottom surface pattern to monotonic line to match the top surface pattern.
- Changed the bottom shell thickness to 0.5mm.
- Changed the sparse infill density to 10%.
- Enabled supports and changed the threshold angle to 45.
- Selected the PLA I was using for the support/raft base and interface.
- Changed the skirt loops to 2.
- Left all other pre-set values.
- Sliced the plate and made sure everything looked ok.
- Exported the plate sliced file into a micro SD card.
The file for the sliced up plate can be found here.
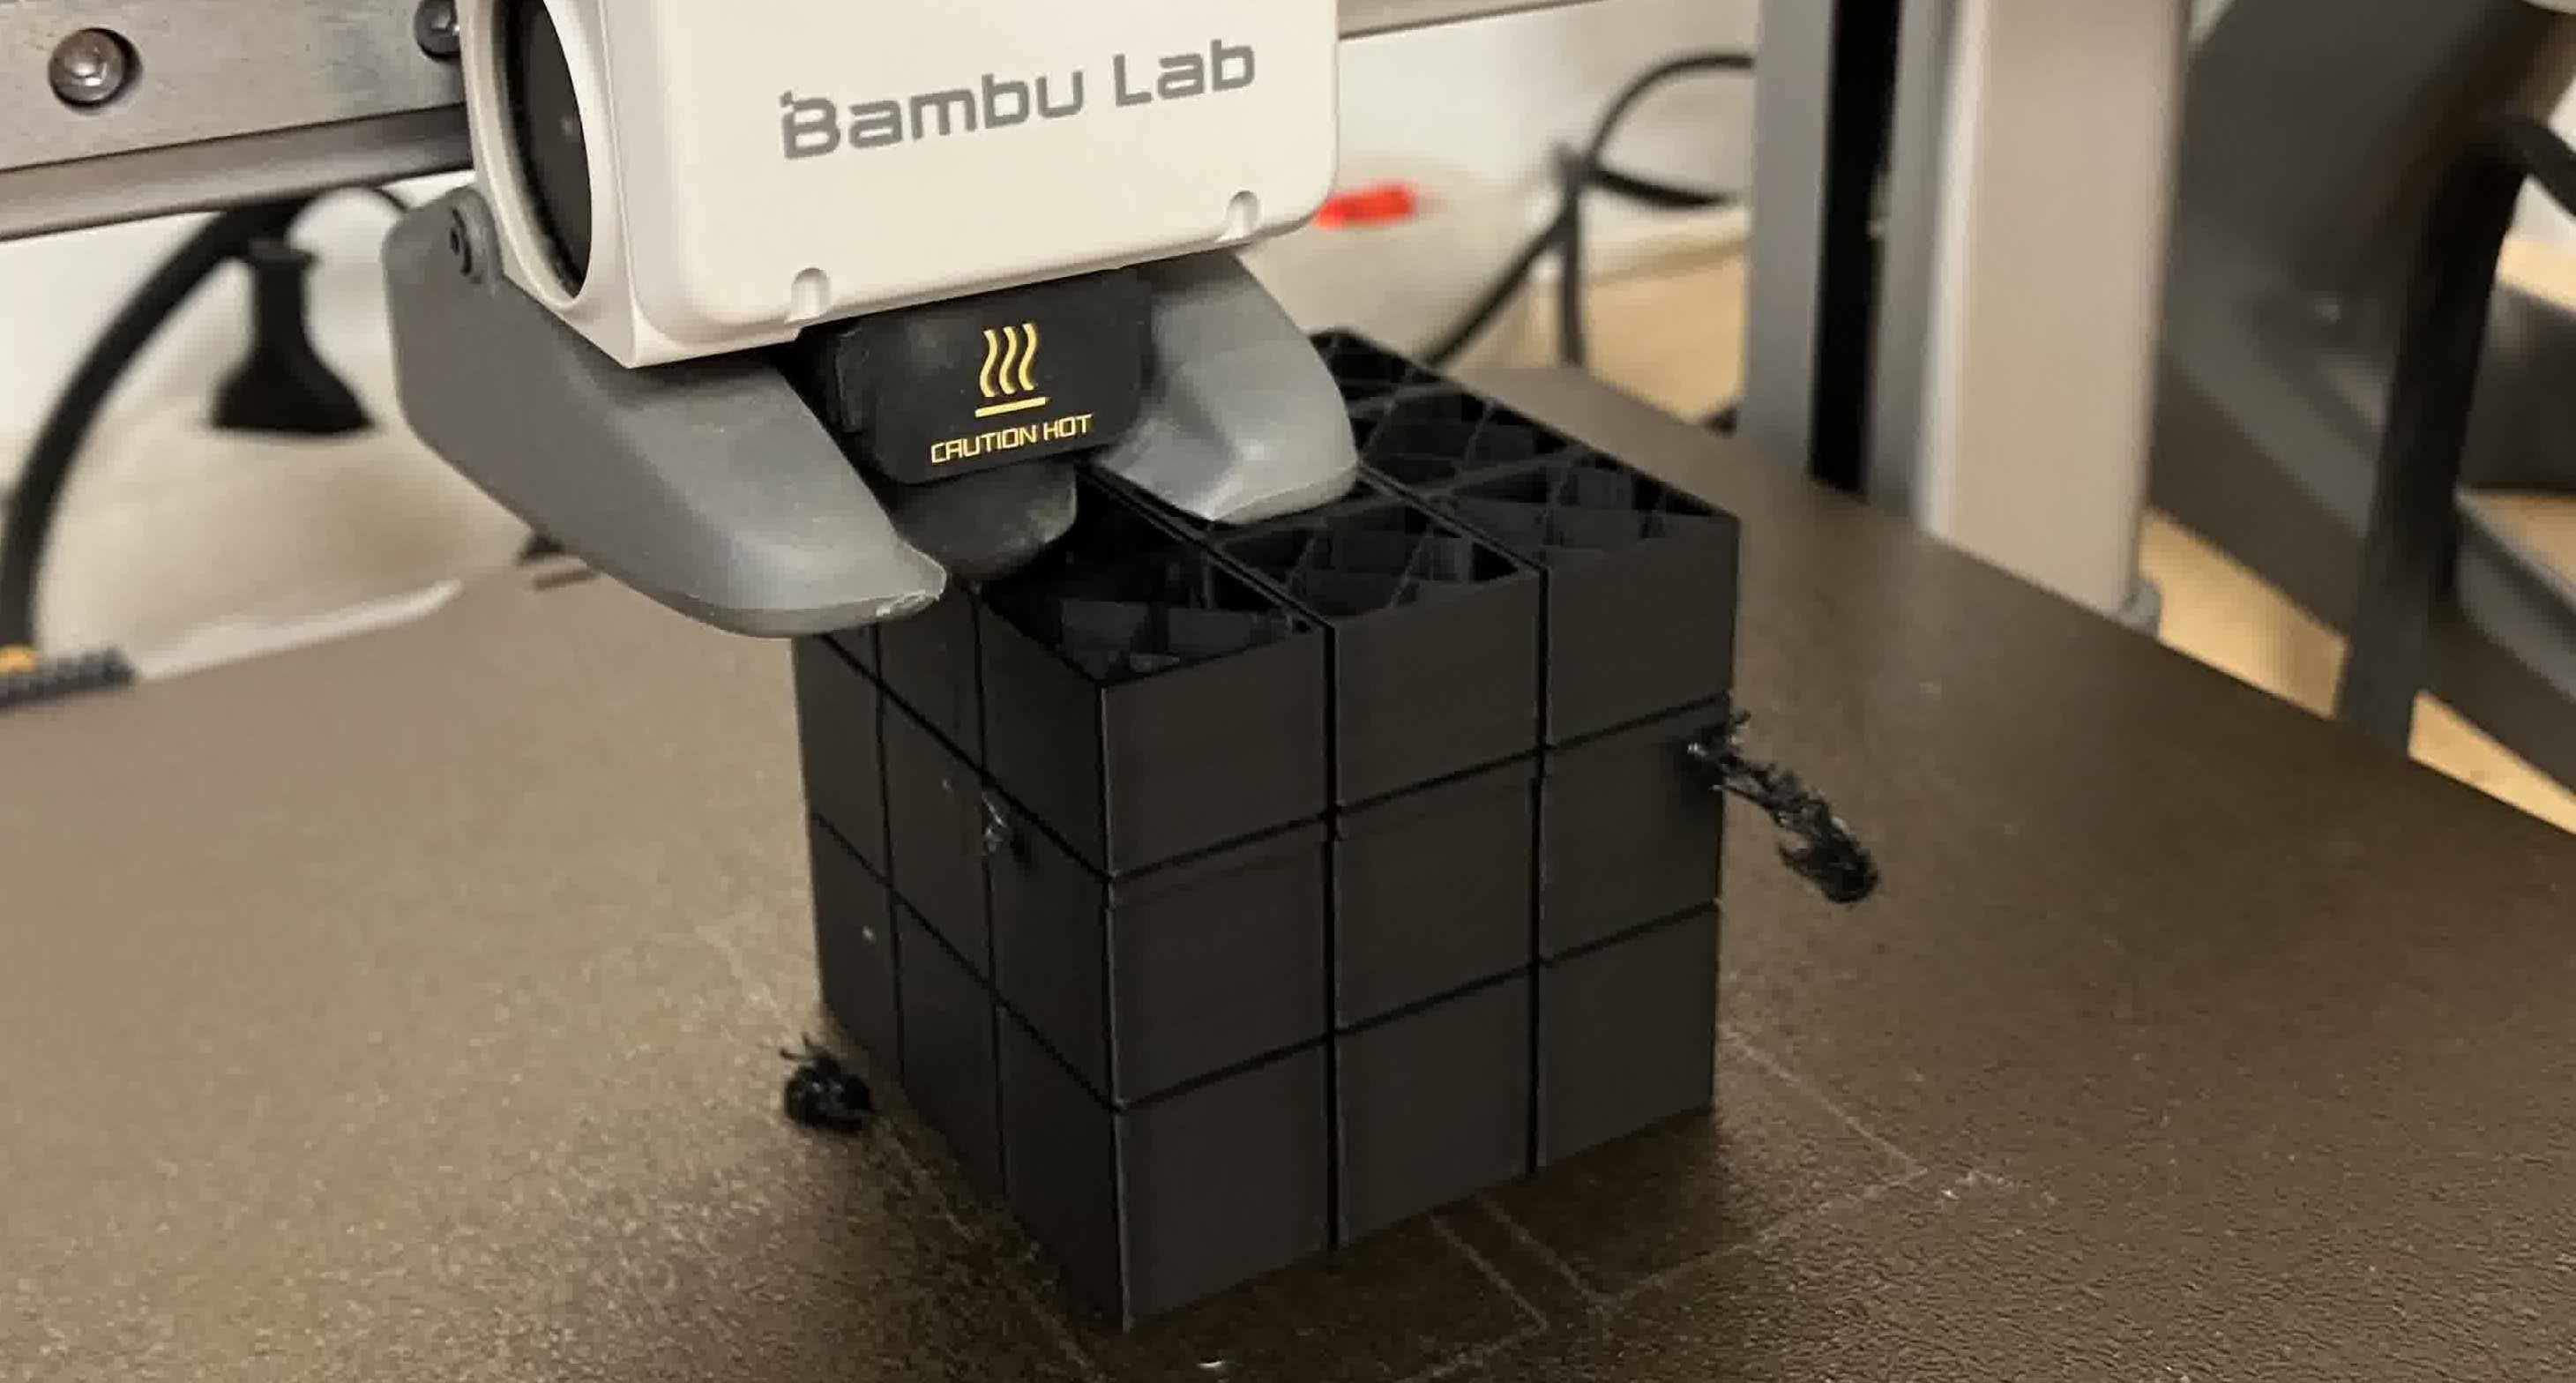
3D Re-Printing in Bambu A1 with PLA
- Inserted the micro SD card into the printer.
- Selected the file to print.
- Loaded up the filament.
- Put hairspray on the base plate and made sure it was set up properly.
- Printed.
- Waited 5hrs (left it overnight).
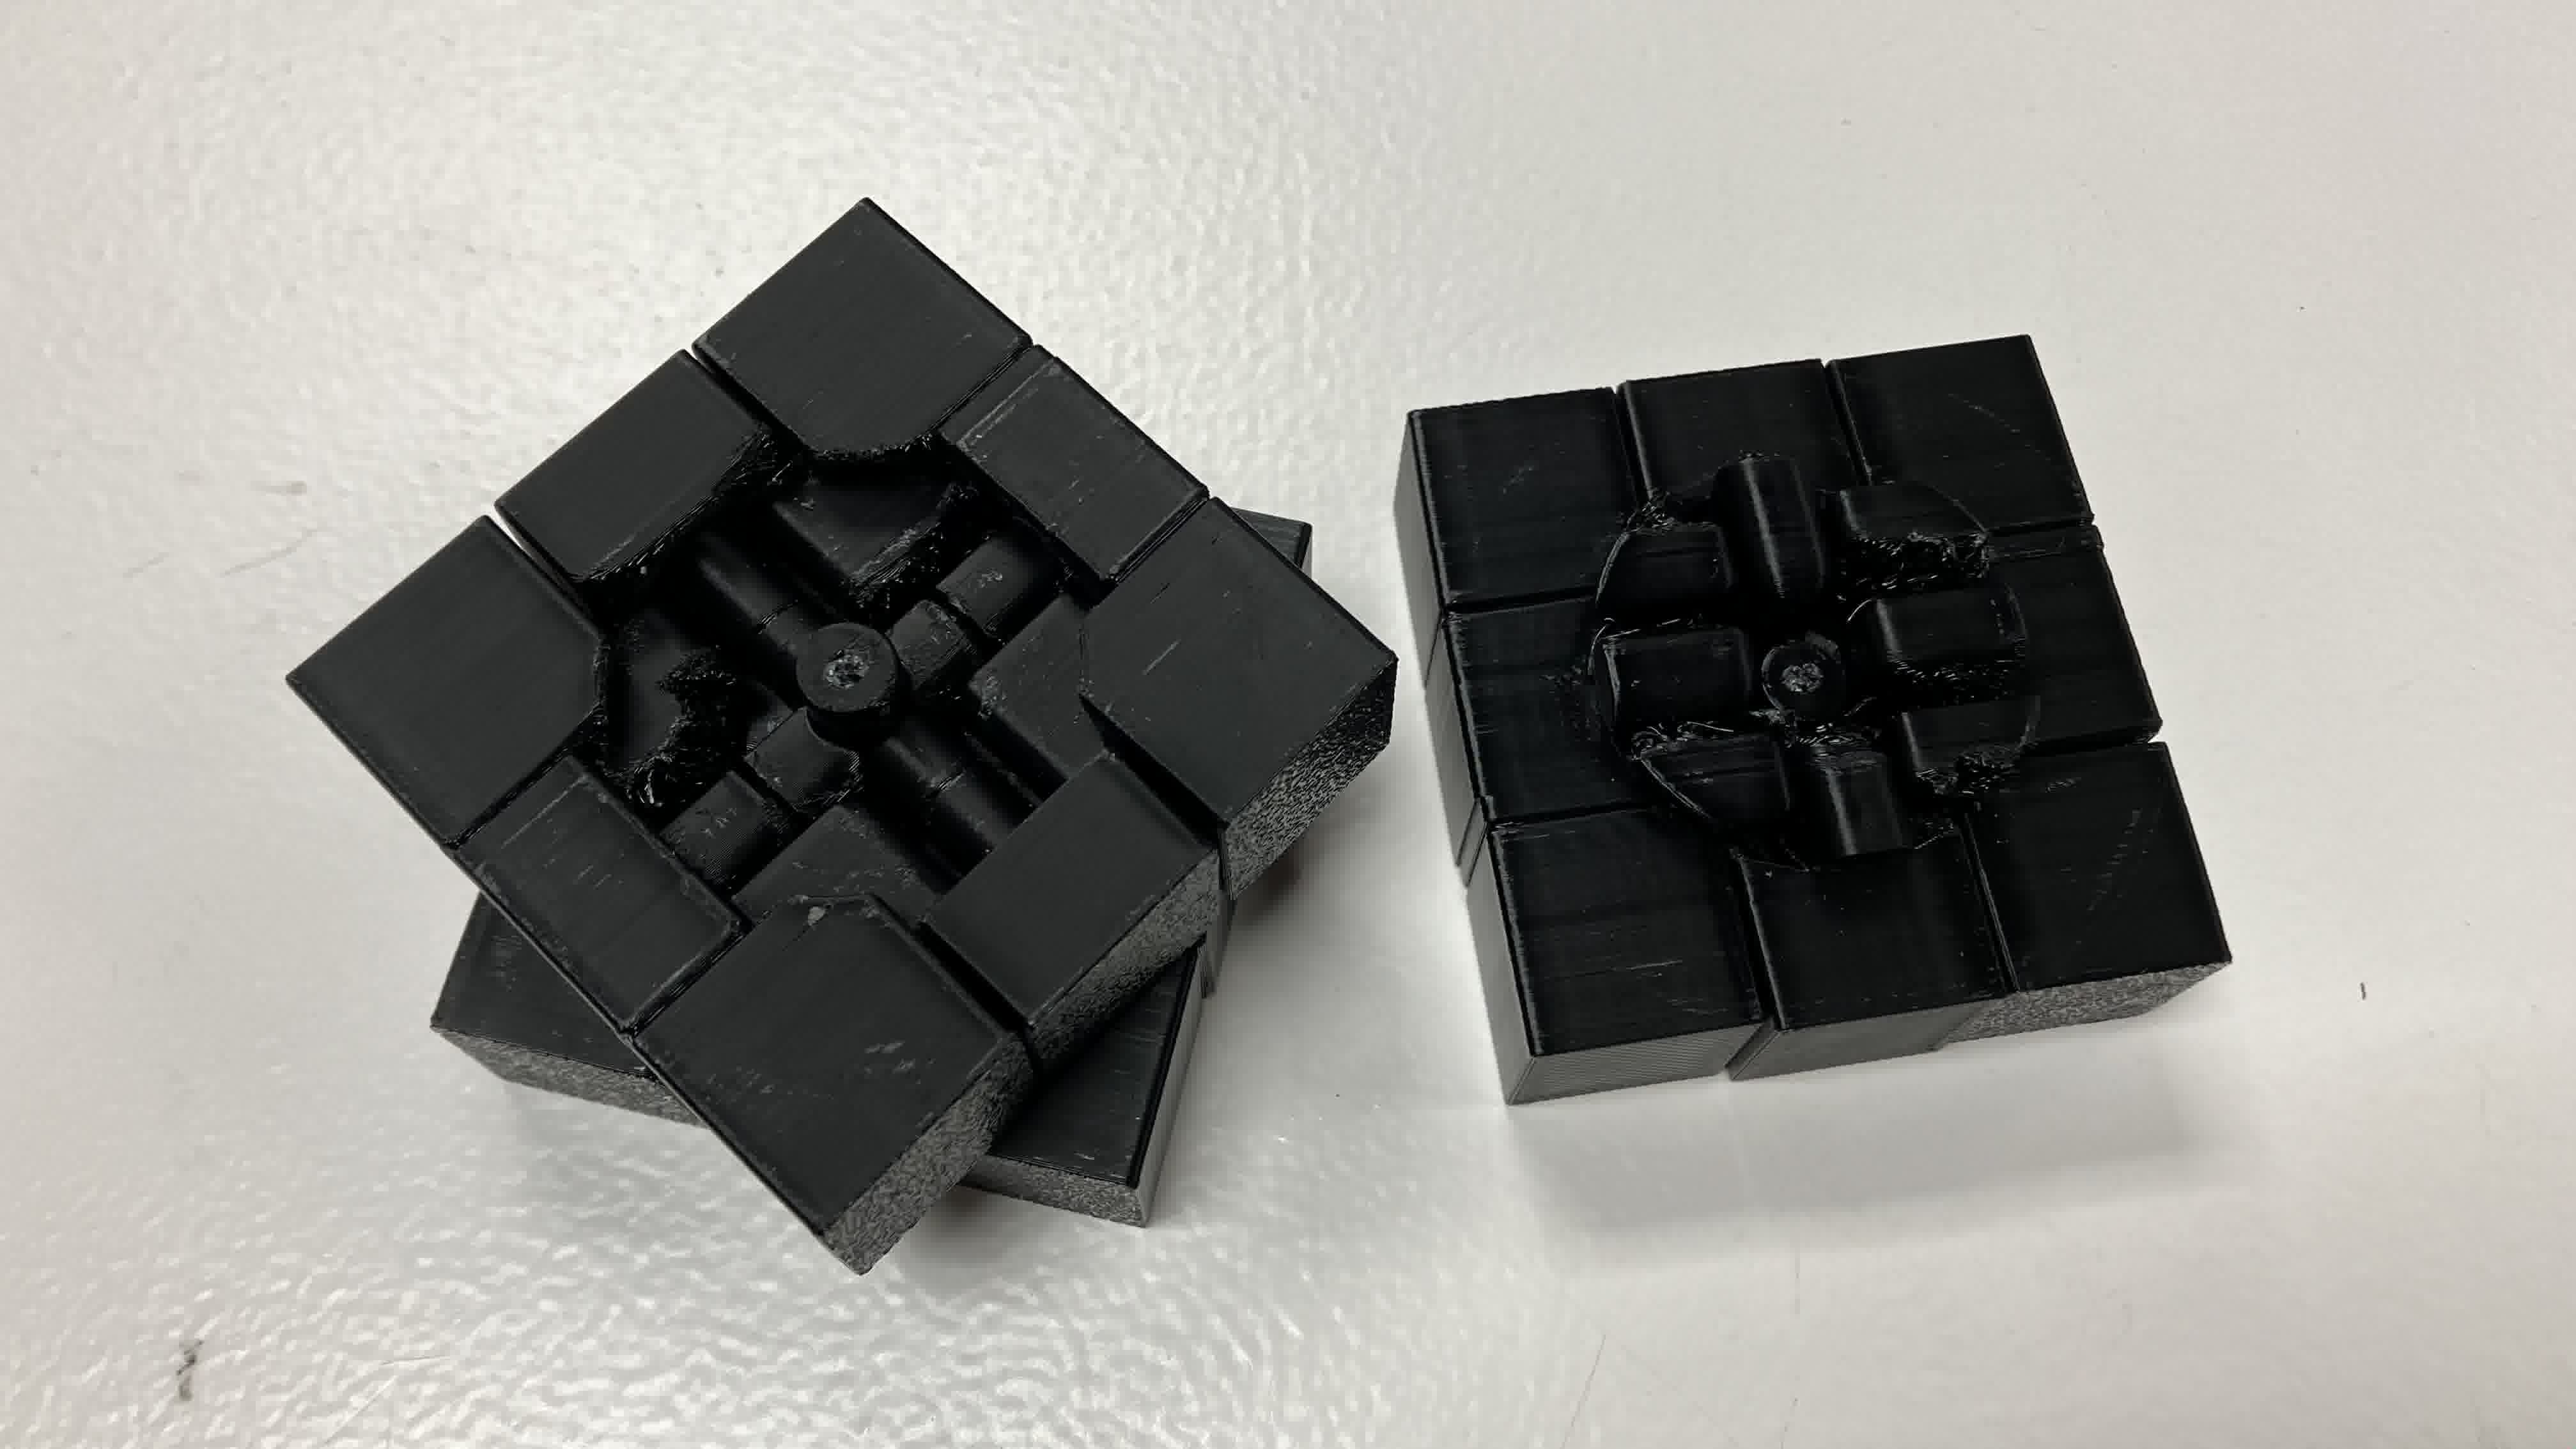
Straight off the bat I saw I was going to have issues. I left my print overnight, so getting the cube off the mat was a pain, and when I finally managed, the bottom pieces delaminated.

The print looked fine otherwise, but once I started trying to turn it, more problems started to appear. Since I left the print overnight, the inside supports solidified and stuck pretty well to the structure. Additionally, the center pieces broke very quickly, I didn't even manage to get the structure to turn a couple of times like the previous design. This allowed me to open the structure up though. I started by exposing the layers. This time the insides didn't fuse together, so that was a win.
However, a lot of the edge and corner pieces broke when I attempted to turn the structure and separate the pieces from the supports.
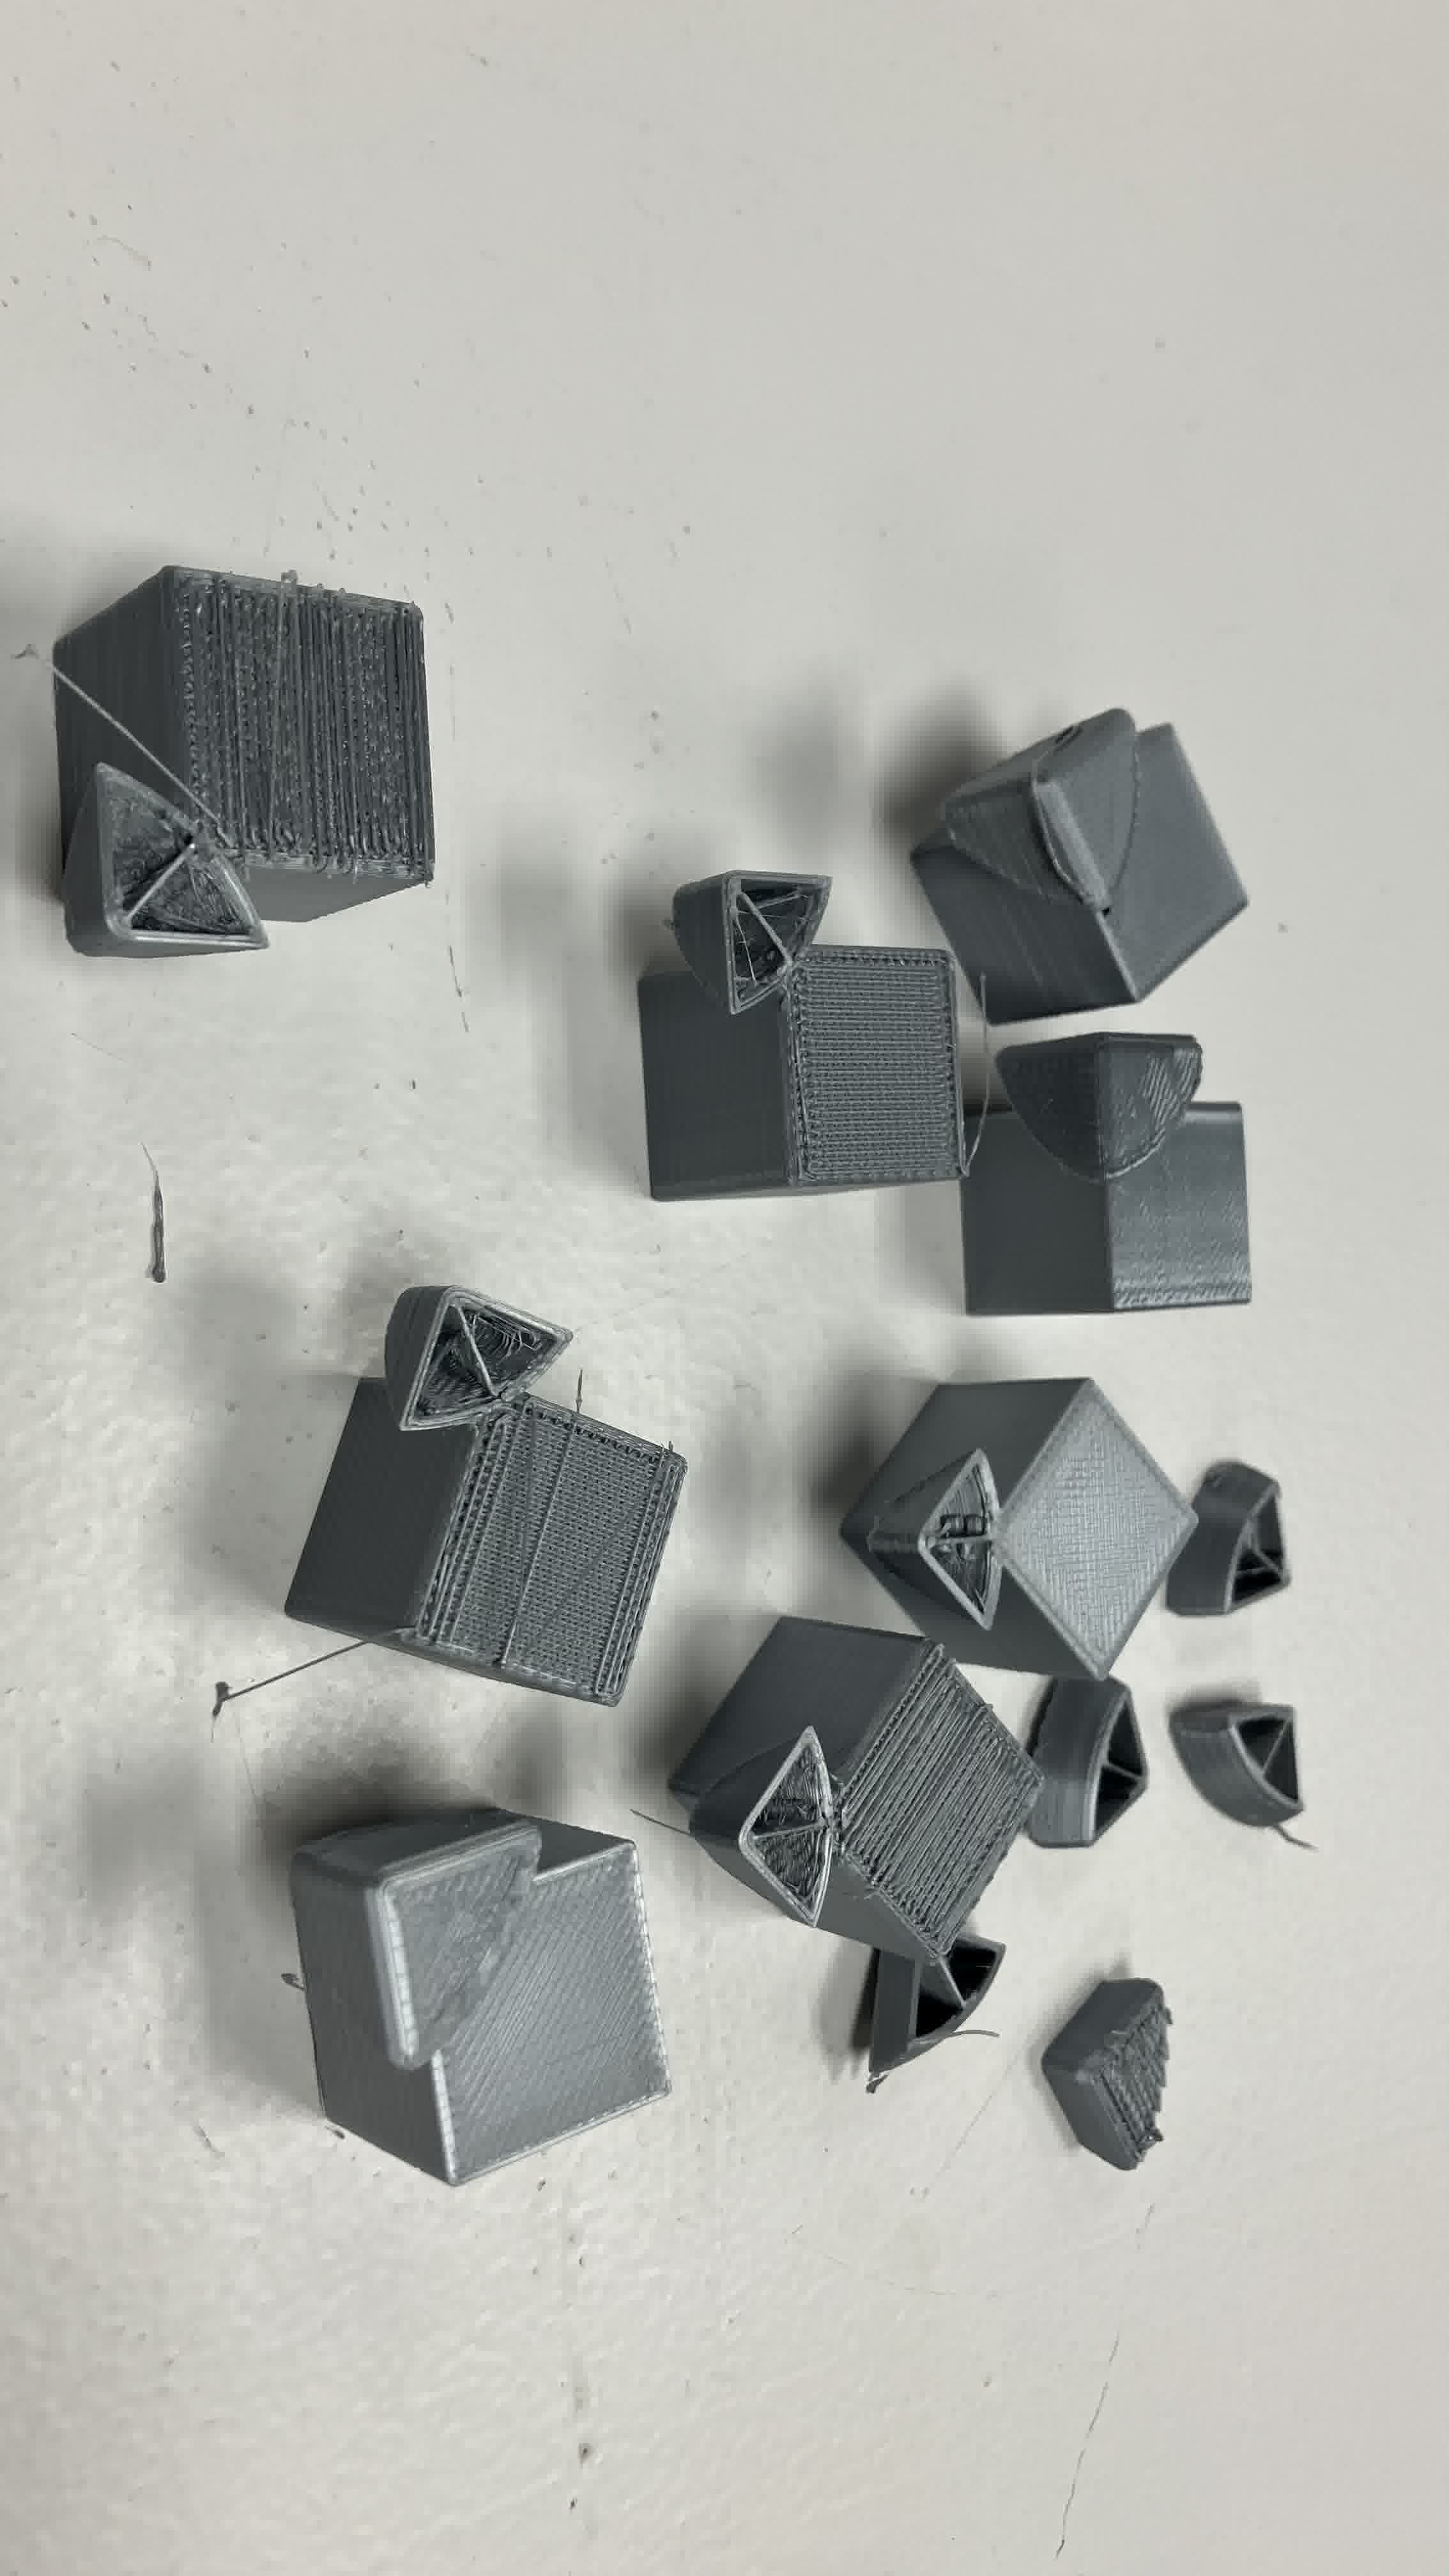
So, my main mistake was leaving the print overnight and letting the supports stiffen up. My other mistakes were the center piece design (again) and the sparse infill density of the pieces. I believe I have to re-design the center structure for printing in place and have to set the infill density of the pieces to a higher number so that the corner and edge pieces are sturdier. After talking with my instructor, Dani, he suggested using watersoluble PLA for the supports.
3D Re-Re-Modelling in Fusion
After meticulously tearing the whole cube apart (once again) to know what went wrong where, I went back to Fusion (once again):
3D Re-Re-Slicing in Bambu Studio
3D Re-Re-Printing in Bambu ... with PLA and Watersoluble PLA for Supports
Simple Vase
After our class with Josep about 3D printing biomaterials, we were all very interested in printing with clay. I decided I wanted to do a flower vase.
3D Modelling in Rhino with Mamba and Grasshopper
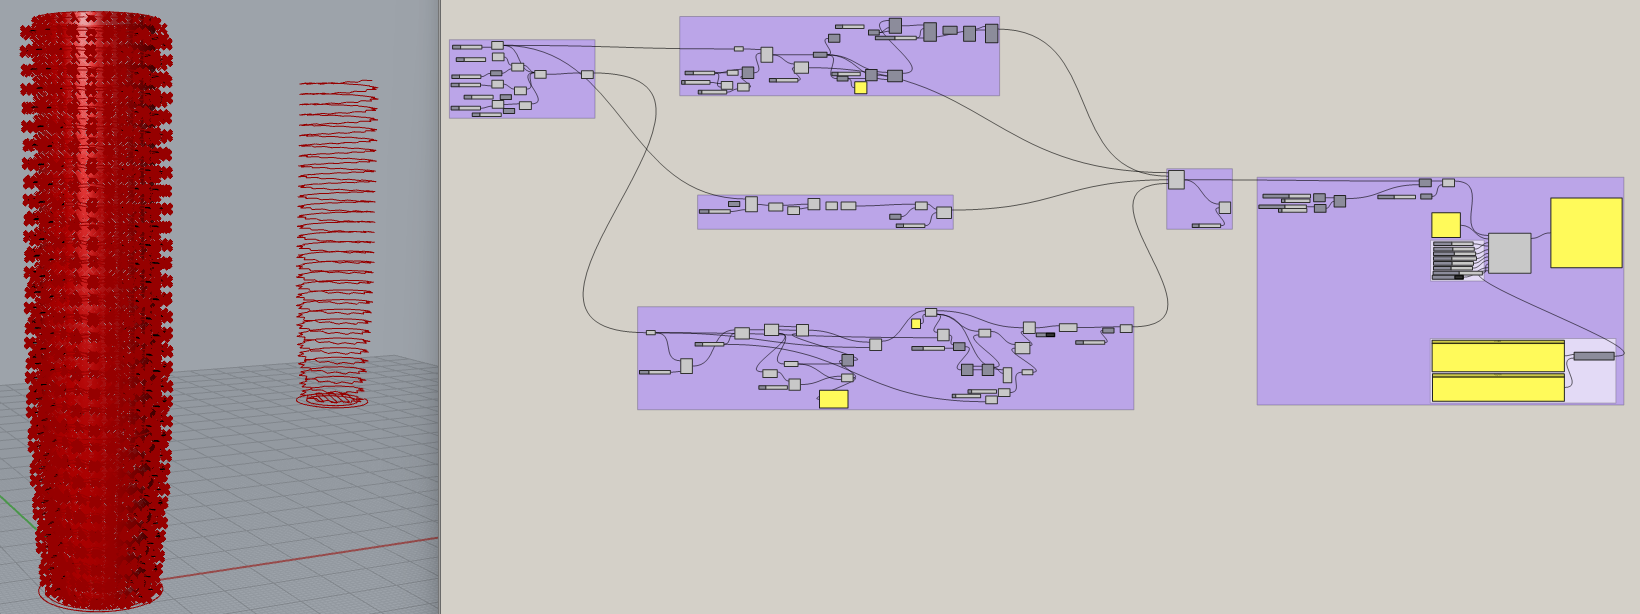
I used the original file Josep used in class as my starting point. I played around with the height and thickness of the design until I got something I liked.
The grasshopper file can be found here.
Slicing in ...
Coming soon!
3D Printing in ... with Clay
Coming soon!
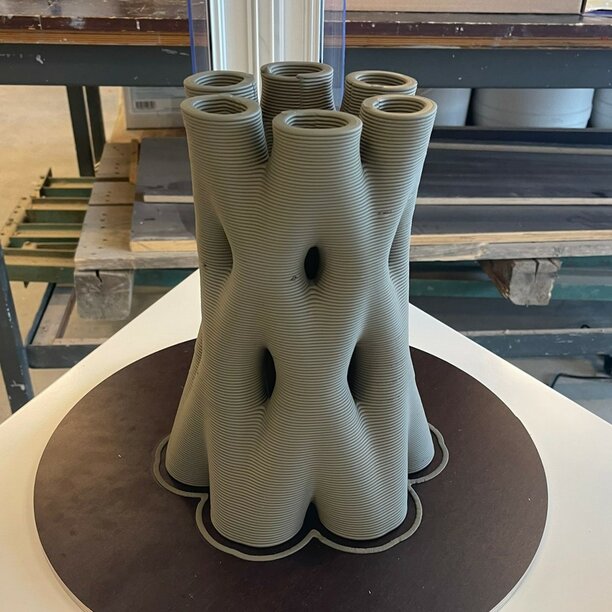
Vase Assembly
I thought a simple vase was cool but too easy, and I wanted to play around with some more complex structures. My inspiration was this prototype from the Eindhoven University of Technology:
3D Modelling in Rhino with Mamba and Grasshopper
Again, I used the original file Josep used in class as my starting point. His file is divided in 5 groups. The first group is the structure of the vase, which then feeds the group that establishes the path for the first layer, the group that establishes the path for the second layer, and the group that establishes the path for the spiral of the vase. These 3 groups then feed the group that combines them all into a tree, and then feeds the group that transforms all the information into a Gcode for the printer.
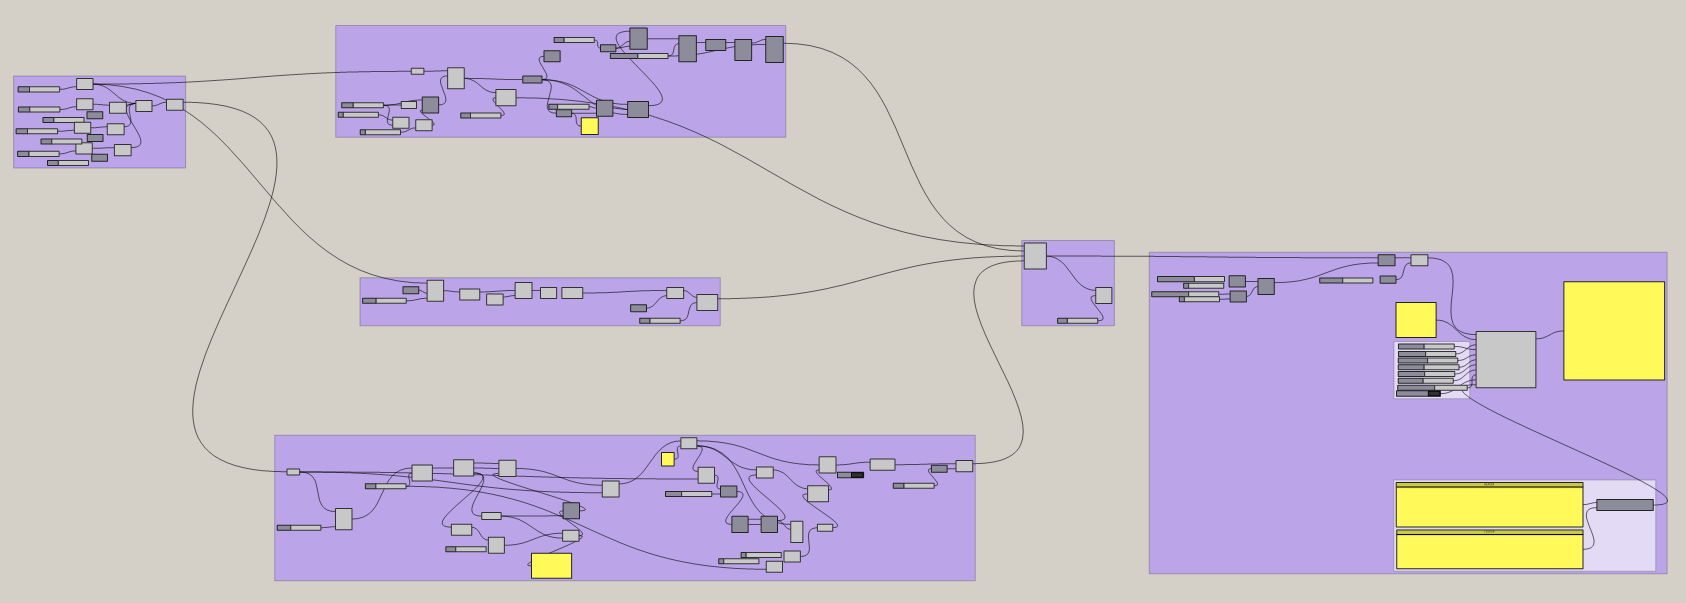
I kept his general file structure but erased his structure and created my own. My workflow was:
- Creating curves along the path that I wanted for one of the sections.
- Created two lofts along the curves to create a single section of the assembly.
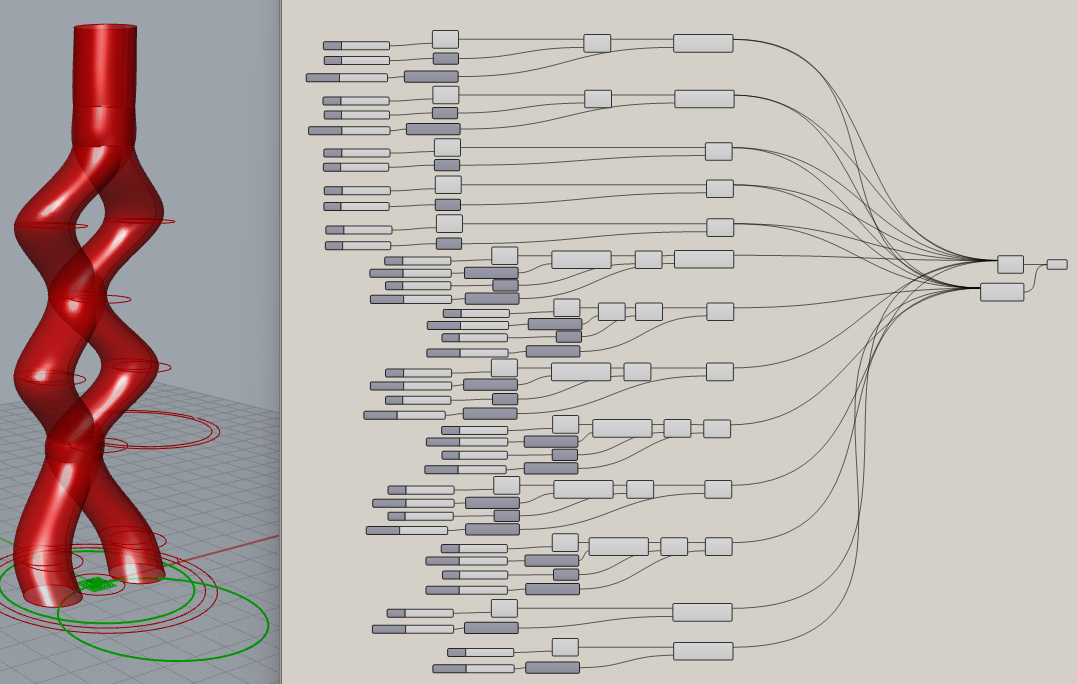
- Created a geometry array of the single structure around a curve
Slicing in ...
Coming soon!
3D Printing in ... with Clay
Coming soon!
3. 3D scan an object.
At first, I attempted to 3D scan my computer mouse using the Revo Point Scanner. This was a nightmare. The object was quite small and dark so the scanner struggled a lot to produce a continuous point cloud. I tried doing a color scan and although it was slightly better, it still struggled. After about 30 minutes of multiple failed attempts, I tried using the Kinect scanner to scan it. Again, the object was too small for the scanner, so it struggled a lot. After another 15 minutes of failed attempts, I decided to try a different object.
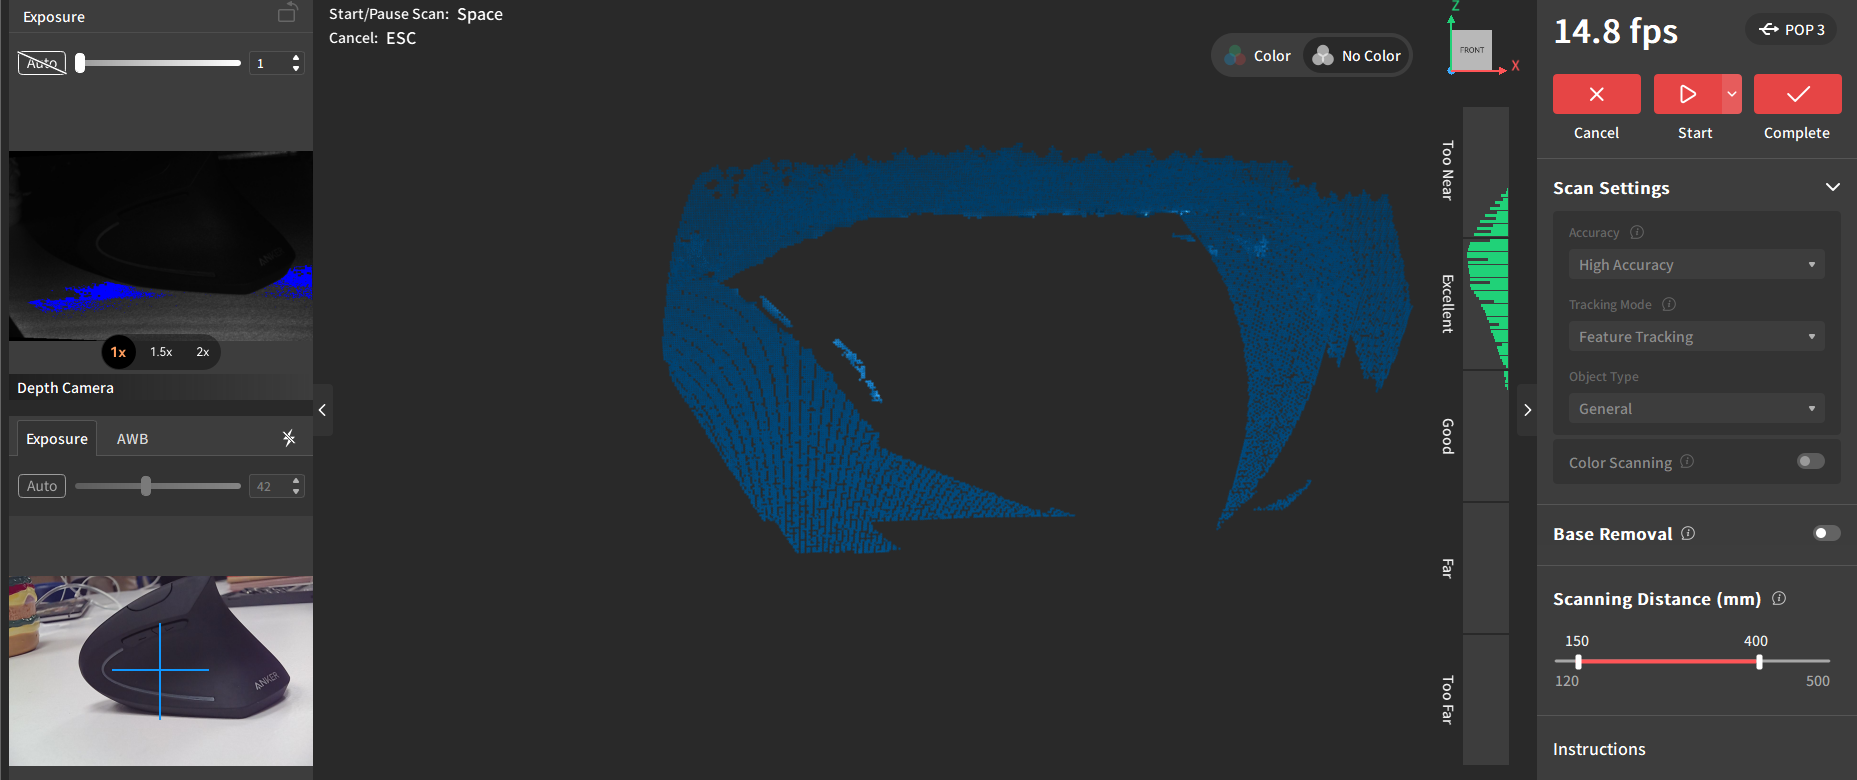
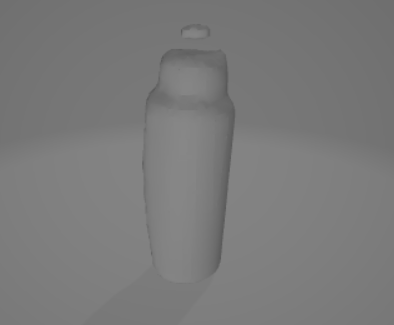
I tried scanning my water bottle with the kinect scanner. It took many attempts to get a somewhat decent scan (which you can see below). It still wasn't good by any standards. I couldn't get the top handle or the back any time.
My biggest struggle with both scanners was doing a full turn around the objects, no matter what angle and speed I used for doing it, both scanners seemed to loose the location of the object, splitting the scan into separate objects or a single object with many holes. The whole process ended up being more of a struggle than I imagined. Granted, I did not choose the easiest objects to scan with these specificc scanners. However, I think it was a cool excercise to do myself. If I had to use these scanners again, I would try to scan bigger objects in a wider space.