Week 1
Principles & Practices and Project Management
Week Outline
- Monday: Student Bootcamp Day 1
- Tuesday: Student Bootcamp Day 2
- Wednesday: First Day Introductions at FabLab BCN. Global Lecture on Principles & Practices and Project Management.
- Thursday: Local Class on Web Development and Git-Gitlab.
- Friday: I planned my Final Project.
- Saturday: I tackled the Weekly Assignments.
- Sunday: I finished the Weekly Assignments.
- Monday: We got together as a group and presented our final project plans in the morning. Julian gave a recitation on version control in the afternoon.
- Wednesday: First Global Review.
Global Class
For principles and practices, Neil covered the origin and evolution of digital fabrication in the global class. He talked about FabLab and the history of the FabAcademy and the impact this has had on a global scale. It was a very interesting lecture and a surreal experience to hear it from Neil himself.
For project management, Neil gave us resources we can use for file synchronization, version control, web development, content management systems, work collaboration, videoconferencing, remote desktops and project management. He also introduced project management concepts like the 80/20 rule, demand and supply side time management styles, serial and parallel development, and spiral development (among others, of course).
Local Class
On thursday, our local class was an introduction to web design and git-gitlab. We were introduced to the basics of the world wide web, HTTP protocol request systems, version control systems. After this, we were introduced to Git.
Assignments
1. Plan and sketch a potential final project
On the second day of FabAcademy, when I was on the metro heading to the Lab, I had a light-bulb moment. You see, when I was a teenager in high school, I played the tenor saxophone in my school's orchestra. I loved playing the instrument and ever since I left it, I have wanted to re-learn it and keep practicing. I always made up excuses for myself. It's an expensive, time-consuming, loud instrument. But what if it didn't have to be? Although I do want to commit to buying a real brass one and re-learning the skill, what if I can make one for myself? A personally produced electronic saxophone that can connect to my headphones instead of torturing the entire street. It will be cheaper. It won't be less time consuming because I will have to do it, but I was going to have to do some project anyways. And it can be as loud as I want or as quiet as the neighbors want. Sure, this may not change other people's lives but I think I will have fun doing it. The following is an initial sketch of what I would like to do:
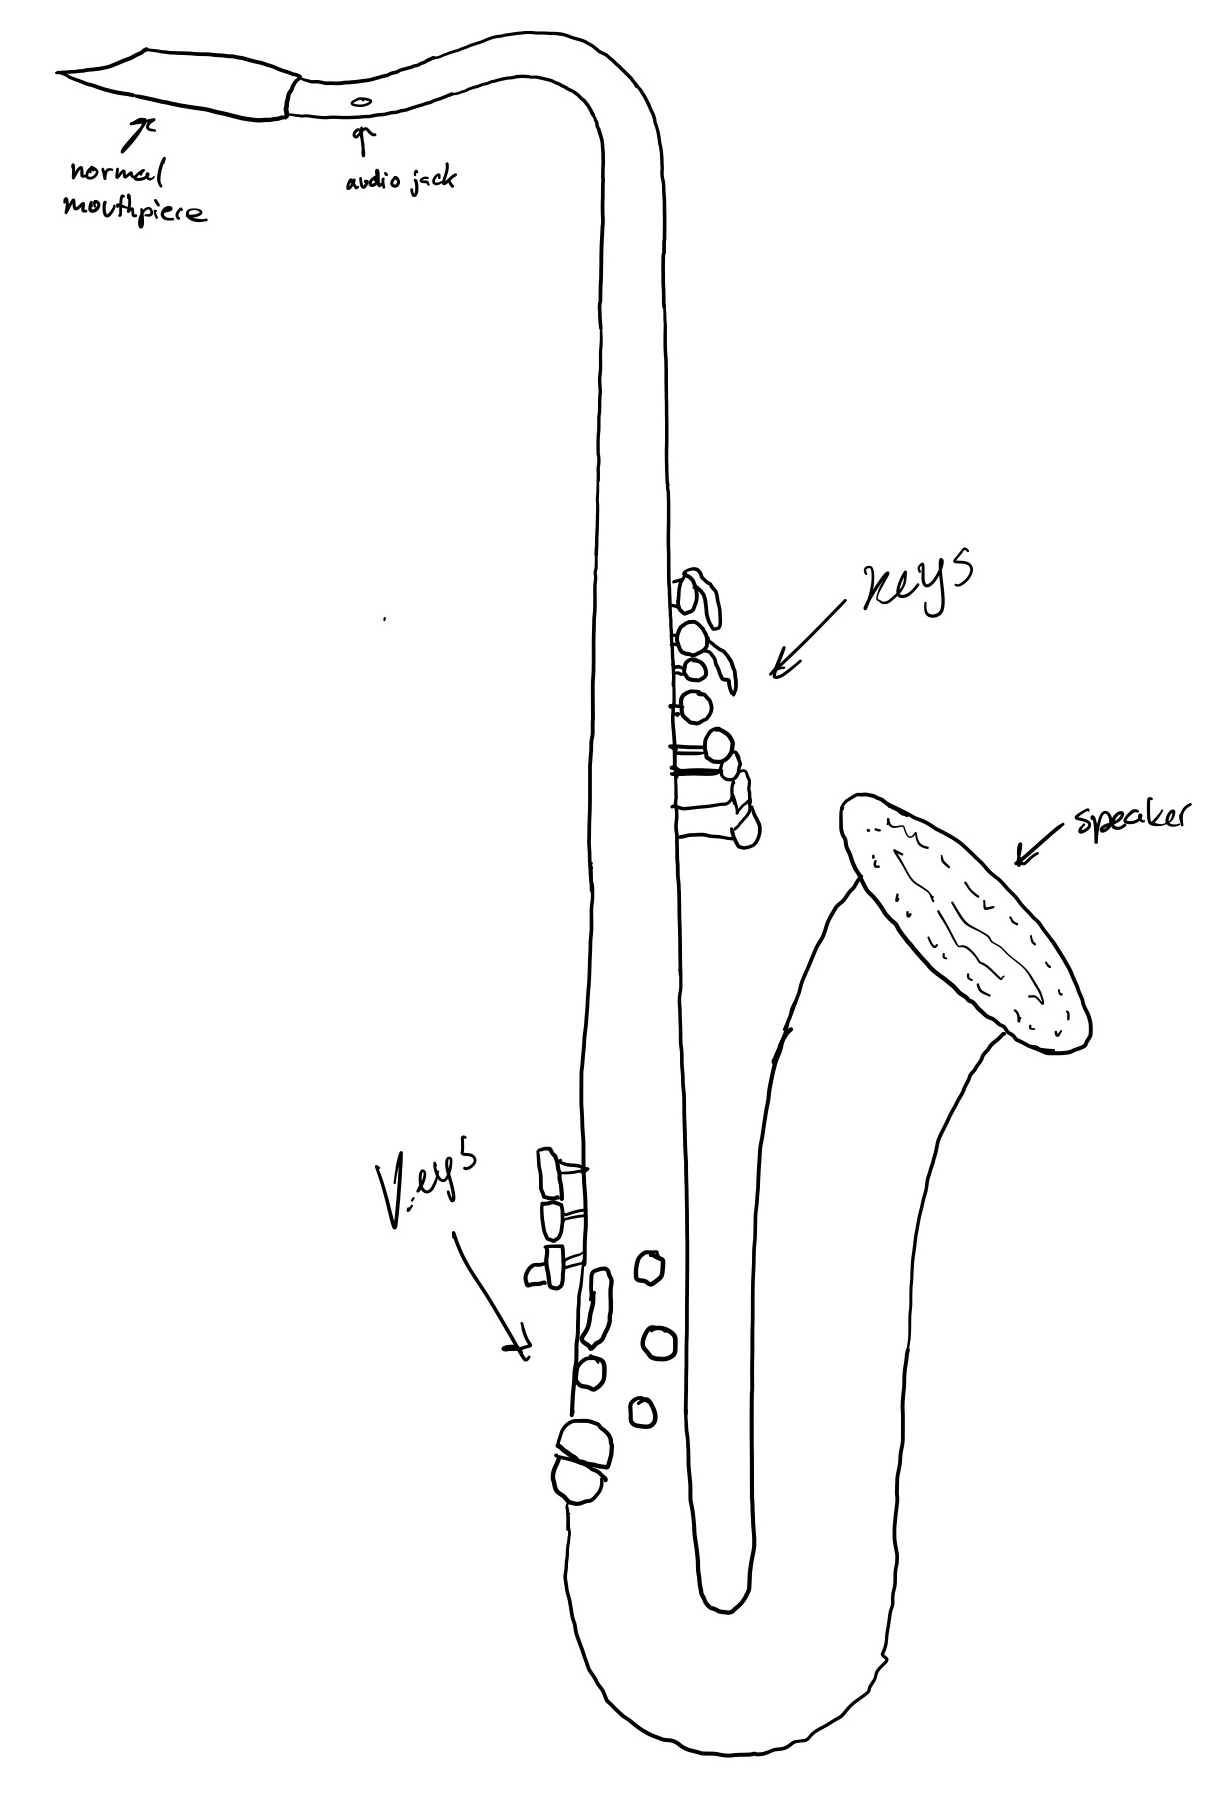
The minimum viable product for this project would be a 3D printed casing with the same dimensions of a tenor saxophone, where a regular mouthpiece can be inserted, with a siphon system to keep moisture outside of the unit, where:
- The user's breath inflates a chamber. A sensor detects how much the chamber inflates by reading the distance it travels, and that signals the intensity of the volume to the speaker
- The user presses buttons (keys), generating inputs that get sent to the microcontroller
- The microcontroller uses the inputs to command an eemprom, wich has samples stored for every key combination.
- The eeprom then sends digital signals to a digital-to-analog converter which emmits the corresponding voltage for every sound
- The voltage emmitted by the converter then passes through the audio amplifier before going to the speaker
As a baseline, this can barely be considered a saxophone. It's more like a saxophone shaped keyboard with breath controlled volume. But after being able to integrate all this, it can be spiralled into:
- Not only measuring the breath pressure, but also the breath flow, so that the oscillation of both values changes the frequency and pitch of the sound. (In my research, I saw somebody else that was building an electronic saxophone who tried to produce the same effect by putting a force-sensitive resistor sensor between his mouthpiece and reed, where the resistor was half of a voltage divider, so that the voltage in the middle varied with the force on the reed and in turn varied the sound being output. However, I want to be able to use regular mouthpieces in mine so I will go this different way)
- Making the buttons as similar as possible to the keys of a regular saxophone in both shape and feeling. Shape-wise it can be easily achieved by scanning the keys on a saxophone and replicating their dimensions when 3D printing. Feeling wise, I can play with the springs on the keys and how they interact with the PCB as switches.
2. Read, sign the student agreement, and commit to repo
The student agreement details what the Fab Academy is responsible for and what the student is responsible for. To complete this assignment I:
- Accessed the document through the FabAcademy directory and copied the text from the page.
- Using visual studio code, I created a markdown document on my working directory. Here I pasted the text, read it, and signed my name. I then saved the document.
- Using the git bash terminal, I added the file to my staging directory, then commited the file to my local repository and then pushed the file into the remote repository.
3. Work through a git tutorial
In our local class on Thursday, our instructor Daniel, talked about the command line, the basic commands, the structure, and the flow. He taught us how to set up Git:
- Everyone in the class created their GitHub account and downloaded Git.
- We opened up our terminals and started typing away. I am personally using a windows laptop to I used Git Bash.
- We all added our username with the command
git config --global user.name "your_username". - Then we configured our email address for uploading files to our repository with the command
git config --global user.email "your_email@mail.com". - Then we checked if we had SSH Keys already generated or not by using the command
cat ~/.ssh/id_rsa.pub. - I already had a key, so I didn't have to generate it. After everyone had either found or generated their keys, we viewed them with the command
cat ~/.ssh/id_rsa.pub. - Then, we copied them to our clipboard. Since I am on windows, I used the command
clip < ~/.ssh/id_rsa.pub. - Then, we copied our SSH keys to our accounts by going into the "SSH Keys" option in our user settings. This now makes it possible for us to connect to our remote repository from our laptop.
After a quick lunch break, our other instructor, Josep, taught us the basics of using the Git terminal and how to work on our repositories:
- After opening up our terminal, we used the command
pwdto check what directory we were working in. - The directory I wanted to work in is a folder called "FabAcademy" in my local "documents" folder. So I used the command
cdand typed in the address of this folder. - I then checked that my GitBash was on the correct directory by once again, using the command
pwd. - Once we were all working on our desired directory, we went to our Git Repo accounts to download our files. In our profiles, where it says "code" we copied the link to clone our repositories with SSH.
- Then, we went back to our terminals to import our files by using the command
git cloneand pasting our SSH links. - I then went to Visual Studio Code, and opened the folder for the directory I was working on. I changed my name on the provided FabLab template for the home page and saved the html file.
- Then, I went back to my GitBash terminal. I used the command
git add. followed by the path of the document I had edited and wanted to add.
- Then, I used the command
git commit -mto commit the document to the local repository and name the changes. - Then, I used the command
git pushto upload the changed file into my remote repository.
4. Build a personal site in the class archive describing you and your final project
Well, here we are!
I created my personal site in the class archive using the provided HTML format for the core and edited it using Visual Studio Code. I decided to use this format as the baseline to keep things simple and efficient, but also made some changes to personalize it more. I decided not to use a static site generator because I wanted to do the whole thing myself. I learned HTML about 10 years ago, and have not used it since, so I thought it would be fun to re-learn it for this. At the moment, I am keeping the site as basic as possible. I do not want to spend too much time focusing on the visuals of it when I can be focusing on the content of it and other topics.
As you can see by navigating in it, I have 4 main pages: the home page, the about page, the weeks page, and the final project page:
- The home page is a simple index for all the other pages with brief summaries of what they each contain.
- The about page contains a picture of me, a description of what I have done, and some pictures of what I have done.
- The weeks page is an index for each week's page. Every week's page has a 3 column layout with a navigation menu on the left and the content in the middle. The content consists of an overview of what I did that week, notes and exercises from the classes, and documentation for the assignments.
- The final project page is an index for all the final project pages. The longer final project phase page have a 3 column layout with a navigation menu on the left and the content in the middle.
Additionally, the navigation bar at the top of the site has interactive dropdown menus for the week and final project pages.
The code for the whole site is in a folder called "public". I have all the main pages and the CSS file in there. In that folder I have a folder for all the images, a folder for all the files, a folder for all the week pages, and a folder for all my final project pages. The images and files folder are organized by nomenclature to keep the access short and easy for me. The weeks folder has all the pages for each week's documentation as well as the base template for them.