
link to group Assignment here
Gyro system and accelerometer
I selected Gyros as input devices beacause I will use them latter in my final project to control the rocket's whereabouts in the flight computer that I am building.
I am using the the XIAO ESP32 WROOM32 this time to collect information from the Gyro siganls (from its movements). I want to be able to record them and save them in spreadsheet to make a kind of telemetry from, or datalogging as well if you like. I am using MPU6050 model.
Process: Linkand an HTML page and CSS to a JavaScript code and arduino (C++) code.
On the HtML page we will display our data, the CSS will format the page, The JavaScript will help us create a 3D box to represent our Gyyroscope, and the C++ code with Arduino IDE will Set up the Gyroscope readings we want to feed to both the HTML and javaScript then display.The documentation will flow cronologically. It makes more sense to read for me that way. This link as well is from a beatiful tutorial I followed from randomnerdtutorials.com: ESP32 Web Server with MPU-6050 Accelerometer and Gyroscope (3D object representation)
HTML
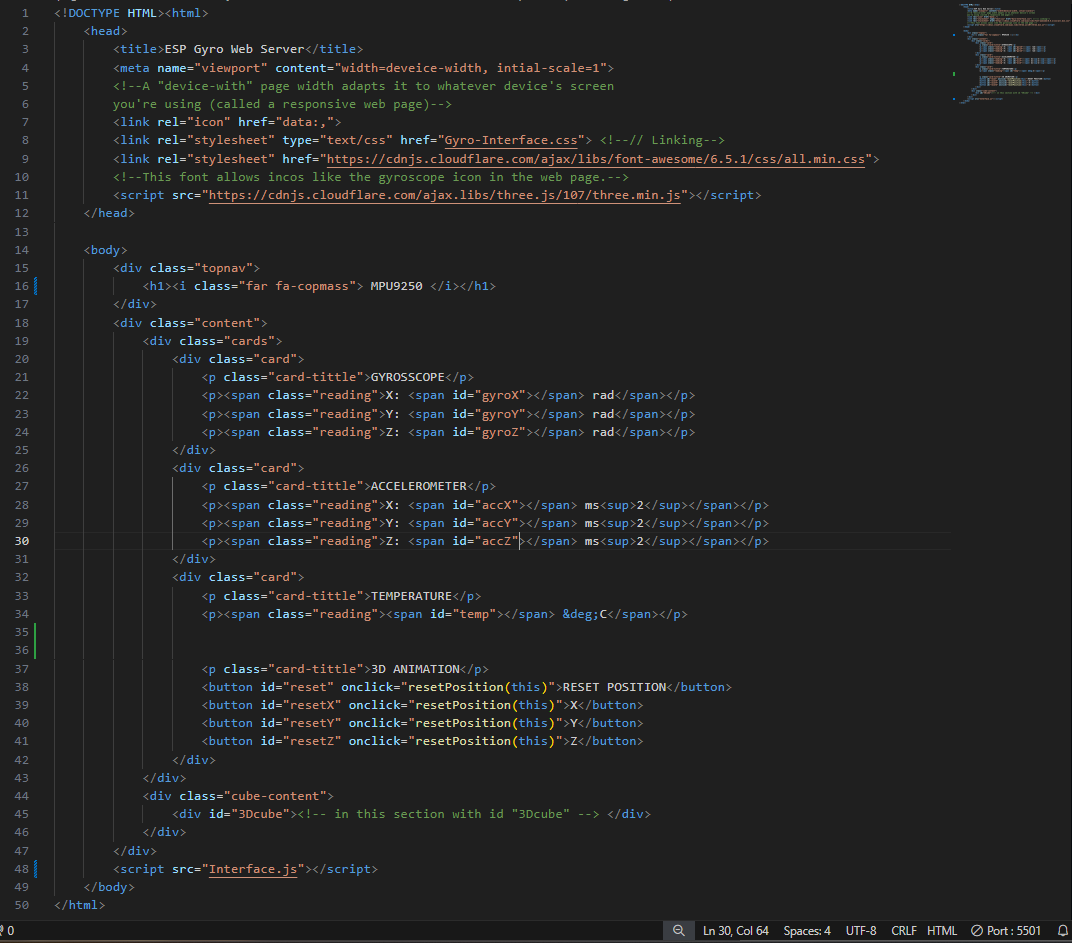
The
Head
Section holds information that will control our website behaviour in the background. Some dare direct tools; like < meta> tag that helps our content adaptable to any display , the < title> tag that sets the page displayed name, The < link rel="icon" href="data:,"> is being used because we don't have a dedicated icon for our webpage. Then < link rel="stylesheet" type="text/css" href="style.css"> is for setting up for the Styling: decoration (page presentation) of the page. < link rel="stylesheet" href="https://cdnjs.cloudflare.com/ajax/libs/font-awesome/6.5.1/css/all.min.css"> for to set fonts to latter display our icons, gyroscope notably. < script src="https://cdnjs.cloudflare.com/ajax/libs/three.js/107/three.min.js"> brings in a library to make 3D representations of our objects: the three.js library.
The Body
In the body section, which is the visible/accessible part from the UI (User Interface).This piece create a header for our page


(Notice the it's a different Gyroscope: It's a mistake in my codes, and I latter updated it. I actually started with MPU6050 gyroscopes but latter switched to MPU9250 because it has morefeatures that I need for my final project).
Next we want to want to make cards/boxes, each being part of a grid that holds the data we want to display. The grid we named Cards, and the smaller boxes in it called "card". We will set up them to take the Gyroscope readings, the Accelerometer, and the Temperature.


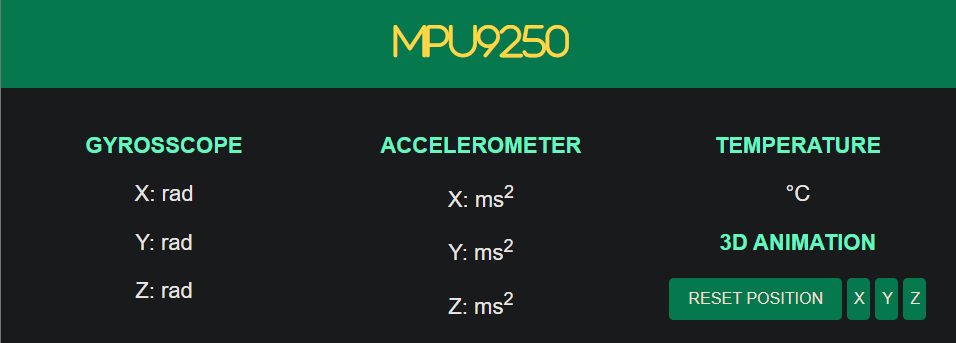
We also want to create a section to put in our 3D object latter


This time I found it distracting to do documentation in a different document/window, it was my first doing JavaScript, (I easily get distracted), so I documented the JavaScript side of the interface set as comments in my codes. I am adding screenshots, below and a link to the file here
The ESP32 program
            //We will need the librarie below to interact with both the Gyroscope
            //and the Java file that is resupplying information to the HTML
            #include < Arduino.h>
            #include < WiFi.h>
            #include < AsyncTCP.h>
            #include < ESPAsyncWebServer.h>
            #include < Adafruit_MPU6050.h>
            #include < Adafruit_Sensor.h>
            #include < Arduino_JSON.h>
            #include < SPIFFS.h>

            //Then we start setting our network credentilas
            const char* ssid = "Phil_ESP-Gyro";
            const Char* password = "canbeanything";

            //Next we are creating an AsyncWebServer object on port 80
            AsyncWebServer server(80);

            //Then an Event Source on /events, which the Java code with pick up from
            AsyncEventSource events("/events");
            //Then a Json variable to hold our readings from the sensor
            JSONVar readings;


            unsigned long lastTime = 0;
            unsigned long lastTimeTemperature = 0;
            unsigned long lastTimeAcc = 0;
            unsigned long gyroDelay = 10;
            unsigned long temperatureDelay = 1000;
            unsigned long accelerometerDelay = 200;

            //We create a sensor object on the line below
            Adafruit_MPU6050;

            sensos_event_t a, g, temp;

            float gyroX, gyroY, gyroZ;
            float accZ, accY, accZ;
            float temperature;

            //We set som deviations as necessary on the Gyroscope sensor. It might be different for you
            float gyroXerror = 0.07;
            float gyroYerror = 0.03;
            float gyroZerror = 0.01;


            // Next we initialize the MPU6050
            void initMPU(){
              if(!mpu.begin()) {
                Serial.println("Failed to find MPU6050 chip");
                while (1) {
                  delay(10);
                }
              }
              Serial.println("MPU6050 Found!");
            }

            void initSPIFFS() {
              if (!SPIFFS.begin()) {
                Serial.println("An error has occured while mounting SPIFFS");
              }
              Serial.println("SPIFFS mounted successfully");
            }

            // Initialize WiFi
            void initWiFi() {
              WiFi.mode(WIFI_STA);
              WiFi.begin(ssid, password);
              Serial.printiln("");
              Serial.print("Connecting to WiFi...");
              while (WiFi.status() != WL_CONNECTED) {
                Serial.print(".");
                delay(1000);
              }
              Serial.println("");
              Serial.println(WiFi.localIP());
            }

            String getGyroReadings(){
              mpu.getEvent(&a, &g, &temp);

              float gyroX_temp = g.gyro.x;
              if(abs(gyroX_temp) > gyroXerror)  {
                gyroX += gyroX_temp/50.00;
              }

              float (gyroY_temp = g.gyroYerror)  {
                gyroY += gyroY_temp/70.00;
              }

              float gyroZ_temp = g.gyro.z;
              if(abs(gyroZ_temp) > gyroZerror)  {
                gyro += gyroZ_temp/90.00;
              }

              readings["gyroX"] = String(gyroX);
              readings["gyroY"] = String(gyroY);
              readings["gyroZ"] = String(gyroZ);

              String jsonstring = JSON.stringify(readings);
              return jsonString;
            }

            String getAcceReadings() {
              mpu.getEvent(&a, &g, &temp);
              // We want to be picking realtime/current acceleretion values
              accX = a.acceleration.x;
              accY = a.acceleration.y;
              accZ = a.acceleration.z;
              readings["accX"] = String(accX);
              readings["accY"] = String(accY);
              readings["accZ"] = String(accZ);
              String accString = JSON.stringify (readings);
              return accString;
            }


            void setup() {
              Serial.begin(115200);
              initWiFi();
              initSPIFFS();
              initMPU();

              // Handle Web Server
              server.on("/", HTTP_GET, [](AsyncWebServerRequest *request){
                request->send(SPIFFS, "/Html-page.html", "text/html");
              });

              server.serverStatic("/", SPIFFS, "/");

              server.on("/reset", HTTP_GET, [](AsyncWebServerRequest *request){
                gyroX=0;
                gyroY=0;
                gyroZ=0;
                request->send(200, "text/plain", "OK");
              });

              server.on("/resetX", HTTP_GET, [](AsyncWebServerRequest *request){
                gyroX=0;
                request->send(200, "text/plain", "OK");
              });

              server.on("/resetY"; HTTP_GET, [](AsyncWebServerRequest *request){
                gyroY=0;
                request->send(200, "text/plain", "OK");
              });

              server.on("/resetZ", HTTP_GET, [](AsyncWebServerRequest *request){
                gyroZ=0;
                request->send(200, "text/plain", "OK");
              });

              // Handle Web Server Events
              events.onConnect([](AsyncEventSourceClient *client){
                if(client->lastId()){
                  Serial.printf("Client reconnected! Last message ID that it got is: &u\n", client->lastId());
                }
                // send event with message "hello!", id current millis
                // and set reconnect delay to 1 second
                client->send("hello!", NULL, millis(), 10000);
              });
              server.addHandler(&events);

              sever.begin();
            }

            void loop() {
              if((millis() = lastTime) > gyroDelay)  {
                //send Events to the web Server with the Sensor Readings
                events.send(getGyroReadings().c_str(),"gyro_readings",millis());
                lastTime = millis();
              }
              if ((millis() - lastTimeAcc) > accelerometerDelay)  {
                // Send Events to the web Server with Sensor Readings
                events.send(getAccReadings().c_str(),"accelerometer_readings",millis());
              }
              if ((millis() - lastTimeTemperature) > temperatureDelay)  {
                // Send Events to the Web Server with teh Sensor Readings
                events.send(getTemperature().c_tr(),"temperature_reading",millis());
                lastTimeTemperature = millis();
              };
            }
Now you want to load your entire program (code and files). You need the to save the files in the
sketch folder, in another folder called data.


Node Red Dashboards
After this we switched to Node Red dashboard interfaces. They are reavely easier to build in terms of time it takes to build, ease of linking with seriarl ports and collecting incoming data from the micontroller.
To start you need to install Node.js. Set up download link and tutorial.


So run the command in CMD:
node --version && npm --version
You'd expect to see something similar to

npm install -g --unsafe-perm node-red
After it has instelled go ahead and run Node-RED
node-red
Which will bring this data with a link (IP Address) you follow or paste in your browser to open the flow environment that you can start building your dashboard.


the specific functions in my flow will make sense if you read the code I wrote for this board I am making an interface for.

The reason the explainations on the sketch work, is because the ESP32 node in the top left corner of the picture can connect to the same COM port that board (the flight computer is this case). we also put it on the same baud rate (picture below). This allows it take informantion directly from the same COM port the micontroller is sending it to and take the role of the serial monitor, with the added benefit of being able to present it however we want latter using output "Dashboard nodes", spcificaly texts and charts.

The Dashboard


Video demonstration (gyroscope data)
When I upload my arduino sketch, and deploy the dashboard it will give live data
Contact
Happy to receive your inquiries.
Location:
Kigali, Rwanda
Email:
philemonmail77@gmail.com.com
Call:
+250 780 716 155