MQTT connect with XIAO boards and Docusaurus-website
Write something at the front
Wrote on 5.8th, I can do the data sending through Wi-Fi from last week, but it is surprisingly that Neil said I can do multiple(one) to one(multiple) data communication with MQTT. I think that is helpful for my final project, so I tend to use this protocol to achieve this week assignment.
After studying Neil's class, I reallized that I can do data communication among different modules and websites, which allows different working devices talk to each other. This example usage('hello.MQTT-blink.C3.py') and the video about it help a lot for me getting started with MQTT.
For continuing and knowing better, I understand that broker is the very heart of the MQTT communication and it hosts everything. There will be serval topics in it and devices can publish and subscribe to transfer the data. Some devices can publish on the channels, and some devices can subscribe to see what's happpening. As for the recommendation, Mosquitto is an open source MQTT broker and I can use it for my MQTT setup.
The broker can be applied in the web browsers for visdual data, which means the web connection. That brings me my Docusaurus - I can integrate it on my Fab Academy page!
I will still use XIAO ESP32C3 as my portable device's computing mdoule.
Setup MQTT on reComputer and test
Since I am using reComputer as my computing host, I will setup MQTT service on reComputer. First I need to install the MQTT broker(Mosquitto) and then try to setup the MQTT server.
From week 14, I use my MAC to control my reComputer, for debugging
I can run this commend
sudo apt-get update
sudo apt-get install mosquitto
and get the Mosquitto installation done on my reComputer(Linux).
Then I run the commend:
sudo service mosquitto start
to start it.
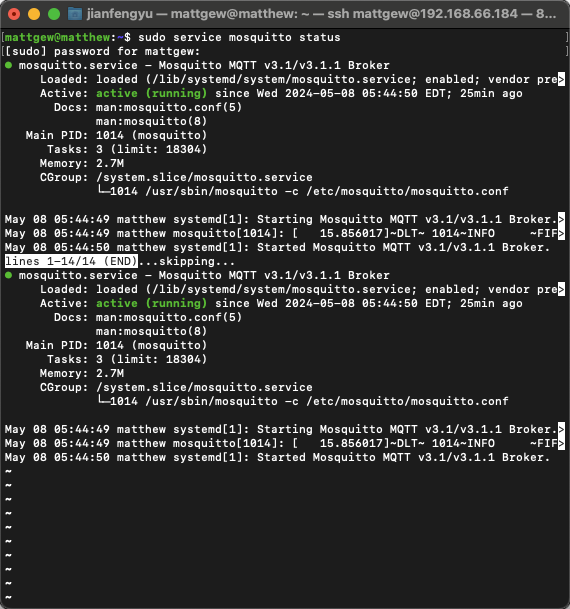
I can run this commend:
sudo service mosquitto status
to see whether it is been activited:
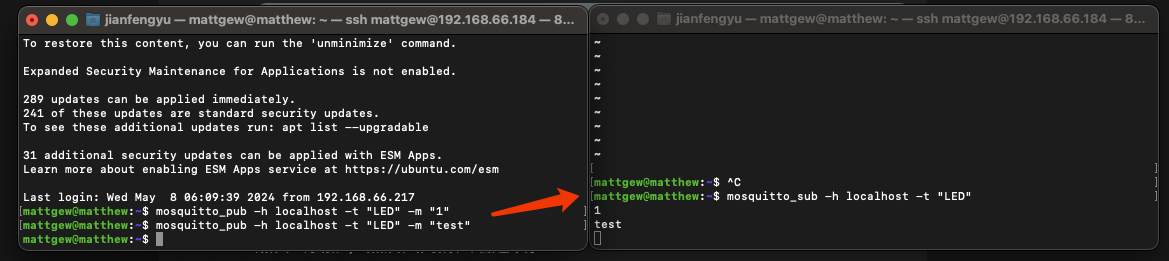
Then, from the example by GPT, I can run two terminals and check whether the broker is working:
For creating/subcribing a topic:
mosquitto_sub -h localhost -t "LED"
For sending/publishing some data:
mosquitto_pub -h localhost -t "LED" -m "1"
mosquitto_pub -h localhost -t "LED" -m "test"
I get the results and it seems all good:
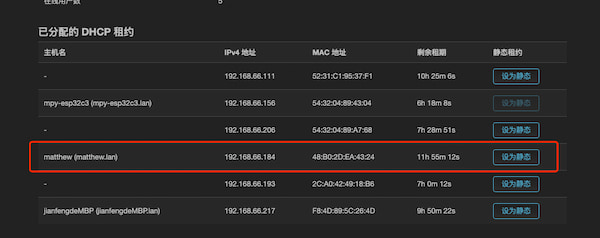
And the localhost is 192.168.66.184:
Enable Docusaurus page conneting MQTT Broker(Mosquitto)
This takes me a lot of time... Where should I even start...
I just write it as the normal order how to implement it...
SO MUCH WORK! Especially since I had no previous experience and had a lot of assignments left behindXXXD
Environment setting
The first step is that I should setup right the environment for both sides(reComputer and XIAO ESP32C3)
For the XIAO ESP32C3 module part, there are not so much that need to do. The noticable thing is the code about confiduring Wi-Fi info(local service) and MQTT info:
WIFI_SSID = "my_wifi_name"
WIFI_PASSWORD = "my_wifi_password"
MQTT_SERVER = "192.168.66.184"  # Where host the MQTT broker. My reComputer.
MQTT_PORT = 1883  # normaly 1883
For the reComputer device part:
First I need to install MQTT.js for Docusaurus pages
npm install mqtt
To communicate directly with the MQTT service from the web pages, I should set up a proxy - WebSocket to MQTT. And the nice thing is the "Mosquitto" is supporting WebSocket.
Then I need to setup the MQTT Client under the relative path of "scr/page/" and I name it as "mqtt_control.js". Based on neil's example, I asked GPT and made the initial js code:
import clsx from 'clsx';
import Link from '@docusaurus/Link';
import useDocusaurusContext from '@docusaurus/useDocusaurusContext';
import Layout from '@theme/Layout';
import HomepageFeatures from '@site/src/components/HomepageFeatures';

import Heading from '@theme/Heading';
import styles from './index.module.css';

function HomepageHeader() {
  const {siteConfig} = useDocusaurusContext();
  return (
    <header className={clsx('hero hero--primary', styles.heroBanner)}>
      <div className="container">
        <Heading as="h1" className="hero__title">
          {siteConfig.title}
        </Heading>
        <p className="hero__subtitle">{siteConfig.tagline}</p>
        <div className={styles.buttons}>
          <Link
            className="button button--secondary button--lg"
            to="/docs/matthew_at_the_beginning">
            Meet Me
          </Link>
          <div style={{ margin: '20px' }}></div>
          <Link
            className="button button--secondary button--lg"
            to="/docs/final_project">
            Final Project
          </Link>
        </div>

      </div>
    </header>
  );
}

export default function Home() {
  const {siteConfig} = useDocusaurusContext();
  return (
    <Layout
      title={`Hello from ${siteConfig.title}`}
      description="Description will go into a meta tag in <head />">
      <HomepageHeader />
      <main>
        <HomepageFeatures />
      </main>
    </Layout>
  );
}
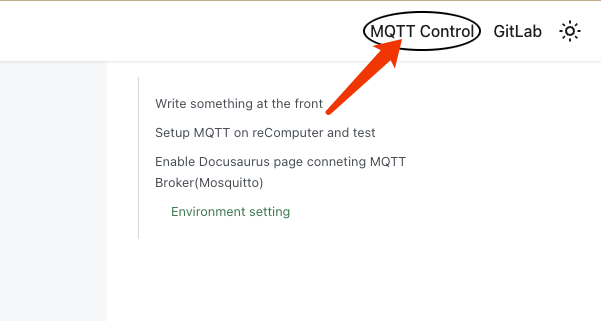
And the relative url is "/mqtt_control" just like the name of the file. Then I want to put it in my top nav bar. So in the "docusaurus.config.js" file I put the code like below:
          {
            to: '/mqtt_control',
            label: 'MQTT Control',
            position: 'right',
            className: 'circle-link',  // custom css
          },
And I circle it, for these memorable time. The css in the "custom.css" is:
.circle-link {
	border: 2px solid #000;
	border-radius: 50%;
	padding: 5px;
  }
So, under the local server and click here:
The display will be shown as:
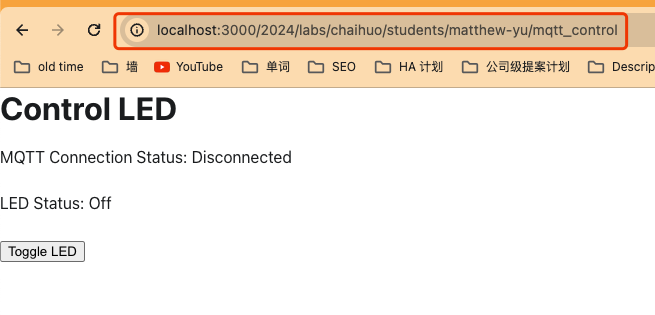
Because it is all local, click it on the final page on my GitLab repo, it will crash.
As the previous saying, I will construct the WebSocket and connect it to MQTT Broker. But for the intial installation of "Mosquitto", it needs to be confiduring:
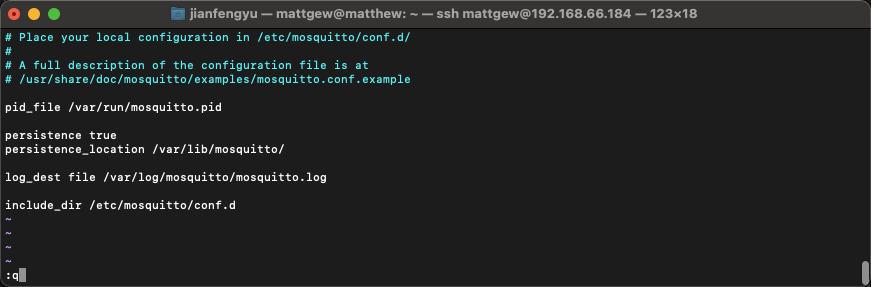
1. Find the path where stored the file named: "mosquitto.conf" and use commend cat to check the contents. For me it said:
So I can create a custom file under the path of "etc/mosquitto/conf.d":
2. Using touch etc/mosquitto/conf.d/web.conf commend will create a file named "web.conf".
And using sudo vim etc/mosquitto/conf.d/web.conf will configure the file. Copy the contents below:
# For regular MQTT clients
listener 1883

# For WebSocket clients
listener 9001
protocol websockets
then type wq to store and exit.
Using find / -name mosquitto.conf 2>/dev/null commend can find all the path that the file named: "mosquitto.conf". Because sometimes the path is not the one above

And some reason, I have to add the listener 1883... Otherwise it will get errors...
3. After configuring the "web.conf" file, I ran this commend:
sudo service restart mosquitto
for restarting the mosquitto, and I will check whether the configured file has been activited:
sudo netstat -tulpn | grep mosquitto

The output here shows:
- "1883" is the default MQTT TCP connection port (IPv4 and IPv6).
- "9001" is the configured MQTT WebSocket port (IPv6 only, but this usually includes IPv4 unless otherwise specifically configured).
4. For finishing it, I configure the MQTT info in the "mqtt_control.js"
The bbove one: const MQTTBroker = 'mqtt://192.168.66.184:1883';
should be ↓
like this: const MQTTBroker = 'mqtt://192.168.66.184:9001/mqtt';
--> What I want to implement is for the Docusaurus page and ESP device to interact via Mosquitto the MQTT broker.
- In this case, even if they use different ports, there is no problem because they both exchange messages through the same MQTT broker.
- In this way, the Docusaurus page and ESP device do not communicate directly, but interact indirectly by subscribing and publishing messages to the same MQTT topics.
- Like mentioned on the class.
Enable the communcation between XIAO ESP32C3 and Docusaurus page
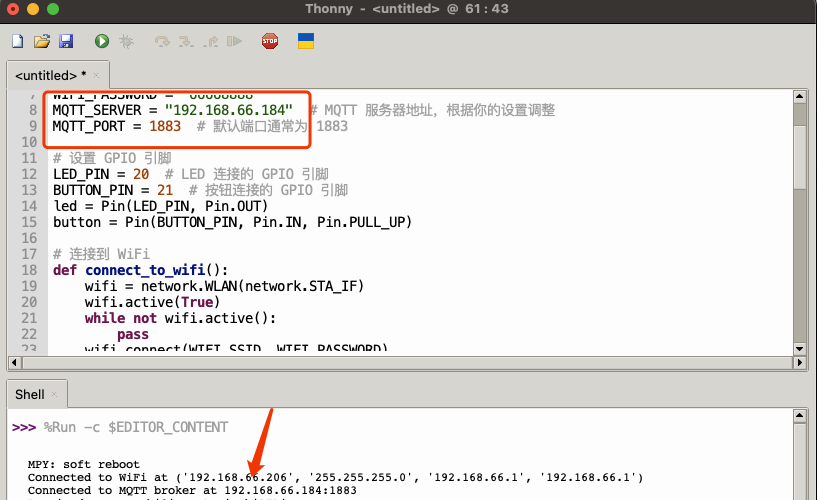
Like I did before, I flashed the MicroPython code on the XIAO ESP32C3(this has been changed a little bit for the Neil's code):
import network
from umqtt.simple import MQTTClient
from machine import Pin

# 配置你的网络和 MQTT 服务器信息
WIFI_SSID = "fros_wifi"
WIFI_PASSWORD = "66668888"
MQTT_SERVER = "192.168.66.184"  # MQTT 服务器地址,根据你的设置调整
MQTT_PORT = 1883  # 默认端口通常为 1883

# 设置 GPIO 引脚
LED_PIN = 20  # LED 连接的 GPIO 引脚
BUTTON_PIN = 21  # 按钮连接的 GPIO 引脚
led = Pin(LED_PIN, Pin.OUT)
button = Pin(BUTTON_PIN, Pin.IN, Pin.PULL_UP)

# 连接到 WiFi
def connect_to_wifi():
    wifi = network.WLAN(network.STA_IF)
    wifi.active(True)
    while not wifi.active():
        pass
    wifi.connect(WIFI_SSID, WIFI_PASSWORD)
    while not wifi.isconnected():
        pass
    print("Connected to WiFi at", wifi.ifconfig())

# MQTT 消息处理函数
def mqtt_handler(topic, message):
    print(f"Received message {message} on topic {topic}")
    if message == b"1":
        led.value(1)
    else:
        led.value(0)

# 连接到 MQTT 服务器
def connect_to_mqtt():
    client = MQTTClient("mqtt_client_id", MQTT_SERVER, MQTT_PORT)
    client.set_callback(mqtt_handler)
    client.connect()
    print(f"Connected to MQTT broker at {MQTT_SERVER}:{MQTT_PORT}")
    return client

# 主函数
def main():
    connect_to_wifi()
    client = connect_to_mqtt()
    client.subscribe("LED")

    button_up = True
    try:
        while True:
            client.check_msg()  # 检查新的 MQTT 消息

            # 发布按钮状态变化
            if button.value() == 0 and button_up:
                led.value(1)
                print("Publish: button down")
                client.publish("button", "button down")
                button_up = False
            elif button.value() == 1 and not button_up:
                led.value(0)
                print("Publish: button up")
                client.publish("button", "button up")
                button_up = True
    finally:
        client.disconnect()

if __name__ == "__main__":
    main()
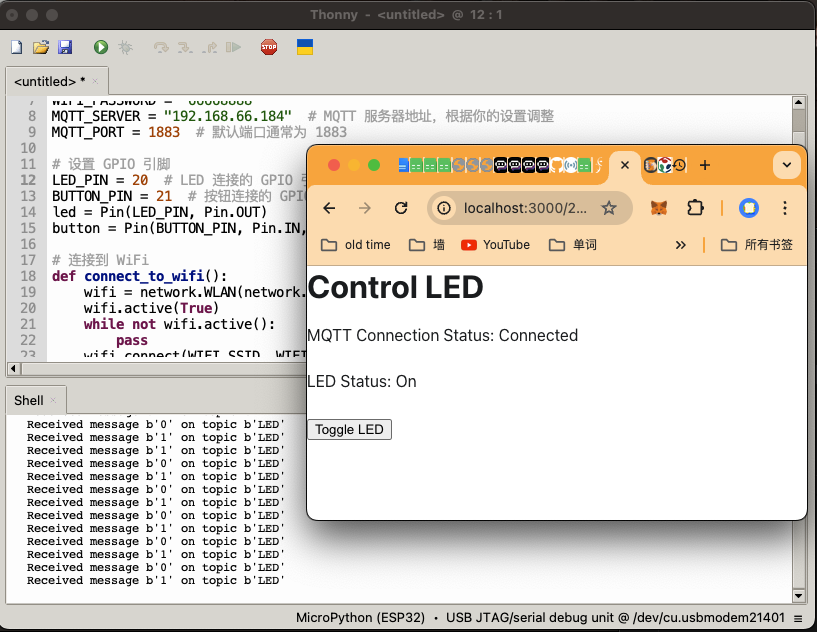
And the Shell will show like this:
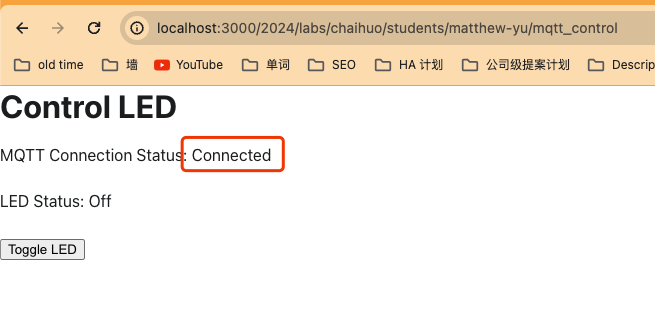
At the same time, I use npm run start to start my website and navigate the MQTT Control page.
I finally get the connented information!!!
The rest will be just OK:
And here is the video:
Enable the two boards connectting with MQTT
Since I understand the principle of MQTT connection. I then want to apply two XIAO ESP32C3(one is my design) to do a RGB light display.
I apply the reComputer as my MQTT Broker and use reRouter as my Wi-Fi Router:
+----------------+
|  Wi-Fi Router  |
|  192.168.66.1  |
+----------------+
        |
        |
        |-- XIAO ESP32C3 board alone (MQTT Publisher)
        |
        |-- XIAO ESP32C3 board with RGB light (MQTT Subscriber)
        |
        |-- reComputer as the MQTT Broker
            IP: 192.168.66.184
I made a mistake that I brought a Wi-Fi extension for reComputer as when it is connecting to the reRouter the IP address is different and not 192.168.66.184 which is 192.168.66.140. So I need to change the port.
MQTT Publisher
For this I am applying the single XIAO ESP32C3 board and create a topic called: "sentence 1" and wait 5 second to send again. This is the MicroPython code:
import network
from umqtt.simple import MQTTClient
import time

# 配置你的网络和 MQTT 服务器信息
WIFI_SSID = "fros_wifi"
WIFI_PASSWORD = "66668888"
MQTT_SERVER = "192.168.66.140"  # MQTT 服务器地址,根据你的设置调整
MQTT_PORT = 1883  # 默认端口通常为 1883

# 连接到 WiFi
def connect_to_wifi():
    wifi = network.WLAN(network.STA_IF)
    wifi.active(True)
    while not wifi.active():
        pass
    wifi.connect(WIFI_SSID, WIFI_PASSWORD)
    while not wifi.isconnected():
        pass
    print("Connected to WiFi at", wifi.ifconfig())

# 连接到 MQTT 服务器
def connect_to_mqtt():
    client = MQTTClient("mqtt_publisher_id", MQTT_SERVER, MQTT_PORT)
    client.connect()
    print(f"Connected to MQTT broker at {MQTT_SERVER}:{MQTT_PORT}")
    return client

# 主函数
def main():
    connect_to_wifi()
    client = connect_to_mqtt()

    try:
        while True:
            message = "sentence 1"
            client.publish("text", message)
            print(f"Published message: {message}")
            time.sleep(5)  # 等待 5 秒钟再发布下一条消息
    finally:
        client.disconnect()

if __name__ == "__main__":
    main()
MQTT Subscriber
I use my desinged board from week 8 and connect it with a RGB stripe:
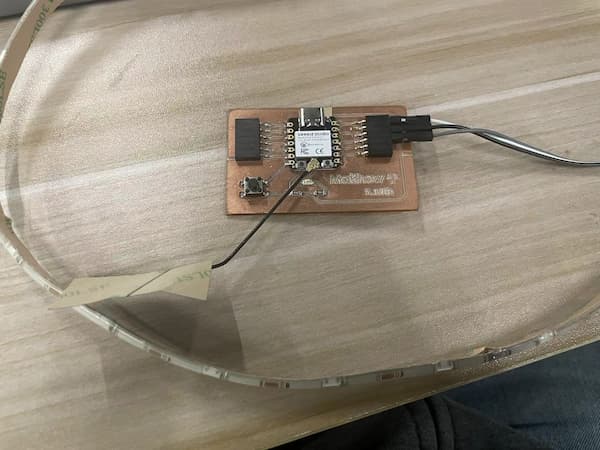
Using 5V(deafult) and D10 port.
I first test the RGB light and use these code generated by GPT:
from machine import Pin
from neopixel import NeoPixel
import time

# 配置
NUM_LEDS = 10  # LED灯的数量
pin = Pin(2, Pin.OUT)  # GPIO2
np = NeoPixel(pin, NUM_LEDS)

# 七彩虹颜色定义
colors = [
    (255, 0, 0),    # 红色
    (255, 165, 0),  # 橙色
    (255, 255, 0),  # 黄色
    (0, 255, 0),    # 绿色
    (0, 0, 255),    # 蓝色
    (75, 0, 130),   # 靛色
    (238, 130, 238) # 紫色
]

def clear_leds():
    for i in range(NUM_LEDS):
        np[i] = (0, 0, 0)
    np.write()

def rainbow_flow(initial_delay, final_delay, steps):
    delay = initial_delay
    delay_step = (initial_delay - final_delay) / steps
    color_length = len(colors)

    for step in range(steps):
        for i in range(NUM_LEDS):
            color_index = (i + step) % color_length
            np[i] = colors[color_index]
        np.write()
        time.sleep(delay)
        delay = max(final_delay, delay - delay_step)  # Ensure delay does not go below final_delay

def flash_white(times, delay):
    for _ in range(times):
        for i in range(NUM_LEDS):
            np[i] = (255, 255, 255)  # 白色
        np.write()
        time.sleep(delay)
        clear_leds()
        time.sleep(delay)

# 主程序
clear_leds()
rainbow_flow(0.1, 0.02, 100)  # 从0.1秒逐渐加速到0.02秒,总共100步
flash_white(3, 0.3)  # 白色闪烁3次,每次0.3秒
This enables the the flashing from slow to fast, with rainbow. Later flash three times white.
Then I use this board as MQTT Suscriber, looking for a "text" topic under the same Wi-Fi:
import network
from umqtt.simple import MQTTClient
from machine import Pin
from neopixel import NeoPixel
import time

# 配置你的网络和 MQTT 服务器信息
WIFI_SSID = "fros_wifi"
WIFI_PASSWORD = "66668888"
MQTT_SERVER = "192.168.66.140"  # MQTT 服务器地址,根据你的设置调整
MQTT_PORT = 1883  # 默认端口通常为 1883

# RGB LED 配置
NUM_LEDS = 10  # LED灯的数量
pin = Pin(2, Pin.OUT)  # GPIO2
np = NeoPixel(pin, NUM_LEDS)

# 七彩虹颜色定义
colors = [
    (255, 0, 0),    # 红色
    (255, 165, 0),  # 橙色
    (255, 255, 0),  # 黄色
    (0, 255, 0),    # 绿色
    (0, 0, 255),    # 蓝色
    (75, 0, 130),   # 靛色
    (238, 130, 238) # 紫色
]

def clear_leds():
    for i in range(NUM_LEDS):
        np[i] = (0, 0, 0)
    np.write()

def rainbow_flow(initial_delay, final_delay, steps):
    delay = initial_delay
    delay_step = (initial_delay - final_delay) / steps
    color_length = len(colors)

    for step in range(steps):
        for i in range(NUM_LEDS):
            color_index = (i + step) % color_length
            np[i] = colors[color_index]
        np.write()
        time.sleep(delay)
        delay = max(final_delay, delay - delay_step)  # Ensure delay does not go below final_delay

def flash_white(times, delay):
    for _ in range(times):
        for i in range(NUM_LEDS):
            np[i] = (255, 255, 255)  # 白色
        np.write()
        time.sleep(delay)
        clear_leds()
        time.sleep(delay)

# 连接到 WiFi
def connect_to_wifi():
    wifi = network.WLAN(network.STA_IF)
    wifi.active(True)
    while not wifi.active():
        pass
    wifi.connect(WIFI_SSID, WIFI_PASSWORD)
    while not wifi.isconnected():
        pass
    print("Connected to WiFi at", wifi.ifconfig())

# MQTT 消息处理函数
def mqtt_handler(topic, message):
    if message.decode() == "sentence 1":
        clear_leds()
        rainbow_flow(0.1, 0.02, 100)  # 从0.1秒逐渐加速到0.02秒,总共100步
        flash_white(3, 0.3)  # 白色闪烁3次,每次0.3秒

# 连接到 MQTT 服务器
def connect_to_mqtt():
    client = MQTTClient("mqtt_client_id", MQTT_SERVER, MQTT_PORT)
    client.set_callback(mqtt_handler)
    client.connect()
    print(f"Connected to MQTT broker at {MQTT_SERVER}:{MQTT_PORT}")
    return client

# 主函数
def main():
    connect_to_wifi()
    client = connect_to_mqtt()
    client.subscribe("text")

    try:
        while True:
            client.check_msg()  # 检查新的 MQTT 消息
    finally:
        client.disconnect()

if __name__ == "__main__":
    main()
Also generated by GPT, which is intereating two parts code.
The main function that it is waitting for a new MQTT message in an infinite loop.
- When the message "sentence 1" is received, it will empty the LED lights and then run the rainbow effect and the white flashing effect.
- For other messages, it will do nothing.
Integration
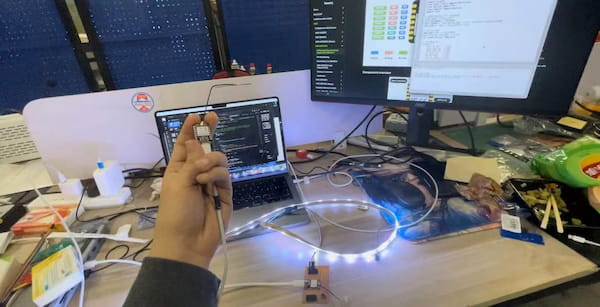
Finally the video about the output:
This is the function that one XIAO board publishing words and one XIAO board suscribing and displaying.
The image:
Integrating on Docusaurus Page
I should enable my docusaurus page to intereact with my device, as the user interface:
First I duplicate "mqtt_control_led" .jsx file and change to a new one called "mqtt_control_display" under the same path of my docusaurus folder, powered by GPT, publish the topic as RGB.
import React, { useEffect, useState } from 'react';
import mqtt from 'mqtt';

const MQTTBroker = 'mqtt://192.168.66.140:9001/mqtt';

const ControlRGBLED = () => {
  const [mqttClient, setMqttClient] = useState(null);
  const [connectionStatus, setConnectionStatus] = useState('Disconnected');

  useEffect(() => {
    const client = mqtt.connect(MQTTBroker);

    client.on('connect', () => {
      console.log('Connected to MQTT Broker');
      setConnectionStatus('Connected');
    });

    client.on('disconnect', () => {
      console.log('Disconnected from MQTT Broker');
      setConnectionStatus('Disconnected');
    });

    client.on('error', (error) => {
      console.error('MQTT Error:', error);
      setConnectionStatus('Disconnected');
    });

    setMqttClient(client);

    return () => {
      if (client) {
        client.end();
      }
    };
  }, []);

  const changeColor = (color) => {
    if (mqttClient) {
      mqttClient.publish('RGB', color);
    }
  };

  return (
    <div>
      <h1>Control RGB LED</h1>
      <p>MQTT Connection Status: {connectionStatus}</p>
      <button onClick={() => changeColor('red')}>Red</button>
      <button onClick={() => changeColor('green')}>Green</button>
      <button onClick={() => changeColor('blue')}>Blue</button>
    </div>
  );
};

export default ControlRGBLED;
On the XIAO ESP32C3 side, I client.subscribe("RGB") subscribe the RGB topic:
from umqtt.simple import MQTTClient
import machine
import neopixel
import time

# MQTT 服务器设置
MQTT_SERVER = "192.168.66.140"
MQTT_PORT = 1883
MQTT_TOPIC = "RGB"

# RGB LED 设置
LED_PIN = 2  # 根据你的连接修改引脚编号
NUM_LEDS = 1  # LED 数量
np = neopixel.NeoPixel(machine.Pin(LED_PIN), NUM_LEDS)

def mqtt_callback(topic, msg):
    print("MQTT Message: {} from Topic: {}".format(msg, topic))
    color = msg.decode()
    if color == "red":
        np[0] = (255, 0, 0)  # Red
    elif color == "green":
        np[0] = (0, 255, 0)  # Green
    elif color == "blue":
        np[0] = (0, 0, 255)  # Blue
    else:
        np[0] = (0, 0, 0)  # Turn off
    np.write()

def connect_to_mqtt():
    client = MQTTClient("micropython_rgb", MQTT_SERVER, port=MQTT_PORT)
    client.set_callback(mqtt_callback)
    client.connect()
    client.subscribe(MQTT_TOPIC.encode())
    print("Connected to {}:{} and subscribed to {}".format(MQTT_SERVER, MQTT_PORT, MQTT_TOPIC))
    return client

def main():
    client = connect_to_mqtt()
    try:
        while True:
            client.wait_msg()
    finally:
        client.disconnect()

if __name__ == "__main__":
    main()
This is just for the demo and when the website server(my computer) connecting to the same Wi-Fi as my board:
This is the showing: