14. Networking and communications
This week is about the networking and communications.
Robot bean
In the input and output week I did a small robot bean:
Idea
I want to do is to use the light sensor to control the master board and the master board will send signal to reader board. So that the servo can dance synchronizely together.
Wired connection
Since we are sill in lock down, I used the arduino wire library to do the test work.
The connection between two arduino boards is like this:
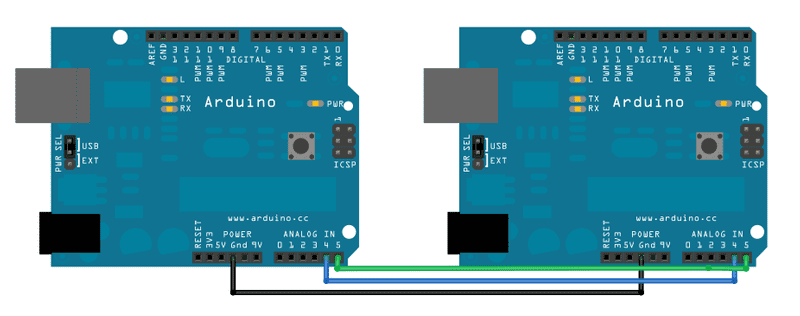
Master:
#include <Servo.h>
#include <Wire.h>

Servo myservo;  // deinfe Servo Object
int pos = 0;

byte x = 0;

void setup() {
  pinMode(0, INPUT);
  myservo.attach(1);
  //Serial.begin(9600);

  Wire.begin();
}

void loop() {
  int value = analogRead(0); //Read value from light sensor
  value = map(value, 0, 1023, 0, 255);
  if (value < 200) {
  //Serial.println(value);
    for (pos = 0; pos <= 180; pos ++) {
      // in steps of 1 degree
      myservo.write(pos);
      delay(2);
    }
    for (pos = 180; pos >= 0; pos --) {
      myservo.write(pos);
      delay(2);
    }
  } else {

    Wire.beginTransmission(8); // transmit to device #8
    Wire.write("x is ");        // sends five bytes
    Wire.write(x);              // sends one byte
    Wire.endTransmission();    // stop transmitting

    x++;

  }

  delay(100);
}
Reader:
// Wire Slave Receiver
// by Nicholas Zambetti <http://www.zambetti.com>

// Demonstrates use of the Wire library
// Receives data as an I2C/TWI slave device
// Refer to the "Wire Master Writer" example for use with this

// Created 29 March 2006

// This example code is in the public domain.


#include <Wire.h>
#include <Servo.h>

Servo myservo;  // deinfe Servo Object
int pos = 0;

void setup() {
  myservo.attach(1);
  Wire.begin(8);                // join i2c bus with address #8
  Wire.onReceive(receiveEvent); // register event
  //Serial.begin(9600);           // start serial for output
}

void loop() {
  delay(100);
  //Serial.println(pos);
}

// function that executes whenever data is received from master
// this function is registered as an event, see setup()
void receiveEvent(int howMany) {
  while (1 < Wire.available()) { // loop through all but the last
    char c = Wire.read(); // receive byte as a character
    //Serial.print(c);         // print the character
  }
  int x = Wire.read();    // receive byte as an integer
  //Serial.println(x);         // print the integer

  for (pos = 0; pos <= 180; pos ++) {
    // in steps of 1 degree
    myservo.write(pos);
    delay(2);
  }
  for (pos = 180; pos >= 0; pos --) {
    myservo.write(pos);
    delay(2);
  }
}
Marks
Sometimes there are conflicts between Serial and Servo? If I comment the Serial code, the Servo will always work. With the Serial code like ‘Serial.print()’ the servo would not respond sometimes.
Still no clue why this happens.
[2022-05-10]
Find a solution: https://tutorial.cytron.io/2015/09/04/softwareserial-conflicting-servo-interrupt
I was using PIN1 to control the servo, PIN1 is also the TX PIN of Arduino, after I change to PIN5 it worked.