Introduction.
I have no experience in programming microcontrollers, but I find it fantastic, as an electronic component can control many things, this week I found it very interesting since in general I got to know the different microcontrollers, both small and large, and even more interesting for them to do. a specific task requires embedded programming, which is a world so big that I think the limitation is first our imagination, second the knowledge related to electronic components and third the stores or companies that sell these electronic components that are more common in developed countries , but that is why I am here because I want to improve my knowledge first and then the people around me and motivate them to use technology and not precisely to buy them but rather to manufacture and innovate their daily tasks based on their jobs or occupations .
individual assignment
Read a microcontroller data sheet program your board to do something, with as many different programming languages and programming environments as possible.
-
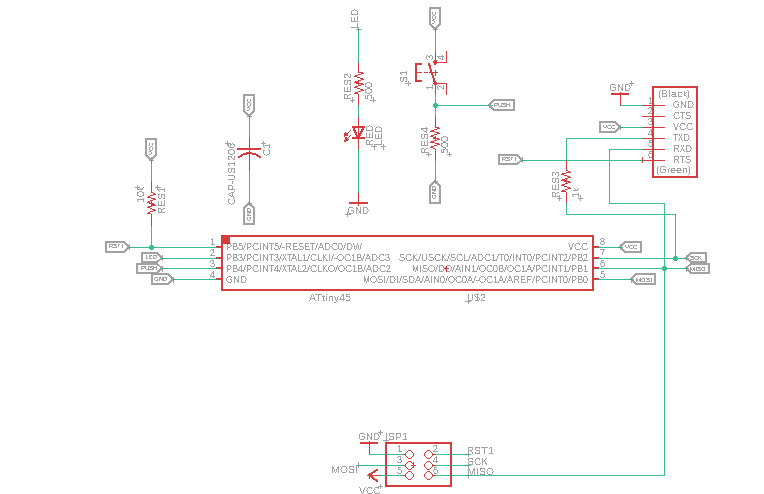
The redesigned version of the ATtiny45 hello.ftdi.45 board, assignment developed in the week "electronic design".
-
For this setting to work properly, I need to verify and declare PINout correctly. So
check ATiny45 / v-10SU datasheet:
 Below is a detailed guide to the attiny45 microcontroller.
-
My board version hello.
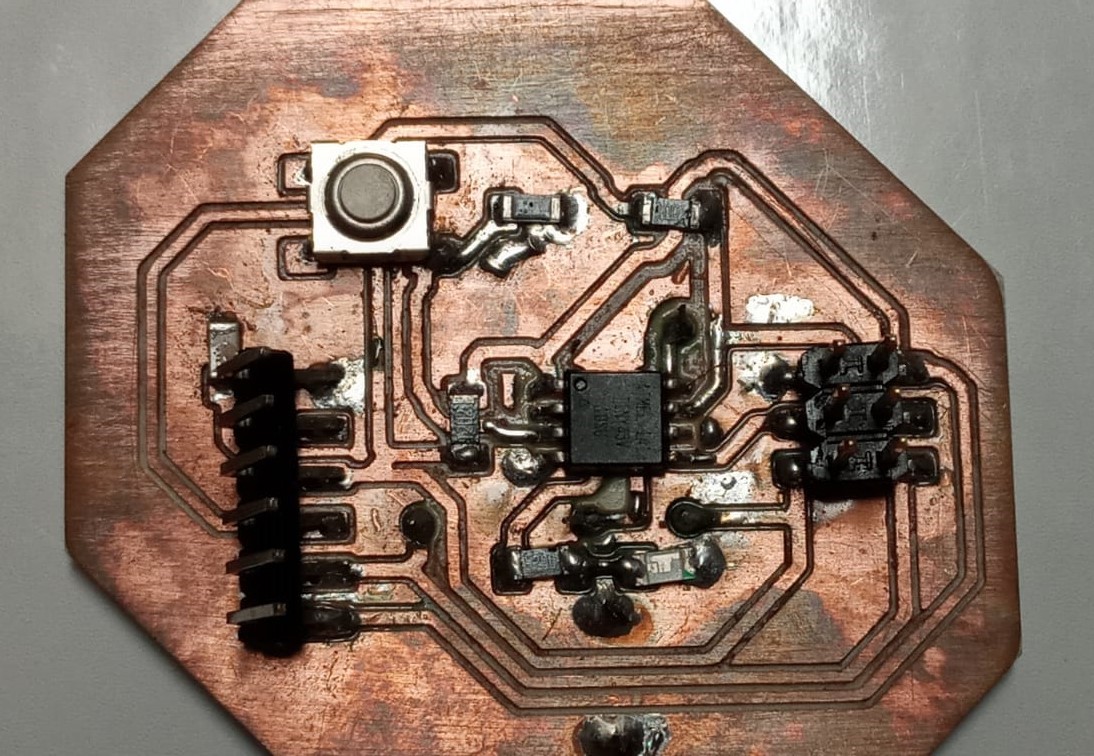
Plate connection to the Arduino uno. It is important to verify the location of the reset in the Arduino, because it does not correspond to the position on FTDI-SMD-Header on the ATTINY45 plate, see the schematic.
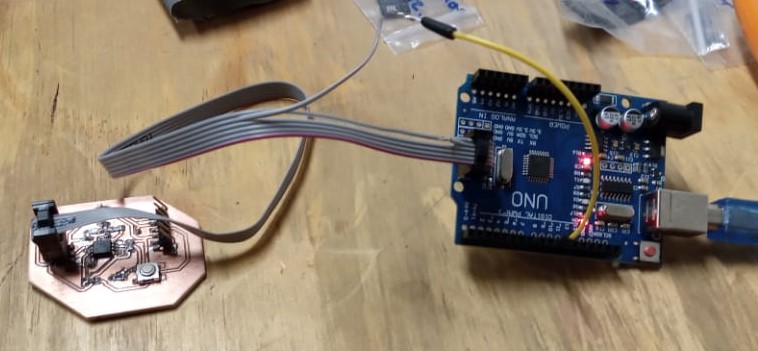
To program the attiny45, I use the arduino uno board as a programmer.
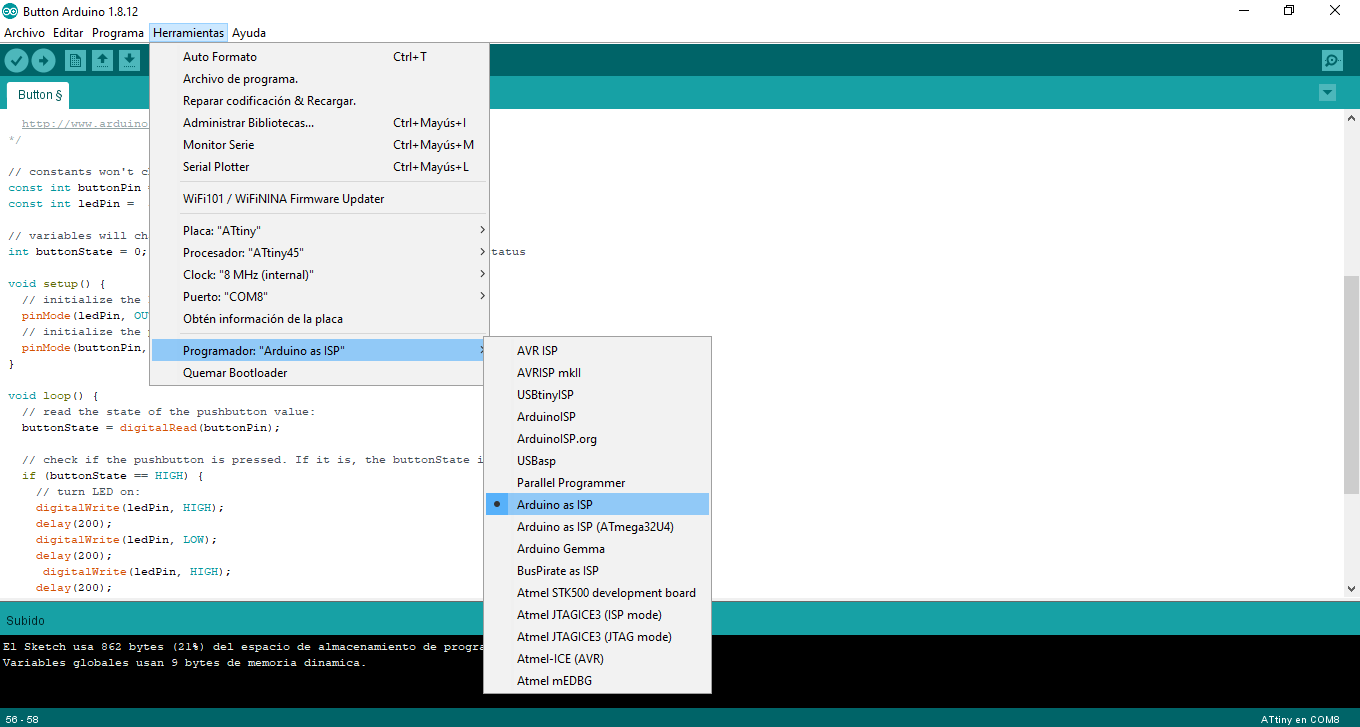
To prepare the newly manufactured attiny45 board, it is necessary to install the library in the arduino ide so that it recognizes the attiny45, this url (https://raw.githubusercontent.com/damellis/attiny/ide-1.6.x-boards-manager/ package_damellis_attiny_index.json) should be added in "preferences" (file menu> preferences).
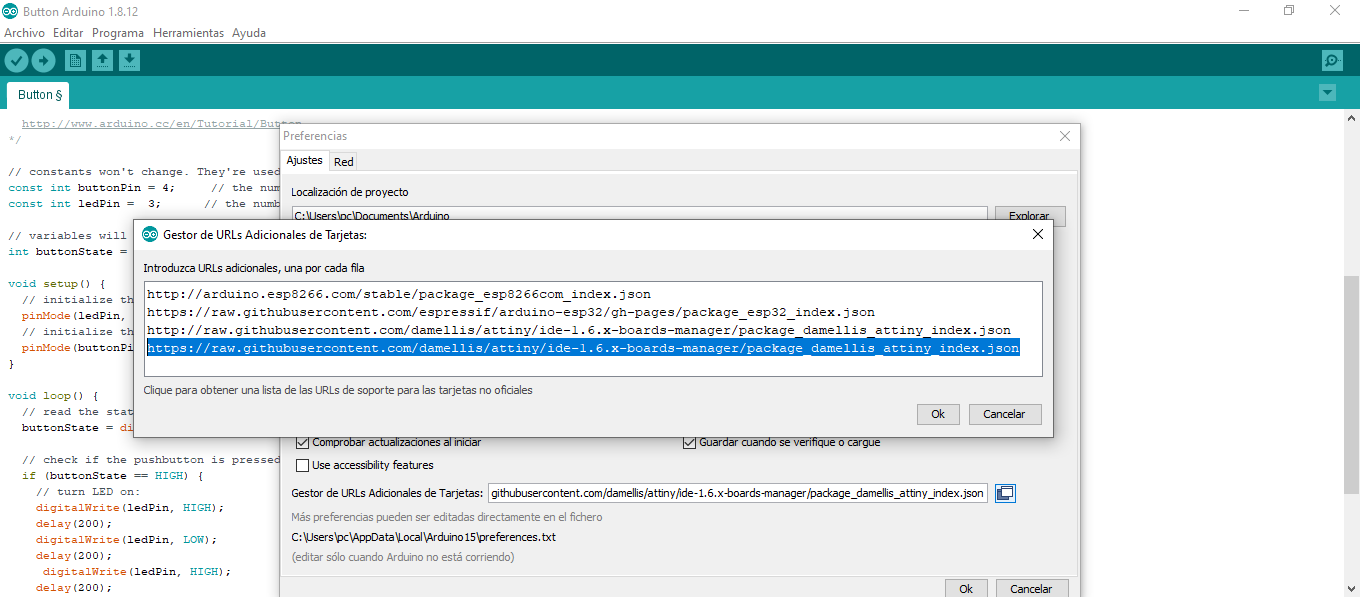
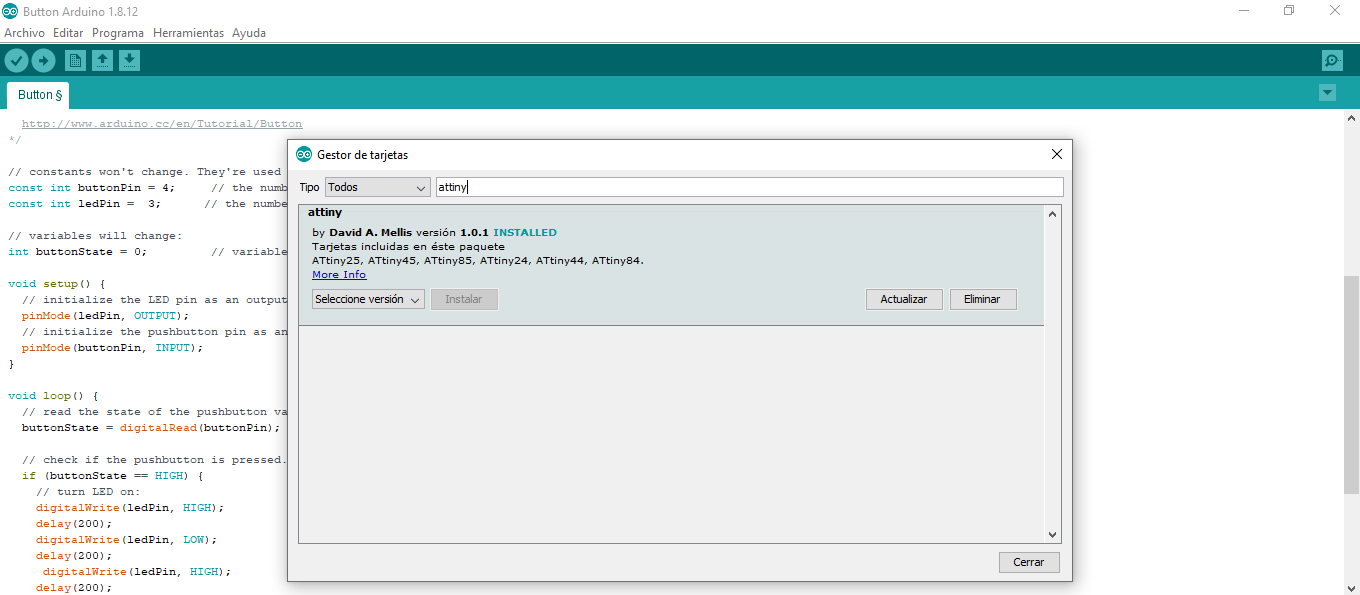
The next step is to go to the "Tools menu> Board> Card manager" and install attiny.
The last step to prepare the attiny45 board is to select each item as shown in the figure and click "Burn Boothoader".
The port depends on your equipment, I just checked

Now you have to program the attyny45, the code is shown below, remember that to program the led and the button you must check the pin where each one is connected in the diagram made in previous steps.const int buttonPin = 4; // the number of the pushbutton pin const int ledPin = 3; // the number of the LED pin // variables will change: int buttonState = 0; // variable for reading the pushbutton status void setup() { // initialize the LED pin as an output: pinMode(ledPin, OUTPUT); // initialize the pushbutton pin as an input: pinMode(buttonPin, INPUT); } void loop() { // read the state of the pushbutton value: buttonState = digitalRead(buttonPin); // check if the pushbutton is pressed. If it is, the buttonState is HIGH: if (buttonState == HIGH) { // turn LED on: digitalWrite(ledPin, HIGH); delay(200); digitalWrite(ledPin, LOW); delay(200); digitalWrite(ledPin, HIGH); delay(200); digitalWrite(ledPin, LOW); delay(200); digitalWrite(ledPin, HIGH); delay(200); digitalWrite(ledPin, LOW); delay(200); } else { // turn LED off: digitalWrite(ledPin, LOW); } }I really feel great emotion because my badge is already programmed, it was worth the hours invested in this assignment.
I decided to try PlatformIO since it has been increasing in popularity as a IDE for different types of boards and MCUs
This is actually an extension for Visual Studio Code, so in order to install it go to the extensions page at the left bar (the icon below the play button with a bug) and search for PLatformIO.

Then restart Visual Studio Code and wait for the alien icon at the left bar to appear, then just click on it and click open on the menu next to it.

At the main window click on "New Project" then just fill the new window with the project name and the board (or mcu) you are going to use, in this case since I am testing a new IDE for the previous code I choosed as a board "Generic ATtiny45 (Atmel)"

A new workspace is generated with the following hirechery
-include
-lib (this is where custom libraries go)
-src (this is where your app code goes)
--main.cpp (your main code)
-test
-.gitignore
-platformio.ini (the project configuration)

//cpp

#include
#include

// ***
// *** Define the RX and TX pins. Choose any two
// ***
#define RX PB1 // ***
#define TX PB2 // ***
SoftwareSerial Serial(RX, TX);
char entrada = 0;  // for incoming serial data
const int led = 3; //pin 3
void setup()
{
  Serial.begin(9600); // opens serial port, sets data rate to 9600 bps
  pinMode(3, OUTPUT);
}
void loop()
{
  // send data only when you receive data:
  while (Serial.available() > 0)
  {
    // read the incoming byte:
    entrada = Serial.read();
    Serial.print(entrada);  //send back the input

    if (entrada == 'H') //if serial reads 'H' turn on led
      digitalWrite(led, HIGH);
    else if (entrada == 'L') //if serial reads 'L' turn off led
      digitalWrite(led, LOW);
  }
}
Since I am using a USBasp to program the board, I took from this page "https://docs.platformio.org/en/latest/platforms/atmelavr.html#upload-using-programmer" the configuration options to use such programmer

Finally is time to upload the code, so click on the alien symbol to open the platformio menu, there just click Upload.
After that, since the code uses serial I had to open a port to comunicate with the board, first I connected the TX and RX pins of the board to a generic FT232RL Serial-USB converter

Then just below the Upload button there is the Monitor button, after click it will open a terminal at 9600bps by default, here I just wrote H or L
to turn on or off the led and pressed Enter to send the message.
Group assignment.
Compare the performance and development workflows for other architectures.
-
von Neumann
-
Harvard
THE MARK I, the first programmable computer in the United States, hummed briefly back to life yesterday, 70 years after performing its first calculations. Gears whirred and parts moved back and forth, drawing cheers from the assembled crowd even though no computations were made. Likewise in attentive attendance were dozens of the machine’s electronic descendants: smartphones, cameras, and at least one wearable computer, Google Glass, all bore witness to how far computer science has come. The brief reboot of the Mark I celebrated the opening of a newly redesigned exhibit centered on the machine. The computational monster was 55 feet long, eight feet tall, and weighed five tons in total, though only part of the machine remains on display in the Science Center lobby. In the 1930s, explained Cherry Murray, dean of the School of Engineering and Applied Sciences, a Harvard graduate student in physics, Howard Aiken, dreamed up the machine as a way to speed up tedious calculations. The Automatic Sequence Controlled Calculator, as the Mark I was originally known, was built by IBM and presented to Harvard in August 1944. For 15 years, it played an important role in U.S. military efforts, solving differential equations called Bessel functions (for which it earned the nickname "Bessie") and running a series of calculations that helped design the atomic bomb. By its 1959 retirement, the Mark I had carved out a place in computing history—as well as popular culture. “One of the things that I love about this machine is that it embodies, in a very direct, literal way, terms that we’re used to—like the ‘bug’, the ‘loop,’ and the ‘library,’” said Pellegrino University Professor Peter Galison, who directs the Collection of Historical Scientific Instruments. On one occasion, for instance, the Mark II, a descendent of the Mark I, was famously laid low by a moth that became trapped in its inner workings. Programmer Grace Hopper attached it to the operations logbook with the comment, “First actual case of bug being found.” -
Bugs
American engineers have been calling small flaws in machines "bugs" for over a century. Thomas Edison talked about bugs in electrical circuits in the 1870s. When the first computers were built during the early 1940s, people working on them found bugs in both the hardware of the machines and in the programs that ran them. In 1947, engineers working on the Mark II computer at Harvard University found a moth stuck in one of the components. They taped the insect in their logbook and labeled it "first actual case of bug being found." The words "bug" and "debug" soon became a standard part of the language of computer programmers. -
CISC and RISC difference
Seeking to increase the processing speed, it was discovered based on experiments that, with a certain base architecture, the execution of programs compiled directly with microinstructions and residents in external memory to the integrated circuit turned out to be more efficient, thanks to the fact that the access time of the memories were decreasing as its encapsulation technology was improved.
The idea was also inspired by the fact that many of the features that were included in traditional CPU designs to increase speed were being ignored by programs running on them. Also, the speed of the processor in relation to the memory of the accessing computer was getting higher and higher.
Because there is a simplified set of instructions, they can be implanted by hardware directly into the CPU, which eliminates microcode and the need to decode complex instructions.
The RISC architecture works very differently from the CISC, its objective is not to save external efforts on the part of the software with its RAM accesses, but to make it easier for instructions to be executed as quickly as possible. The way to do this is by simplifying the type of instructions the processor executes. Thus, the shorter and simpler instructions of a RISC processor are capable of executing much faster than the longer and more complex instructions of a CISC chip. However, this design requires much more RAM and more advanced compiler technology.
The relative simplicity of the RISC processor architecture leads to shorter design cycles when new versions are developed, always making it possible to apply the latest semiconductor technologies. As a result, RISC processors tend not only to offer 2 to 4 times greater system throughput, but the capacity jumps that occur from generation to generation are much greater than in CISCs.
The commands that the RISC chip incorporates into its ROM consist of several small instructions that perform a single task. The applications here are responsible for indicating to the processor what combination of these instructions it should execute to complete a major operation.
Also, RISC commands are all the same size and are loaded and stored the same way. As these instructions are small and simple, they do not need to be decoded in smaller instructions as in the case of CISC chips, since they already constitute decoded units themselves. Therefore, the RISC processor does not spend time verifying the size of the command, decoding it, or figuring out how to load and save it.
The RISC processor can also execute up to 10 commands at a time since the software compiler is the one that determines which commands are independent and therefore it is possible to execute several at the same time. And since the RISC commands are simpler, the circuitry they pass through is also simpler. These commands go through fewer transistors, so they run faster. To execute a single instruction, a clock cycle is usually sufficient.
Among the advantages of RISC we have the following:
The CPU works faster by using fewer clock cycles to execute instructions. It uses a non-destructive address system in RAM. That means that unlike CISC, RISC retains the two operands and their result after performing its operations in memory, reducing the execution of new operations. Each instruction can be executed in a single CPU cycle Example of microprocessors based on CISC technology:
MIPS, Millions Instruction Per Second.
PA-RISC, Hewlett Packard.
SPARC, Scalable Processor Architecture, Sun Microsystems.
POWER PC, Apple, Motorola and IBM.
-
Conclusion
After reading about some architectures, it can be concluded that there is no good or bad technology; at the time, they were only developed to carry out certain activities, and as one advances or evolves, new hardware needs arise to be complemented with software, and as any invention carries time to perfect it and you cannot evaluate a past architecture with the conditions of use, rather you can make improvements depending on the context or need of people, in the end all technology is created to make people's activities easier.