Project management
Objectives of the week
- Build a personal site describing you and your final project
- Upload it to the class archive
- Work through a git tutorial
This week is about learning to use different tools of project management and documentation. I have a small experience in such tools thanks to my background, and I think I will not be so lost this week, but I never had the opportunity to go further. I will also try to work version by version, implementing at each step new levels of complexity and new layers on my project.
What I did
- Downloaded and used new tools: MkDocs, Atom, Git, GitLab, ...
- Created my website and customized it using *.yml* configuration and adding extra CSS
- Documented the two first week and putting content on the site (and created a documentation template)
- Put my MkDocs site on two remote repositories using git
- Compressed images
What I learned
- Git and version Control
- Markdown syntax and Mkdocs
- Good practice for documentation
- CSS and HTML basics
If I had the time to go further...
- Customizing the template further and make it fancy
Step 1: Identifying and installing the tools I will use
Here are the different tools used this week:
- MkDocs to generate my site based on markdown syntax.
- Atom, a text editor designed for developers
- Git for the version control, in command line with Git Bash
- GitLab, an application for project management, including a fancy online git interface.
Step 2: Learning the markdown syntax and MkDocs
To learn mkdocs, that I had never used, I followed this great tutorial.
I had first to install a new version of python, on which is based the mkdocs.
When the project is created with the command line mkdocs new project-name, a file structure is created as follow:

the .yml file is a configuration file, that can be edited, and that is structured as the site. The same structure is found in the docs folder.


Using the command mkdocs serve, the website can now be visualized on your favourite web browser at the address: http://127.0.0.1:8000/.
Another possibility to visualize the markdown pages is to use the markdown preview package.
The site can now be edited using the simple and powerful markdown syntax. A great cheatsheet can be found here. I trained by documenting my first two weeks of the Fab Academy.
Step 3: Learning git
Learning Git was already more work. To learn it, I followed this clear french tutorial.
To use git in command line, I use the program Git Bash.
Configure git
The first step is to configure git. Useful commands are:
git config --global color.diff auto
git config --global color.status auto
git config --global color.branch auto
git config --global user.name "my user name"
git config --global user.email my@email.com
I also created an ssh key with the command ssh-keygen in Git Bash, and pasted the created public key in GitLab.
Cloning the repository
To create my website, I will clone the project of the Fab Academy GitLab. A template site has already been uploaded on it.

I created a new folder in which the command clone imported all the files of the repository specified.
Modifying the code
The files can then be modified locally. I personally used Atom, and mainly documented the first week.

git status is an interesting command, which shows the status of the project, i.e. which files have been modified. git diff can also be used to see more precisely what was changed.
Making a commit
A commit can be seen as a point of history of the files. The commit must be commented with a short line.


We can see after the commit that all the changes have been committed, but that some files that I added are not tracked yet. The command add . adds all the untracked file, and a new commit can be made.

Uploading the modifications
I made like this several rounds of modifications and commit. I can now upload my changes on the repository. Two commands are here useful:
git pull
git push
The first line downloads the modifications made by other people on the project, to be sure to have the most up-to-date version, while the second lines upload the local changes on the repository.
After a few minutes, my Fab Academy site is online!

Working with two remote repositories
I will work with two remote repositories: the one of hosted by the Fab Academy, and another one specific of the ULB FabLab.

The first line creates links the folder with the second repository. git remote -v displays all the remote repositories.
To pull and push in one or another repository, the following commands can be used.
git pull remote-name branch-name
git push remote-name branch-name
Step 4: Improving my website
Image size
I want to put some image in my website to make it clear and fancy. Those images must be compressed. I tested two solutions:
- Using GIMP
- Using ImageMagic. Here is the Fab Academy cheatsheet
I tested first (and lost a lot of time) with GIMP. I then tried it with ImageMagick. My images beeing in PNG format, I first have to convert them into jpg format.
magick mogrify -format jpeg *.PNGThen, I can compress them and resize them.
magick mogrify -quality 50% -resize 1000 *.jpegI can also crop my images. As an example, if I want to make all my images in the folder 300x300:
magick mogrify -resize 400x400^^ -gravity center -extent 400x400 *.*Note that the mogrify function is similar to the convert function, excepted that the files are overwritten.
Customization
Updating the content of the site
Now that I have a website, I want to customize it.
I will keep the same structure as in the template, and I will start by editing index.md files of the home and the about page. I also add the signed Student Agreement.
I would like the different assignments to appear one at a time, so I deleted all the template files of the week assignments, and I will add them week after week.
Finally, I created a page Project development in Final Project, in which I will document linearly all the development steps of my final project, week after week.
Changing the template
I want to customize my site a little bit further.
I will use the Windmill template. To implement it, I have to modify the file mkdocs.yml:
theme:
  name: windmill

use_directory_urls: false
I also have to modify the requirements.txt file and add the line mkdocs-windmill, to ensure that the package is correctly downloaded before the publication of the site.
I have now a new site layout! I like the easy navigating between the pages.

Customizing the template
Configuration
I want to customize my site a little bit further. Some explanation for the windmill template are given here. The first and simpler way is to configure the mkdocs.yml file. I will add a logo and remove navigation buttons using this method.
extra:
  logo: images/logo.png
  article_nav_top: false
  article_nav_bottom: false
More configurations are available for mkdocs and documented here. I will change the navigation structure of my site:
nav:
  - Home: index.md
  - Weekly assignments:
    - Week 1: assignments/week01.md
    - Week 2: assignments/week02.md
  - Final Project:
    - Final project: projects/final-project.md
    - Project development: projects/project-development.md
  - About:
    - About me: about/index.md
    - Student agreement: about/agreement.md
Customization
To customize further the template, I will use two other ways:
- Add extra CSS to overwrite some parts of the template
- include inline HTML
Extra CSS
A great tutorial for basics of CSS can be found here.
I first created a file called extra.css placed in the documentation folder as documented here. I must also modify the mkdocs.yml file adding the following line: extra_css: [extra.css].
I can now add CSS instructions in this file that will overwrite the template. All to source code of the template can be found here and I got inspired to overwrite and customize it.
The following CSS code modifies the colours of the different elements of the template and customize the font and the titles.
body {
    background-color: #f8f8f8;
    font-family: "Open Sans Light"
}

.navbar {
  background-color: #8ca868;
}

.wm-toc-pane {
  background-color: #f2f2f2;
}

h1 {
    color: #8ca868;
    font-weight: 400;
    font-size: 42px;
    font-family: "Open Sans"
}

h2, h3, h4, h5, h6 {
    color: #444;
    font-weight: 300;
    font-family: "Open Sans"
}
Inline HTML
I also used inline HTML to add custom elements in my site. HTML uses tags, and can be written directly in the markdown files. A great tutorial for basics of HTML can be found here.
I added mainly two elements in HTML: the summary environment at the beginning of each week documentation and the galley of the homepage. Both use the same principle. I first defined new classes in CSS, that I defined in the extra.css file:
 .summary {
   background-color: #8ca868;
   color: white;
   margin: 20px;
   padding: 20px;
   border-radius: 20px;
   box-shadow: 5px 5px 3px grey;
 }

 p.sh {
   font-family: "Open Sans";
   font-weight: 500;
   font-size: 18px;
   font-style: italic;
 }
 ```

 I can then use the new classes defined to add the custom HTML elements in the markdown file. This code renders the summary block at the top of this page:


``` html
 <div class="summary">
   <p class="sh"> Objectives of the week </p>
     <ul>
       <li> Some list element </li>
     </ul>
     <p> Some text </p>

   <p class="sh"> What I did </p>
     <ul>
       <li> Some list element </li>
     </ul>

   <p class="sh"> What I learned </p>
     <ul>
       <li> Some list element </li>
     </ul>

   <p class="sh"> If I had the time to go further... </p>
     <ul>
       <li> Some list element </li>
     </ul>
  </div>
Update 06/02: Changing the theme
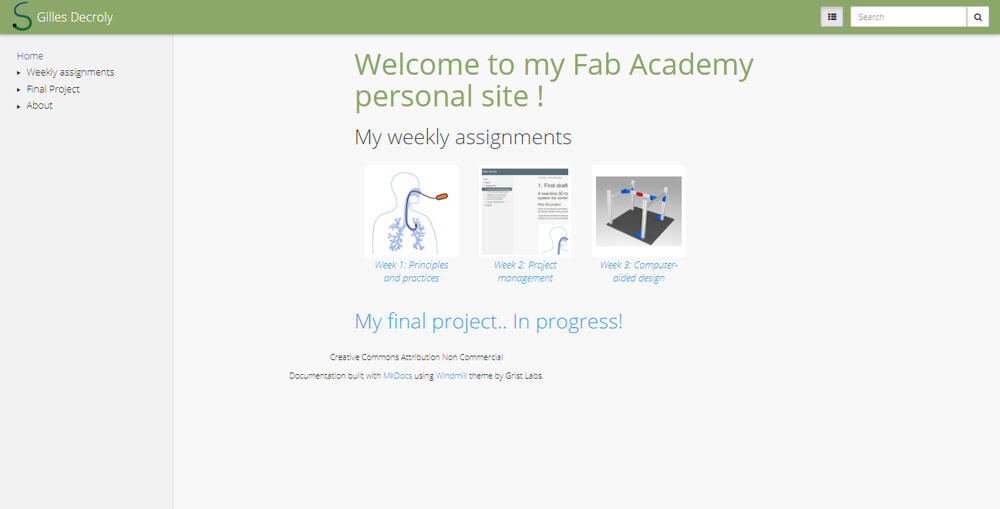
As I explained, I was not satisfied at all with my site theme. Here is a capture of the old version:
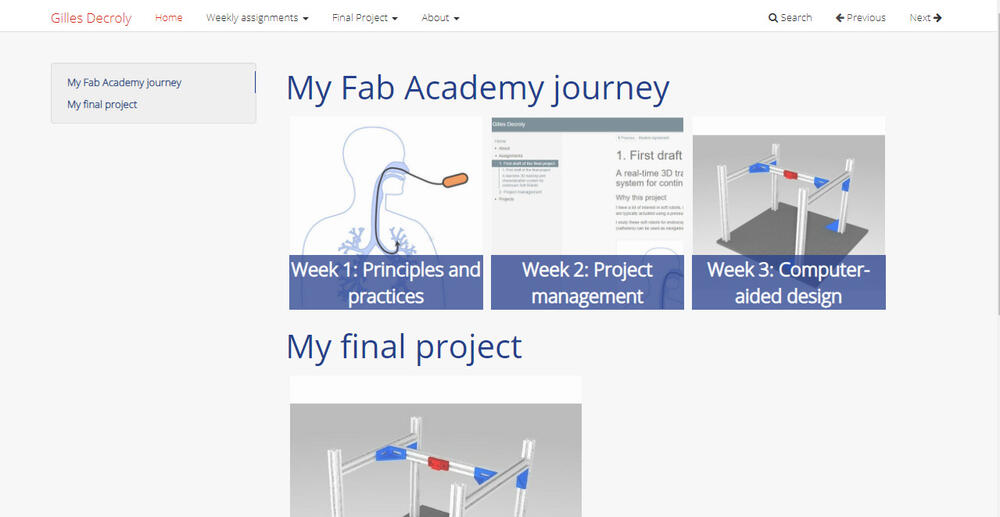
After a few searches, I choose the simplex bootswatch theme. I kept mainly the same customization. I almost changed nothing in my extra.css file, excepted some colours. I also modified the gallery elements of my homepage. Here is the new version of my site. Not perfect yet but already better!
This was also the occasion to create a branch in git:
git branch theme
git checkout theme
Now I created a new local branch named theme and jump to it. Once I finished and validated the changes, I have to merge the two branches (theme and master).
git checkout master
git merge theme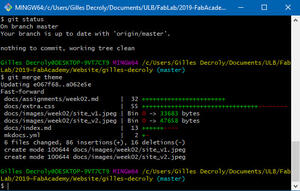
Since I have not worked on the master branch, there are no conflict to handle, and I can now delete the theme branch.
git branch -d theme