Final Project
Contents
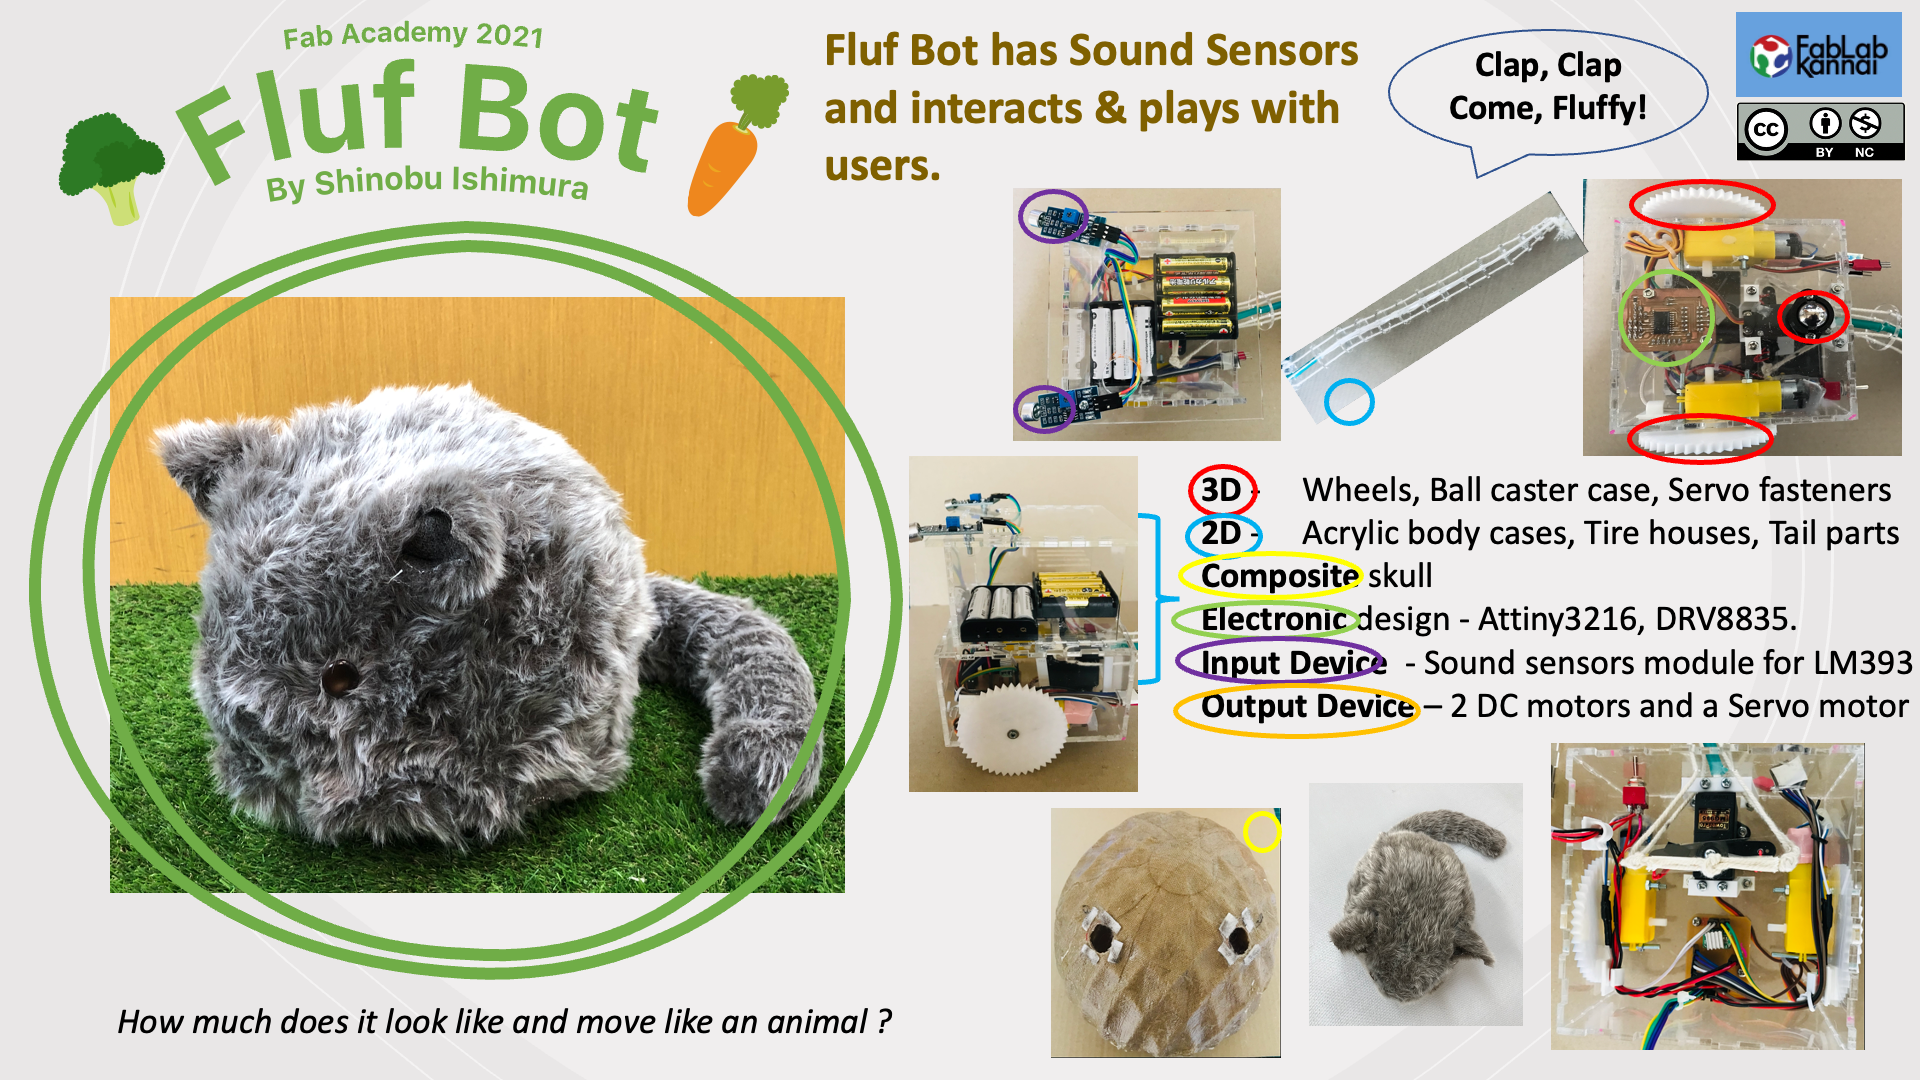
  Final Project presentation slide
  Final Project presentation movie
-
Documentation about Final project Requirements - Answering Final project questions.
- Bill of Materials
- What are the implications?
- Processes used
-
Overview of the development history - Quick tour of Final project development
- Sketches
- Sketches
- Proto types
- Final structure
-
files - you can reproduce my Fluff bot.
1. Documentation about Final project requirements
I wrote my answers about some of the requirements in other documentations. Please refer to below links.
Bill of materials and Process used were not finalized in week 16 and the implications were not included there. So I’d like to write then down in this document.
Week 16 Documentation - Requirements
week17 Documentation - License
Bill of Materials
| Item | Qty | Unit Price(JPY) | From | Site |
|---|---|---|---|---|
| Servo | 1 piece | 850 | Amazon | link |
| Burlap | 0.5M | 300 | Amazon | link |
| Polyester Resin Base | 1 box | 1990 | Monotaro | link |
| Catalyst | 1 bottle | 999 | Monotaro | link |
| Mobile battery | 2 pack | 2500 | Amazon | link |
| Stepper Motor | 2 piece | 300 | Amazon | link |
| Sound sensor | 2 piece | 157 | Amazon | link |
| M3 Screw / Nuts | 1 set | 765 | Amazon | link |
| Fake fur(Boa) | 0.5M | 765 | Yuzawaya | |
| Thread | 1 | 100 | Daiso | |
| ATtiny3216 | 1pc | 133 ea. | DigiKey | link |
| DRV8835 | 1pc | 300 | Akizuki Denshi | link |
| Heat sink | 1pc of 1 pack(Large and small) | 180/pack | Akizuki Denshi | link |
| AA battery | 7pc of 1 pack(10pc) | 319/pack | Monotaro | link |
| Battery case | 2 set | 299 ea. | Monotaro | link |
| Small Hook | 2pc of 1 pack(6pc) | 100/pack | Daiso | |
| ball | 1pc of 1 pack(10pc) | 149/pack | Monotaro | link |
| Cable tie(30cm) | 1 of 1 pack(20pc) | 298/pack | Super Viva home |
What are the implications?
I could learn how to make ideas to physical objects thru the final project development processes.
I knew numerous numbers of knowledge and informations for fabrications are shared in websites, social media and YouTube channels.
From here, I think I can start my journey of fabrication life.
Processes used
| Requirements | My Project |
|---|---|
| 2D and 3D design | design body parts, wheels, skull |
| additive and subtractive fabrication processes | 3D printed wheels,ballcaster case, Laser cut body parts and composite base card boards |
| electronics design and production | designed and made a circuit board - ATtiny3216 /DRV8835 |
| embedded microcontroller interfacing and programming | made up a program to run 2 DC motors, 1 servo motor and 2 Elecret sound sensor module |
| system integration and packaging | put all the components packaged in the case tidy and gave an animal like outlook |
| a summary slide and a one minute video showing its conception, construction, and operation | Done and presented in June 14th session |
2. Overview of the development history
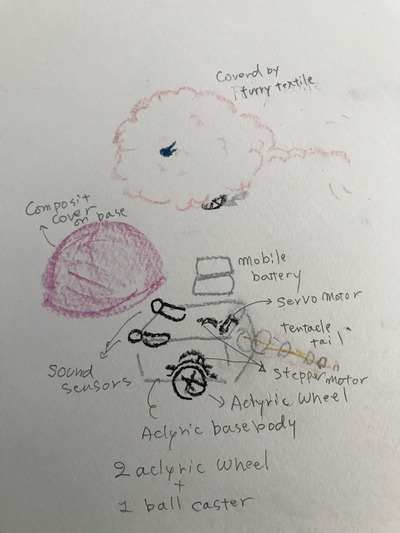
Sketches
My first idea & sketch of Final Project :
Many people want to have animal companionship. However it is not easy to have a pet in the city because of strict building rules, no dog park around, which are just a couple of problems.
I would like to create electric pets, which is coming to me when clapped hands. The pet will not move like a toy car. It will move like a tail of dog welcoming its mom’s back home. It will be a furry friend , need only a small place to “live”, and I hope it be good for stress-relief.

Latest sketch
Prototype
Stated with Stepper motor since DC motor noise might make my final project item look “a machine” not an animal like robot.
- 150 X 150 mm base box
- 4 x stepper motors / ULN2003A Driver
- 4 x 30mm diameter wheel (Acryl)
- 1 x servo motor
-
1 x mobile battery 5V 1A
-
include Stepper.h
Motors turn one by one and the last wheel did not turn 90 degree as the first wheel.
- include Unistep2.h
2 stepper motors moved together. Not for applicable for 4 stepper motors.
On the floor, very slow (motors turned opposite direction, move backward, need adjustment of a program)
Final structure
Changed motors for wheel drive from Stepper motor to DC motor since Stepper motor run the wheels too slow. Also changed Motor drivers.
Changed supplies from mobile batteries to AA dry batteries because mobile batteries often became out of order.
Changed tail length longer to be impressive even after putting skulls and fur cover.
- 120 X 120 mm base body box
- 110 x 110 mm sound sensor case
- 2 x DC motors / DRV8835 Driver
- 2 x 50mm diameter wheel(3D printer)
- 1 x ball caster
- 1 x servo motor
- 2 x AA battery case, one for DC motors (4 cells)and the others(Servo motor,Sound sensors,PCB) (3 cells)
PCB
Microcontroller ATtiny3216 and Motor Driver DRB8835. Since there is very limited space in the body box, designed the PCB as sockets and cables are connecting from above.


Body
In order to hold the Skull and put the sensors in the holl of the Skull, two boxes used for the body structure.


Skull
Using Composite process for Skull and sewing boa (fake fur) to fluffy outfit.


how to make is in final project diary
Programs
Expected move upon catching claps:
- Right sound sensor catches claps, wheels turn clockwese >> Turn Right
- Left sound sensor does, turn counterclockwise. >> Turn left
- Both catch claps, move moveForward >> Go ahead
- Nothing heard, stop and wagging tails >> Wagging
# include <Servo_megaTinyCore.h>
//#include <Servo.h>

Servo myservo;       // create servo object to control a servo

int rightDC1 = 8;
int rightDC2 = 9;

int leftDC1  = 0;
int leftDC2  = 1;

int pos = 90;    // variable to store the servo position

const int rightSensorPin = 15;
const int leftSensorPin = 16;

float right_sound = 0;  // added
float left_sound = 0;   // added

float rightVal = 0;     // changed bool to float
float leftVal = 0;      // changed boot to float

float threshold = 0.75;

void movetail() {
  for (pos = 90; pos <= 180; pos += 1) { // goes from 90 degrees to 180 degrees
    // in steps of 1 degree
    myservo.write(pos);              // tell servo to go to position in variable 'pos'
    delay(15);                       // waits 15ms for the servo to reach the position
  }
  for (pos = 180; pos >= 0; pos -= 1) { // goes from 180 degrees to 0 degrees
    myservo.write(pos);              // tell servo to go to position in variable 'pos'
    delay(15);                       // waits 15ms for the servo to reach the position
  }
  for (pos = 0; pos <= 90; pos += 1) { // goes from 0 degrees to 90 degrees
    // in steps of 1 degree
    myservo.write(pos);              // tell servo to go to position in variable 'pos'
    delay(15);                       // waits 15ms for the servo to reach the position
  }

}

void moveForward() {
  digitalWrite(rightDC1, HIGH);
  digitalWrite(rightDC2, LOW);
  digitalWrite(leftDC1, HIGH);
  digitalWrite(leftDC2, LOW);
}

void moveStop() {
  digitalWrite(rightDC1, LOW);
  digitalWrite(rightDC2, LOW);
  digitalWrite(leftDC1, LOW);
  digitalWrite(leftDC2, LOW);
}

void turnLeft() {
  digitalWrite(rightDC1, HIGH);
  digitalWrite(rightDC2, LOW);
  digitalWrite(leftDC1, LOW);
  digitalWrite(leftDC2, HIGH);
}

void turnRight() {
  digitalWrite(rightDC1, LOW);
  digitalWrite(rightDC2, HIGH);
  digitalWrite(leftDC1, HIGH);//255
  digitalWrite(leftDC2, LOW);
}


void setup() {

  myservo.attach(10);   //attaches the servo on pin 10 to the servo object

  pinMode(leftSensorPin, INPUT); //pin 16 an input pin.
  pinMode(rightSensorPin, INPUT); //pin 15 an input pin.

  Serial.begin(9600);// initialize the serial port:

}


void loop() {


  // analog sound input
  right_sound = analogRead(rightSensorPin); //changed digital to analog
  left_sound  = analogRead(leftSensorPin);  //value is between 0 and 1023

  // mic level ajustment in serial plotter

  rightVal = (right_sound ) / 1024; // added
  leftVal  = (left_sound ) / 1024;  // value is between 0.5 and 1

  // when the sensor detects a signal above the threshold value set on sensor, turn finder to the direction of sound

  Serial.println("rightVal=" + String(rightVal) + " ,leftVal=" + String(leftVal));


  if (leftVal > threshold && rightVal > threshold) {
    Serial.println("move forward");
    moveForward();
    delay(500);
  }


  if (leftVal < threshold && rightVal > threshold) {
    Serial.println("turn right");
    turnRight();
    delay(500);

  }


  if (leftVal > threshold && rightVal < threshold) {
    Serial.println("turn left");
    turnLeft();
    delay(500);
  }

  moveStop();
}
3. Files
Body Parts
Eagle files
Code file