- Compare the performance and development workflows for different microcontroller families. Document your work (in a group or individually):
My individual part:
When it comes to special applications that need calculations and good speed, it’s good to have a reference to know what controller meets our needs the most.
For this task we have chose 3 microcontrollers: ATtiny1614, Arduino UNO (ATMEGA328P), and Arduino DUE (AT91SAM3X8E) cause they are the most used in the community.
As a theoretical comparison:
Microcontroller
Estimated MFlops
Flash. Program Memory Size
ATtiny1614
0.1
16 KB
ATMEGA328P
0.08
32 KB
AT91SAM3X8E
0.7
512 KB
Group assignment page:here, which contains also floating point operations per second (FLOPS, flops or flop/s) test for these 3 microcontrollers.
- Read the datasheet for the microcontroller you are programming:
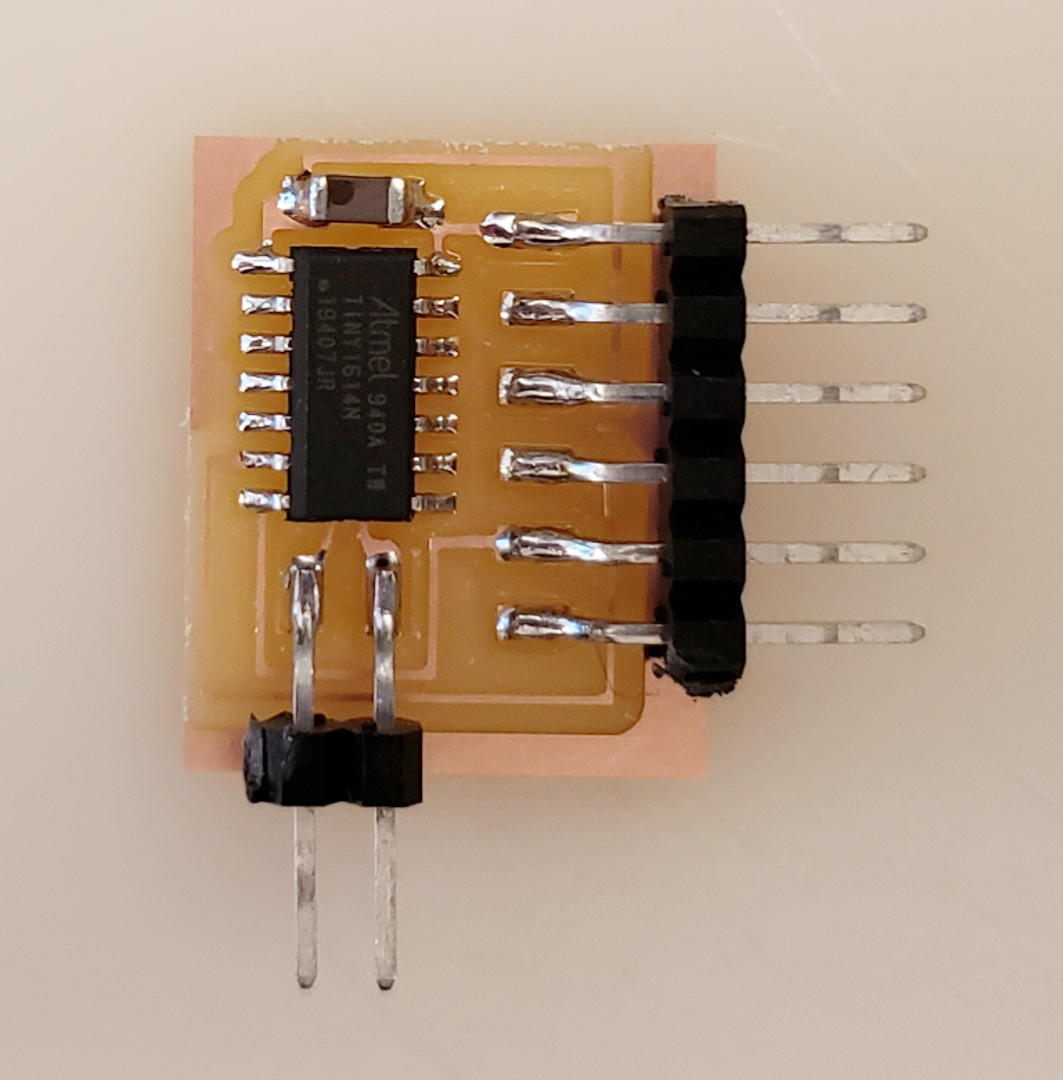
As we have done for the Electronics production assignment, we have read the datasheet of the microcontroller (the ATtiny1614 in this case) and we have learned what components we need for each pin, it’s capabilities and how to program it.
- Program the board you have made to do something, with as many different programming languages and programming environments as possible:
I have done some basic exercises using the LED and button on board, in Arduino and C as General Purpose Input/Output (GPIO). In these codes, the button makes use of the built-in pull-up resistors.
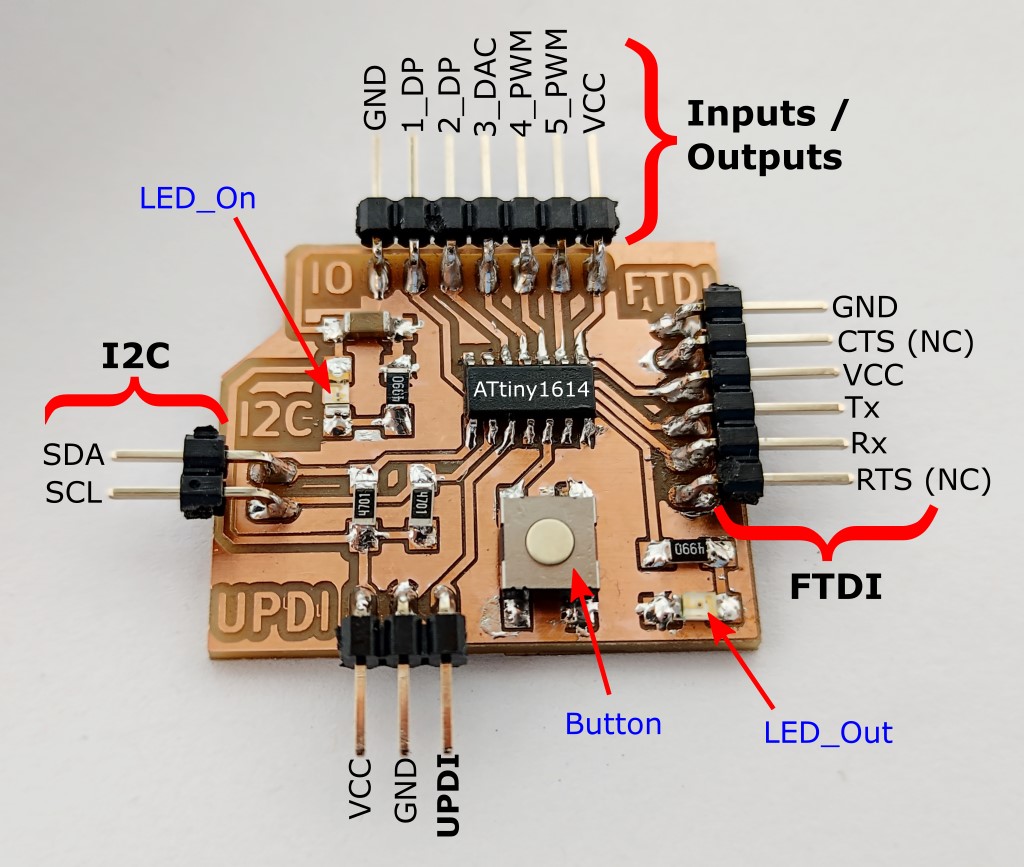
For this assignment I programmed the board that I made during the Electronics design week. This section is mostly a modified part of that previous documentation.
The following table describes the relationship between the board pinout (including onboard LED and Button) described above and the microcontroller pin number for programming:
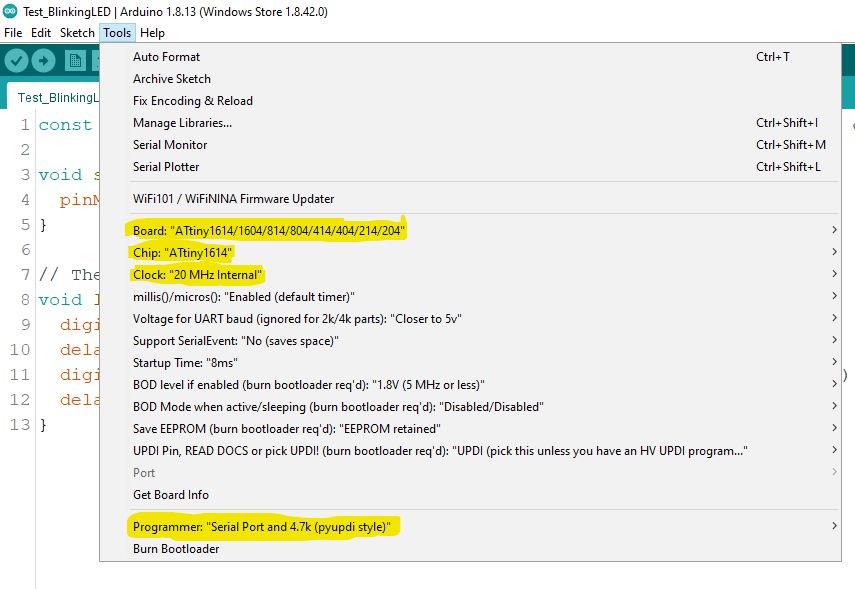
To upload a code to the Board, we just need to use the following highlighted settings in the Arduino IDE:
After selecting these options and when testing the board by the first time, press Burn Bootloader to setup the Microcontroller; then you can just press the Upload button:
/* Made by Jefferson Sandoval during the Embedded programming for the FabAcademy2021 * * This is just a simple testing code in Arduino consisting of a button and a led, * the led is going to be On during the time that the button is pressed. * * This code was uploaded to a board with an Attiny1614 microcontroller. Documentation: * http://fabacademy.org/2021/labs/kamplintfort/students/jefferson-sandoval/assignments/week09/ */constintbutton=9;// Set number of the button pinconstintled=10;// Set number of the LED pinbytebuttonState=1;// Variable for button statusvoidsetup(){pinMode(led,OUTPUT);// Set LED as an outputpinMode(button,INPUT_PULLUP);// Set button as an input with PullUp resistors configuration}voidloop(){buttonState=digitalRead(button);// Read state of the button valueif(buttonState==LOW)// Check if button is pressed{// If button is pressed, Turn on LEDdigitalWrite(led,HIGH);// Turn led on}else{digitalWrite(led,LOW);}// If button is not pressed, keep the LED off}
/* Made by Jefferson Sandoval during the Embedded programming for the FabAcademy2021 * * This is just a simple testing code in C consisting of a button and a led, * the led is going to be On during the time that the butotn is pressed. * * This code was uploaded to a board with an Attiny1614 microcontroller. Documentation: * http://fabacademy.org/2021/labs/kamplintfort/students/jefferson-sandoval/assignments/week09/ */#define F_CPU 3333333 //equals the frequency (20MHz) divided by 6#include<avr/io.h>intmain(void){PORTA.DIR|=PIN3_bm;// Set LED as an outputPORTA.DIR&=~PIN2_bm;// Set button as an inputPORTA.PIN2CTRL=PORT_PULLUPEN_bm;// Set PullUp resistors configurationwhile(true){if(~PORTA.IN&PIN2_bm)// Check if button is pressed{// If button is pressed, Turn on LEDPORTA.OUT|=PIN3_bm;// Turn led on}else{PORTA.OUT=~PIN3_bm;}//If button is not pressed, keep the LED off}return(0);}
/* Made by Jefferson Sandoval during the Embedded programming for the FabAcademy2021 * * This is just a simple testing code in Arduino consisting of a button and a led. * If led is On, pressing the button will turn it off. * If led is Off, pressing the button will turn it on. * * This code was uploaded to a board with an Attiny1614 microcontroller. Documentation: * http://fabacademy.org/2021/labs/kamplintfort/students/jefferson-sandoval/assignments/week09/ */constintbutton=9;// Set number of the button pinconstintled=10;// Set number of the LED pinbytebuttonState=0;// Variable for button statusbytelastButtonState=0;// previous state of the buttonintPressCounter=0;// Button press countervoidsetup(){pinMode(led,OUTPUT);// Set LED as an outputpinMode(button,INPUT_PULLUP);// Set button as an input with PullUp resistors configuration}voidloop(){buttonState=digitalRead(button);// Read state of the button valueif(buttonState!=lastButtonState){// Compare buttonState to lastButtonStateif(buttonState==HIGH){// If the current state is HIGH, button was pushedPressCounter++;}delay(25);}lastButtonState=buttonState;// Save the current state as lastButtonState, for next comparisonif(PressCounter%2==0){digitalWrite(led,HIGH);// If modulo = 0, turns on the LED.}else{digitalWrite(led,LOW);//If modulo != 0, turns off the LED.}}
This is code consisting of a button and a led, if the button is pressed, the led is going do a quick blinking with the following sequence: 1sec ON > 0.5secs OFF > 1sec ON > 0.5secs OFF > 1sec ON > turn OFF.
/* Made by Jefferson Sandoval during the Embedded programming for the FabAcademy2021 * * This is just a simple testing code in Arduino consisting of a button and a led, if the * button is pressed, the led is going do a quick blinking with the following sequence: * 1sec ON > 0.5secs OFF > 1sec ON > 0.5secs OFF > 1sec ON > turn OFF. * * This code was uploaded to a board with an Attiny1614 microcontroller. Documentation: * http://fabacademy.org/2021/labs/kamplintfort/students/jefferson-sandoval/assignments/week09/ */constintbutton=9;// Set number of the button pinconstintled=10;// Set number of the LED pinbytebuttonState=1;// Variable for button statusvoidsetup(){pinMode(led,OUTPUT);// Set LED as an outputpinMode(button,INPUT_PULLUP);// Set button as an input with PullUp resistors configuration}voidloop(){buttonState=digitalRead(button);// Read state of the button valueif(buttonState==LOW)// Check if button is pressed{// If button is pressed, do the blinking sequencefor(inti=0;i<=2;i++){delay(500);// Wait for half a secdigitalWrite(led,HIGH);// Turn led ondelay(1000);// Wait for a secdigitalWrite(led,LOW);}// Turn led off}else{digitalWrite(led,LOW);}// If button is not pressed, keep the LED off}
/* Made by Jefferson Sandoval during the Embedded programming for the FabAcademy2021 * * This is just a simple testing code in C consisting of a button and a led, if the * button is pressed, the led is going do a quick blinking with the following sequence: * 1sec ON > 0.5secs OFF > 1sec ON > 0.5secs OFF > 1sec ON > turn OFF. * * This code was uploaded to a board with an Attiny1614 microcontroller. Documentation: * http://fabacademy.org/2021/labs/kamplintfort/students/jefferson-sandoval/assignments/week09/ */#define F_CPU 3333333 //equals the frequency (20MHz) divided by 6#include<avr/io.h>#include<util/delay.h>intmain(void){PORTA.DIR|=PIN3_bm;// Set LED as an outputPORTA.DIR&=~PIN2_bm;// Set button as an inputPORTA.PIN2CTRL=PORT_PULLUPEN_bm;// Set PullUp resistors configurationwhile(true){if(~PORTA.IN&PIN2_bm)// Check if button is pressed{// If button is pressed, do the blinking sequencefor(inti=0;i<=3;i++){_delay_ms(500);// Wait for half a secPORTA.OUT|=PIN3_bm;// Turn led on_delay_ms(1000);// Wait for a secPORTA.OUT&=~PIN3_bm;}// Turn led off}else{PORTA.OUT=~PIN3_bm;}//If button is not pressed, keep the LED off}return(0);}
This is code consisting of a button and a led, the led is going to blink 4 times depending on how long the button is pushed.
- If there is a long press (more then 2 secs), the blinking with be 1sec long.
- If there is a short press (less then 2 secs), the blinking with be 0.25secs long.
/* Made by Jefferson Sandoval during the Embedded programming for the FabAcademy2021 * * This is just a simple testing code in C consisting of a button and a led, the led * is going to blink 4 times depending on how long the button is pushed. * * This code was uploaded to a board with an Attiny1614 microcontroller. Documentation: * http://fabacademy.org/2021/labs/kamplintfort/students/jefferson-sandoval/assignments/week09/ */#define F_CPU 3333333 //equals the frequency (20MHz) divided by 6#include<avr/io.h>#include<util/delay.h>intmain(void){PORTA.DIR|=PIN3_bm;// Set LED as an outputPORTA.DIR&=~PIN2_bm;// Set button as an inputPORTA.PIN2CTRL=PORT_PULLUPEN_bm;// Set PullUp resistors configurationuint8_tcounter=0;while(true){if(~PORTA.IN&PIN2_bm)// Check if button is pressed{while(~PORTA.IN&PIN2_bm){// While button is being pressed..._delay_ms(100);// Add 1 to the counter every 0.1 secscounter++;}}if(counter>0){if(counter>=20){for(uint8_ti=0;i<4;i++){_delay_ms(1000);// Wait for a secPORTA.OUT|=PIN3_bm;// Turn led on_delay_ms(1000);// Wait for a secPORTA.OUT&=~PIN3_bm;}// Turn led off}else{for(uint8_ti=0;i<4;i++){_delay_ms(250);// Wait for 0.25 secsPORTA.OUT|=PIN3_bm;// Turn led on_delay_ms(250);// Wait for 0.25 secsPORTA.OUT&=~PIN3_bm;}// Turn led off}}else{PORTB.OUT&=~PIN5_bm;}counter=0;}return(0);}
/* Made by Jefferson Sandoval during the Embedded programming for the FabAcademy2021 * * This is just a simple testing code in Arduino consisting of a button and a led, if * the button is pressed, the led is going fade in and fade out one time. * * This code was uploaded to a board with an Attiny1614 microcontroller. Documentation: * http://fabacademy.org/2021/labs/kamplintfort/students/jefferson-sandoval/assignments/week09/ */constintbutton=9;// Set number of the button pinconstintled=10;// Set number of the LED pinbytebuttonState=1;// Variable for button statusvoidsetup(){pinMode(led,OUTPUT);// Set LED as an outputpinMode(button,INPUT_PULLUP);// Set button as an input with PullUp resistors configuration}voidloop(){buttonState=digitalRead(button);// Read state of the button valueif(buttonState==LOW)// Check if button is pressed{// If button is pressed, Turn on LEDdelay(500);// fade in from min to max in an increments of 5for(inti=0;i<=255;i+=5){analogWrite(led,i);delay(50);}// fade out from max to min in a decrement of 5for(inti=255;i>=0;i-=5){analogWrite(led,i);delay(50);}}else{digitalWrite(led,LOW);}// If button is not pressed, keep the LED off}