12.Interfaces and application programming
This week assigment
group assignment:
- compare as many tool options as possible
Group project page
individual assignment:
- write an application that interfaces a user with an
input &/or output device that you made
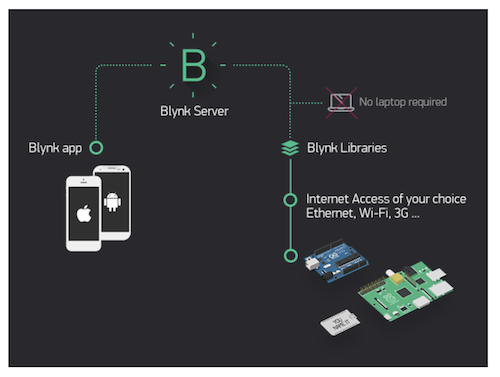
Brynk
This time I tried to control the Satshakit remotely using the Blink.
I started with the simplest LED blink.
0.Satshakit on the breadboard
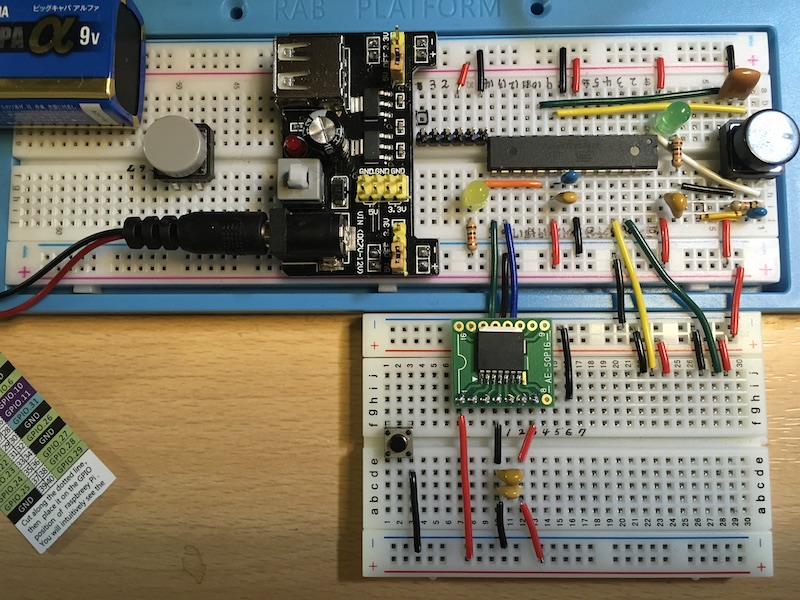
The lab is closed again this week, so I tried to assemble a Sasha kit with a breadboard.
By the way, the board in front is a board with BD6222HFP motor driver, which I designed in the week of output device.
This time, the yellow LED on the 13th pin is controlled remotely by Blynk.
1.Brink App(ios) setting
First I installed the brynk app on my IOS.

Set up your email and password.
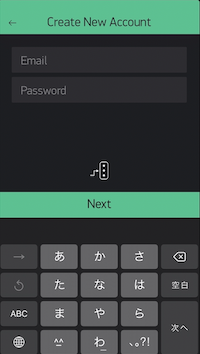
Pressing the next.
Create a new project
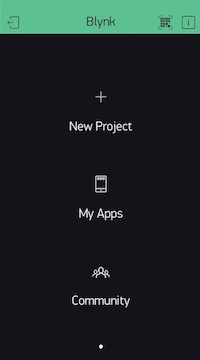
Select Arduino UNO in Hardware Selection
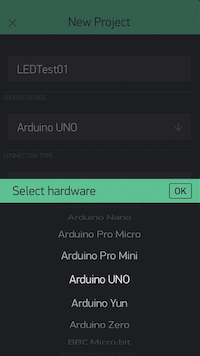
Select USB for connection type

When I clicked OK, a token was sent to me by email!

I’ll use this token for writing the Arduino IDE later, so I’ll make a note of it.

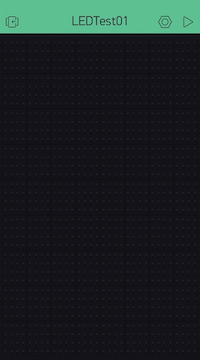
This is the virtual breadboard. When you touch the board, a “widget box” will appear.
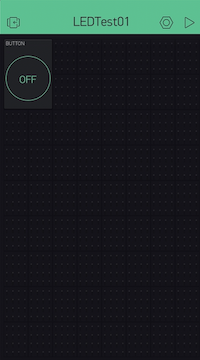
Touch the “button” to place it on the virtual breadboard.

Touch the “Button” component to change the pin assignment.
Touch the “PIN” button to change the setting.
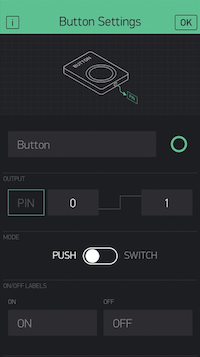
Select the pins [Digital] and [D13] and press [OK].
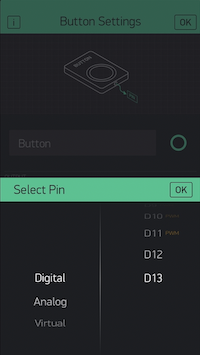
Press “OK” again.

If you push the “Play” button on the upper left, the communication is connected, but
Before that, you need to set up and sketch the Arduino IDE, so I’ll explain them next.

2.Brynk Arduino IDE setting
First, go to the brynk examples page.

Go to the GitHub page in the red frame at the top right
Note: As of April 2020, it is v0.6.1, but please make sure the version is up to date at that time.
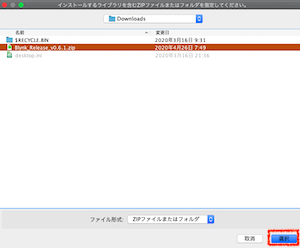
Download the Zip file

Include it in your library.
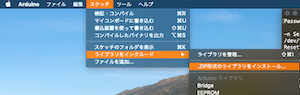
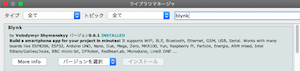
Tools → Library Management brynk”, and it was able to install it safely.
Next, write the sketch in the Arduino IDE.
3.Arduino IDE sketch
Also, go tobrynk examples page.
This time, “Arduino Uno”, “SEroal or USB”, and
Select “LED Blind”.
By the way, if you put the third token from the top, it will be automatically reflected in the code.
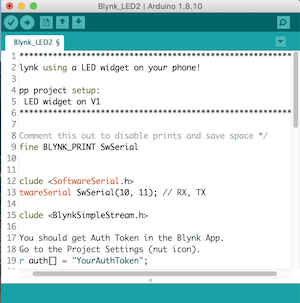
Then it generated the code automatically as follows.
char auth[] = “YourAuthToken”; pastes the token that was sent to us by email.
 *************************************************************
  Blynk using a LED widget on your phone!

  App project setup:
    LED widget on V1
 *************************************************************/

/* Comment this out to disable prints and save space */
#define BLYNK_PRINT SwSerial


#include <SoftwareSerial.h>
SoftwareSerial SwSerial(10, 11); // RX, TX

#include <BlynkSimpleStream.h>

// You should get Auth Token in the Blynk App.
// Go to the Project Settings (nut icon).
char auth[] = "YourAuthToken";

WidgetLED led1(V1);

BlynkTimer timer;

// V1 LED Widget is blinking
void blinkLedWidget()
{
  if (led1.getValue()) {
    led1.off();
    SwSerial.println("LED on V1: off");
  } else {
    led1.on();
    SwSerial.println("LED on V1: on");
  }
}

void setup()
{
  // Debug console
  SwSerial.begin(9600);

  // Blynk will work through Serial
  // Do not read or write this serial manually in your sketch
  Serial.begin(9600);
  Blynk.begin(Serial, auth);

  timer.setInterval(1000L, blinkLedWidget);
}

void loop()
{
  Blynk.run();
  timer.run();
}
I wrote this in the Arduino IDE.
4.Connect to Blynk
I went to the “scripts” folder and ran the script.
hiroakikimura@Air:~/Documents/Arduino/libraries/Blynk/scripts$
However, I got such an error, so I did ”brew install socat.
$ sh ./blynk-ser.sh

This script uses socat utility, but could not find it.
  Try installing it using: brew install socat
$ brew install socat

Updating Homebrew...
==> Auto-updated Homebrew!
Updated 2 taps (homebrew/core and homebrew/cask).
==> New Formulae
.
.
.
.
.
.
.
.
==> Installing dependencies for socat: openssl@1.1 and readline
==> Installing socat dependency: openssl@1.1
==> Downloading https://homebrew.bintray.com/bottles/openssl@1.1-1.1.1g.catalina
==> Downloading from https://akamai.bintray.com/19/1926679569c6af5337de812d86f4d
######################################################################## 100.0%
==> Pouring openssl@1.1-1.1.1g.catalina.bottle.tar.gz
==> Caveats
A CA file has been bootstrapped using certificates from the system
keychain. To add additional certificates, place .pem files in
  /usr/local/etc/openssl@1.1/certs

and run
  /usr/local/opt/openssl@1.1/bin/c_rehash

openssl@1.1 is keg-only, which means it was not symlinked into /usr/local,
because macOS provides LibreSSL.

If you need to have openssl@1.1 first in your PATH run:
  echo 'export PATH="/usr/local/opt/openssl@1.1/bin:$PATH"' >> ~/.bash_profile

For compilers to find openssl@1.1 you may need to set:
  export LDFLAGS="-L/usr/local/opt/openssl@1.1/lib"
  export CPPFLAGS="-I/usr/local/opt/openssl@1.1/include"

For pkg-config to find openssl@1.1 you may need to set:
  export PKG_CONFIG_PATH="/usr/local/opt/openssl@1.1/lib/pkgconfig"

==> Summary
🍺  /usr/local/Cellar/openssl@1.1/1.1.1g: 8,059 files, 18MB
==> Installing socat dependency: readline
==> Downloading https://homebrew.bintray.com/bottles/readline-8.0.4.catalina.bot
==> Downloading from https://akamai.bintray.com/6a/6ae1c8e7c783f32bd22c6085caa4d
######################################################################## 100.0%
==> Pouring readline-8.0.4.catalina.bottle.tar.gz
==> Caveats
readline is keg-only, which means it was not symlinked into /usr/local,
because macOS provides BSD libedit.

For compilers to find readline you may need to set:
  export LDFLAGS="-L/usr/local/opt/readline/lib"
  export CPPFLAGS="-I/usr/local/opt/readline/include"

For pkg-config to find readline you may need to set:
  export PKG_CONFIG_PATH="/usr/local/opt/readline/lib/pkgconfig"

==> Summary
🍺  /usr/local/Cellar/readline/8.0.4: 48 files, 1.5MB
==> Installing socat
==> Downloading https://homebrew.bintray.com/bottles/socat-1.7.3.4.catalina.bott
==> Downloading from https://akamai.bintray.com/78/78e28a89b73b096849654b737ea66
######################################################################## 100.0%
==> Pouring socat-1.7.3.4.catalina.bottle.tar.gz
🍺  /usr/local/Cellar/socat/1.7.3.4: 9 files, 658.9KB
==> `brew cleanup` has not been run in 30 days, running now...
Removing: /Users/hiroakikimura/Library/Caches/Homebrew/automake--1.16.1_1.catalina.bottle.tar.gz... (945.3KB)
.
.
.
.
.

==> Caveats
==> openssl@1.1
A CA file has been bootstrapped using certificates from the system
keychain. To add additional certificates, place .pem files in
  /usr/local/etc/openssl@1.1/certs

and run
  /usr/local/opt/openssl@1.1/bin/c_rehash

openssl@1.1 is keg-only, which means it was not symlinked into /usr/local,
because macOS provides LibreSSL.

If you need to have openssl@1.1 first in your PATH run:
  echo 'export PATH="/usr/local/opt/openssl@1.1/bin:$PATH"' >> ~/.bash_profile

For compilers to find openssl@1.1 you may need to set:
  export LDFLAGS="-L/usr/local/opt/openssl@1.1/lib"
  export CPPFLAGS="-I/usr/local/opt/openssl@1.1/include"

For pkg-config to find openssl@1.1 you may need to set:
  export PKG_CONFIG_PATH="/usr/local/opt/openssl@1.1/lib/pkgconfig"

==> readline
readline is keg-only, which means it was not symlinked into /usr/local,
because macOS provides BSD libedit.

For compilers to find readline you may need to set:
  export LDFLAGS="-L/usr/local/opt/readline/lib"
  export CPPFLAGS="-I/usr/local/opt/readline/include"

For pkg-config to find readline you may need to set:
  export PKG_CONFIG_PATH="/usr/local/opt/readline/lib/pkgconfig"
After the installation was completed, I typed in the command again and it was connected to Blynk.
$ sudo sh ./blynk-ser.sh
       1 ports found. You can specify port manually using -c option
-n Select serial port [ /dev/tty.usbserial-1420 ]:
/dev/tty.usbserial-1420
Resetting device /dev/tty.usbserial-1420...
[ Press Ctrl+C to exit ]
Connecting: GOPEN:/dev/tty.usbserial-1420,raw,echo=0,clocal=1,cs8,nonblock=1,ixoff=0,ixon=0,ispeed=9600,ospeed=9600,crtscts=0 <-> openssl-connect:blynk-cloud.com:443,cafile=/Users/hiroakikimura/Documents/Arduino/libraries/Blynk/scripts/certs/server.crt,nodelay
2020/04/25 12:31:06 socat[7233] N opening character device "/dev/tty.usbserial-1420" for reading and writing
2020/04/25 12:31:07 socat[7233] N opening connection to LEN=16 AF=2 188.166.206.43:443
2020/04/25 12:31:07 socat[7233] N successfully connected from local address LEN=16 AF=2 127.0.0.1:63512
2020/04/25 12:31:07 socat[7233] N trusting certificate, commonName matches
2020/04/25 12:31:07 socat[7233] N SSL connection using ECDHE-RSA-AES128-GCM-SHA256
2020/04/25 12:31:07 socat[7233] N SSL connection compression "none"
2020/04/25 12:31:07 socat[7233] N SSL connection expansion "none"
2020/04/25 12:31:07 socat[7233] N starting data transfer loop with FDs [5,5] and [8,8]
5.Connected
It’s a long explanation, but now it’s time to connect.
Press the Play button in the upper right corner.
Brynk RGB_LED
This time, I played with the three primary colors of light using RGB_LED.
#include <BlynkSimpleStream.h>
#include <Adafruit_NeoPixel.h>

char auth[] = "AceFmh803-k0OEKo-5awReXy4B4l6iCo";

#define PIN 19
#define NUMPIXELS 3

Adafruit_NeoPixel strip = Adafruit_NeoPixel(NUMPIXELS, PIN, NEO_GRB + NEO_KHZ800);

uint32_t Wheel(byte WheelPos) {
  if (WheelPos < 85) {
    return strip.Color(WheelPos * 3, 255 - WheelPos * 3, 0);
  } else if (WheelPos < 170) {
    WheelPos -= 85 ;
    return strip.Color(255 - WheelPos * 3, 0, WheelPos * 3);
  } else {
    WheelPos -= 170 ;
    return strip.Color(0, WheelPos * 3, 255 - WheelPos * 3);
  }
}


int ledR = 0;
int ledG = 0;
int ledB = 0;
int pixelBrightness = 50;
int Mode = 0, j = 0, Speed = 20;


BLYNK_WRITE(V0) //pick a color of LED
{
  ledR = param[0].asInt();
  ledG = param[1].asInt();
  ledB = param[2].asInt();
   for(int i=0; i < NUMPIXELS;i++){
    strip.setPixelColor(i, strip.Color(ledR, ledG, ledB));
  }
  strip.show();
}

BLYNK_WRITE(V1) // parameter of LED brightness
{
  pixelBrightness = param.asInt();
  strip.setBrightness(pixelBrightness);
  strip.show();
}

BLYNK_WRITE(V2) //parameter of the pattern of blinking
{
  Mode = param.asInt();
}


BLYNK_WRITE(V3) //parameter of the speed of color change
{
  Speed = param.asInt();
}

//a function of changing the color of LEDs like a rainbow
void rainbowCycle(uint8_t wait, uint8_t j) {
  uint16_t i;
  for(i=0; i < strip.numPixels(); i++) {
    strip.setPixelColor(i, Wheel(((i * 256 / strip.numPixels()) + j) & 255));
  }
  strip.show();
  delay(wait);
}

void setup()
{
  Serial.begin(9600);
  Blynk.begin(Serial, auth);
  Blynk.syncAll();
  strip.begin();
  strip.setBrightness(pixelBrightness);
  strip.show();
}

void loop()
{
  Blynk.run();
  strip.setBrightness(pixelBrightness);

  if(Mode == 0){
    //normal mode
    for(int i=0; i < NUMPIXELS;i++){
      strip.setPixelColor(i, strip.Color(ledR, ledG, ledB));
    }
    strip.show();
  }else{
    //rainbow mode
    j++;
    if(j >256){
      j = 0;
    }
    rainbowCycle(Speed, j);
  }
}
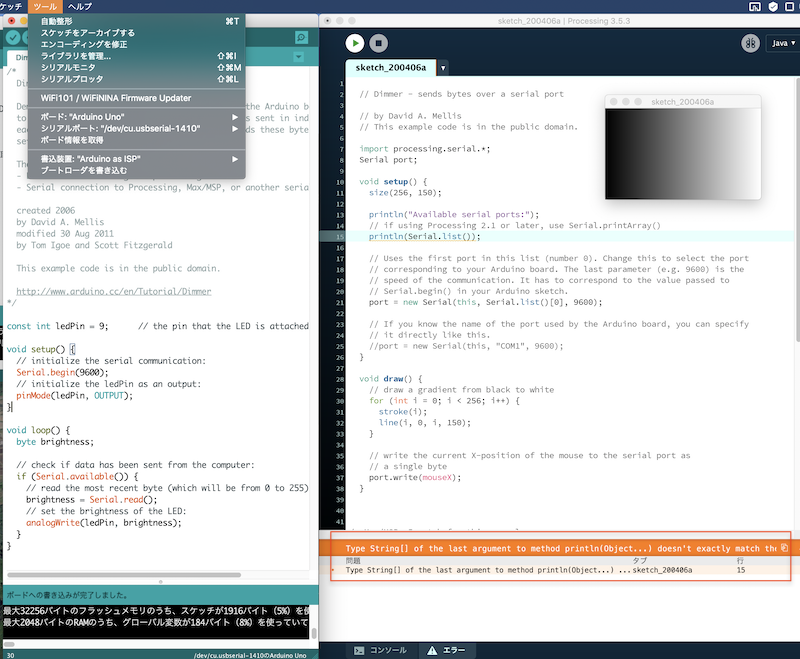
Processing → Arduino
https://omoroya.com/processing-lesson01/
I’m trying to link arduino processing with reference to this site, but it doesn’t work.
Probably there is a problem with the port setting, but as a problem
Type String [] of the last argument to method println (Object ...) doesn't exactly match the vararg parameter type.Cast to Object [] to confirm the non-varargs invocation, or pass individual arguments of type Object for a varargs invocation.
Has been messaged.

Mr. Honma, a student at Fab lab Kannai, gave me advice.
I think that Serial.list () of processing returns String [] (array) instead of String. https://processing.org/reference/libraries/serial/Serial_list_.html If you try String [0] etc., I think this error will be solved.
print(Serial.list());
#correction
printArray(Serial.list());
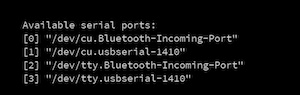
I connected to the serial port, but I got an error Since port [0] was selected, change it to [1].
I did well. Thank you, Homma.
Arduino → Processing
arduino code
int val = 0;

void setup() {
  Serial.begin(9600);
}

void loop() {
  // Get sensor value
  val = analogRead(0);

  // Convert to data (1 byte) that can be sent at one time
  map(val, 0, 1023, 0, 255);

  // Serial data transmission
  Serial.write(val);

  delay(50);
}
processing code
import processing.serial.*;

Serial port;

float x;
float y;

int in_data;

void setup() {
  size(300, 300);
  port = new Serial(this, "/dev/ttyACM0", 9600);
  background(0, 0, 0);
}

void draw() {
  // Drawing area setting
  fill(255, 10);
  noStroke();
  rect(0, 0, width, height);

  // When you receive data from the serial port
  if (port.available() > 0 ) {
    // Serial data reception
    in_data = port.read();

    // drawing
    x = width  / 2 + random(-3, 3);
    y = height / 2 + random(-3, 3);

    noFill();

    stroke(random(255), random(255), 255);

    ellipse(x, y, in_data, in_data);
  }
}