1_2. Project management
This week assigment
-
build a personal site in the class archive describing you and your final project
-
work through a git tutorial
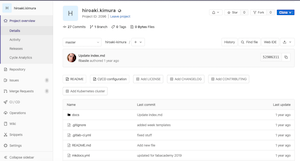
1. Login Academy’s GtiLab page.
When I logged in, the project was already created.
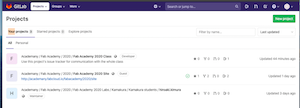
I’m impressed that the template for mkdocs has been created!
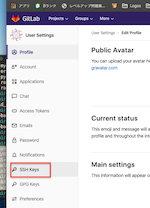
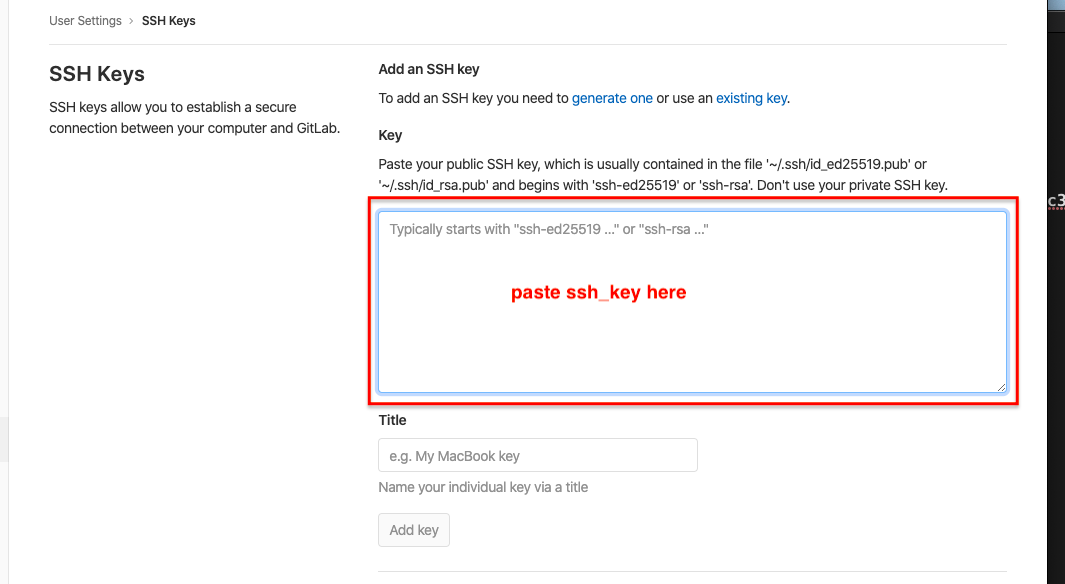
2. SSH key with GitLab
- Check git installation
$ which git
 → /usr/local/bin/git
- Check git version
$ git --version
 → git version 2.23.0
- I have git settings, so check that
$ cat ~/.gitconfig
 → # This is Git's per-user configuration file.
[user]
    name = Hiro.k
    email = info@self-build.biz
[core]
    editor = vim -c \"set fenc=utf8\"
    excludesfile = /Users/kimurahiroaki/.gitignore_global
- I confirm that the SSh key has already been created
kimurahiroaki@iMac:~$ cd .ssh
kimurahiroaki@iMac:~/.ssh$ ls
id_rsa  id_rsa.pub  known_hosts
(If you have not created a key, create a key)
$ ssh-keygen -t rsa -C "$your_email"
- Check the key you created.
$ cat ~/.ssh/id_rsa.pub
 →
ssh-rsa AAAAB3NzaC1yc2EAAAADAQABAAACAQD1rpKvX+LzFJywFo/
-------- Omitted ----------
/e54UkXV4b+xDPE61sowo5J5mIzjo1a/3Ep9Swr4hVZXX3ZMnmQ== info@self-build.biz
- Finally add the copied key to GIT on the web version
Note:
if you connect from another PC, you need to set up an SSH key again.
If you try to push without shuffling the ssh key, you will get the following error:
$ git push origin master
 → The authenticity of host 'gitlab.fabcloud.org (13.59.248.79)' can't be established.
ECDSA key fingerprint is SHA256:Rphnjz211wPLjTJcyAip0xozt0hOoFgT9hl5eZfxzd0.
Are you sure you want to continue connecting (yes/no)? yes
Warning: Permanently added 'gitlab.fabcloud.org,13.59.248.79' (ECDSA) to the list of known hosts.
git@gitlab.fabcloud.org: Permission denied (publickey).
fatal: Could not read from remote repository.

Please make sure you have the correct access rights
and the repository exists.
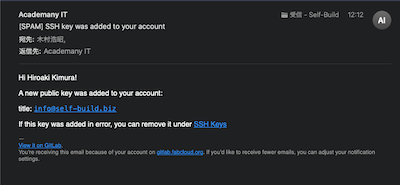
- Once all the keys are set, the Academy will send you an email
3. Clone from gitlab
-
Copy Academy Repo

-
Copy Clone with SSH
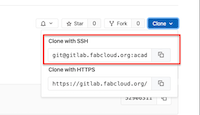
-
Terminal
git clone (ssh key)
$ git clone git@gitlab.fabcloud.org:academany/fabacademy/2020/labs/kamakura/students/hiroaki-kimura.git
 → Cloning into 'hiroaki-kimura'...
Enter passphrase for key '/Users/hiroakikimura/.ssh/id_rsa':
remote: Enumerating objects: 171, done.
remote: Counting objects: 100% (171/171), done.
remote: Compressing objects: 100% (64/64), done.
remote: Total 171 (delta 98), reused 171 (delta 98)
Receiving objects: 100% (171/171), 405.19 KiB | 158.00 KiB/s, done.
Resolving deltas: 100% (98/98), done.
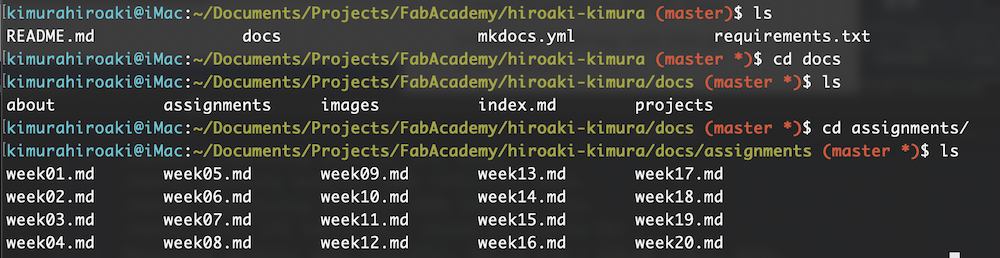
- Successfully cloned to local PC!

- Confirm at terminal
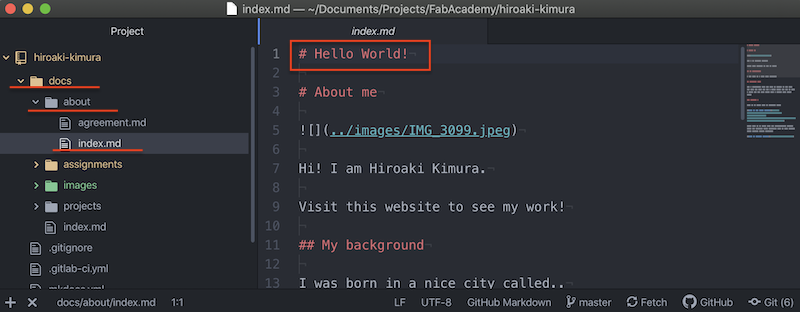
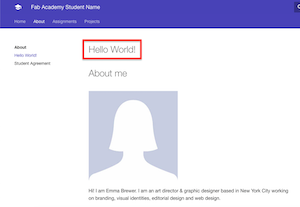
4. Overwrite the file locally
- I tried using Atom editor
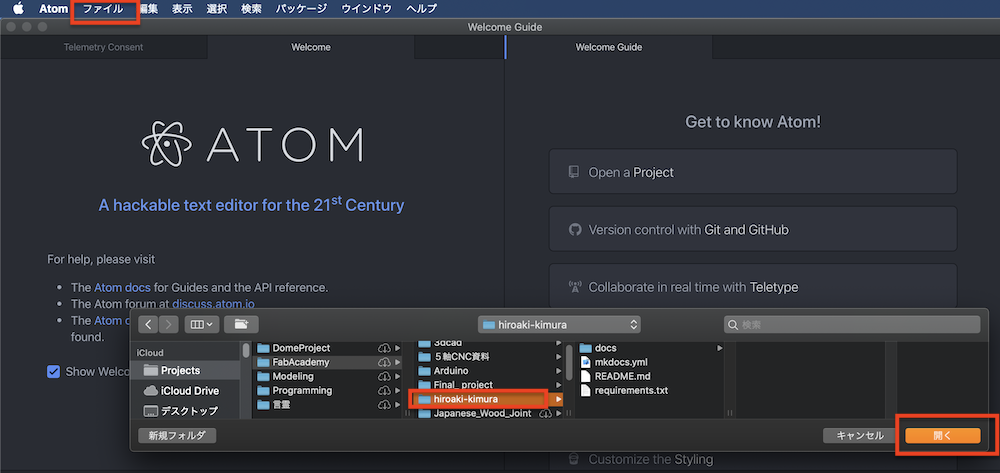
- I opened docs / about / index.md and wrote “Hello World!”
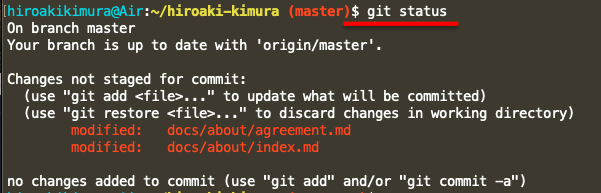
- Check the difference with the git status command
- Use the git add. command to put it on the stage area
- Check the contents with git diff HEAD command.
(Items deleted in red letters, items added in green letters) -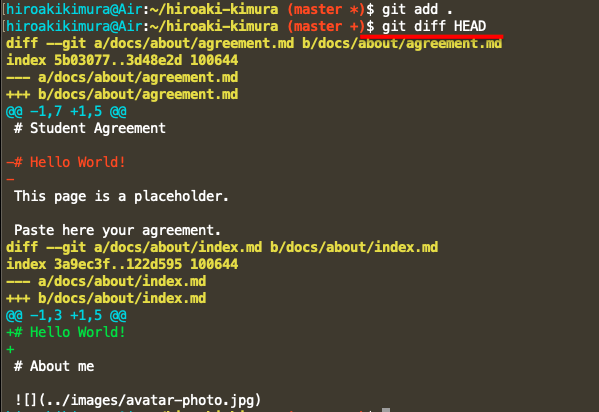
- git commit -m “commit name”
- Send data to remote repository with git push
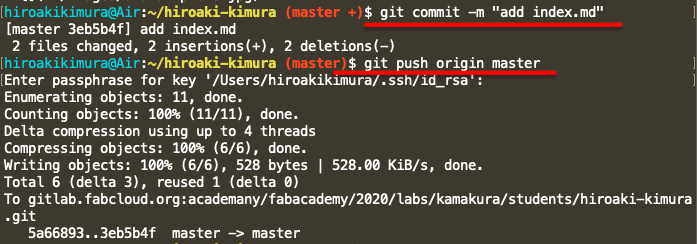
- Was reflected in the Academy student’s web page! !
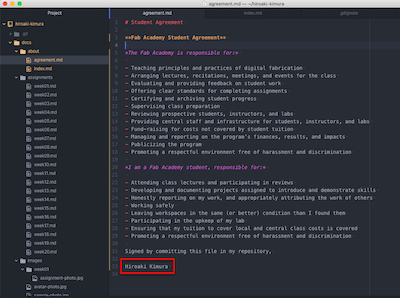
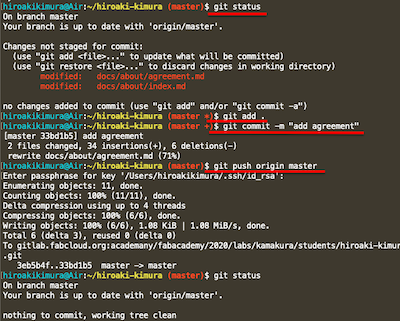
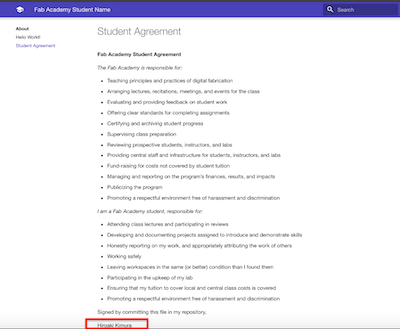
5. Sign an agreement
6. Document creation MkDocs
Features of MkDocs
You can create a set of files required for a website with Markdown (a simple language description of text + alpha), and you don’t need to modify HTML directly.
What is MkDocs?
MkDocs is a static site generator that builds document sites based on Markdown. Material for MkDocs is one of the themes of MkDocs and reflects the material design proposed by Google. I feel like this theme is really well done.
What is a static site?
A static site is simply a file consisting of HTML and CSS and JavaScript that is sent to the client through the server and displayed in the browser.
A client is a user, a person who comes to your home page. There are many ways to do this, whether it’s with a computer, a smartphone, or a tablet.
When a client makes a query (request) to the server, it will transfer the necessary files to the server.
In contrast, a dynamic site means that when a client makes a query (request), the server generates content and forwards it to the client according to the content of the request.
Which would you choose?
If you don’t need the functionality of the home page, you may want to choose a software that makes static files.
When you only need to look at the images and text.
It is recommended to create a personal site for researchers or a technical site.
On the other hand, if you run a store or need a multi-functional website, you should use a dynamic site.
If you want to use a variety of functions such as cart functions, campaigns, coupons, and mail magazines, use web services such as Wix, Webnode, Goope, and BASE.
If you want to be proactive with your blog and media, you may want to use something like WordPress.
Mkdocs environmental construction
- Install mkdocs
$ pip3 install mkdocs
- Creating a project
$ mkdocs new test
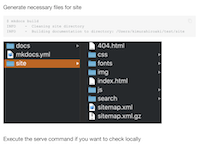
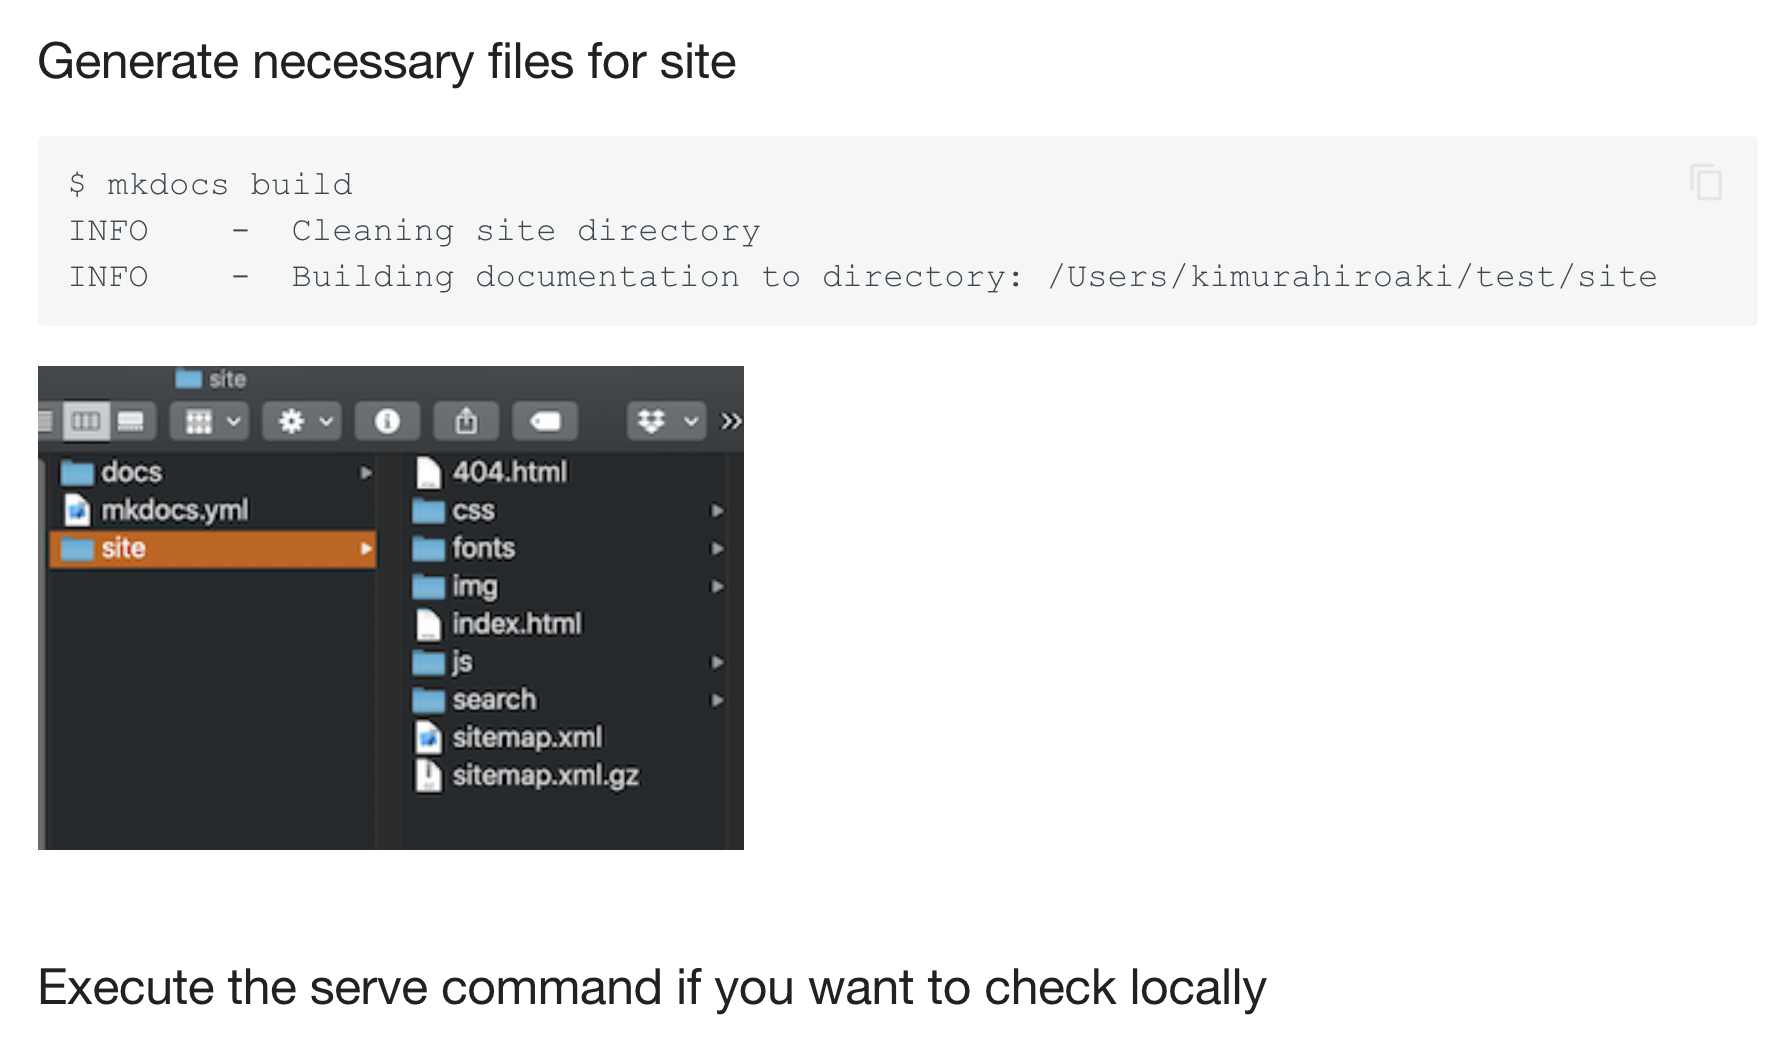
- Generate necessary files for site
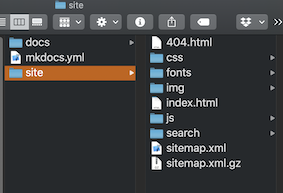
$ mkdocs build
INFO    -  Cleaning site directory
INFO    -  Building documentation to directory: /Users/kimurahiroaki/test/site
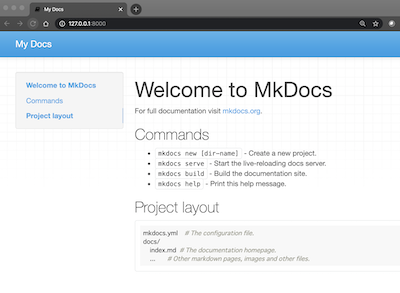
 - Execute the serve command if you want to check locally
$ mkdocs serve
INFO    -  Building documentation...
INFO    -  Cleaning site directory
[I 200202 15:21:49 server:296] Serving on http://127.0.0.1:8000
[I 200202 15:21:49 handlers:62] Start watching changes
[I 200202 15:21:49 handlers:64] Start detecting changes
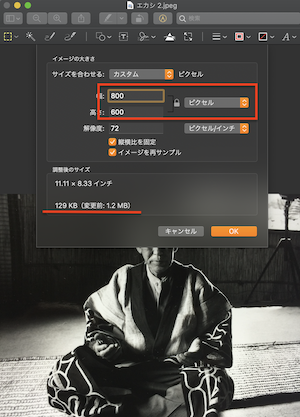
7. Image size adjustment
-
Mac preview
1.2 MB → 129 KB
-
Mac preview Display size(W . H) change
- Change width to 10 cm
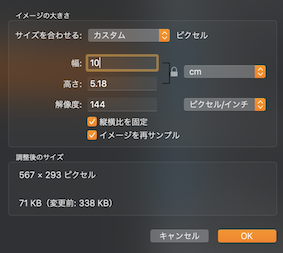
↓
- Change width to 5 cm
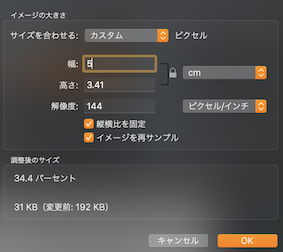
↓
8. Markdown Useful functions
Admonition
Admonition is an extension included in the standard Markdown library that makes it possible to add block-styled side content to your documentation, for example summaries, notes, hints or warnings.
- Admonition
Add the following lines to your mkdocs.yml:
(Already set up on the Academy site)
markdown_extensions:
  - admonition
Note
Example:
!!! note
    Lorem ipsum dolor sit amet, consectetur adipiscing elit. Nulla et euismod
    nulla. Curabitur feugiat, tortor non consequat finibus, justo purus auctor
    massa, nec semper lorem quam in massa.
Note
Lorem ipsum dolor sit amet, consectetur adipiscing elit. Nulla et euismod nulla. Curabitur feugiat, tortor non consequat finibus, justo purus auctor massa, nec semper lorem quam in massa.
Success
Example:
!!! success
    Lorem ipsum dolor sit amet, consectetur adipiscing elit. Nulla et euismod
    nulla. Curabitur feugiat, tortor non consequat finibus, justo purus auctor
    massa, nec semper lorem quam in massa.
Success
Lorem ipsum dolor sit amet, consectetur adipiscing elit. Nulla et euismod nulla. Curabitur feugiat, tortor non consequat finibus, justo purus auctor massa, nec semper lorem quam in massa.
Danger
Example:
!!! danger
    Lorem ipsum dolor sit amet, consectetur adipiscing elit. Nulla et euismod
    nulla. Curabitur feugiat, tortor non consequat finibus, justo purus auctor
    massa, nec semper lorem quam in massa.
Danger
Lorem ipsum dolor sit amet, consectetur adipiscing elit. Nulla et euismod nulla. Curabitur feugiat, tortor non consequat finibus, justo purus auctor massa, nec semper lorem quam in massa.
Notation changes when returning the first letter
Be careful to leave 4 indents (spaces) from the next line
!!! note
!!! abstract
!!! tip
!!! question
!!! warning
    leave 4 indents (spaces) from the next line
!!! bug
!!! example
Note
Abstract
Tip
Question
Warning
leave 4 indents (spaces) from the next line
Bug
Example
CodeHilite
Example:
```python
import tensorflow as tf
Result
import tensorflow as tf
Example:
``` python
""" Bubble sort """
def bubble_sort(items):
    for i in range(len(items)):
        for j in range(len(items) - 1 - i):
            if items[j] > items[j + 1]:
                items[j], items[j + 1] = items[j + 1], items[j]
Result
""" Bubble sort """
def bubble_sort(items):
    for i in range(len(items)):
        for j in range(len(items) - 1 - i):
            if items[j] > items[j + 1]:
                items[j], items[j + 1] = items[j + 1], items[j]
There are various other functions, so I’d like to try them later
9. Git commands
- Perform initial settings
$ git config --global user.name "XXXX"
$ git config --global user.email "XXXX@hogehoge.com"
- Check settings
$ cat ~/.gitconfig
- Create repository locally and push to remote
$ git init
$ git status
$ git add .
$ git commit -m "Initial commit"
$ git remote add origin https://github.com/XXXX/XXXXXX.git
$ git push -u origin master
- Extract differences between remote and local files
$ git diff <file name>
- View commit change history
$ git log
$ git log -p
$ git log --oneline
$ git log --graph
$ gitk
- See changes for the specified commit
$ git show <Commit hash value>
- Push to remote
$ git push origin <Branch name>
- Cancel add
$ git reset HEAD <file name>
- Cancel commit
$ git reset --hard HEAD^
$ git revert <Commit hash value>
- Cancel push
$ git reset --hard <The hash value of the commit you want to return>
$ git push -f
- Create a branch locally
$ git branch <Branch name>
- Switch branch locally
- Branch creation & switching
$ git checkout <Branch name>
$ git checkout -b <Branch name>
- Change branch name
$ git branch -m <old branch name> <new branch name>
- Deleting a branch
$ git branch -d <Branch name>
- Reflect local branch to remote
$ git push -u origin <Local branch name>
- Bring remote branch locally
$ git branch <branch name> origin/<branch name>
- Check all branches
$ git branch -a
- Compare branches
$ git diff <branch name> <branch name>
- Merge branches
$ git merge <branch name>
- Always make a merge commit even in a fast-forward relationship
$ git merge --no-ff <branch name>
- Delete file
$ git rm -f <file name>
10. Project management
Below, what I learned from Fab Lab Kamakura Instructor (Rico)
It’s very helpful, so I record it.
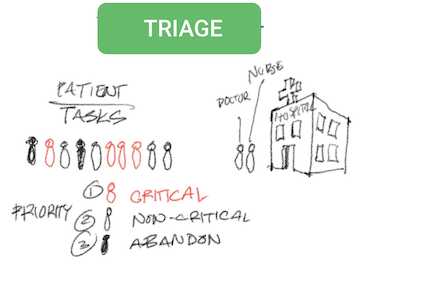
Triage
Note
A technique to prioritize critical tasks over non-critical tasks.
With a limited time each week to complete your assignments, it is important that you decide before you start your project what tasks are more important than others. As time remaining becomes less and less, choose to work on critical tasks (tasks needed to complete your weekly assignments) and put aside non-critical tasks (not necessary to completing your weekly assignment).
For example, if you are building a robot, it is more important to complete work on the supporting mechanical structure and internal electronics than to work on the decorative outer shell. Even without the outer shell, the robot can be tested for movement and other functionality.
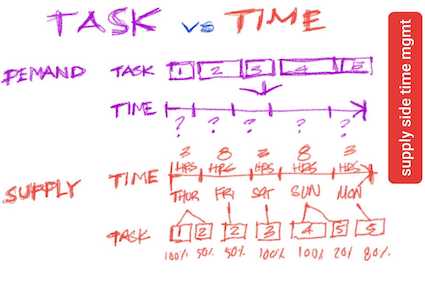
Supply Time_management
Note
Completing a project by organizing the project time, not the project tasks.
How to use SSTM:
Begin with deciding how much “Total Time” in the week you will have to work on your weekly assignmen…ex: 25 hours each week Break down the “Total Time” into smaller “Work Sessions”..ex: 3 hours Thursday, 8 hours Friday, 3 hours Saturday, 8 hours Sunday, 3 hours Monday Assess the task components necessary for you to complete your weekly assignment…ex: research, work, document Assign the task components into the “Work Sessions”…ex: research on Thursday, work & document on Friday, research on Saturday, work & document on Sunday, document on Monday. Complete your weekly assignment in a time disciplined manner, being constantly mindful of time remaining in each work session, and using the triage technique to complete each component task in the work session it is assigned to…avoid extending work from one work session into the next work session. Have the time control the tasks, not the tasks control the time.
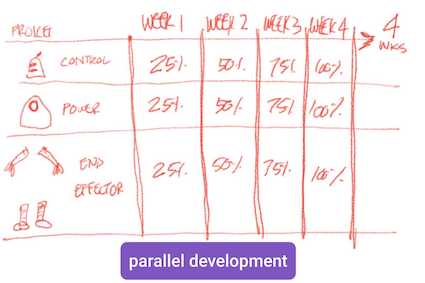
Parallel development
Note
Work on several project tasks in parallel, not one after another (serial)
Since each sub-task will be discreet and separate from other sub-task and will have its own beginning and end, you can start on several sub-tasks at the same time and switch your work effort from one sub-task to the next during the work session. While this method cannot be used all the time, it is a good way to make sure that acceptable progress is made on all sub-tasks during the work session.
For example, using the robot example, make the supporting mechanical structure for the robot head, then move to make the support frame for the body, arms and legs. When all the frames of the robot are done, go back to the head to work on the electronics, moving to body, arms and legs electronics when the head electronics is done.
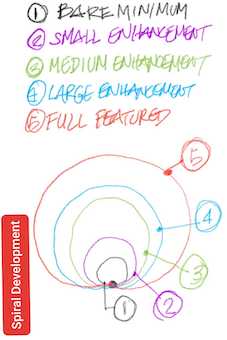
Spiral development
Note
Complete the bare minimum version of the project, then incrementally improve it with added features and refinements
Spiral Development is a method to plan project work so that an acceptable, functioning result can be completed in a limited amount of time. The idea is that after the “bare minimum” functioning version is completed, if time is still available, improvements can be made to the project to make it better. Imagine working on the “bare minimum” project as drawing a small circle…starting and ending at the same point after drawing in a tight curve motion. Once you arrive at the starting point, if time allows, start drawing another circle (the second version of the Project), this time with a slightly bigger radius than the first…to end up at the same starting point as the first, smaller circle (bare minimum version). Repeat this process to drawing increasingly bigger circles (make improvements to the original simple project version) until time ends.
This method helps to guarantee that when the time period ends, you have a completed project…even if it is a simple one.
Bottom_up debugging
Note
Perform debugging on smaller, simpler component parts of a project, not on the complex, overall project
It is difficult to debug a complex project using a “Top Down” technique because there are many variables to consider that may be causing the problem. Debugging is most effective when it is done on the smallest sub-components, one at a time…”Bottom-up” technique.
For example, if the robot we are building is not functioning, it is best to look at each sub-system one at a time and eliminate each as the cause of the problem. Test to see if each sub-system of the robot head is working (Primary controller, electrical wiring, mechanical linkages, power system, etc.) and fix any non-functioning component. When that is done, move to the next major sub-group (the robot body) and debug each of that group’s sub-systems, fixing any problems that you find.
Solving problems in simpler component groups is easier to do than to try to work on a large complex group.
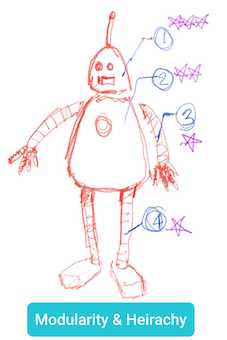
Hierarchy, modularity
Note
Conceive and plan your project in smaller, modular components that are each arrange in a heirachy of importance.
For every project or weekly assignment, take time to review and break down the work before you begin. Instead of seeing the project or assignment as one, big and complex task, see it as a combination of smaller, modular, inter-related, easier to understand “Sub-Tasks” components.
For example, if you are building a robot project, see it as a combination of robot head project, robot arm project, robot leg project, robot body project, etc. Once you have your big project broken down into sub-tasks (and even sub-sub-tasks)…make an effort to rank the project in heirachical order of importance. For example, robot head first, then body, then arms
Document as you work
Note
Document your work incrementally from the beginning, rather than wait until the project is finished to start.
It will take you approximately 20-30 hours a week to complete your assignment. If you wait until you are done with your assignment or project to document your work, you will forget many things and end up with incomplete documentation. It is much better to document from the beginning of your work session and do so consistently and constantly during the entire work session. Take notes. Take photos. Take videos. At the end of the work week you will have much more documentation than you need…but it is easier to delete than not to have documentation and have to recreate it (and waste time doing the same thing twice).
11. recitation: version control
HTML Review
- Created by adding html.index to the site of Hiroaki Kimura
$ touch index.html
$ cd index.html
- FabAcademy/hiroaki-kimura/index.html
<!DOCTYPE html>

<html>
    <head>
      <title>My Fab Academy Documentation</title>
      <meta charset="utf-8">
      <meta name="viewport" content="width=device-width">
    </head>

    <body>
      Hello Fab Academy!

      <h1>Hiro's Fab Academy Documentation</h1>

      <p>This website is meant to be filled with interesting adventues during Fab Academy in Kamakura.</p>

      <img src="docs/images/week02/ajiafab.png" alt="hiro" width="100%">

      <ul>
        <li><a href="about.html">About</a></li>
        <li><a href="final-project.html">Final Project</a></li>
        <li>Asignments:
          <ul>
            <li>Week 01: princkples and Practices</li>
            <li>...</li>
          </ul>ß
        </li>
      </ul>
    </body>
</html>
Git Review
$ git status
$ git add index.html
$ git add .
$ git commit -m "commit name "
$ git commit

(vim Editor)
add index file with
- Title
- Basic description
- An image
- and a menu

(git log history)
commit db49207bae3c2cb5a222394f017d2144309d4035 (HEAD -> master)
Author: Hiro.k <info@self-build.biz>
Date:   Wed Feb 5 11:31:26 2020 +0900

        add index file with
        - Title
        - Basic description
        - An image
        - and a menu
Note
If you only have the $ git commit command, you can go to the Vim editor and fill in the details. Make a note of where you can do that(code below).If you want to set it to Atom, use “vim → Atom”.
$ git config --global core.editor 'vim -c "set fenc=utf-8"'
- Push to remote repository. I used to be “git push origin master” until now, but now I know that the command can only be done with “git push”.
$ git Push
Conflict
I tried to create a conflict intentionally, but this time it failed.

- So keep an example for that time


- If there is a conflict, just fix it to the code you want and commit, so don’t worry.
GitLab Flow
- A command to create a new development branch and move to that branch.
$ git checkout -b featureA
 → Switched to a new branch 'featureA'
- Check branches
$ git branch
 → * featureA
     master
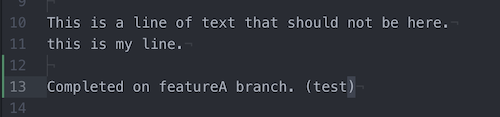
- Write “Completed on featureA branch. (Test)” in the README.md file
(featureA)
$ git status
$ git add .
$ git commit -m "first featureA commit"
- Continue next week
What I learned this week
- Gitlab setup and usage (commands)
- Setting up and using Mkdocs (commands)
- Image size adjustment
- Git commands
- Project management