Week 2: Computer-aided design
Assignment for this week: model (raster, vector, 2D, 3D, render, animate, simulate, ...) a possible final project, compress your images and videos, and post it on your class page
This week was challenging for me, as I didn’t have any experience with design tools and programs and now had to work with numbers of them. I decided to explore programs step-by-step to be confident in at least one of them. Besides doing the design work, this week I did a lot of work with images and video: trimming and changing format, decreasing the size and making collages, etc.
I have worked in Inkscape, Adobe Photoshop and as a main software for designing my final project I used Fusion 360.
I have learned a lot during this week: about raster and vector design, basics of Inkscape and Fusion360. I believe this is just the beginning of my long journey in design world, as I like the process a lot.
-
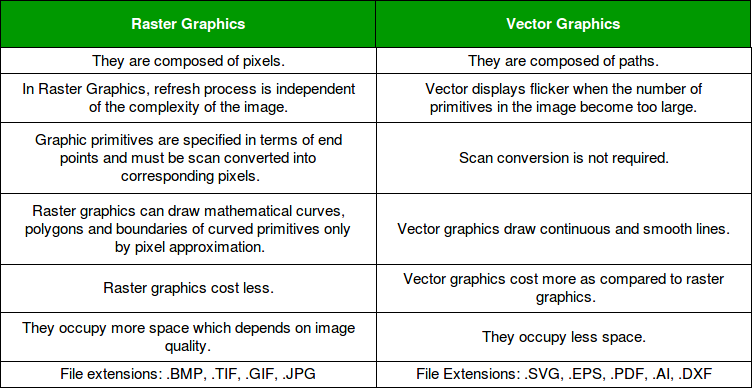
Raster vs Vector
Before this I didn’t know anything about the graphics and particularly the difference between raster and vector graphics. The only thing which I associate with the term “vector” is the vector in maths and science. That’s why I had to go through many tutorials to know what it is, what’s the difference, when and where to use each of them. Here are some articles and a video which I found informative:
Vector vs Raster graphics
Raster vs. Vector: What’s the Difference and When to Use Which
So basically, raster , or bitmap, images consist of tiny squares called pixels. These pixels contain bits of color and when combined, they build images. The more pixels in an image the higher the quality, and vice versa. When you zoom in on an image the pixels become more apparent while the details of the image become blurry. Raster images are used in photography and digital applications. When you take a picture with a phone or a camera the image is recorded as pixel data, and when these images are uploaded online the end result is a raster image. To edit these images you need access to raster-based programs like Adobe Photoshop. The common formats for raster images are:
- tiff (Tagged Image File Format)
- .psd (Adobe Photoshop Document)
- .pdf (Portable Document Format)
- .jpg (Joint Photographics Expert Group)
- .png (Portable Network Graphic)
- .gif (Graphics Interchange Format)
- .bmp (Bitmap Image File)
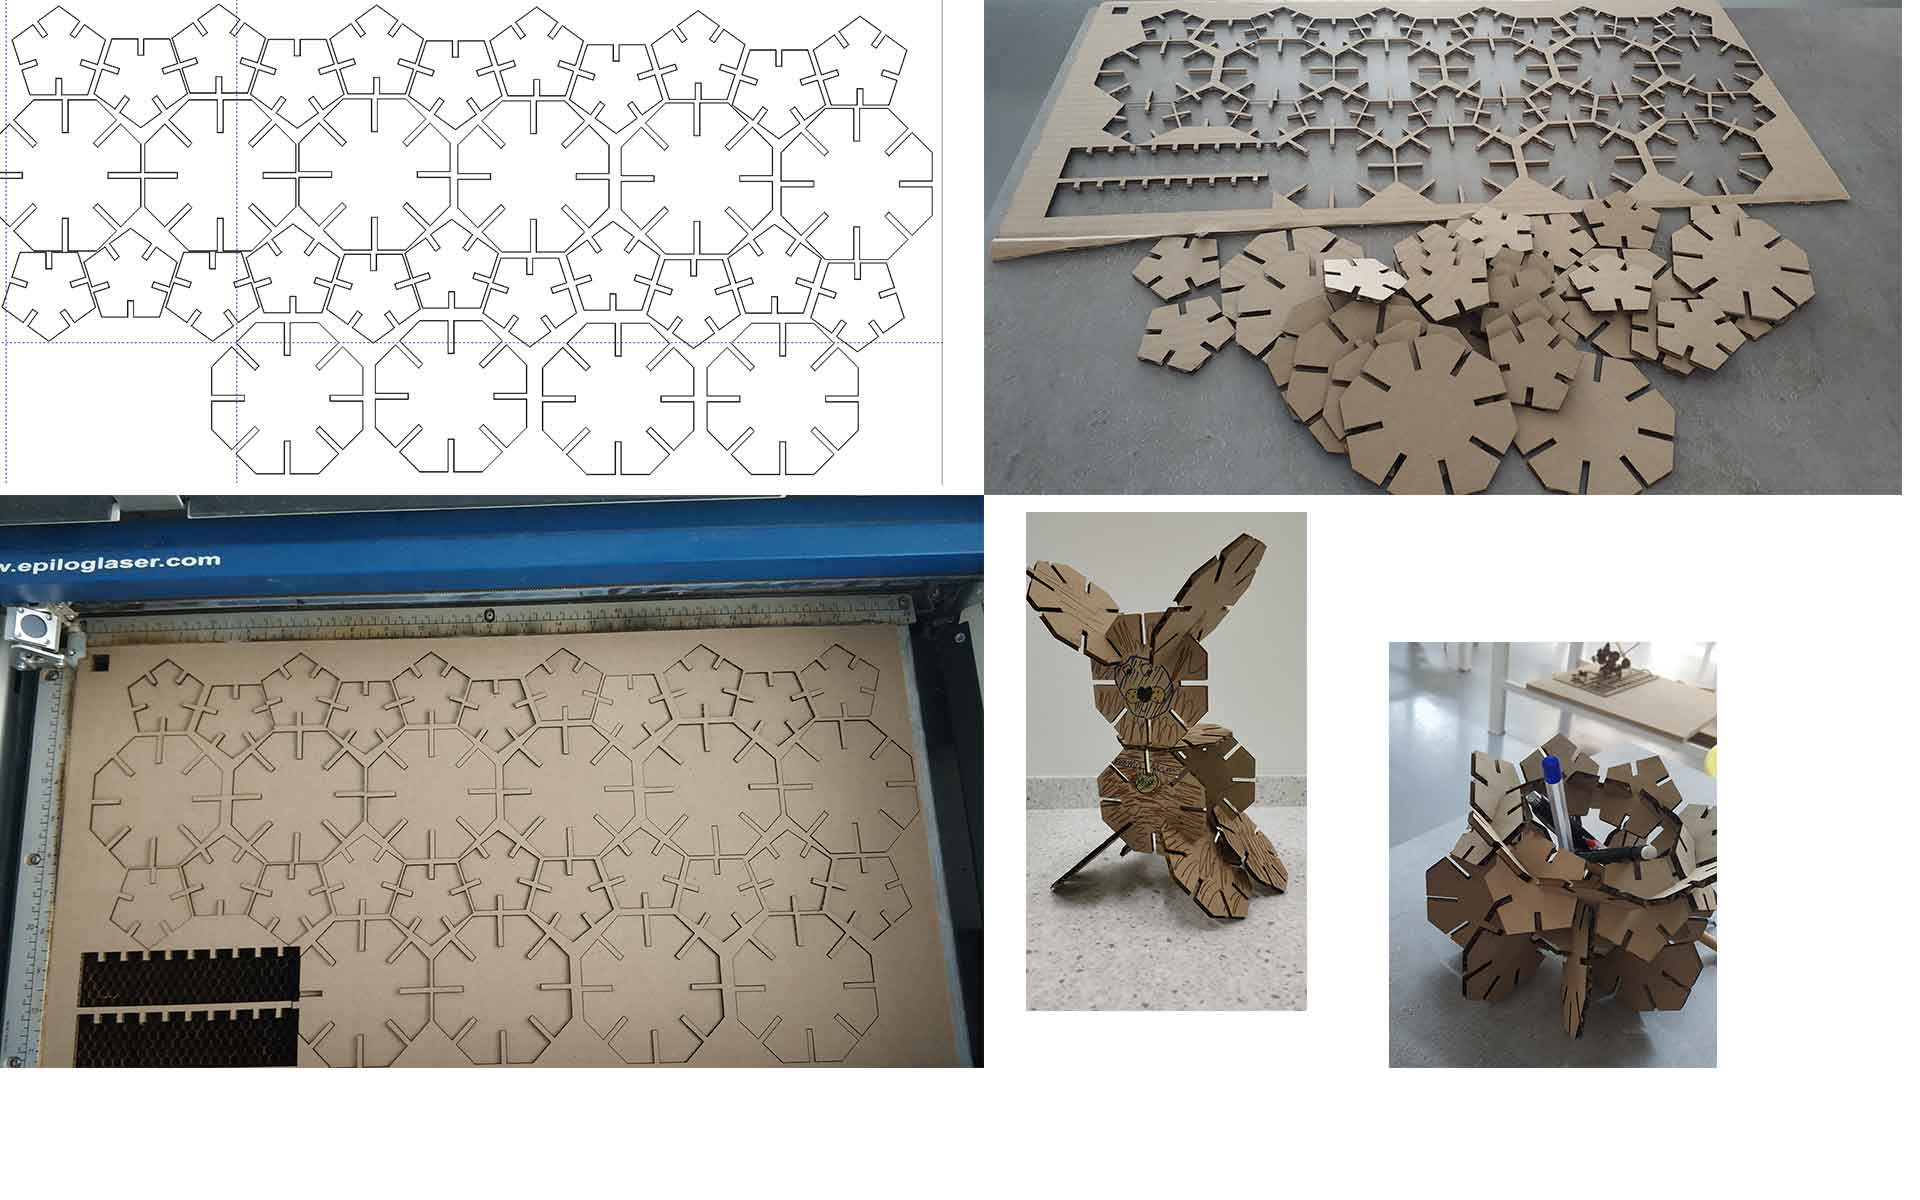
Even when scaled to substantial proportions, this pattern below remains clean and exact. Elements like fonts render the same way: When sized up or down, they retain their quality. Vectors’ scalability make them ideal for design work consisting of logos and icons. Both logos and icons require immense details and many size options, usually depending on their application. Vectors are ideal for large or small format prints, because rasterized designs will lose quality when resized. Vector files can be saved or edited in these formats:- .ai (Adobe Illustrator document)
- .eps (Encapsulated PostScript)
- .svg (Scalable Vector Graphic)
- .pdf (Portable Document Format; only when saved from vector programs)
-
Designing a coffee mug in Inkscape
I had very poor experience with graphic software, I have used only MyPaint for basic changes on the photos and Adobe Photoshop while doing front-end programming.
I found a very detailed comparison between the most famous vector graphic software: Inkscape, CorelDraw and Illustrator. Basically, for the inexperienced person like me who is just doing the first steps, Inkscape is the best option, because it’s free, works on all OSc and has a good user interface. CorelDraw and Illustrator are paid software and mostly used by people who work in graphic design companies.
As I’m a coffee addicted person, the first thing which came to my mind to draw as a 2D vector, was a coffee cup.
I have downloaded Inkscape from the official website and did the design in following order:
- Open Inkscape and create a new file by pressing File → New
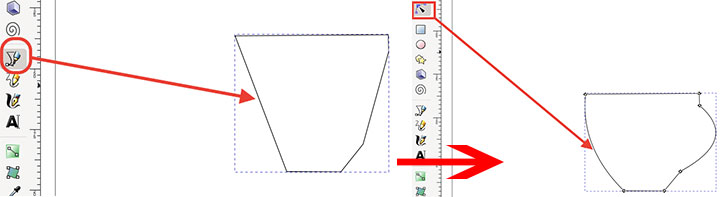
- Select the Draw Bezer curves and lines tool from the left toolbar (hotkey: B) and draw a rough sketch of the cup.
- Select Edit paths by nodes (hotkey: N) tool and keep pressing the mouse left button hold and move curves as you wish them to be.
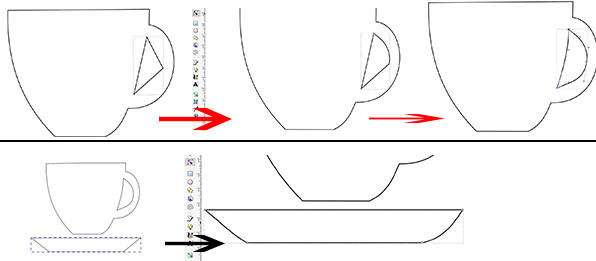
- The same way I drew the holder of the cup and the saucer.
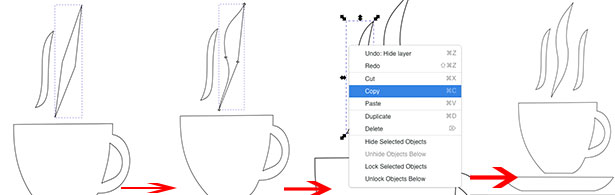
- Then I drew some streams going out from the mug.
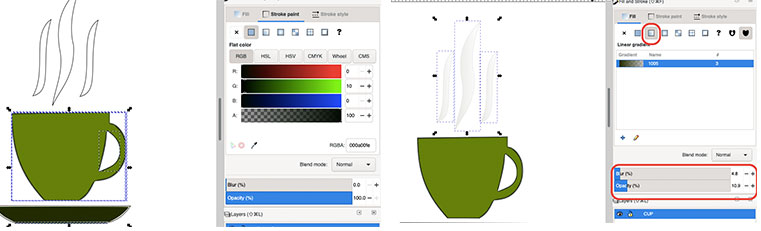
- Using the select tool select the objects and by pressing Fill and Stroke (Cmnd+Shift+F) choose the fill color and type, stroke color and style. For the stream I lowered opacity and gave some blur effect.
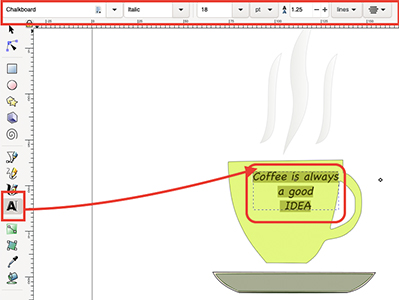
- Using the Text tool I have added text on the cup. On the top bar it is possible to change text font family, style, size, layout.
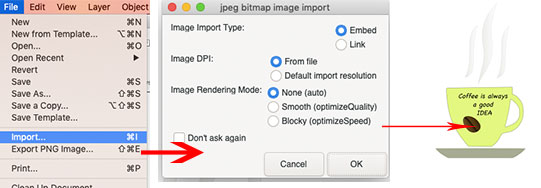
- I wanted to add a coffee bean image on the mug. So I downloaded an svg image of a coffee bean from freesvg.com and then pressed File → Import, chose the downloaded file, scaled it and put on the mug.
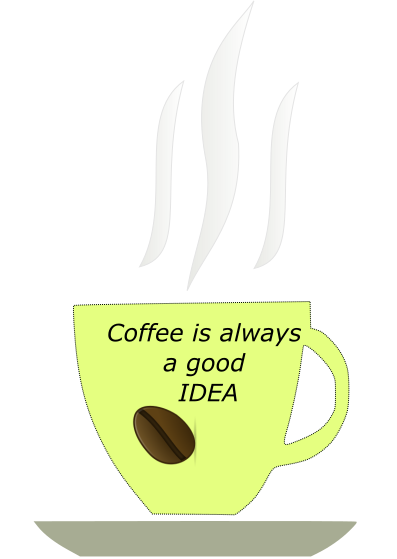
- To group all of the componets together go to Edit → Select all (Command+A) and then Object → Group (Command+G)
- And here is the result
- Comparison and choosing between the 3D design software
This was my first time to do any design work so first of all I had to choose the software. I watched some videos to compare the software and in the end wanted to choose between FreeCAD and Fusion 360. Both of them have advantages and disadvantages and I tried to compare them by some key features:
- Price: This is important for the user as if you are not doing industrial work for profit, generally you don’t want to pay. Fusion 360 is a product of Autodesk. In general, it’s a paid product, but it has a 3 years free educational licence and one year licence for startups. FreeCAD is an open source product. So here it has an advantage.
- User interface and usability: this is, of course, a personal opinion because each user has their own preferences. As a beginner I liked Fusion 360 more, because it was easy to navigate, find appropriate tools and options. Besides that, Fusion 360 automatically uploads and saves your design to the cloud service, which is a very useful option.
- Tutorials and documentation: As both of the software are very popular, there are many tutorials and documentation both for FreeCAD and for Fusion360.
So I have decided to work in Fusion360, because it seems more user friendly for me and to try other software for the next few weeks.
- The model of my final project
First of all I downloaded Fusion 360 from the official website and started my first steps there. It has free educational license, you just have to sign up on their website.
There are lots of tutorials for Fusion360 but for me this one was really helpful and I started to understand the basics. Afterwards, after many unsuccessful attempts to draw the sketch of my final project, my classmate Ashot Margaryan helped me to get used to the tools and now I have rough design of my final. This, of course, has to be improved but I think I did a good job considering my zero knowledge before this course.
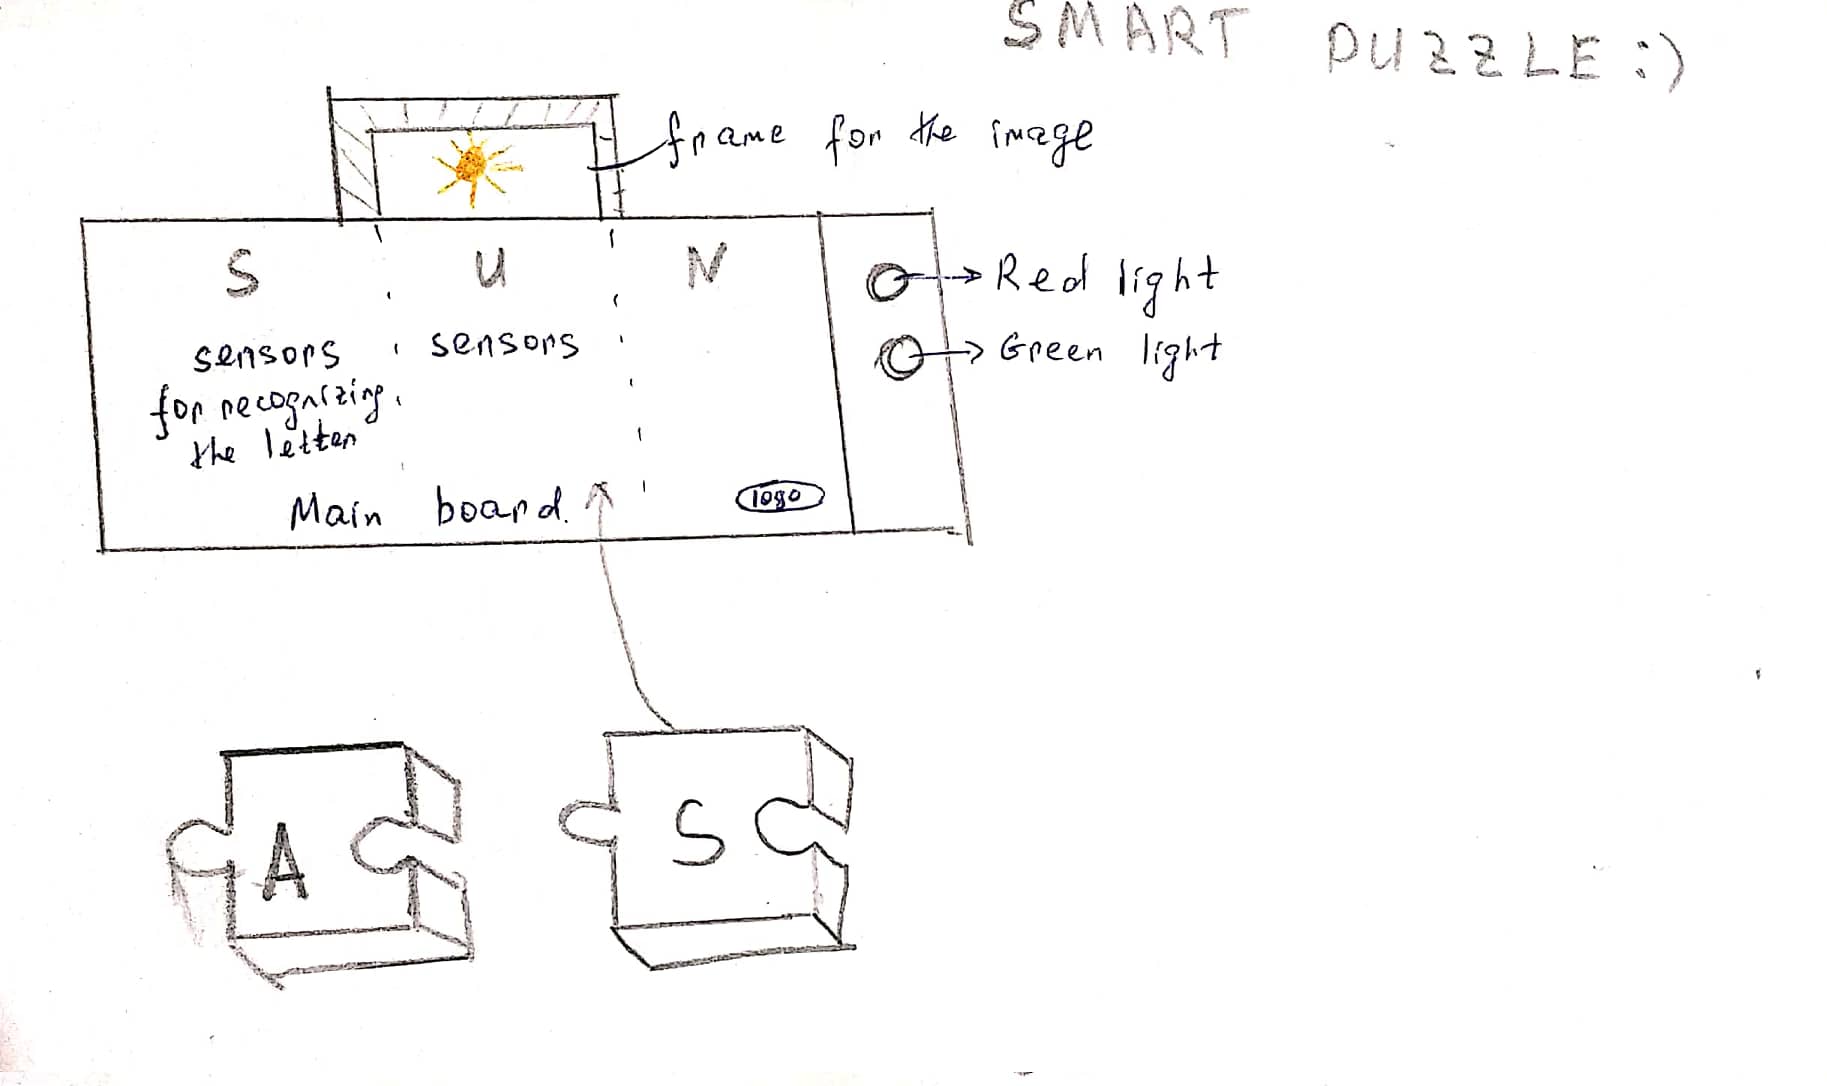
For my final project I’m going to create a puzzle. More details are in Final project proposal.-
After opening Fusion360, go to File → New design and you will have a new workplace.
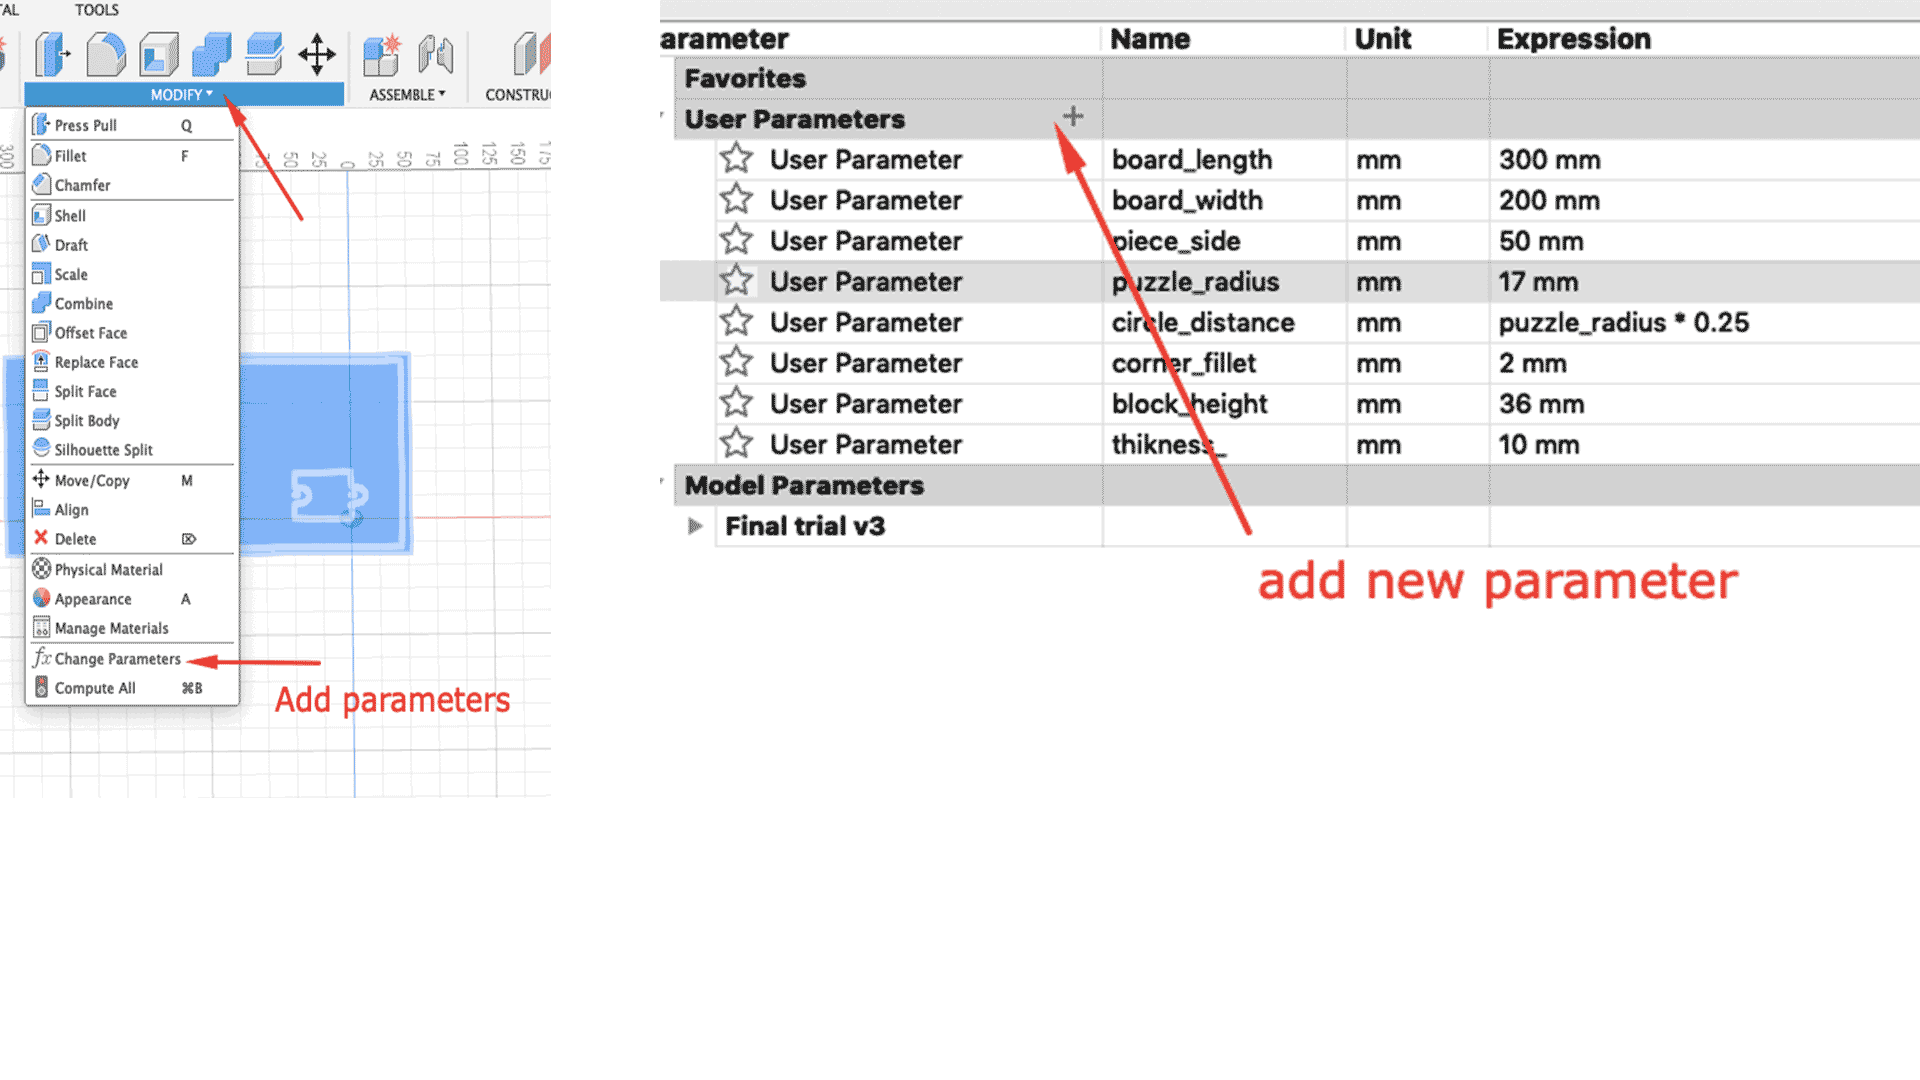
- Before starting actual modelling, I opened the parameters spreadsheet from Modify → Change parameters and added basic parameters that I will need. For example board height, width, thickness, size of the frame etc.
- When everything is ready go to Create → Create Sketch and choose which shape you want to have. You should choose the plane first and then start creating on it.
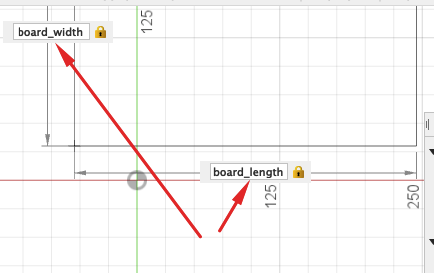
- To draw the base of my board, I did draw a rectangle and with sides “board_length” and “board_width” . So if at some point I don’t like the sizes, I’ll just go to my spreadsheet and change them there.
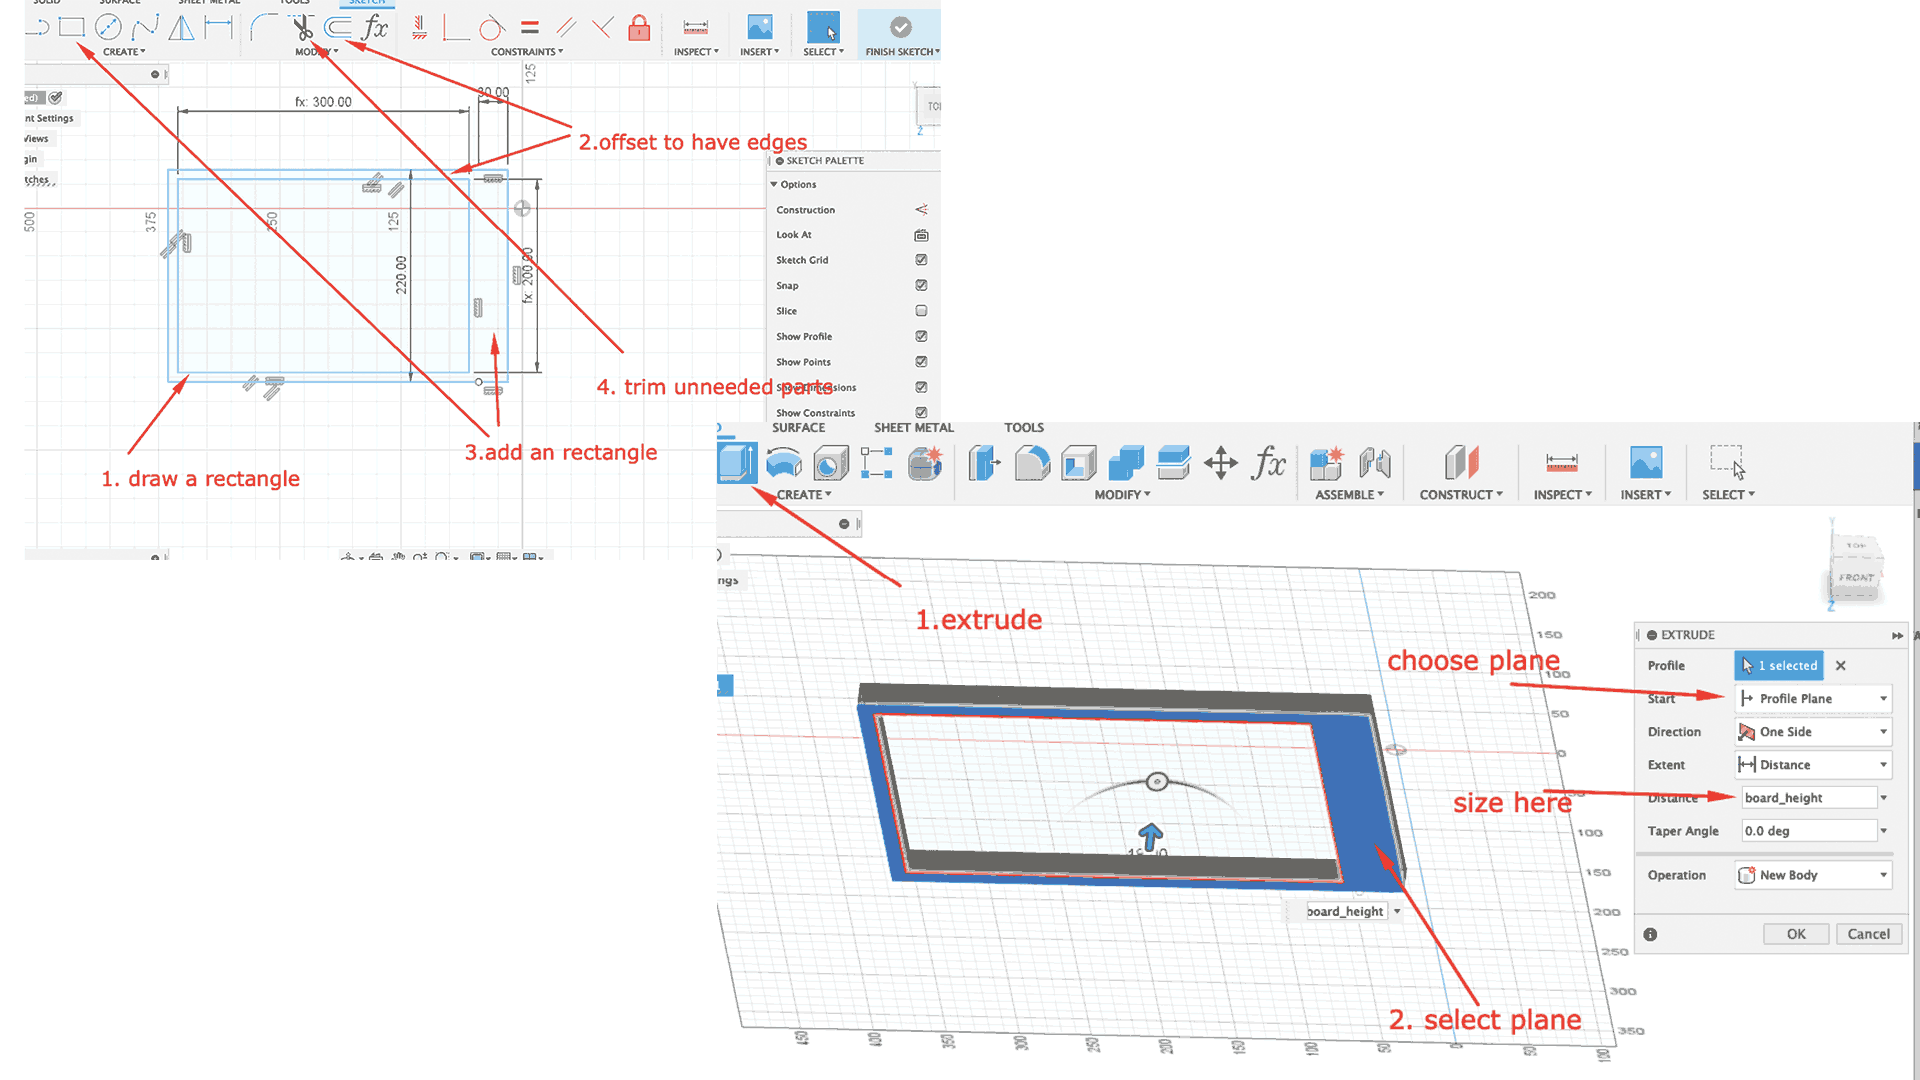
- I am going to have a rectangular box, with a bit wider one wall. On that wall I will put the lights. To make sketches for the walls I have used the Offset tool. The offset size is the thickness of the wall. Then I have added an additional rectangle on one side, merged with an already offseted part and then using the Trim tool cuted unnecessary lines. Sketch is ready, so we have to press Finish sketch. After that I did Create → Extrude to give my model height.
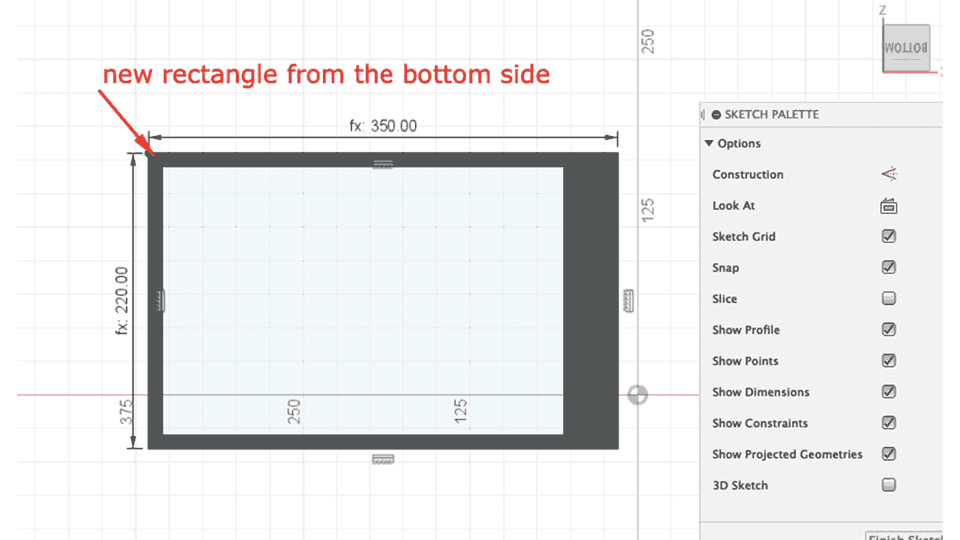
- Now I have a frame and have to make an actual bottom part of it. For that I rotated my plane to the bottom and created a rectangle with sizes (board_width+2*offset_size) and (board_width+workbanch_width). After that I extruded by (-board_height).
- Now I have my board ready, time to make puzzle blocks. For that I sketched a quadrate with the side “block_side”., which is the size of my block. Then I created construction lines in “circle_radius*0.25” distance from quadrate vertical sides. I need these lines to put circle centers there. Afterwards, I created 2 circles on each side. Now, if I trim some lines, will have a sketch for the puzzle block. When sketch is ready, I extruded it by "block_height" and it's ready.
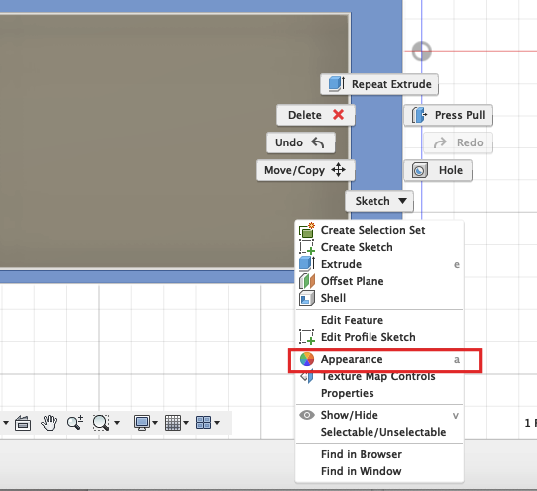
- I am planning to have the board made from wooden material and puzzle blocks will be 3d printed from plastic. To have a better idea of that, I changed the appearance of my created bodies. For that you have to right click on the body and select Appearance. There you can find different types of materials in different colors. Find whatever you like and drug it to your object.
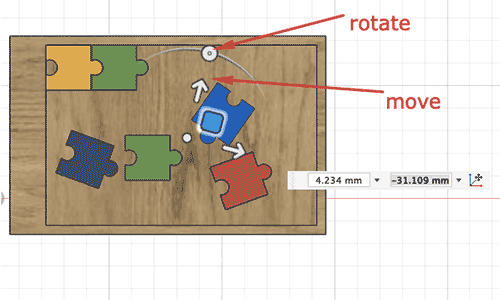
- As I need many puzzle blocks, I copied the one I made and pasted as a new body. After that I the new one to different locations and changed the color, to have coloreful blocks. While moving, you can also rotate the object to the position you want to have them on.
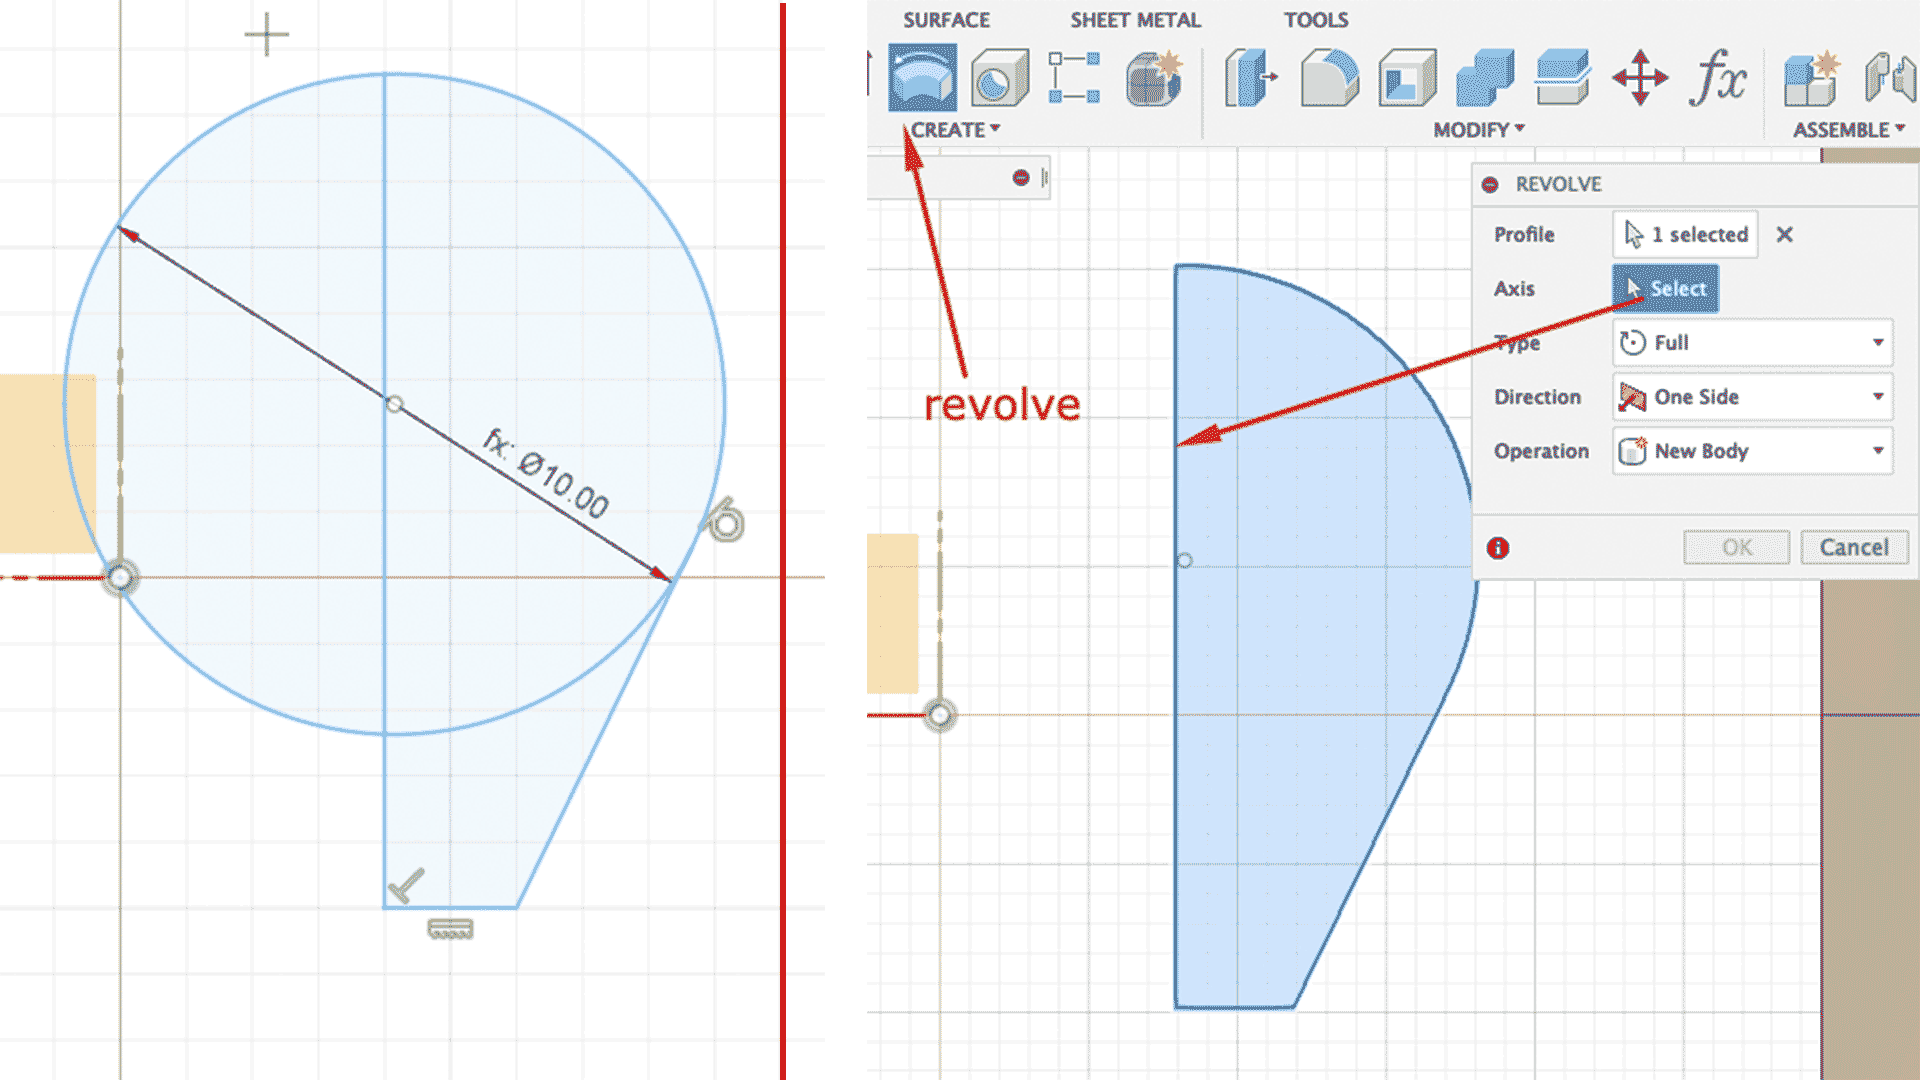
- On one side of my board I will have red and green lights. If the kid will put the block in right place, the green light will turn on, otherwise - the red one. To create the light I did Create sketch then draw a circle with given parameter-radius. To have the root part of my bulb, I drew a tangent line to the bootom part of the circle. Then, if yo take the haf of this sketch and revolve around central axis, you will have a nice looking light bulb.
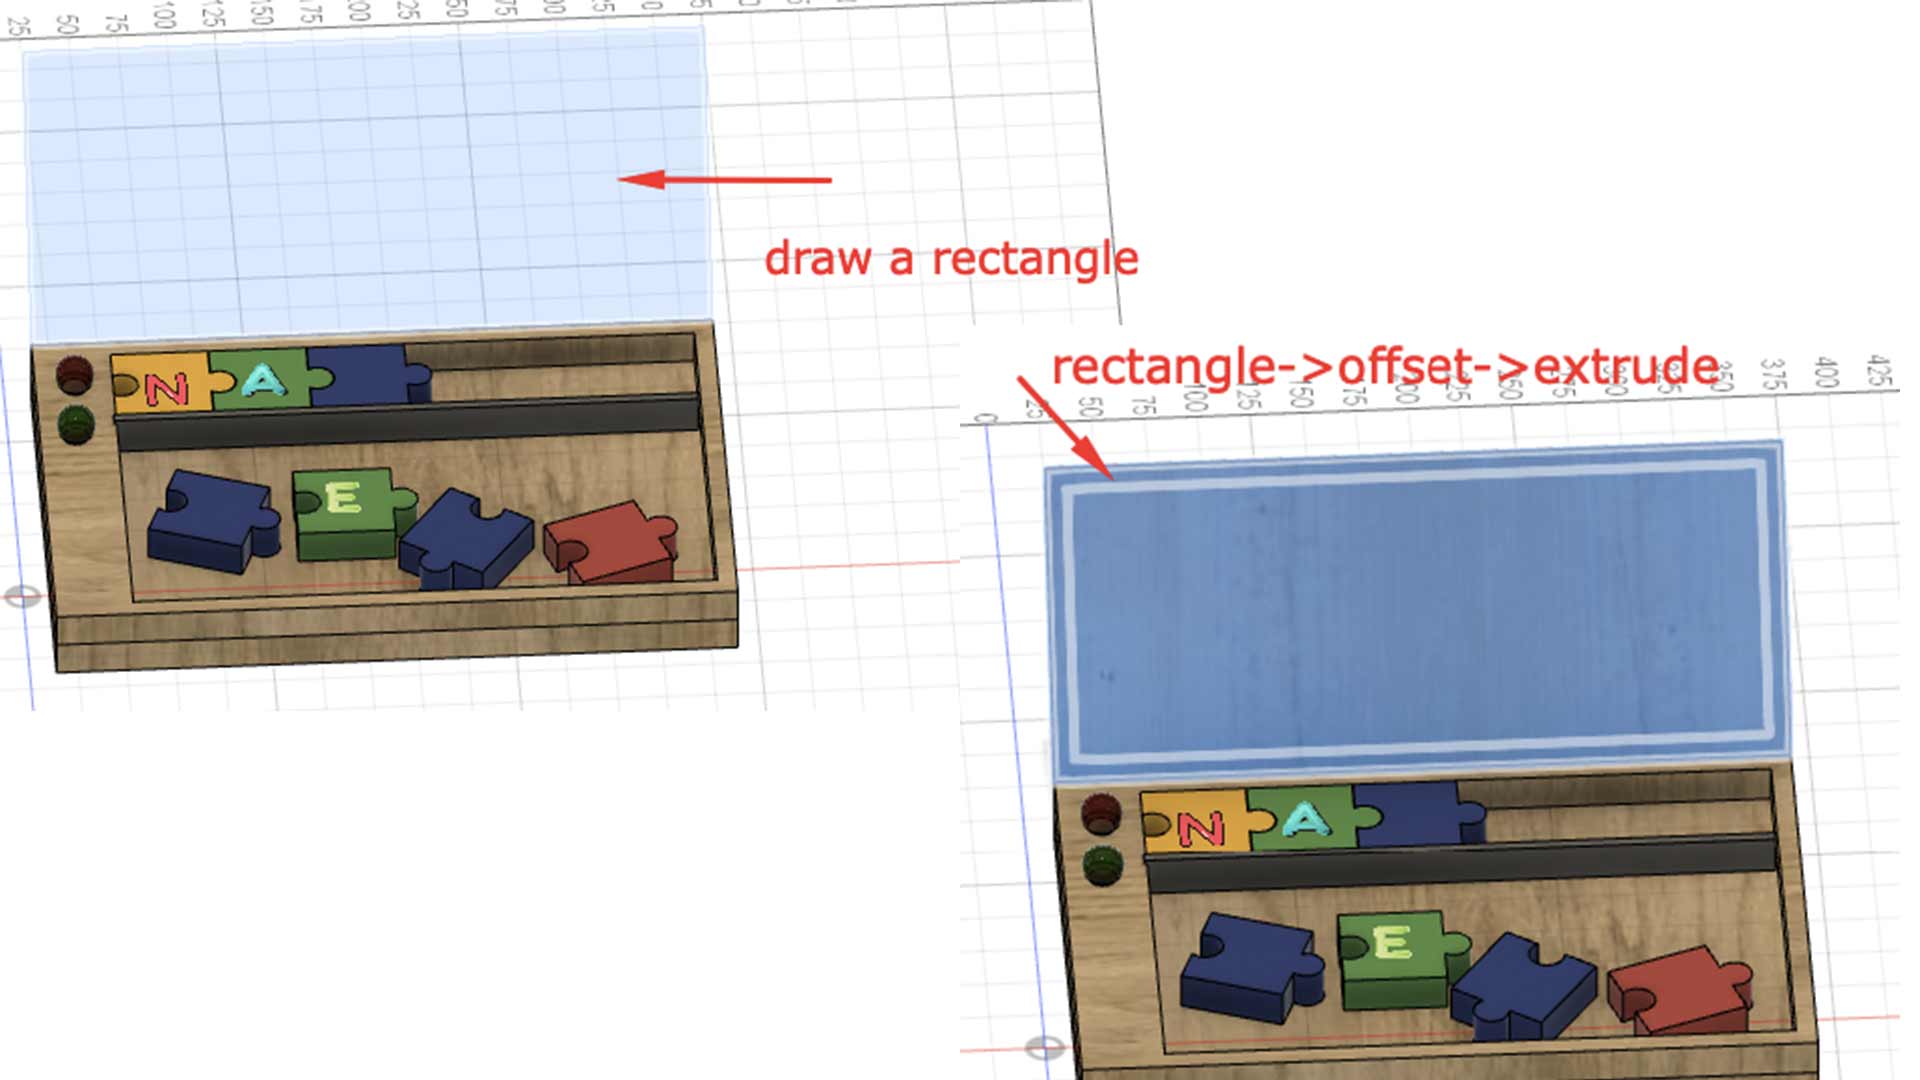
- I was thinking that it would be nice if the kid has the image or the word he is going to collect in front of him all the time. So I decided to make another board almost perpendicular to the main one. For that I created a new plane from Construct → Plane at angle , chose the base line and angle. I made it 30deg Then i drew a rectangle n that plane with a frame.
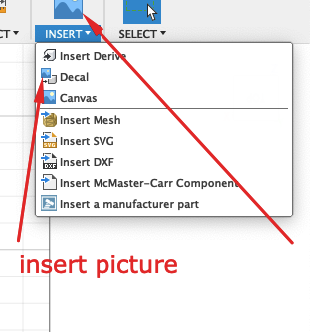
- My blocks should have letters on them, so that kid can construt a word. I downloaded letters from the internet to my computer. Afterwords select the surface where you want to have the letter or image, go to Insert → Decal → Chose from my computer and insert picture. You can resize, rotate, move it to fix it on the surface. The same way I added an image on the cover part, which will show kids what word are they going to build.
-
When I was done, I went to my work history in Fusion and recorded the screen. To change the format of my video from MOV to MP4
I used this website.
This videowill help to post the video on the website.

-
After opening Fusion360, go to File → New design and you will have a new workplace.
- Some improvements that could be done
- While making puzzle blocks, I did't consider that we have to put one block into another. Therofore, they can't have the same radius. One of them should be for 1mm smaller than another. Unfortunately, I couldn't find a way to fix this yet, but this is on my list.
- Now, when I'm more familiar with the tools of Fusion360, I would do fillet to some edges of my puzzle blocks, to make the joints more smooth. Hopefully, by the time I will do the final modelling I'll be more confident.
-
Lightshot for making screenshots
While doing documentation, we have to do lot of screenshots. I found a nice tool for that, which started to make my life easier. Lightshot is a very handy programm to take a customizable screenshot. Here you can choose the part of the screen you want to capture, add simple objets and text on it and save as a .png file. It works on Windows and Mac.
-
Working in Photoshop
Sometimes I have to gather some screenshots together and make one collage for WEB use. for that I used Photoshop. Adobe Photoshop is a raster graphics editor developed and published by Adobe Inc. for Windows and macOS. It was originally created in 1988 by Thomas and John Knoll. Since then, the software has become the industry standard not only in raster graphics editing, but in digital art as a whole. This is a paid software $29.99/month and has 7 days free trial.
There are open source alternatives to the Photoshop such as Gimp or Krita but in this stage I had many things to learn and chose Photoshop for editing my screenshots, because I am familiar with it and have a licence from the company where I work.
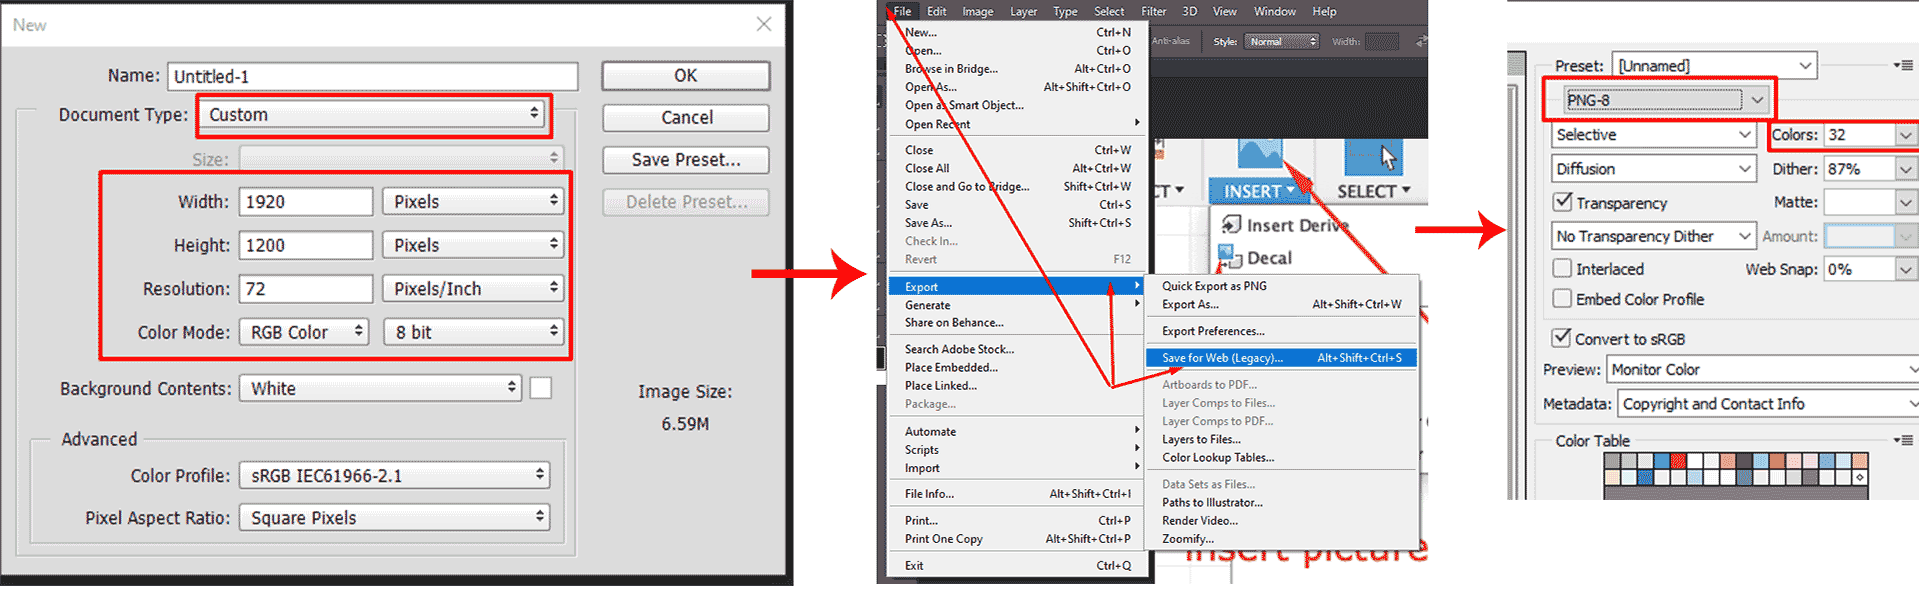
Here are some easy ways to have good quality photos using Photoshop.- Open Photoshop. Go to File → New.
- In opened window chose Custom for Document type. Then insert document width and length as you want to have. More details are presented in the photo below.
-
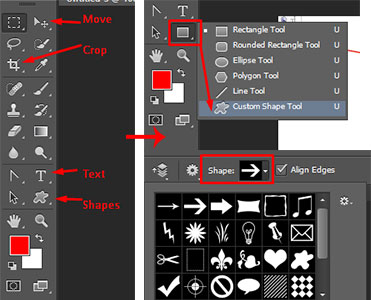
In opened blank insert your screenshots/photos as you want them to be. You can add text, frames, shapes there. Here are the common tools which I used for working with screenshots in Photoshop
- When you're done with editing, go to File →Export → Save for Web
- Here you can choose the format, number of colors and much more. And what's the most important: you have a preview tab there, so you can play with parameters to find the one which fits your needs.
- And finally Save the image.
-
Conclusion
This week was more productive for me, because I was learning things which are completely new to me. I did some research about design software , their similarities and differences and found Fusion 360 more suitable one for me at this point for 3D design and Inkscape for 2D design.
Update
Before this I didn’t know anything about vector and raster graphics and their differences. I had to explore and learn about them and it was a very interesting discovery for me. Now I know what is better to use for different purposes.
Then I have learnt the basics of 2D and 3D design and what does parametric design mean. After all of this I designed a coffee cup in Inkscape and did the 3D design of my final project.
I found modelling programs very challenging for the first view, but when I got the points, everything changed and I'm more into that now. I hope to develop these skills during the coming weeks. The best thing that one can do to learn design is watching many tutorials and keep trying.Following week I did some basic work with Inkscape and CorelDRAW, while preparing files for luser cutting and vinyl cutting.
During the Computer-Controlled Cutting and 3D scanning and printing I did parametric design in Freecad and developed my skills there. During the Computer-Controlled Machining week I did parametric design of a bookcase in Fusion360, where I did a lot of new things. - Files
Attached are the original files for my model
Coffee cup
3D model of final project proposal
stl file of final project proposal
svg file of final project proposal


