Week 15: Molding and casting
Assignment for this week:
Group assignment: Review the safety data sheets for each of your molding and casting materials,
then make and compare test casts with each of them
Individual assignment: Design a mold around the stock and tooling that you'll be using,
mill it (rough cut + (at least) three-axis finish cut),
and use it to cast parts
- Introduction
This week we should review in group the safety data sheets for each of our molding and casting materials, then make and compare test casts with each of them. For an individual assignment we had to design a mold, mill it (rough cut + finish cut) and use it to cast parts. For me almost all of these processes are new, so I had to do research and explore everything from the basics. In the beginning it seemed that the design work is the most easy step here, but then I found out that there are many tricks that I have to consider and that makes life harder. Eventually I did the design of a keychain for two-parts mould, milled it on the Roland SRM-20 machine (both rough cut and finish cut). Then I made molds from PMC™-121 Series urethane rubber and Mold Max60 heat resistant silicone. And finally, did plastic cast in both of the molds and a metal cast in the heat resistant silicone mold.
- Group assignment: Safety data sheets for molding and casting materials
In our lab we have the following molding and casting materials (images are from linked websites):
- Machinable wax : This has Flash Point (COC): 575 degrees F (301.6C) and Melt Point : 240 degrees F (116C).
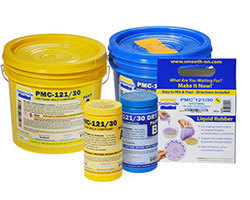
According to the SDS it’s not classified as an hazardous material and GHS symbols are not applicable. - PMC 121/30 urethane mold compound : feature convenient one-to-one by volume mix ratios.
It is exceptionally strong and abrasion resistant for soft urethane mold rubbers.
It does not exude oil and can be used for casting waxes, Smooth-On liquid plastics, gypsum plasters and other materials.
It has 30 minutes of Pot life and 16 hours Cure time.
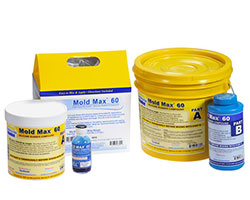
According to the SDS it is harmful if swallowed, in contact with skin or if inhaled, causes skin irritation, causes serious eye irritation,may cause respiratory irritation, suspected of causing cancer. - Mold Max™ 60 : this is a high heat resistant (up to 560°F/294°C) silicone rubber compound.
Parts A & B are mixed 100A & 3B by weight. Pot life is 40 minutes and cure time is 24 hours.
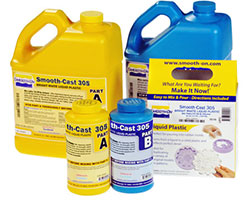
According to the MSDS it is not a hazardous substance or mixture and there are no GHS (Globally Harmonized System of Classification and Labelling of Chemicals) labels applied. - Smooth-Cast® 305 liquid plastics : are ultra-low viscosity casting resins that yield castings that are bright white and virtually bubble free.
Vacuum degassing is not necessary. Mix Ratio By Volume is 1A:1B and Mix Ratio By Weight is 100A:90B.
Pot life is 7minutes, cure time - 30 minutes.
According to the SDS this is quite toxic material, harmful if swallowed, in contact with skin or if inhaled, causes skin irritation, causes serious eye irritation,may cause respiratory irritation, and is suspected of causing cancer, etc. - Babbitt (alloy) or Babbitt metal, any of several tin- or lead-based alloys based on the tin alloy invented in 1839 by Isaac Babbitt for use in steam engines. Modern babbitts be made of:
(1) high-tin alloys with small quantities of antimony and copper;
(2) high-lead alloys containing antimony, arsenic, and tin; and
(3) intermediate tin-lead alloys with antimony and copper.
According to SDS, it is harmful if swallowed and suspected of causing cancer.
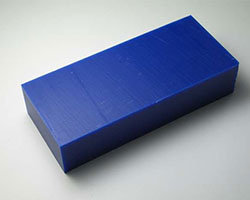
- Machinable wax : This has Flash Point (COC): 575 degrees F (301.6C) and Melt Point : 240 degrees F (116C).
-
Designing mold model and milling the wax
I decided to make a keychain with logos on both sides. It seemed a very simple thing to design, but during the process I faced several problems, because there are several rules to apply, if you are designing a mold model. Here are the some of them ( source and image credits: 3D HUBS )
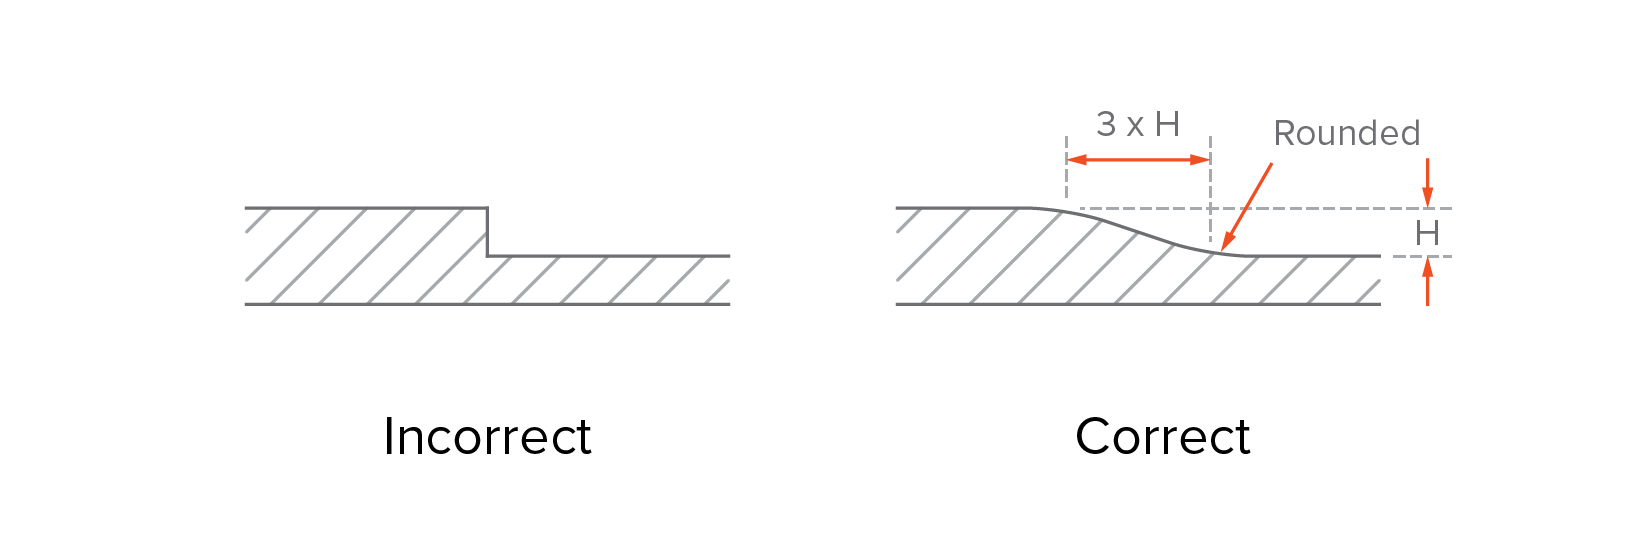
- Use a constant wall thickness: Use a uniform wall thickness throughout the part (if possible) and avoid thick sections. This is essential as non-uniform walls can lead to warping or the part as the melted material cools down. If sections of different thickness are required, make the transition as smooth as possible using a chamfer or fillet. This way the material will flow more evenly inside the cavity, ensuring that the whole mold will be fully filled.
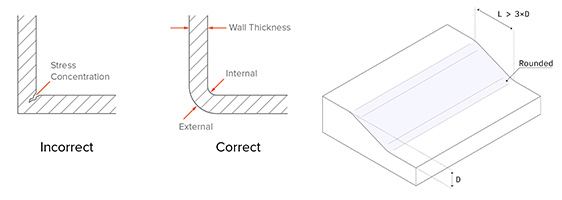
- Round all edges: sharp corners result in stress concentrations which can result in weaker parts.
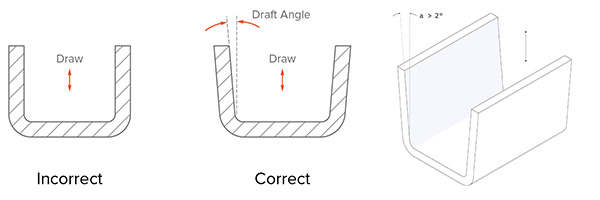
- Add draft angles: To make the ejection of the part from the mold easier, a draft angle must be added to all vertical walls. Walls without a draft angle will have drag marks on their surface, due to the high friction with the mold during ejection. A minimum draft angle of 2° is recommended. For the best result, for features taller than 50 mm, increase the draft angle by one degree every 25 mm. Draft angles should be considered for all surfaces parallel to the mold separate directions.
Considering these rules and also having very valuable tips and comments from my classmate Ashot Margaryan, who is a molding and casting specialist, I started to design two sided keychain in Fusion360.
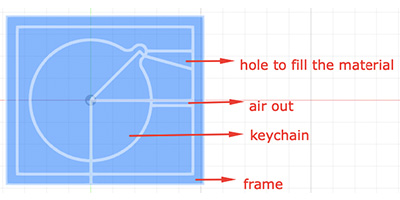
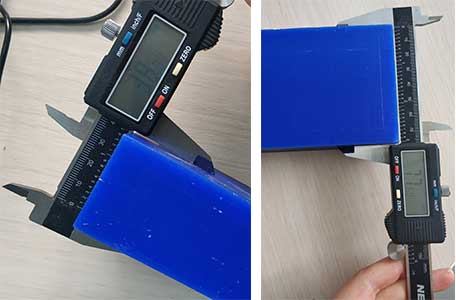
- First of all I did the sketch of one side. As the width of the wax I will be using is 77mm, I made a square frame box with 77mm side. I did an offset of 5mm, which will be the wall thickness of the frame box. The diameter of the keychain is 55mm and the thickness of one side will be 2,5mm. I have also added two holes for pouring the cast (the conical one) and for hot air to go out.
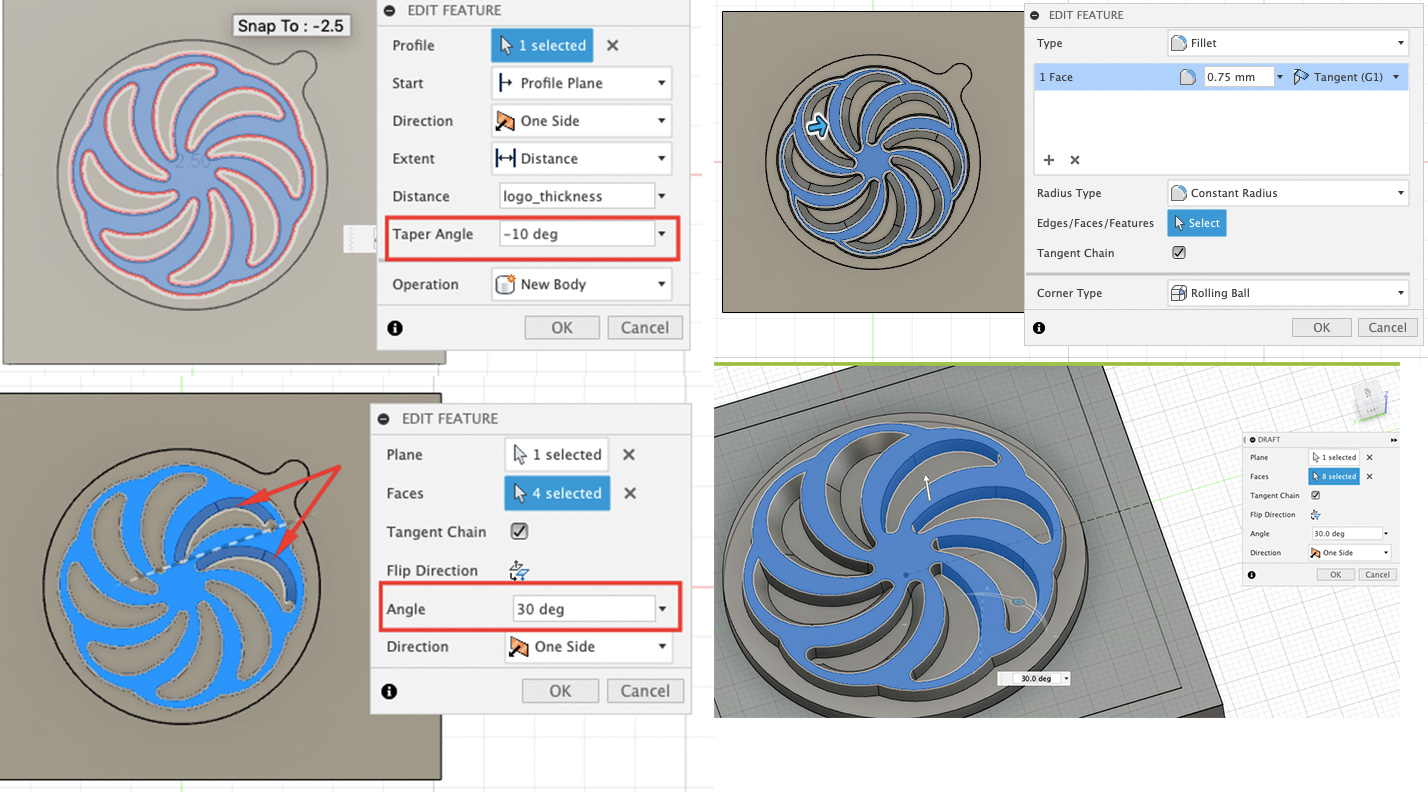
- I extruded the keychain sketch by thickness and added 2degress draft angle. Then go to Insert → Insert SVG and inserted Armenian eternity symbol downloaded from here on the top face. I tried to extrude it by 2mm and give -10 degrees draft angle, but because of the not very good quality of the image, there were crashes. I had to redraw one bench and did a pattern around the center. Then it was possible to extrude with the draft angle.
- I applied 30deg. draft angle to the inner faces of the branches as well, so I have smooth transitions.
- I have added fillets to all of the edges. As I mentioned above, having smooth corners will help to remove the cast easier.
- I extruded the walls and the base of the box, applying a draft angle here as well.
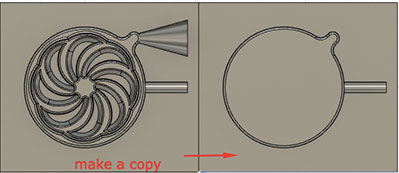
- I copied all of the bodies except for the symbol and put them next to the ready one.
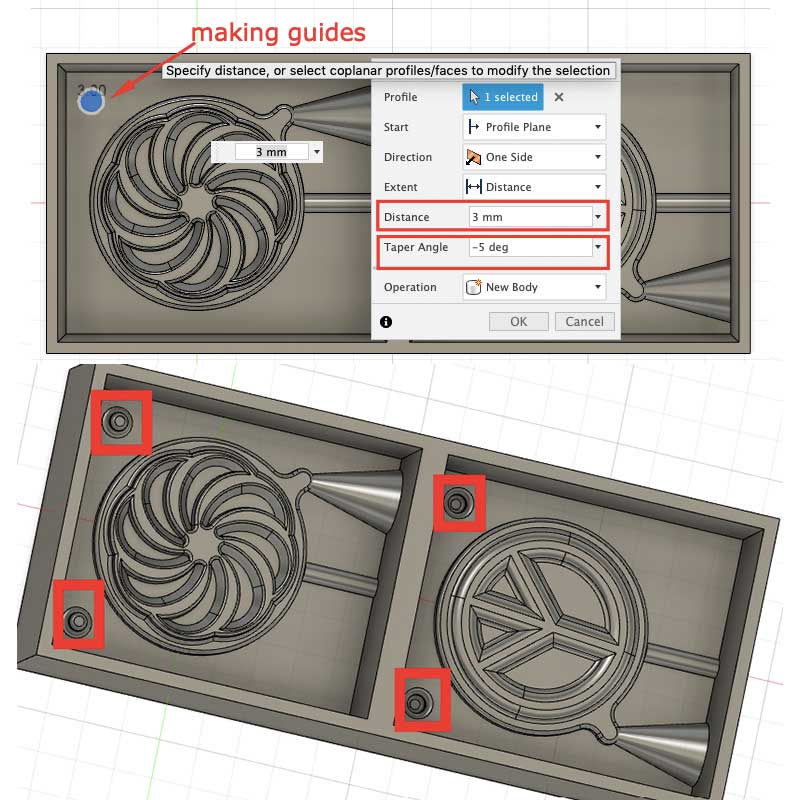
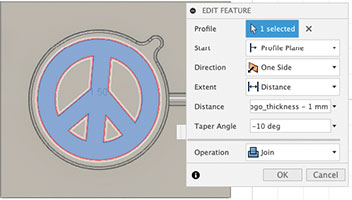
On the second face using the same techniques I put the peace sign downloaded from freesvg.org . Here I applied a -10 degrees draft angle. And also applied fillet to all of the edges. - As I am doing two parts molding, I should have guides, so that I can connect both sides together properly. I made two 3mm height cylinders on one part and mirrored the same size holes on the other part of the mold.
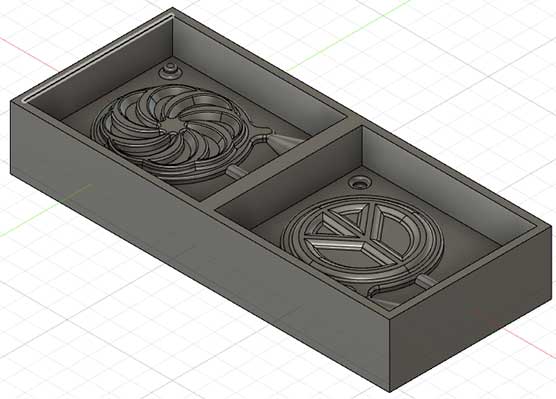
Also, I did a mirror of the hole for the filling material, as the two parts of it should be symmetric to the middle plane.
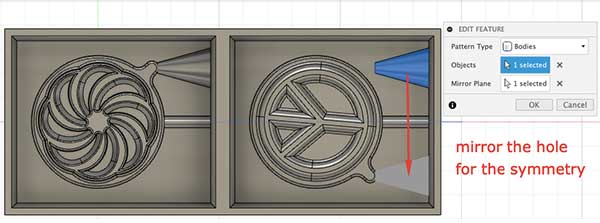
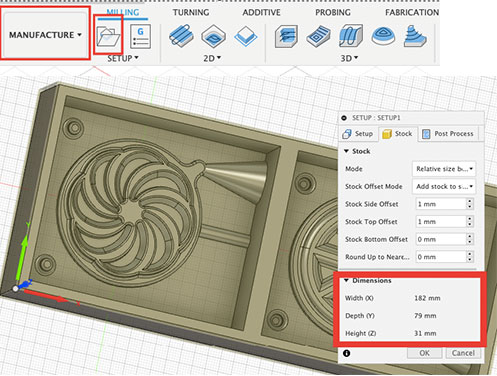
And here is the ready design: - After doing the design, go to Manufacture workspace in Fusion 360 to prepare the file for cutting.
- First of all open the Setup tab and go to the Stock subtab. Here we should insert the dimensions of the stock material.
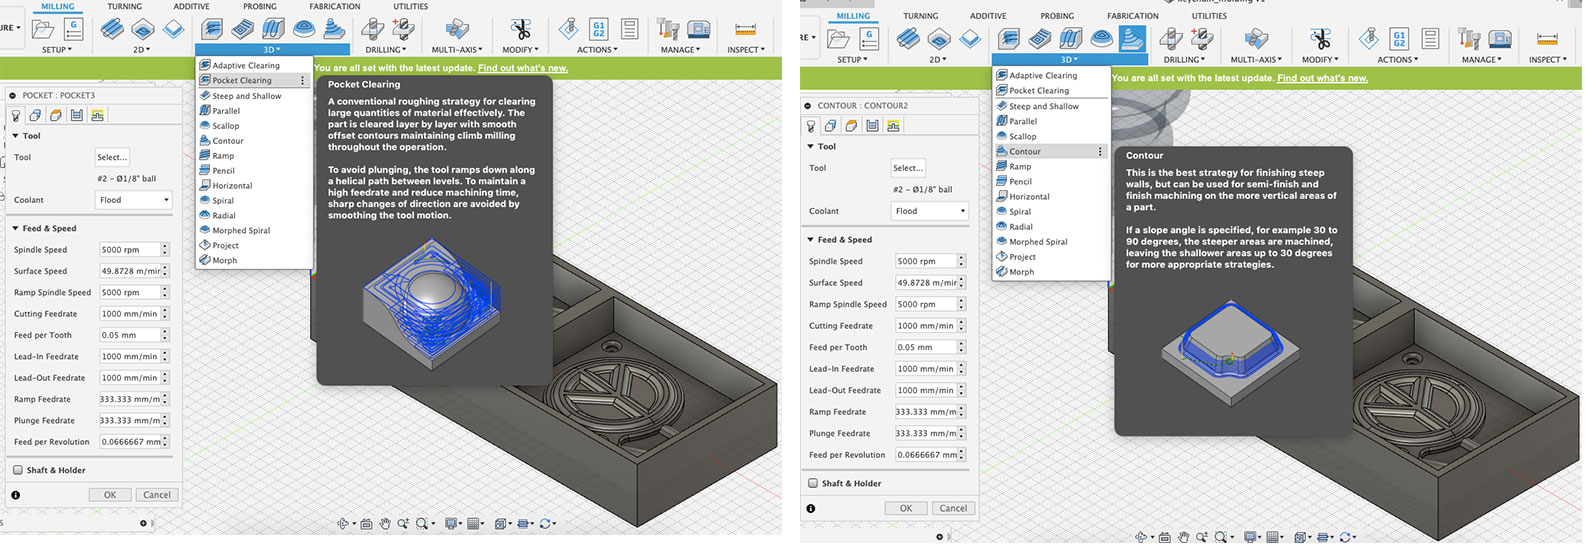
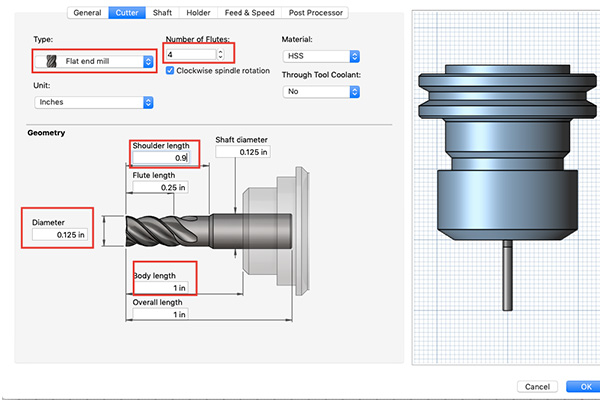
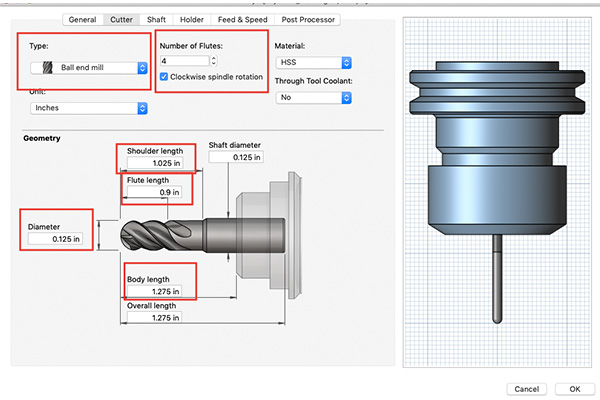
- For the rough cut go to 3D → Pocket Clearing. Here we should select or add the tool. I will be using a ⅛ = 0.125 inch flat end mill for this, so added it to the tools library.
- For the fine cut go to 3D → Contour. For this I will be using a ⅛ = 0.125 inch ball end mill, so added it to the tools library and selected.
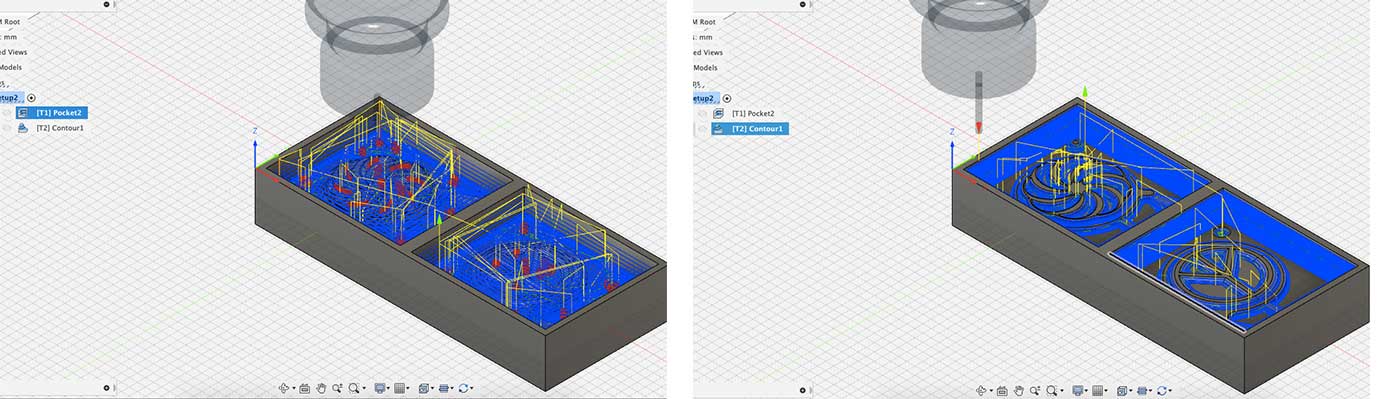
- Go to Actions → Generate , this will generate the toolpath
- When everything is ready, go to the Actions → Simulate and press Play. You will see the whole process of milling. If everything is fine, we can download the G-codes.
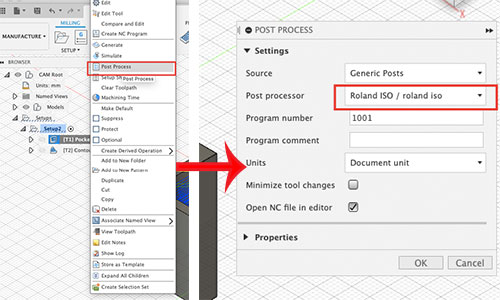
- Right click on each of the processes (Pocket and Contour in this case) and choose Post Process. Choose your machine (I chose Roland ISO) and press OK. The G-code will be saved to your laptop.
-
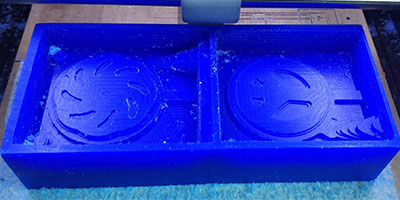
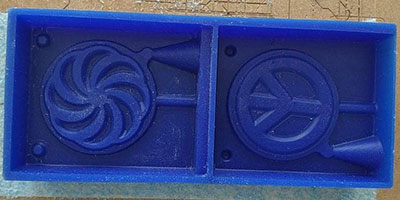
After this I attached the wax to the machine table using two-sided tape, and following the same procedure as in Electronics production week, started the rough cut.
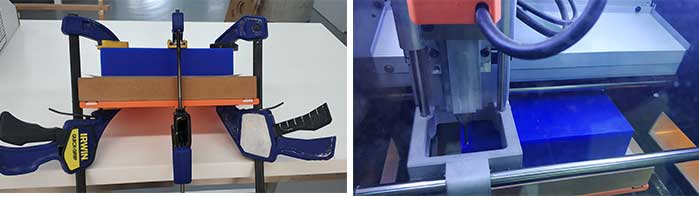
Here are the results of the rough cut: - When the rough cut was done, I changed the end mill to the ball-end one, set up 0 for Z again, and did the fine cut. Here is the result:
- Making the silicone mold from wax
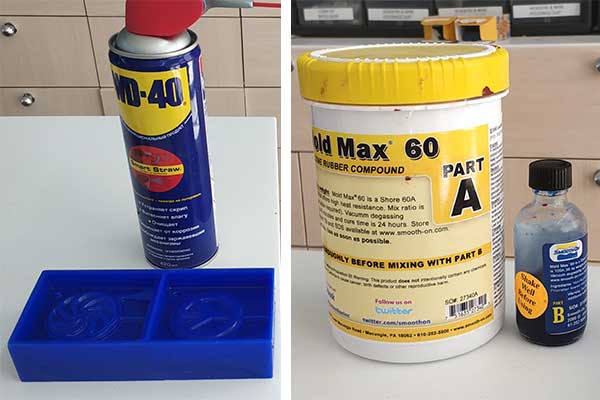
When the wax mold was ready, I started making the silicon mold from wax. As I want to cast metal in this mold, I decided to make heat-resistant silicone mold. In the lab we have Mold Max60 , which is a high heat resistant (up to 560°F/294°C) silicone rubber compound. Parts A & B are mixed 100A & 3B by weight. Pot life is 40 minutes and cure time is 24 hours.
First of all I carefully read the instructions and safety data sheet of this compound. It says: before you begin, pre-mix Part A (base) thoroughly to re-disperse fillers that may have settled. Using a gram scale, dispense required amounts of parts A and B into a mixing container and mix for 3 minutes. Scrape the sides and bottom of the container several times. For best results, pour your mixture in a single spot at the lowest point of the containment field. Let the rubber seek its level up and over the model. A uniform flow will help minimize entrapped air. The liquid rubber should level off at least 1/2” (1.3 cm) over the highest point of the model surface. Allow the mold to cure overnight (at least 24 hours) at room temperature (73°F/23°C) before demolding.Post curing the mold an additional 4 - 5 hours at 125°F (51°C) will eliminate any residual moisture and alcohol that is a by-product of the condensation reaction.
According to the MSDS of Mold Max60 it is not a hazardous substance or mixture and there are no GHS (Globally Harmonized System of Classification and Labelling of Chemicals) labels applied.
After acknowledging all of this, I started to make the silicone mold.- Before making the mixture, I measured approximate volume and mass with water.
- Then dried the wax properly and applied WD-40 release agent and left it dry for some time. According to it’s MSDS, this is a Extremely Flammable Aerosol, contains gas under pressure; may explode if heated, may be fatal if swallowed and enters airways, may cause drowsiness or dizziness. That’s why I was wearing a face mask, safety goggles and gloves for protection.
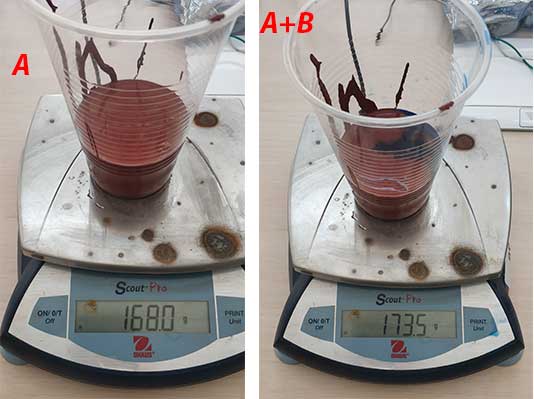
- I pre-mixed part A properly in its container, before pouring to my cup, then measured 168g of it.
- Before opening the bottle of part B, I have shaked it properly, then slowly added to the part A, to reach 173.04g (168/100*3 = 5.04 ; 168+5.04 = 173.04). By mistake, I have added a bit more of part B and had 173.5g of mixture.
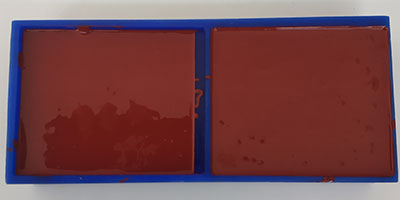
- The manual offers to mix properly for 3 minutes. I mixed for about 5 minutes and then slowly poured the mixture to the wax mould. I started from the lower point and then slowly filled the whole mold. Even though I tried hard to avoid the bubbles, I had some of them in the end. It was difficult to poure the mixture, because it's very sticky and has high density.
- I let it to solidify for 24 hours and here is the result
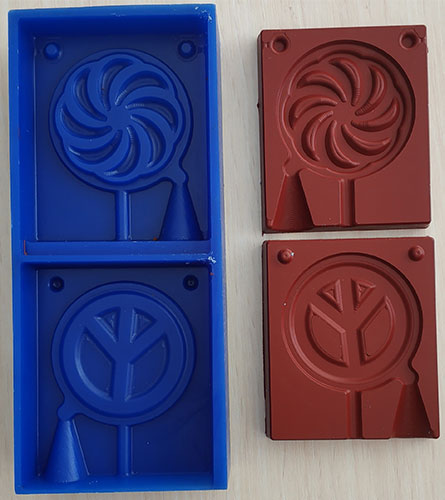
- Making the urethane rubber mold from wax
I have decided to use as many materials as possible, so I made a urethane mold from wax as well. In the lab we have PMC™-121 30/DRY which is is exceptionally strong and abrasion resistant for soft urethane mold rubbers. It does not exude oil and can be used for casting waxes, Smooth-On liquid plastics, gypsum plasters and other materials. Mix ratio both by weight and by volume is 1A:1B. Pot live is 30minutes and cure time is 16 hours. It is quite toxic material, according to the SDS, so it’s important to wear safety glasses, long sleeves and rubber gloves to minimize contamination risk. Good ventilation (room size) is necessary.
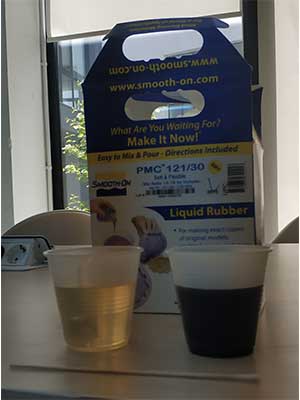
I shaked the bottles before opening and poured equal volumes of A and B parts in transparent cups. Then mixed carefully and slowly using a long cotton swab, as it was advised in my instructor Babken’s documentation. It helps to reach all the corners of the cup and mix well. Before pouring the mixture into the wax mold, I applied a WD-40 release agent on it and spreaded, using a brush.
After mixing for 5 minutes, I poured the mixture into the wax mold and let it dry for 16 hours.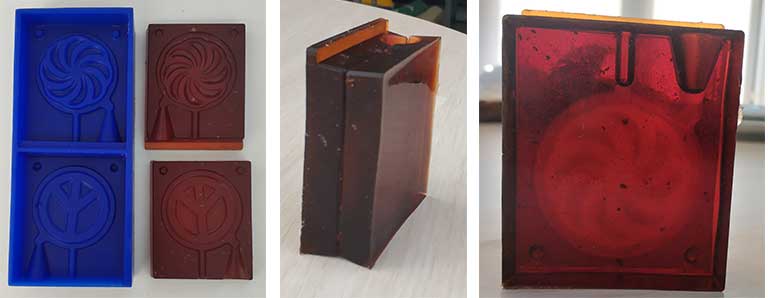
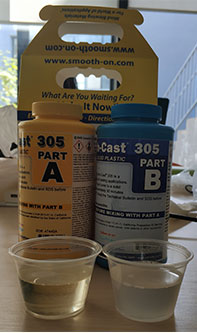
-
Casting with plastic (Smooth-Cast 305)
I did my first cast using Smooth-Cast® 305 liquid plastics . Manual says, we should mix A and B parts on a 1:1 ratio by volume. I shaked the containers before opening and we need to take the equal volumes, I used transparent cups to measure it.
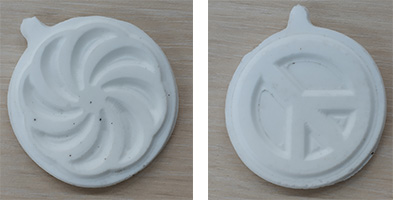
Then added component B to the A and mixed carefully and slowly for 5 minutes, trying to avoid bubbles. Before that I sprayed WD-40 release agent. Then I fixed two parts of my silicone cast together and poured the plastic in it. After 40 minutes the cast was ready, here are the results.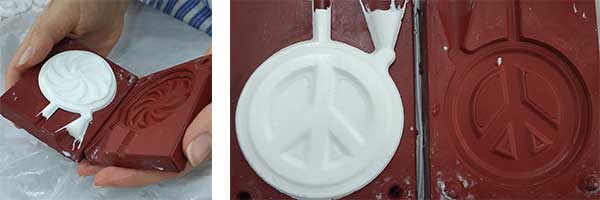
I cut the extra parts using electrical cutter
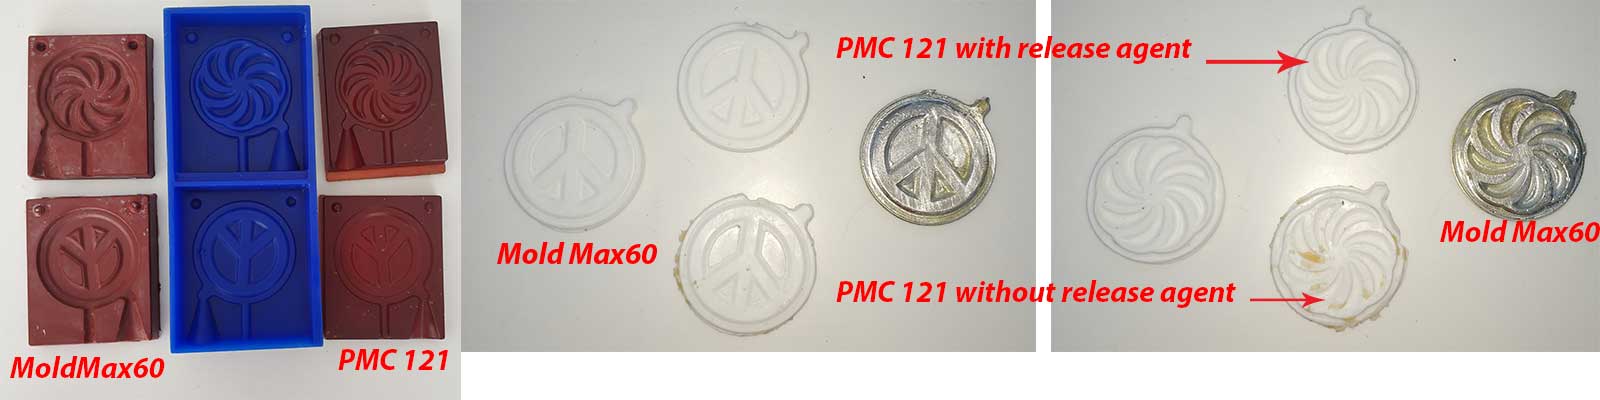
I did casting with plastic in urethane mold as well for the comparison. On my first attempt I forgot to apply the release agent, so I destroyed the mold during the opening. I had to make the second mold and this time I was careful and applied the release agent.
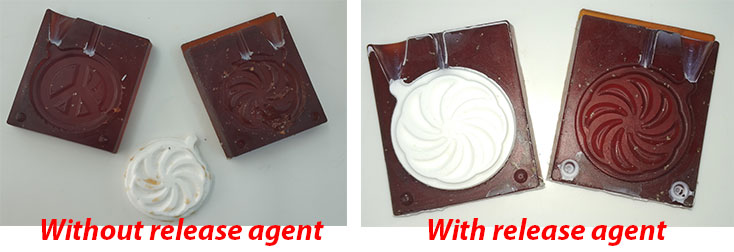
The cast was very nice and smooth. If I would decide which mold to use to cast the plastic, I would choose the urethane, because it is more sticky and you can connect to parts together easily. Secondly, it has transparency, you can see the level of the cast and pour exactly needed amount, without having extra parts. -
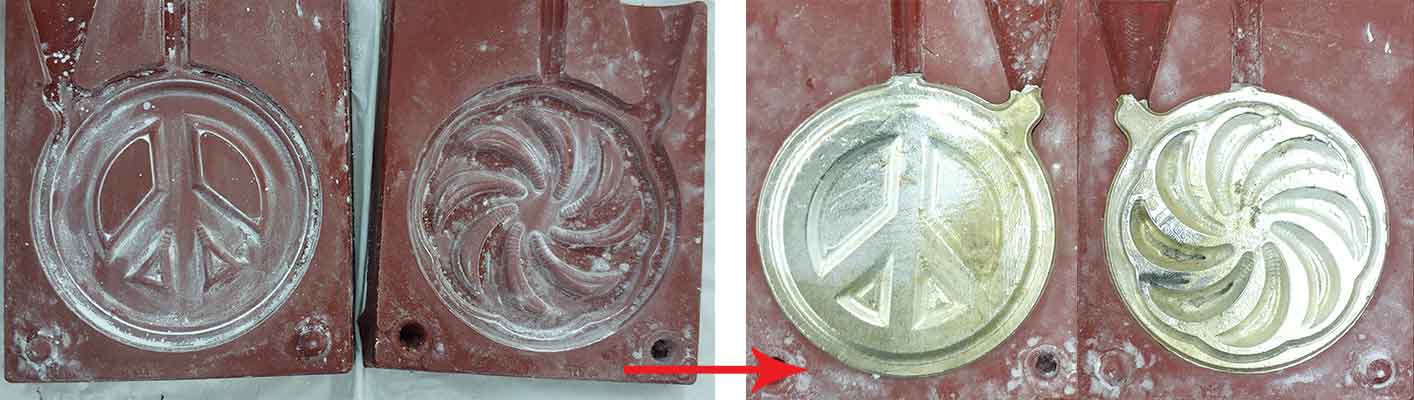
Casting with metal (Babbitt alloy)
For the metal casting we have Babbitt alloy in the lab. It has a melting point of 241 C (466 F). I've applied talc powder as a release agent to the silicon mold and fixed two parts of mold together, using clamps. I put a piece of the metal in the Vulcan A 550 oven in a special heat resistant cup. I adjusted the temperature to 400C. When the metal melted, I poured carefully into the mold. After 5 minutes it solidified, I opened the clamps and using a metallic tong put it into cold water to cool down.
-
Conclusion
This week was full of learning, practice and excitement. I have learnt design rules and tricks for designing the mold and creating the manufacturing file from Fusion 360. It was very interesting to work with different materials and compare their properties. I am a very impatient person and it was a challenge for me to carefully mix the components for a long time and wait for hours for molds to solidify. This was a very good practice for me. I did casts of the same shape from plastic and metal alloy. Before casting I was thinking that metal will be better and nicer, but in fact metal is quite heavy and inconvenient to be a keychain. On the other hand, it is very easy and less dangerous to cast the plastic, so I would prefer plastic casts, even though metal has advantages such as strength and reliability. Here is the comparison of my plastic and metal casts, I like the plastic more for this particular case.
-
Files to download
Original design file
G-code for rough cut
G-code for fine cut