Power Managment for the Ice Thickness Measuring Device
Using the Ice Thickness Measuring Device means that it has to be used out in the open. So i have to rely on battery of some sort. Also because the casing is closed, and i wanted to avoid battery change by users, i decided to go for rechargeable battery’s.
After some research i decided for a Lithium polymer battery. The battery is light, dense and contains sufficient power for my project. I had a 500mAh, and after some testing it sorted out to be powerfull enough for my project. From the wikipedia page i noticed that overcharge and over-discharge are problems.
To avoid this problem i’m going to use a charger board i had also on the shelf from another project: the Solar LiPoly Charger -V2 (Adafruit). Although it is specially designed for use with the adafruit solarpanel, it also works with a USB mini-B cable or a 5V DC adapter. So perfect for my project. It contains a Low Battery Indicator and Three color indicator LEDs - Power good, Charging and Done. That charging led, which has connectors for using an external led onboard, i wanted to connect to my PCB. Because when the device is being charged, it’s probably not operated, so i could visualize the charging on the oled display.
At home i had a max17043 from another project, that i wanted to use with the battery also. It is a low-cost, host-side fuel-gauge system for lithium-ion batteries and monitors a single lithium cell and can estimate the battery’s relative state-of-charge (SOC). There is some arduino librarys and using that library you can get the battery’s voltage and SoC; the IC has also an alert function that triggers an alert when the battery’s SoC goes below a threshold value.
To combine these 3 components i have a near perfect power suply unit for my device, i think.
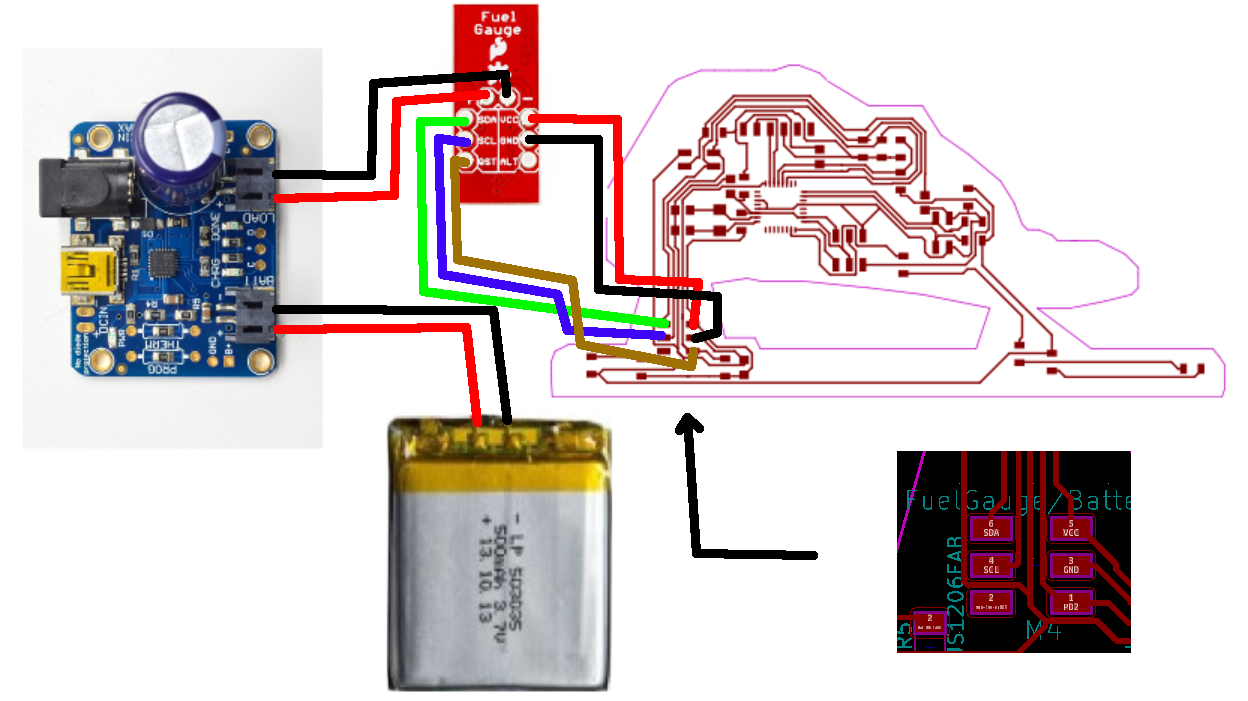
Here you can see the power unit on the left side of the PCB:
The wiring is done like these:
On the left the LiPoly Charger connected to battery and load to the LiPoFuelGauge. LipoFuelGauge is connected with a flatcable and 6pin connector to my PCB. VCC and GND for powering the board, SDA and SCL for i2C communication, and a connection to PD2 on my board for giving alert to my board when the battery’s SoC goes below a threshold value.
LiPo 500mAh battery
- 8.2 Notice for Designing Battery Pack
  - 8.2.1 Package Design
  Battery pack should have sufficient strength and battery should be protected from mechanical shock.
  No sharp edge components should be inside the pack containing the battery.
  - 8.2.2 PCM Design
  The overcharge threshold voltage should not be exceed 4.30V (single pack)
  - The over-discharge threshold voltage should not be lower than 2.5V (single pack)

The PCM should have short protection built inside.
max17043
Many information found on codebender:[tutorial] LiFuelGauge

Later on i also tested the board with some other libraries. I didn’t use them for my final project itself, but to test the possibilities for the LiPoFuelGauge.
I tested the board with the following code that i found on this github page containing a library for the LiPoFuelGauge. Btw! It’s not the library i use for my final project. But i used this library to test the connection of the LiPoFuelGauge to my final board. It lists all command you can get info from the board. And of course the board worked :)
The test
#include <Wire.h>
#include <MAX17043.h>

MAX17043 fuelGauge(20,4);

void setup(){
  Serial.begin(9600);

  Serial.println("Starting up... Alert Threshold should be 20");
  Serial.println("");
  fuelGauge.begin();
  output();
  Serial.println("Setting Alert Threshold to 3");
  fuelGauge.setAlertThreshold(3);
  output();
  Serial.println("Sleeping...");
  fuelGauge.sleep();
  output();
  Serial.println("Waking...");
  fuelGauge.wake();
  output();
  Serial.println("Setting Alert Threshold to 33");
  fuelGauge.setAlertThreshold(33);
  output();
  Serial.println("Setting Alert Threshold to 0");
  fuelGauge.setAlertThreshold(0);
  output();
  Serial.println("Tests Complete");
}

void loop(){
}

void output() {
  Serial.print("Version: ");
  Serial.println(fuelGauge.getVersion());
  Serial.print("Alert Threshold: ");
  Serial.println(fuelGauge.getAlertThreshold());
  Serial.print("Alert Threshold Register Version: ");
  Serial.println(fuelGauge.getAlertThresholdRegister());
  Serial.print("Battery Voltage: ");
  Serial.println(fuelGauge.getBatteryVoltage());
  Serial.print("Battery Percentage: ");
  Serial.println(fuelGauge.getBatteryPercentage());
  Serial.print("Is Alerting? ");
  Serial.println(fuelGauge.isAlerting());
  Serial.print("Is Sleeping? ");
  Serial.println(fuelGauge.isSleeping());
  Serial.print("Is Sleeping Register Version? ");
  Serial.println(fuelGauge.isSleepingRegister());
  Serial.println("");
}
Solar LiPoly Charger -V2 (Adafruit)
Had this board from a former project and am it gonna use now for the Ice Thickness Measuring device.
It has unconnected pads for external LED’s. So one for charge and one for done. I want to use at least the charge pad, connect it to a pin on my board. Then pinmode INPUT_PULLUP, like i did in the [electronics design week](./week07.html] and programmed in the embedded programming week. That should trigger the board to display the gaugemeter.