Week 11: Networking and Communications
Note: My English writing skills are limited. For this documentation, I have used AI assistance for parts of the translation.
Date: April 2 - 8, 2026
What I Did This Week
 System overview — XIAO ESP32C6 sends sensor data to the NAS via MQTT, and a web browser shows the live data
I connected the XIAO ESP32C6 to a local network using WiFi. The board sends temperature and humidity data to a server every 5 seconds using MQTT. I can see the live data in a web browser and turn the fan on or off from the browser.
Group Assignment
For our group activity, Yoshi and I each built a networking project and reviewed each other's documentation. 📎 Yoshi's Week 11 documentation
Yoshi built a two-node communication system using UART. One node (a developer board) reads a potentiometer and sends the value as a string every 500 ms. The other node (QPAD-xiao PCB) receives the string over UART at 9600 bps and displays it on an SSD1306 OLED via I2C. A notable challenge was that the PCB had no drill holes, so he trimmed pin headers and soldered them on the surface. The project showed a clean example of wired node-to-node communication without a broker or network stack.
What I Learned
- Different approaches to networking: Yoshi used direct UART between two nodes, while I used WiFi + MQTT through a broker. Both are valid — UART is simpler and lower latency, MQTT scales better across a network.
- PCB improvisation: Trimming pin headers to solder on a surface-only board is a useful skill when drill holes are missing.
- Wired vs wireless trade-offs: Wired UART needs no network infrastructure and has no latency from a broker, but the nodes must be physically close. WiFi + MQTT adds complexity but allows remote access from anywhere on the network.
Individual Assignment: MQTT Communication
What I Built
I built a system where the XIAO ESP32C6 sends sensor data to a MQTT broker on my NAS. A web browser connects to the same broker and shows the data in real time. The browser also has buttons to turn the fan on and off.
Communication method: WiFi + MQTT (PubSubClient library)
Why I chose MQTT: MQTT is a lightweight protocol made for IoT devices. It is easy to use with ESP32, and good libraries already exist for it.
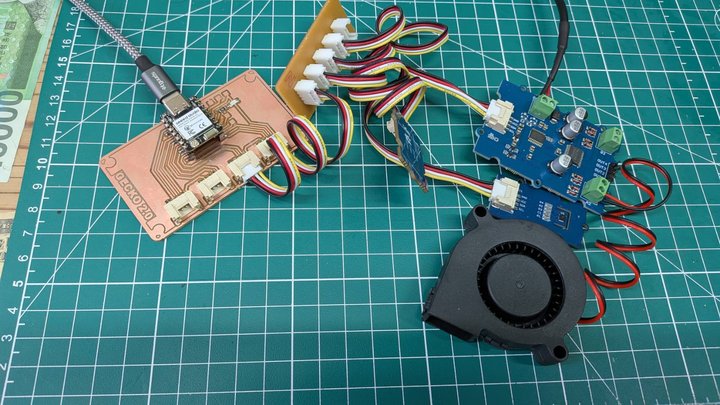 Hardware — Reptile Monitor board, motor driver, and blower fan
Step 1: I Learned About MQTT
MQTT stands for "Message Queuing Telemetry Transport." IBM made it in 1999 for IoT devices. It is now an OASIS standard.
How MQTT works:
[Publisher]  →  sends a message to a topic
                    ↓
             [Broker (relay server)]
                    ↓
[Subscriber] ←  receives the message from the topic
- Broker: receives and delivers messages. I used the official Eclipse Mosquitto Docker image.
- Topic: the address of a message. You can use slashes to make levels (for example:
reptile/sensor). - Publisher: sends messages. In this project, the XIAO ESP32C6 is the publisher.
- Subscriber: receives messages. In this project, the web browser is the subscriber.
Topics I used:
| Topic | Direction | Content |
|---|---|---|
reptile/sensor |
XIAO → Browser | Temperature, humidity, fan state (JSON) |
reptile/fan/cmd |
Browser → XIAO | "ON" or "OFF" fan command |
References: - MQTT.org - Eclipse Mosquitto - PubSubClient library
Step 2: I Set Up a Server on My NAS
I set up a server on my NAS using Docker. The NAS was already running Docker for other projects, so I added two new containers.
I used the official Eclipse Mosquitto Docker image (eclipse-mosquitto:2) for the MQTT broker.
I did not need to write any server code. I only needed a small config file.
System layout:
XIAO ESP32C6 (WiFi)
  ↕ MQTT TCP port 1883
NAS 192.168.11.201
  ├─ fablab-mqtt  : Eclipse Mosquitto (MQTT broker)
  │    ├─ port 1883: MQTT TCP (for XIAO)
  │    └─ port 8083: MQTT WebSocket (for browser)
  └─ fablab-web   : nginx (static site)
       └─ port 8002: MkDocs site + MQTT dashboard
docker-compose.yml:
services:
  web:
    image: nginx:alpine
    container_name: fablab-web
    ports:
      - "8002:80"
    volumes:
      - ./site:/usr/share/nginx/html:ro
    restart: unless-stopped

  mqtt:
    image: eclipse-mosquitto:2
    container_name: fablab-mqtt
    ports:
      - "1883:1883"
      - "8083:8083"
    volumes:
      - ./mosquitto/mosquitto.conf:/mosquitto/config/mosquitto.conf:ro
    restart: unless-stopped
mosquitto.conf:
listener 1883
allow_anonymous true

listener 8083
protocol websockets
allow_anonymous true
I set up two listeners: TCP for the XIAO, and WebSocket for the browser.
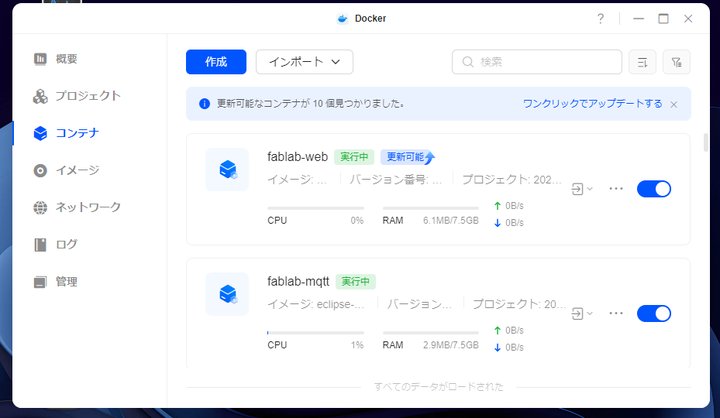 Two Docker containers running on the NAS — fablab-web and fablab-mqtt
Step 3: I Wrote the XIAO Code
I added WiFi and MQTT to the XIAO ESP32C6. These are the libraries I used:
| Library | Purpose |
|---|---|
WiFi.h |
Connect to WiFi |
PubSubClient |
MQTT communication |
Adafruit_SHT31 |
Read temperature and humidity |
Grove_Motor_Driver_TB6612FNG |
Control the fan (from Week 10) |
What the code does:
- Every 5 seconds, it publishes a JSON message to
reptile/sensor:json {"temp_b":25.1,"hum_b":50.3,"temp_t":24.8,"hum_t":48.2,"fan":"ON","manual":1} - It subscribes to
reptile/fan/cmd: - "ON" → turn on manual mode and start the fan
- "OFF" → turn off manual mode and go back to auto control
Fan control logic:
// Use auto control only if the web button is not active
if (!manualOverride && valid_b) {
    if      (temp_b > TEMP_FAN_ON && !fanOn) fanTurnOn();
    else if (temp_b <= TEMP_FAN_ON &&  fanOn) fanTurnOff();
}
The web button has full priority over the auto control. Pressing OFF returns the system to auto mode.
This was my first time using MQTT. I used an LLM to help me write and fix the code. I started with a simple connection test and added features step by step.
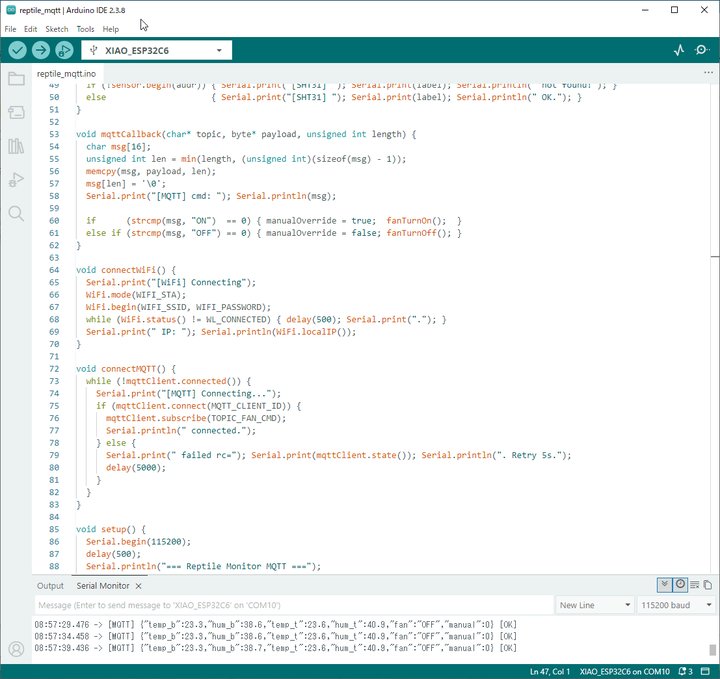 Arduino IDE — reptile_mqtt.ino sketch
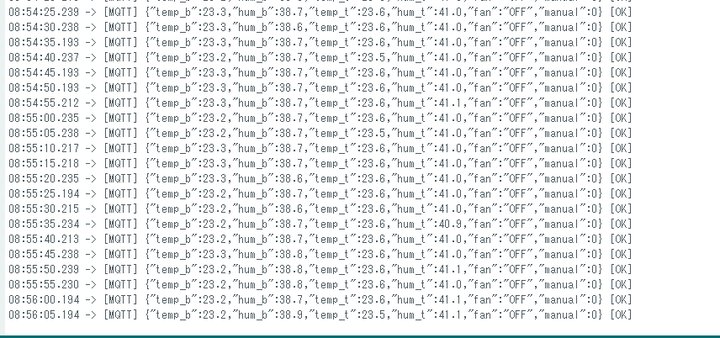 Serial monitor — WiFi connection, MQTT connection, and sensor data
 Reconnect test — MQTT reconnects automatically after WiFi disconnect
Step 4: I Built a Web Dashboard
I made a simple HTML dashboard to see the data in a browser. I kept it minimal because the goal was just to test the communication.
The browser uses MQTT.js to connect to Mosquitto over WebSocket.
What it shows: - Bottom and Top sensor temperature and humidity - Fan state (ON/OFF) and mode (Manual / Auto) - MQTT connection state (Connected / Disconnected)
Fan ON button: Turns on manual mode. The fan keeps running even below 27°C.
Fan OFF button: Turns off manual mode and returns to auto control.
The button color changes to show the current fan state.
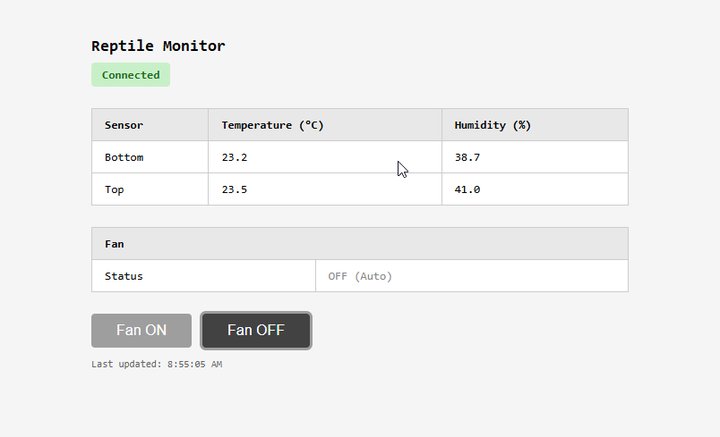 Web dashboard — live sensor data and fan control buttons
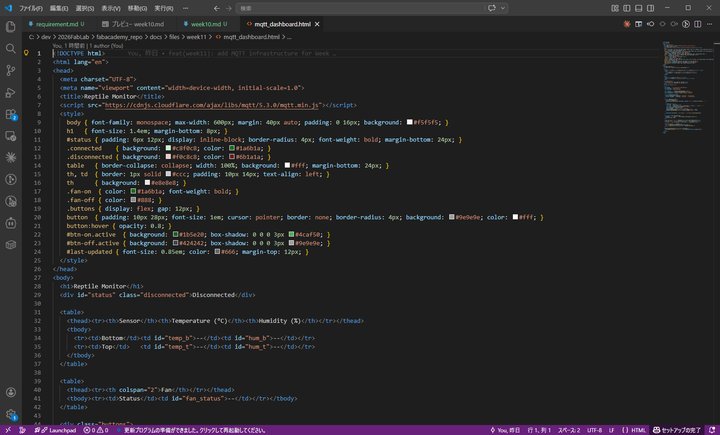 mqtt_dashboard.html source code (VS Code)
Step 5: I Tested Everything
Test steps:
- Start the XIAO and watch the serial monitor
- Open
http://192.168.11.201:8002/mqtt.htmlin the browser - Check that sensor data updates every 5 seconds
- Press Fan ON and check that the fan starts
- Press Fan OFF and check that auto control returns
Results:
| Test | Result |
|---|---|
| WiFi connection | ✅ OK |
| MQTT broker connection | ✅ OK |
| Sensor data in browser (every 5 s) | ✅ OK |
| Fan ON button (below 27°C) | ✅ Fan started, button turned green |
| Fan OFF button → auto control | ✅ Returned to auto |
| MQTT reconnect (WiFi disconnect test) | ✅ Auto reconnect OK |
Design Files
| File | Description |
|---|---|
| reptile_mqtt.ino | XIAO ESP32C6 Arduino sketch |
| docker-compose.yml | NAS Docker config |
| mosquitto.conf | Mosquitto config file |
| mqtt_dashboard.html | Web dashboard |
Connection to Final Project
- Remote monitoring: I can check the habitat environment from a phone or computer in real time.
- Remote fan control: I can turn the fan on or off from anywhere on the network.
- Easy to expand: I can add more MQTT topics to control the heater or humidifier using the same system.
What I Learned
- MQTT is simple and powerful. The Publisher / Broker / Subscriber model makes it easy to connect devices and web pages.
- Official Docker images save a lot of time. I used the Eclipse Mosquitto Docker image and did not need to write any server code. A small config file was enough.
- Browsers need WebSocket for MQTT. Browsers cannot open TCP sockets directly. I needed to add a WebSocket listener in Mosquitto.
- A flag keeps manual and auto control clean. The
manualOverrideflag made it easy to separate web button control from temperature-based auto control. - Docker on a NAS is a great local server. Running containers on the NAS gives a stable 24-hour server without any extra hardware.
- I want to learn more about MQTT security. This setup uses anonymous connections with no authentication. I want to study TLS and QoS settings next.
References
- Fab Academy: Networking and Communications
- Group Work Page
- MQTT.org
- Eclipse Mosquitto official site
- Eclipse Mosquitto on Docker Hub
- Eclipse Mosquitto documentation
- PubSubClient library
- MQTT.js (for browser)
- Week 10: Output Devices
Last updated: April 2026