Week 15 Interface and Application Programming
Click Here to Access the Group Assignment
Write an application for the embedded board that you made. that interfaces a user with an input and/or output device(s)
This week, I chose to use the board I used for Input and Output week. I wanted to control the motor with an application.
Click here to access the week where I made the Board
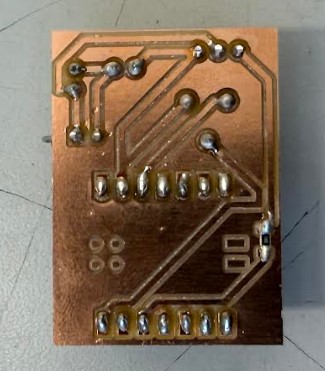
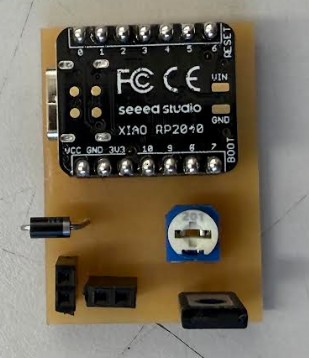
This is the board I chose to use.
Code
For the Xiao RP2040 Microcontroller, I used ChatGPT to generate code. This code reads serial commands, (“ON”/“OFF”) from USB and controls a PWM output to switch the DC motor on or off.
Here is the code below:
from machine import Pin, PWM
import sys
import select

motor = PWM(Pin(28))
motor.freq(2000)

while True:
    if sys.stdin in select.select([sys.stdin], [], [], 0)[0]:
        cmd = sys.stdin.readline().strip()

        if cmd == "ON":
            motor.duty_u16(65535)
        elif cmd == "OFF":
            motor.duty_u16(0)
Code Description
This code controls a motor using a RP2040 and lets you turn it on and off by typing commands over serial input.
At the start, it sets up pin 28 as a PWM output (so it can control power to the motor in a smooth, adjustable way) and sets the PWM frequency to 2000 Hz.
Then it runs an endless loop where it constantly checks if anything has been typed in the serial console. If it detects input, it reads the line and cleans it up.
If you select ON, it sends full power to the motor (maximum PWM duty cycle), so the motor turns on at full speed. If you select OFF, it sets the PWM duty to zero, which turns the motor off.
For the interface, it provides a simple desktop interface with ON/OFF buttons that send serial commands to the microcontroller over USB to control the motor.
Below is the code:
import serial
import tkinter as tk

# CHANGE THIS to your port!
ser = serial.Serial('COM8', 115200)

def motor_on():
    ser.write(b'ON\n')

def motor_off():
    ser.write(b'OFF\n')

root = tk.Tk()
root.title("Motor Control")

btn_on = tk.Button(root, text="ON", command=motor_on, width=15, height=3)
btn_on.pack(pady=10)

btn_off = tk.Button(root, text="OFF", command=motor_off, width=15, height=3)
btn_off.pack(pady=10)

root.mainloop()
Code Description:
This program is basically a tiny desktop control panel that talks to your RP2040 over USB.
It opens a serial connection on COM8 at 115200 baud, which is the communication link between your computer and the microcontroller. When you press a button in the window, it sends a short text command through that connection.
The ON button sends the text “ON”, and the OFF button sends “OFF”. Those messages go straight to the RP2040, which reads them and decides whether to turn the motor on or shut it off.
The rest of the code just builds a simple window using Tkinter with two large buttons. One triggers the function that sends the ON command, and the other triggers the OFF command.
AI Conversation
Click Here to download a PDF of my conversation with ChatGPT
Running the Code
First, I plugged in the Xiao RP2040. I made sure the microcontroller is connected to COM8, otherwise, I would need to move the microcontroller to COM8, or modify the code to whichever COM the microcontroller is connected to.
To run the Python GUI, in the VSCode terminal, where my python file lives, I ran:

After entering that into the terminal, my application window pops up.

This is the application.
Testing the Application
This is the application running. As you can see, the on button and off button turn the DC motor on and off, respectively.
Revising the Application
The first application was to simple. I decided to try adding more colors, features, etc.
import serial
import tkinter as tk

ser = serial.Serial('COM8', 115200)

def motor_on():
    ser.write(b'ON\n')
    status_label.config(text="Motor: ON", fg="#00ff88")

def motor_off():
    ser.write(b'OFF\n')
    status_label.config(text="Motor: OFF", fg="#ff3355")

# --- Main Window ---
root = tk.Tk()
root.title("XIAO RP2040 Motor Control")
root.geometry("400x300")
root.configure(bg="#1e1e2e")

# --- Title ---
title = tk.Label(
    root,
    text="Motor Control Interface",
    font=("Arial", 18, "bold"),
    bg="#1e1e2e",
    fg="white"
)
title.pack(pady=20)

# --- Status ---
status_label = tk.Label(
    root,
    text="Motor: OFF",
    font=("Arial", 14),
    bg="#1e1e2e",
    fg="#aaaaaa"
)
status_label.pack(pady=10)

# --- Button Frame ---
frame = tk.Frame(root, bg="#1e1e2e")
frame.pack(pady=30)

btn_on = tk.Button(
    frame,
    text="TURN ON",
    command=motor_on,
    font=("Arial", 12, "bold"),
    bg="#00aa55",
    fg="white",
    activebackground="#00cc66",
    activeforeground="white",
    width=12,
    height=2,
    relief="flat"
)
btn_on.grid(row=0, column=0, padx=15)

btn_off = tk.Button(
    frame,
    text="TURN OFF",
    command=motor_off,
    font=("Arial", 12, "bold"),
    bg="#aa0033",
    fg="white",
    activebackground="#cc0044",
    activeforeground="white",
    width=12,
    height=2,
    relief="flat"
)
btn_off.grid(row=0, column=1, padx=15)

root.mainloop()
This is the application code.
New App
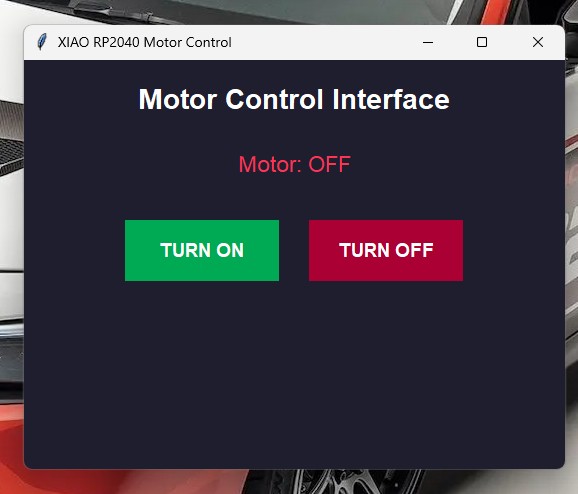
This is the new interface. It has more colors, and features.
This is the new interface with the motor. As you can see, it works.
Click Here to Access the next AI Prompt and Response Regarding the Application
(This AI prompt and response are in the same conversation as the previous prompt and response).
Reflection
Overall, I found this week to be very refreshing. Machine week was very difficult, and the molding and casting group work took longer than expected. I completed this week very quickly, and found myself able to relax. I later went back and gave the app more features. This took a bit longer but it felt good to have a better looking and functioning app.