


git
Git is a distributed version control system that tracks changes in any set of computer files.
Week not started
Git is a distributed version control system that tracks changes in any set of computer files.

For this week, I explored device-to-device communication using the I²C (Inter-Integrated Circuit) protocol. I connected a Seeed Studio XIAO RP2040 as the master device and a XIAO ESP32S3 as the slave.
I²C is a synchronous, multi-master, multi-slave, packet-switched, single-ended, serial communication bus. It uses only two lines for communication:
Each device on the I²C bus has a unique 7-bit address. The master controls the clock and initiates communication, while slaves respond to requests. It is commonly used for short-distance communication between microcontrollers and sensors.
The wiring between the XIAO RP2040 (master) and XIAO ESP32S3 (slave) was as follows:
Pull-up resistors (4.7kΩ–10kΩ) were added to SDA and SCL lines.
The RP2040 sends a message to the ESP32S3 using the Wire library.
const int THERMISTOR_PIN = A3;
	const float SERIES_RESISTOR = 10000;  // 10k resistor
	const float NOMINAL_RESISTANCE = 10000; // 10k at 25C
	const float NOMINAL_TEMPERATURE = 25;
	const float B_COEFFICIENT = 3950;
	const int ADC_MAX = 4095;

	void setup() {
	  Serial.begin(115200);
	}

	void loop() {
	  int adcValue = analogRead(THERMISTOR_PIN);
	  float voltageRatio = (float)adcValue / ADC_MAX;
	  float resistance = SERIES_RESISTOR * (1.0 / voltageRatio - 1.0);

	  float steinhart = resistance / NOMINAL_RESISTANCE;
	  steinhart = log(steinhart);
	  steinhart /= B_COEFFICIENT;
	  steinhart += 1.0 / (NOMINAL_TEMPERATURE + 273.15);
	  steinhart = 1.0 / steinhart;
	  steinhart -= 273.15;

	  Serial.print("Temperature: ");
	  Serial.print(steinhart);
	  Serial.println(" °C");

	  delay(1000);
	}
The ESP32S3 receives the message using the Wire library in slave mode.
	#include
		#include
		#include

		// WiFi Configuration
		const char* ssid = "FABLAB";
		const char* password = "fablab@2023";

		// I2C Configuration
		#define I2C_ADDR 0x08
		#define SDA_PIN D4
		#define SCL_PIN D5

		WebServer server(80);
		float currentTemp = 0.0;
		unsigned long lastUpdate = 0;

		// Forward declarations of functions
		void handleRoot();
		void handleTemperature();
		void handleUpdate();
		void updateTemperature();

		void setup() {
		  Serial.begin(115200);

		  // Initialize I2C
		  Wire.begin(SDA_PIN, SCL_PIN);

		  // Connect to WiFi
		  WiFi.begin(ssid, password);
		  Serial.print("Connecting to WiFi");
		  while (WiFi.status() != WL_CONNECTED) {
			delay(500);
			Serial.print(".");
		  }
		  Serial.println("\nConnected! IP: " + WiFi.localIP().toString());

		  // Setup web server routes
		  server.on("/", handleRoot);
		  server.on("/temperature", handleTemperature);
		  server.on("/update", handleUpdate);

		  server.begin();
		  Serial.println("HTTP server started");
		}

		void loop() {
		  server.handleClient();

		  // Update temperature every second
		  if (millis() - lastUpdate >= 1000) {
			updateTemperature();
			lastUpdate = millis();
		  }
		}

		void updateTemperature() {
		  Wire.requestFrom(I2C_ADDR, sizeof(float));

		  if (Wire.available() == sizeof(float)) {
			byte tempBytes[sizeof(float)];
			for (int i = 0; i < sizeof(float); i++) {
			  tempBytes[i] = Wire.read();
			}
			currentTemp = *((float*)tempBytes);
			Serial.printf("Updated temperature: %.2f°C\n", currentTemp);
		  } else {
			Serial.println("Error reading from I2C");
		  }
		}


		void handleTemperature() {
		  String json = "{\"temp\": " + String(currentTemp) + "}";
		  server.send(200, "application/json", json);
		}

		void handleUpdate() {
		  updateTemperature();
		  server.send(200, "text/plain", "Temperature updated");
		}
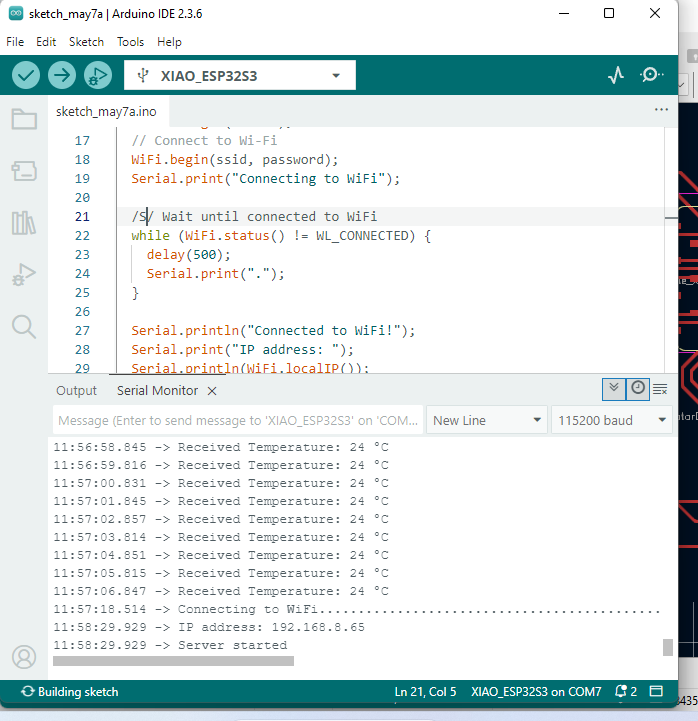
"Temperature Recieved from XIAO RP2040".This week introduced me to communication between microcontrollers using the I²C protocol. I learned how to set up master/slave roles, configure addresses, and send data. This method is scalable and useful for sensor networks or distributed control systems.