Final Project
Control gate door sisytem using web app.
The problem that my project wants to solve of mechanical close/open gate door and reducing gate keepers on gate by control gate door using smartphone in presence of wifi receiver.where every family member will be having web app to close/open the gate.This project will be made of wifi switch, door sensor, creating web app.
The idea was to build control home gate door system Opening and closing home gate door have been always boring job especially in place where a person or man power is always required to open the gate door for me from job and vistors at home. Here is a solution to open and close gate door i.e, control gate opener by web app in mobile phone with WIFI receiver. The project includes sketch,mechanical design and some structual construction in my project.
I made a basic hand drawing of the final look of the control home gate door system by using web App
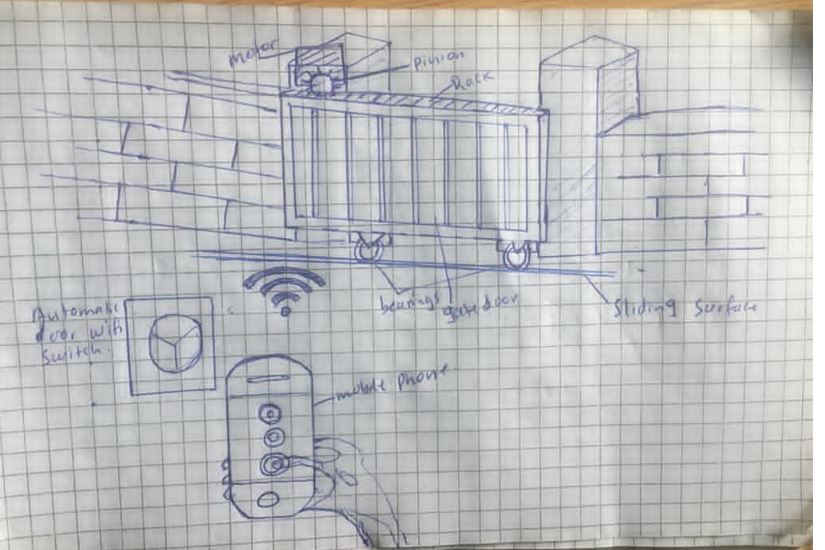
The control home gate system using web app i want to make is for reducing man power for opening and closing gate and minimising gatekeepers.
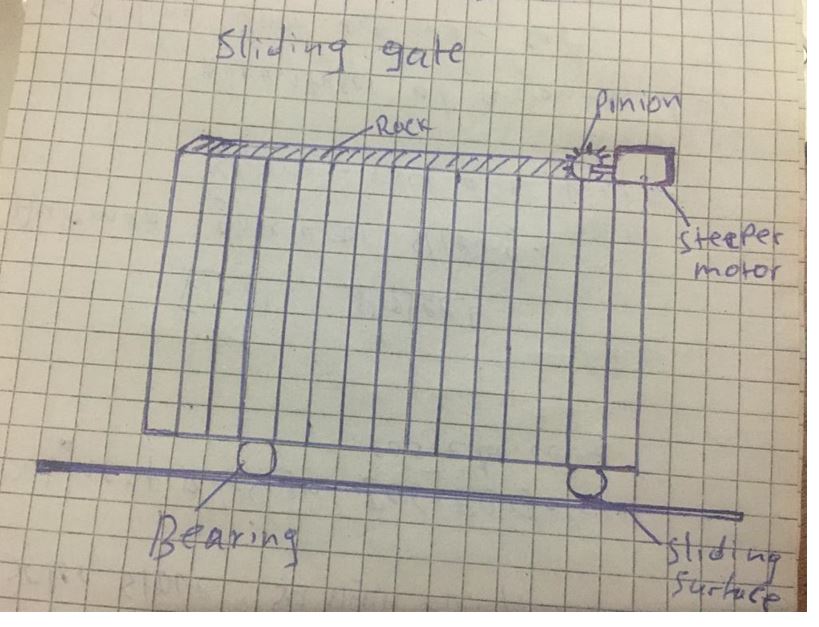
Sliding gate door
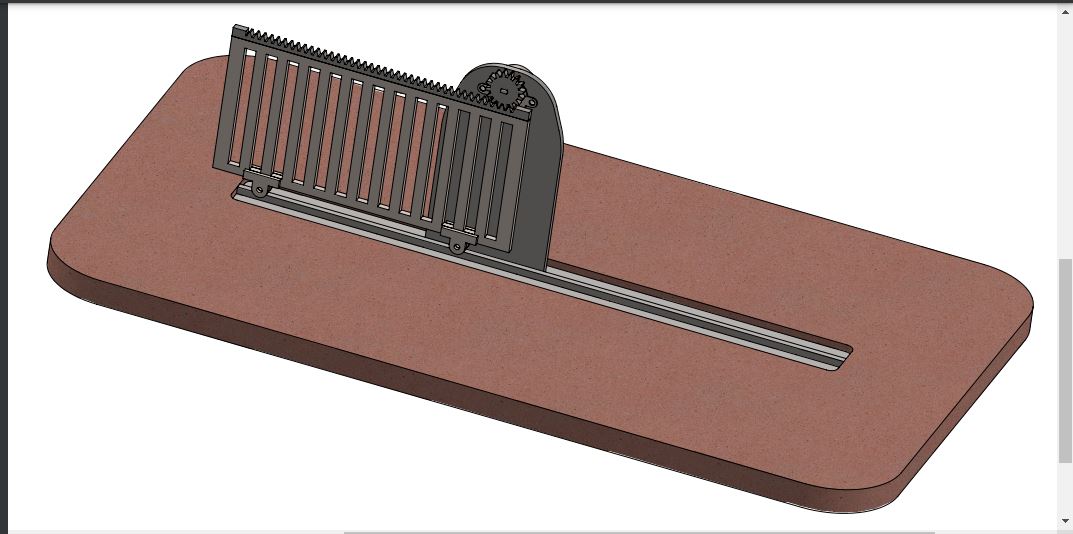
Provide privancy and security at home this gate door has rack and pinion for pushing gate door and steeper motor for rotating gears of pinion.
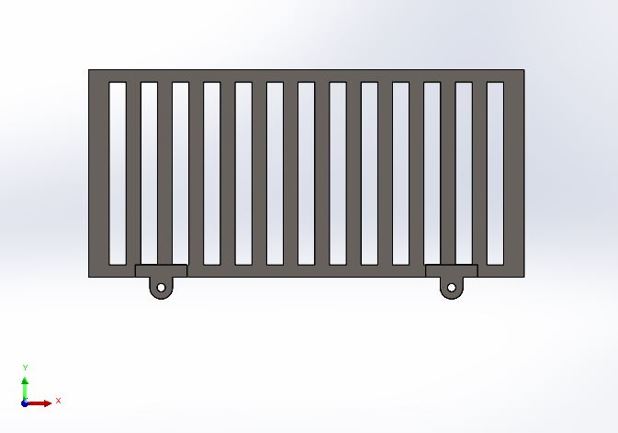
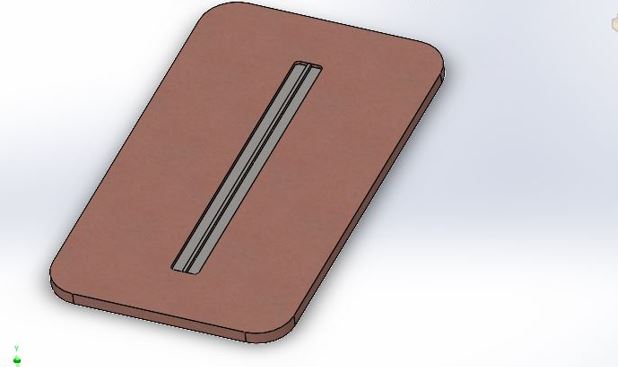
Designing sliding gate
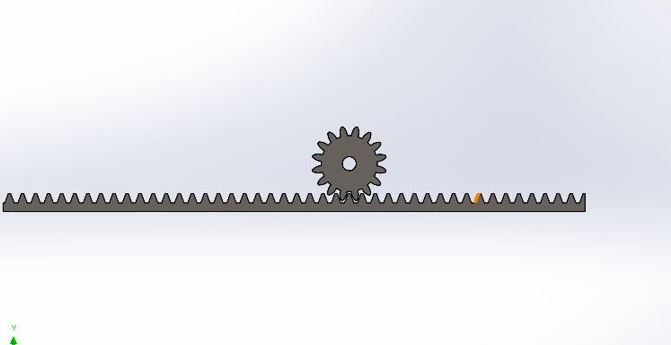
Designing Rack and pinion
Designing structure of Ground
Assembly of all parts which was designed using solid works software.
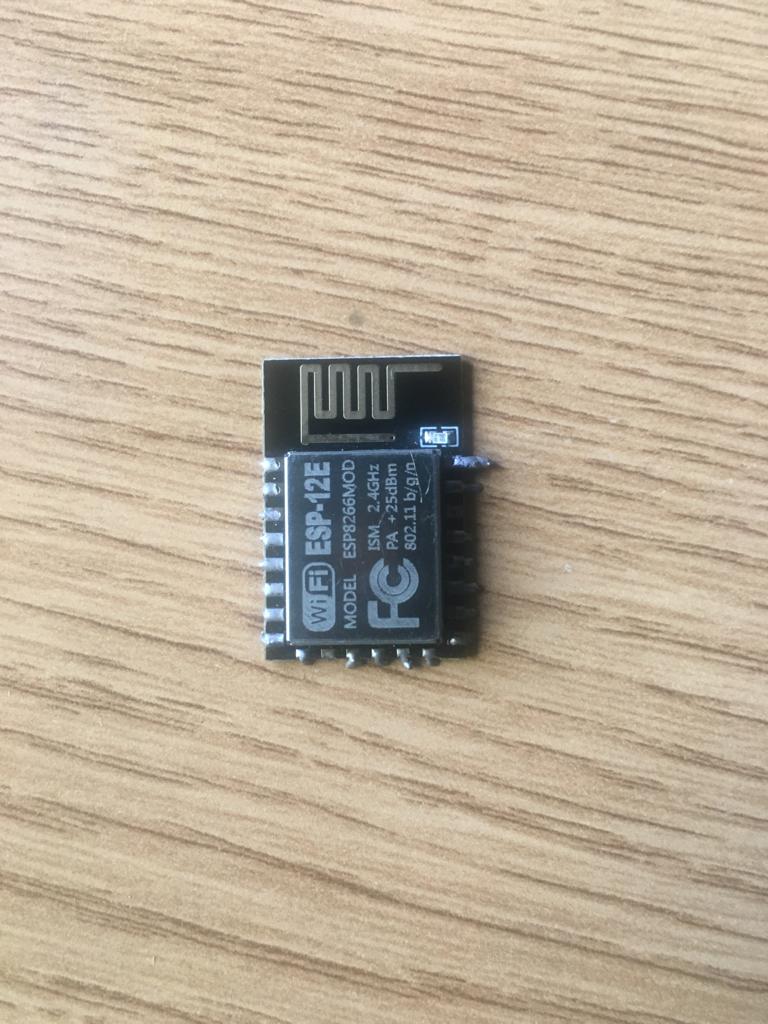
The ESP8266 WiFi Module is a self contained SOC with integrated TCP/IP protocol stack that can give any microcontroller access to your WiFi network. The ESP8266 is capable of either hosting an application or offloading all WiFi networking functions from another application processor.
A Stepper Motor: Electric motor that rotates by performing steps, that is by moving by a fixed amount of degrees.moves in forward and reverse directions.
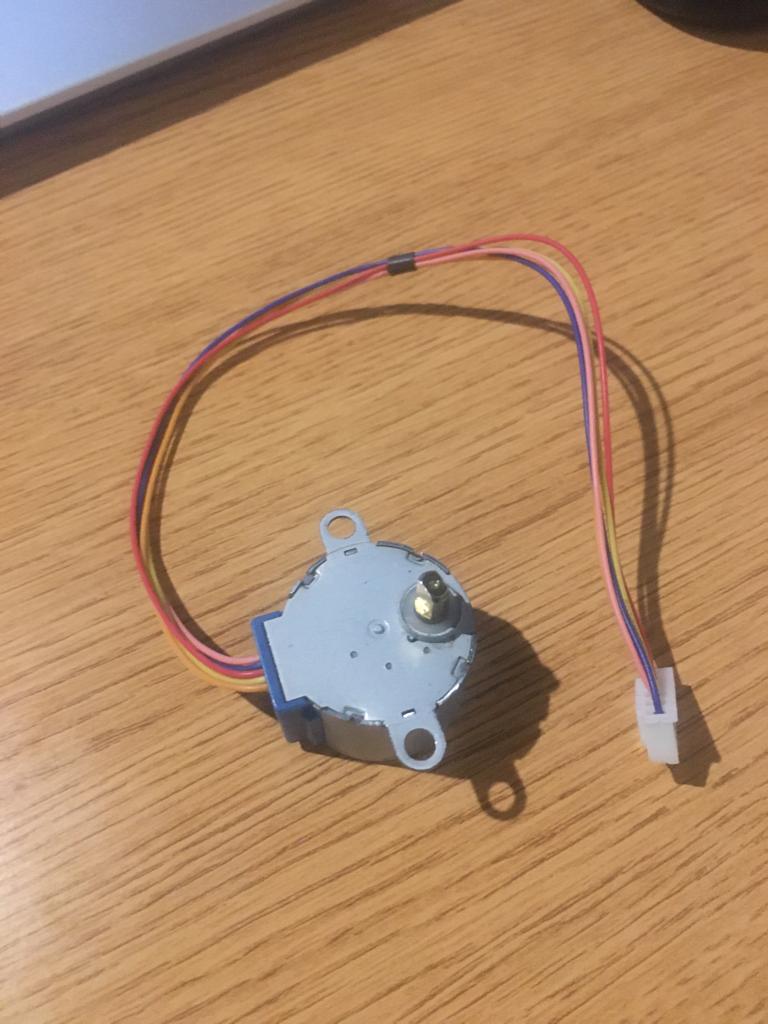
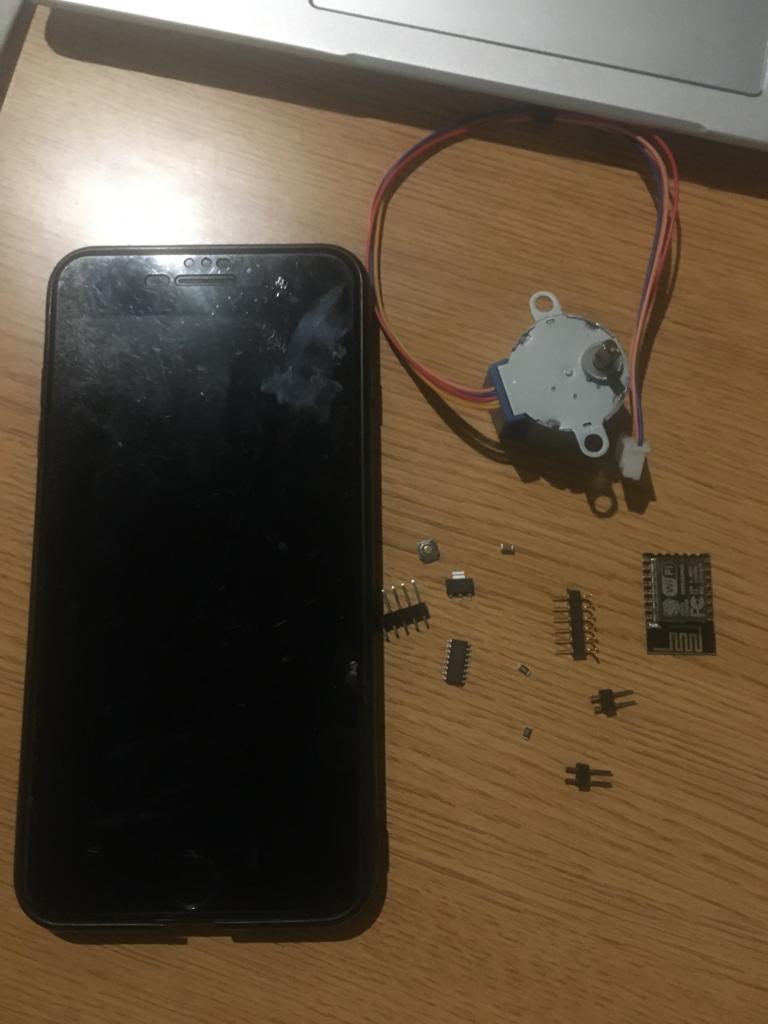
Electronics components to be used in final project.
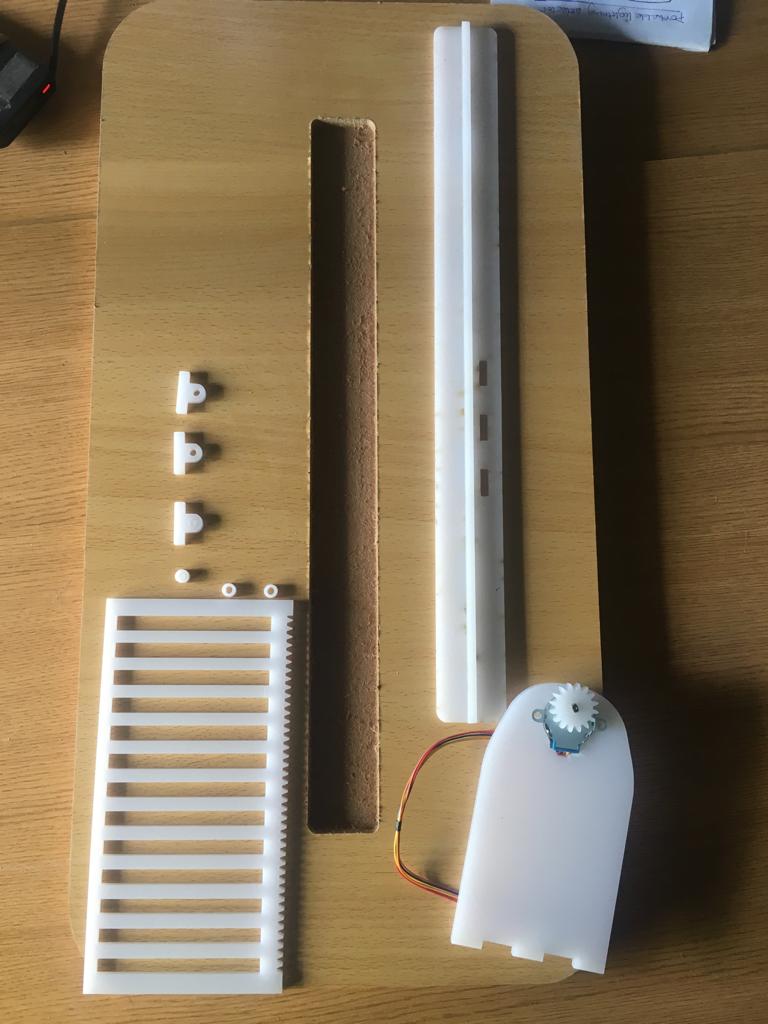
Below is printed materials used to make gate.The white color components are made in Acrylic materials printed in laser cutter and MDF material cut using CNC machine
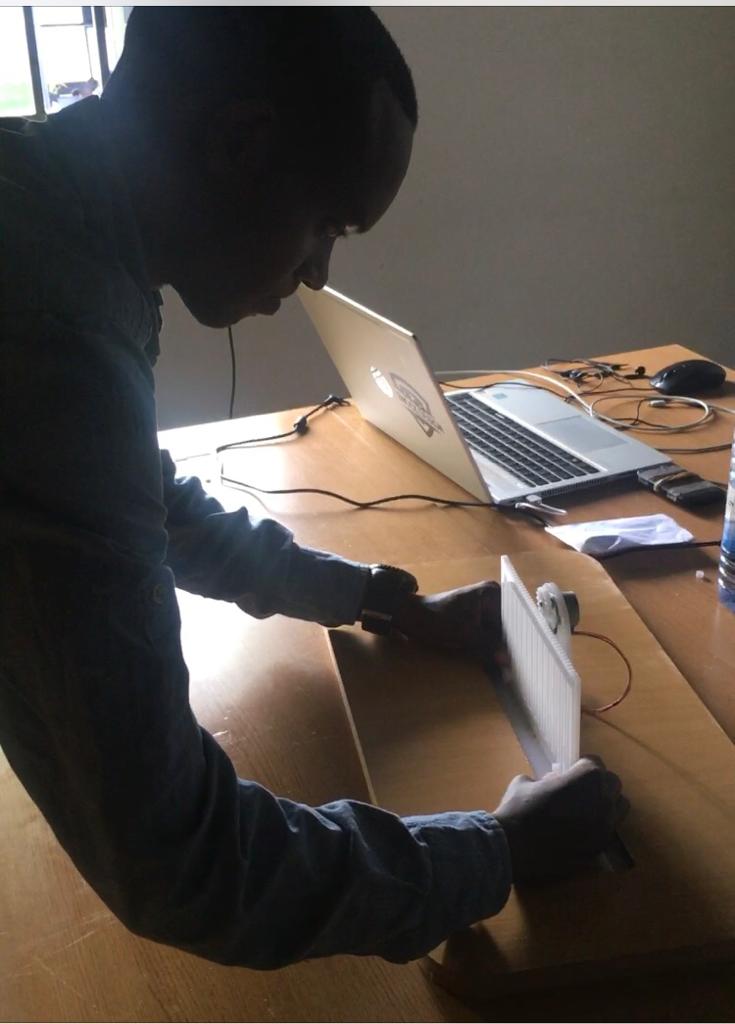
Below, I assembly all printed components
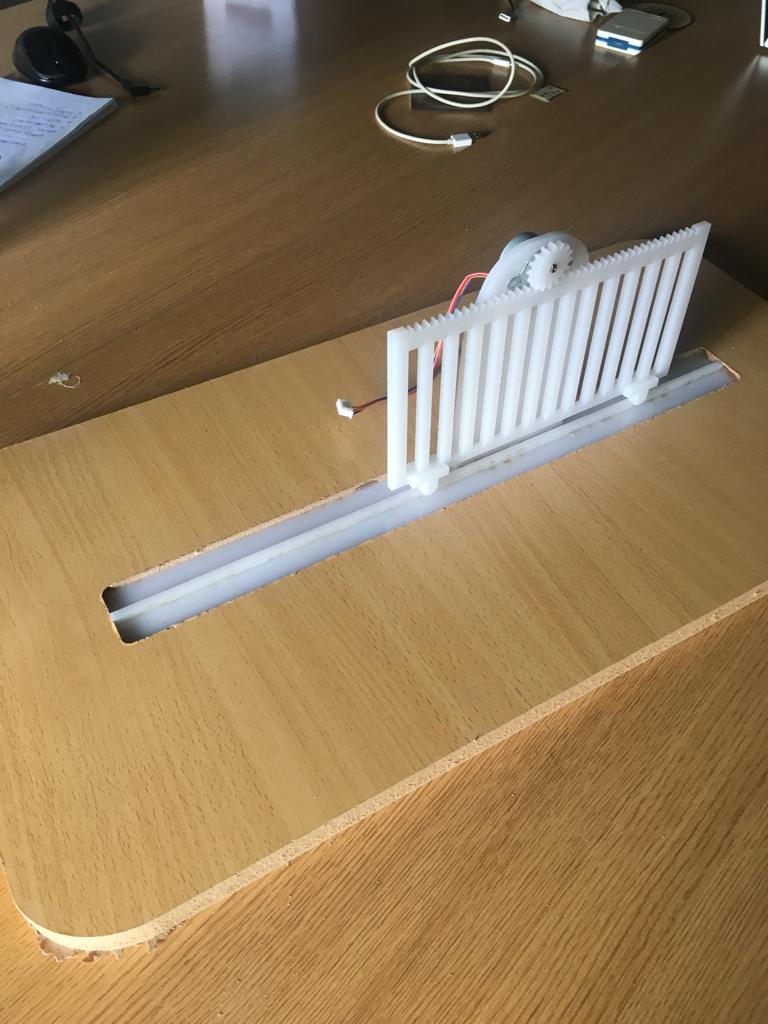
Below is finished assembly of gate design.
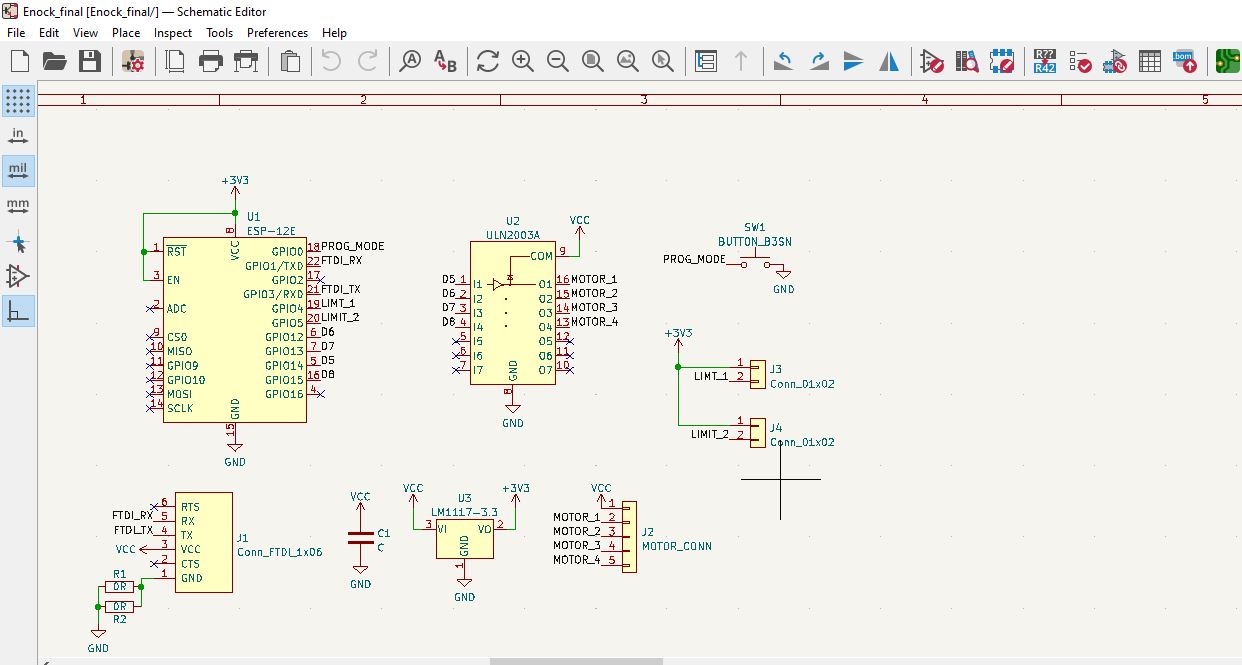
On designing the circuit was straight forward, the schematic was not difficult. I started by designing in schematic editor as I have analysed it.I used KiCAD software.
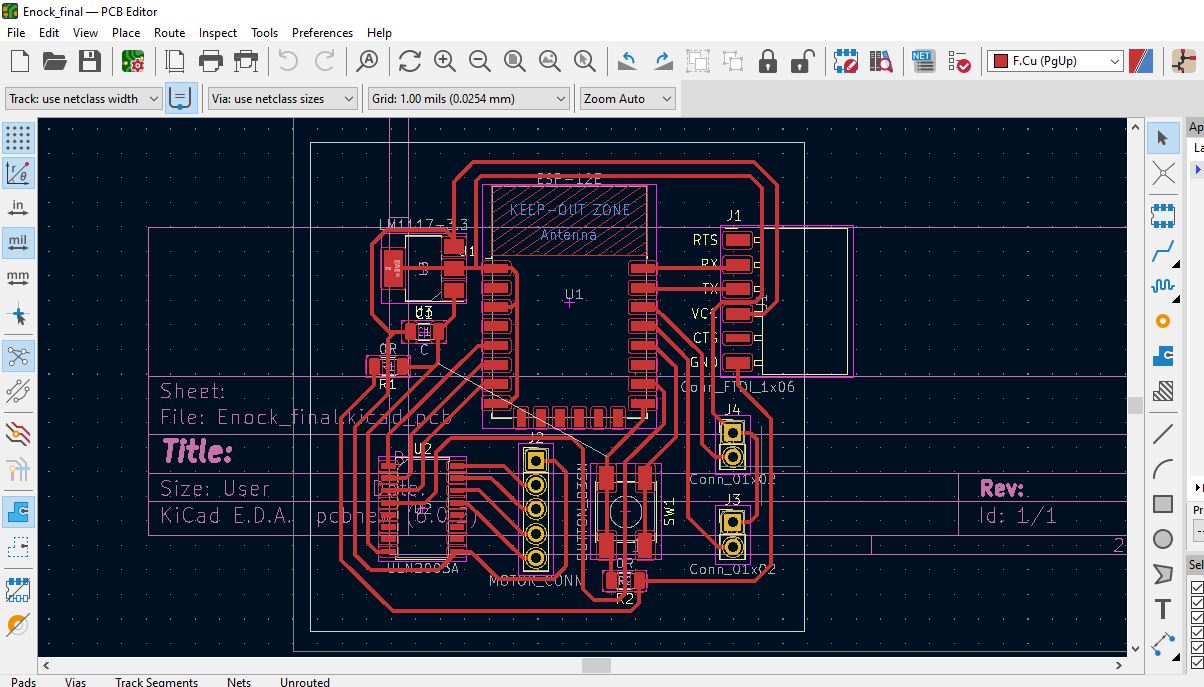
Below, i switched schematic editor to PCB editor.I had to make Route tracks in PCB.
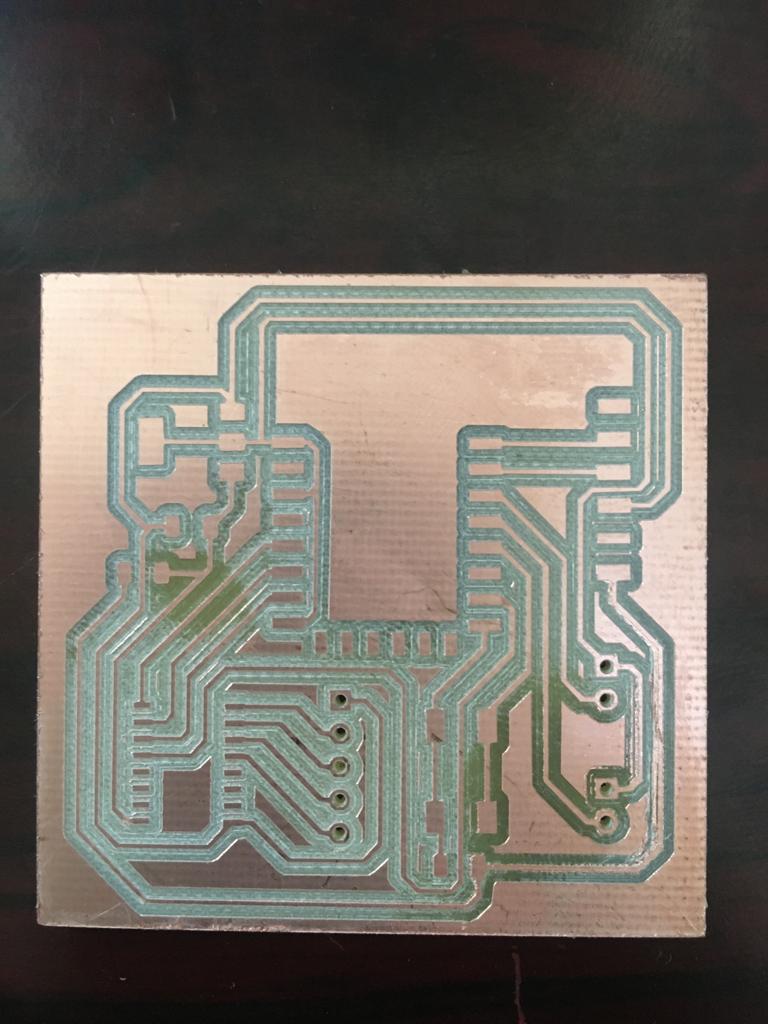
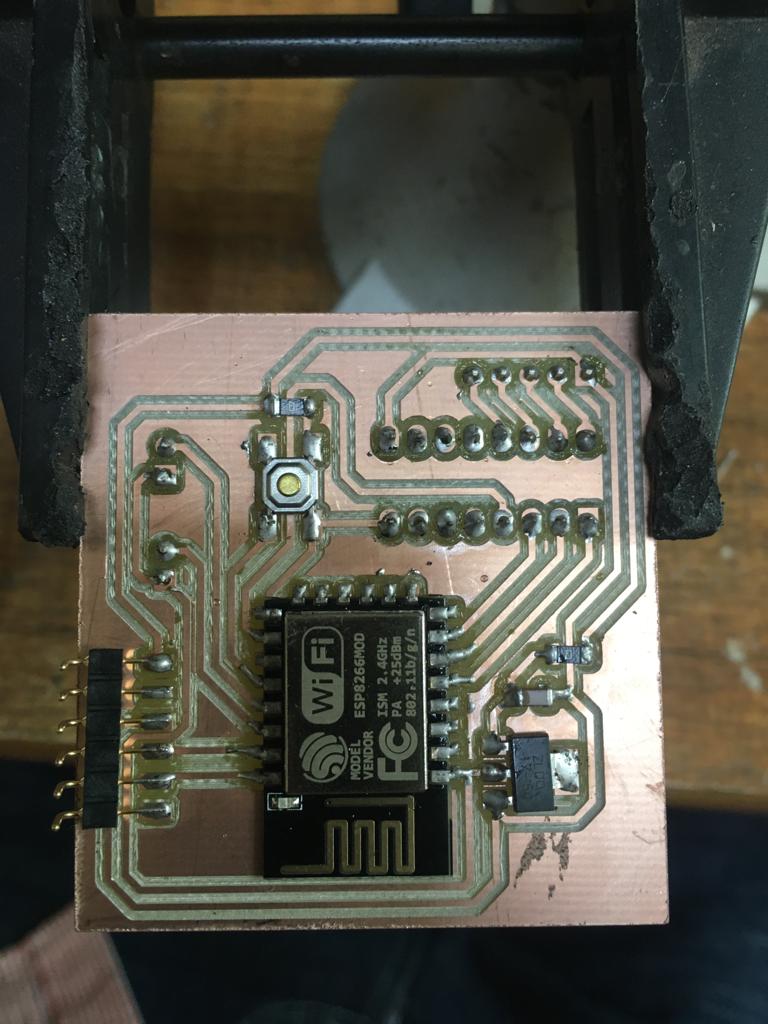
After designing the PCB I printed it and solderd all components.
Materials used
| Qty | Description | Price | Link |
|---|---|---|---|
| 1 | Steeper motor | 5.00 $ | http://amazon.com/test |
| 1 | ESP8266 module | 10.00$ | http://amazon.com/test |
| 2 | 01*02 PinHeader | 2.00 $ | http://amazon.com/test |
| 2 | 499kohm Resistors | 3.00 $ | http://amazon.com/test |
| 1 | Switch button | 2.00 $ | http://amazon.com/test |
| 1 | 1uF capacitor | 1.00 $ | http://amazon.com/test |
| 1 | Voltage regulator | 4.00 $ | http://amazon.com/test |
| 1 | 01*06 FTDI PinHeader | 1.00 $ | http://amazon.com/test |
Codes for the gate control I uploaded these ones
int Pin1 = 14;//IN1 is connected
int Pin2 = 12;//IN2 is connected
int Pin3 = 13;//IN3 is connected
int Pin4 = 15;//IN4 is connected

int pole1[] ={0,0,0,0, 0,1,1,1, 0};//pole1, 8 step values
int pole2[] ={0,0,0,1, 1,1,0,0, 0};//pole2, 8 step values
int pole3[] ={0,1,1,1, 0,0,0,0, 0};//pole3, 8 step values
int pole4[] ={1,1,0,0, 0,0,0,1, 0};//pole4, 8 step values

int poleStep = 0;
int  dirStatus = 3;// stores direction status 3= stop (do not change)

String buttonTitle1[] ={"Close", "Open"};//Watch Video for details (on Udemy)
String buttonTitle2[] ={"Close", "Open"};
String argId[] ={"close", "open"};

#include <ESP8266WiFi.h>
#include <WiFiClient.h>
#include <ESP8266WebServer.h>
#include <ESP8266mDNS.h>

#ifndef STASSID
#define STASSID "UWR200K-BBBE"
#define STAPSK  "Rwanda@5050"
#endif

const char *ssid = STASSID;
const char *password = STAPSK;

ESP8266WebServer server(80);

void handleRoot() {

   //Robojax.com ESP32 Relay Motor Control
 String HTML ="<!DOCTYPE html>\
  <html>\
  <head>\
  \t\n<title>Enock fabacademy project</title>\
  \t\n<meta name=\"viewport\" content=\"width=device-width, initial-scale=1\">\
  \n<style>\
 \nhtml,body{\t\nwidth:100%\;\nheight:100%\;\nmargin:0}\n*{box-sizing:border-box}\n.colorAll{\n\tbackground-color:#90ee90}\n.colorBtn{\n\tbackground-color:#add8e6}\n.angleButtdon,a{\n\tfont-size:30px\;\nborder:1px solid #ccc\;\ndisplay:table-caption\;\npadding:7px 10px\;\ntext-decoration:none\;\ncursor:pointer\;\npadding:5px 6px 7px 10px}a{\n\tdisplay:block}\n.btn{\n\tmargin:5px\;\nborder:none\;\ndisplay:inline-block\;\nvertical-align:middle\;\ntext-align:center\;\nwhite-space:nowrap}\n";

  HTML +="</style>\n\n</head>\n\n<body>\n<h1>Gate Controller (Fab 2022) </h1>\n";

   if(dirStatus ==2){
    HTML +="\n\t<h2><span style=\"background-color: #FFFF00\">Gate is Opening</span></h2>\n";
   }else if(dirStatus ==1){
    HTML +="\n\t<h2><span style=\"background-color: #FFFF00\">Gate is Closing</span></h2>\n";
   }else{
    HTML +="\n\t<h2><span style=\"background-color: #FFFF00\">Gate is stopped</span></h2>\n";
   }
      if(dirStatus ==1){
        HTML +="\t<div class=\"btn\">\n\t\t<a class=\"angleButton\" style=\"background-color:#f56464\"  href=\"/gate?";
        HTML += argId[0];
        HTML += "=off\">";
        HTML +=buttonTitle1[0]; //Gate ON title
      }else{
        HTML +="\t<div class=\"btn\">\n\t\t<a class=\"angleButton \" style=\"background-color:#3768c4\"  href=\"/gate?";
         HTML += argId[0];
        HTML += "=on\">";
        HTML +=buttonTitle2[0];//Gate OFF title
      }
     HTML +="</a>\t\n\t</div>\n\n";
       //Watch details at my Arduino Course at Udemy.com
      if(dirStatus ==2){
        HTML +="\t<div class=\"btn\">\n\t\t<a class=\"angleButton\" style=\"background-color:#f56464\"  href=\"/gate?";
        HTML += argId[1];
        HTML += "=off\">";
        HTML +=buttonTitle1[1]; //Gate ON title
      }else{
        HTML +="\t<div class=\"btn\">\n\t\t<a class=\"angleButton \" style=\"background-color:#3768c4\"  href=\"/gate?";
         HTML += argId[1];
        HTML += "=on\">";
        HTML +=buttonTitle2[1];//Gate OFF title
      }
     HTML +="</a>\t\n\t</div>\n\n";

  HTML +="\t\n</body>\n</html>\n";
  server.send(200, "text/html", HTML);

}

void handleNotFound() {

  String message = "File Not Found\n\n";
  message += "URI: ";
  message += server.uri();
  message += "\nMethod: ";
  message += (server.method() == HTTP_GET) ? "GET" : "POST";
  message += "\nArguments: ";
  message += server.args();
  message += "\n";

  for (uint8_t i = 0; i < server.args(); i++) {
    message += " " + server.argName(i) + ": " + server.arg(i) + "\n";
  }

  server.send(404, "text/plain", message);

}

void setup(void) {

  //Robojax.com 28BYJ-48 Steper Motor Control

 pinMode(Pin1, OUTPUT);//define pin for ULN2003 in1
 pinMode(Pin2, OUTPUT);//define pin for ULN2003 in2
 pinMode(Pin3, OUTPUT);//define pin for ULN2003 in3
 pinMode(Pin4, OUTPUT);//define pin for ULN2003 in4


  Serial.begin(115200);//initialize the serial monitor
  Serial.println("Gate Controller ");

  //
  WiFi.mode(WIFI_STA);
  WiFi.begin(ssid, password);
  Serial.println("");

  // Wait for connection
  while (WiFi.status() != WL_CONNECTED) {
    delay(500);
    Serial.print(".");
  }

  Serial.println("");
  Serial.print("Connected to ");
  Serial.println(ssid);
  Serial.print("IP address: http://");
  Serial.println(WiFi.localIP());

//multicast DNS   //Robojax.com 28BYJ-48 Steper Motor Control
  if (MDNS.begin("fabgate")) {
    Serial.println("MDNS responder started");
    Serial.println("access via http://fabgate");
  }

  server.on("/", handleRoot);
  server.on("/gate", HTTP_GET, motorControl);
  server.onNotFound(handleNotFound);
  server.begin();
  Serial.println("HTTP server started");
}

void loop(void) {
  server.handleClient();
  MDNS.update();
  //Watch details at my Arduino Course at Udemy.com
if(dirStatus ==1){
   poleStep++;
    driveStepper(poleStep);
 }else if(dirStatus ==2){
   poleStep--;
    driveStepper(poleStep);
 }else{
  driveStepper(8);
 }
 if(poleStep>7){
   poleStep=0;
 }
 if(poleStep<0){
   poleStep=7;
 }

   delay(1);
   //Robojax.com 28BYJ-48 Steper Motor Control
}


void motorControl() {

//Watch details at my Arduino Course at Udemy.com
    if(server.arg(argId[0]) == "on")
    {
      dirStatus = 1;// CCW

    }else if(server.arg(argId[0]) == "off"){
      dirStatus = 3;  // motor OFF

    }else if(server.arg(argId[1]) == "on"){
      dirStatus = 2;  // CW

    }else if(server.arg(argId[1]) == "off"){
      dirStatus = 3;  // motor OFF

    }


  handleRoot();
}//motorControl end

void driveStepper(int c)
{
  //Watch details at my Arduino Course at Udemy.com
     digitalWrite(Pin1, pole1[c]);
     digitalWrite(Pin2, pole2[c]);
     digitalWrite(Pin3, pole3[c]);
     digitalWrite(Pin4, pole4[c]);
}//driveStepper end here