
Week Seven: Computer-Controlled Machining
Goal
The goal for this week is to make something big. Since big is relative term, I assume this means use the Shopbot to make something.
Week Seven: Computer-Controlled Machining Objectives
- Decide what to design and design with.
- Design
- Cut design on Shopbot
- Assemble
Decide What to Design and Design With
What to Design
There is so many items I want to design, so I decided to look for design constraints to start. I wanted the design to be modular, have a living hinge, and foldable. As for what to design I came up with the top three below.
- Bicycle rack for garage
- A bookcase for my house
- A fort for my son
After a talk with my wife, the practical one, she wanted a Bike rack for the garage.
What to Design With
I wanted to push the limits of my tools, so I did not want to design in Solid Works. Which still leaves a lot of tools. I chose kokopelli because the coding apeals to me. As designing with kokopelli I listed a a few thoughts which are stated below.
Kokopelli
- first time making a function in kokpelli (COOL)
- The function in the program must come first before using it. Does kokopelli exectues linearly?
- relfect_x and reflect_y seem to be switched.
- wish they had dimensioning in kokopelli
- really forces you to understand the geometry of your design
- no dimensions and 3D part to look at. Not use to looking at 2D flat drawing.
Design
Design constraints wish list:
- Modular.
- Design with a living hinge.
- Foldable.
I was able to obtain 2 out of 3 constraints and could not figure a way how to fold it, as of yet.

When designing with kokopelli I was confused which was the the lenghth and the width, I need to organize my code better. I need to think of contsraints first and think about the driving parameters. I had few iterations of the design.
I wanted to design something different than your standard bike rack. My thoughts were to have a the front whell of the bike placed on living hinge. I designed an arm to be highered and lowered on the handlebars of the bike. This allows the bike to stand up.
First Design Thoughts
- to tall for the type of bikes we have
- slots on the frame need to be smaller
Second Design
Below are 2D images in kokopelli
Crossbar x2

Frame and handles

Living Hinge

You may download the kokopelli file HERE. WARNING the layout will not fit on a 4 x 8 feet of plywood.
The above layout was not the final layout. The workflow was export svg in kokopelli -> import svg into Inkscape export pdf -> import pdf into Partworks 3 export shopbot file -> open Shopbot file in Shopbot 3 software and cut.
Inkscape allowed me to modify the layout and export to pdf, however, that did not work so well, when I imported the pdf into Partworks each line changed to two lines. This was not acceptable. I imported the svg to Corel Draw to modify the layout. I exported a file as a dxf and opened in Partworks. This worked like a charm.
As I writing this, I might not have converted the lines in Inkscape to hairlines. This may have caused the issue.
Cut on Shopbot
The shopbot is an awesome machine. I have used different machine tools with different platforms, but for the price and capabilities I would struggle to find something to compare it to. Below is an outline of the workflow. For the kokopelli, Inkscape, and Partworks there was no trouble at all. However, the outline below shows a more detailed workflow kokopelli to the Shopbot. Note: The first time I did not use my computer.
- Export from kokopelli to SVG at 10 pixels/mm
- Open Inkscape
- Check length
- Extensions > Visualize Path > Measure
- DID NOT WORK
- Extensions > Visualize Path > Measure
- OK don't check length
- Export PDF
- Open Partworks 3.5
- Open pdf if partworks
- Change job set up
- thickness = .75 "plywood thickness"
- off (use origin offset)
- Center data in job
- inches
- Join vectors
- set tolerance to .005 did not work on all of them
- set tolerance to .1 it workes
- select curves
- could not join vectos
- needed to trim feature and try joining vectors again. (It Worked!)
- Toolpath panel
- create toolpaths
- cutting depth 0-.753 in (Allowed for material to cut all through)
- .25 endmill
- 8 passes
- Tabs yes
- length 1 in
- Thickness .125
- select vectors
- modify settings
- Extimated tool path
- 30 min
- Save Toolpath(s) to File
- Open Shopbot3
- connect two dongles to ports
- Interlock disengage
- turn on machine
- stop button check and reset button
- click show keypad
- move tool
- set zero
- only set X and Y
- move z height up
- ZZero set with aligator clips and zeroing plate->[C]uts
- C2 Zero Z Axis with Z Zero plate
- Load Part File
- Open File
- Tabbing on (however bad move)
- Start
- Engage interlock and give it a couple a seconds
- Ran with Tabs on
- tabs as thick as the piece (I belive this is due to tabs being on, remember bad move to turn on tabbing in the Shopbot 3 software.)
- Funny Story (Two Mistakes make No Mistakes): First mistake turned on tabs in the Shopbot3 software. Second mistake: screwed screws wer I was planning to cut. Take these two mistake and what happed, a tab just happened to be where the screw was located. This avoided a lot of greef.
- NOTE: If the mouse is touched the Shopbot stops. Found this out not once, but TWICE!
I was able to cut out one frame on Friday night. I realized the frame was too tall and the slots were to wide.
Sunday night
I was excited to get the build on way. I showed up to the building on Sunday night expecting to complete the build, however, the stars did not align for me. This time I was using my computer, which had the correct software. However, I could not Zero the Z axis, with the ZZero program. I observed the contact plate works and am getting a signal on the computer screen. (No problem here.)
I noticed the decrease plunge part of the program works. On the second part of the first plunge the spindle moves at a different rate than the numbers on the computer. With this analysis I looked at the forums for this error and could not find anything like this, so I emailed the class.
Eddie Kirby, from Fab Lab Manchester, replied and said they ran into the same problem and uninstall the Shopbot3 program and drivers and try again.
In the meantime, other people in the lab did not have trouble Zzeroing.
Used another computer and it ran like a charm and finished the up on Monday night.

Aseemble
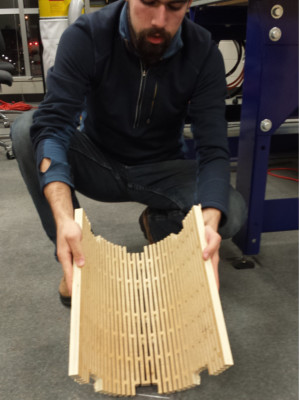
The living hinge came out more flexible than I anticipated. I have never tried cutting this type of design before. It was a cool experience. Below is Chris showing the flexibility of the livining hinge.
The plywood used was a tad larger than .75 in, so a sander works wonders.
Asembly is when the "rubber meets the road." In this case, there are a couple of items that did not work out as planned. I am spoiled by using Solidworks and did not completely check clearances and dimensions SW automatically does. So the assembly did not assemble as planned and needs modifications.
First, the arms are to large. The arm does not allow the bike wheel nest in the living hinge. This is a simple oversight on my part.
Second, when assembling the living hinge onto the crossbar the width of the tabs are slightly off. Need to recheck the dimensions.
Third, the livining hinge is larger than the slots in the frame. The dimension is off by one slot width. This can be handled with post processing called sanding/filing.
From this experience, gather the driving dimensions, create features with symetry, use the driving dimensions. These are methods I take for granted in SW.
Below is the final build.

*Many thanks to Chris Bienert, Jonathan Apgar, and DI von Briesen for staying late.
Resources:
- living hinge - http://nathanjohnthompson.com/projects/living-hinge/
- kokopelli sizing - http://fab.cba.mit.edu/classes/4.140/people/wildebeest/projects/week3/index.html
- http://www.talkshopbot.com/forum/showthread.php?t=2882
- http://fab.cba.mit.edu/classes/4.140/people/geoff/projects/project_05/index.html