Project Page
June 3rd, 2014
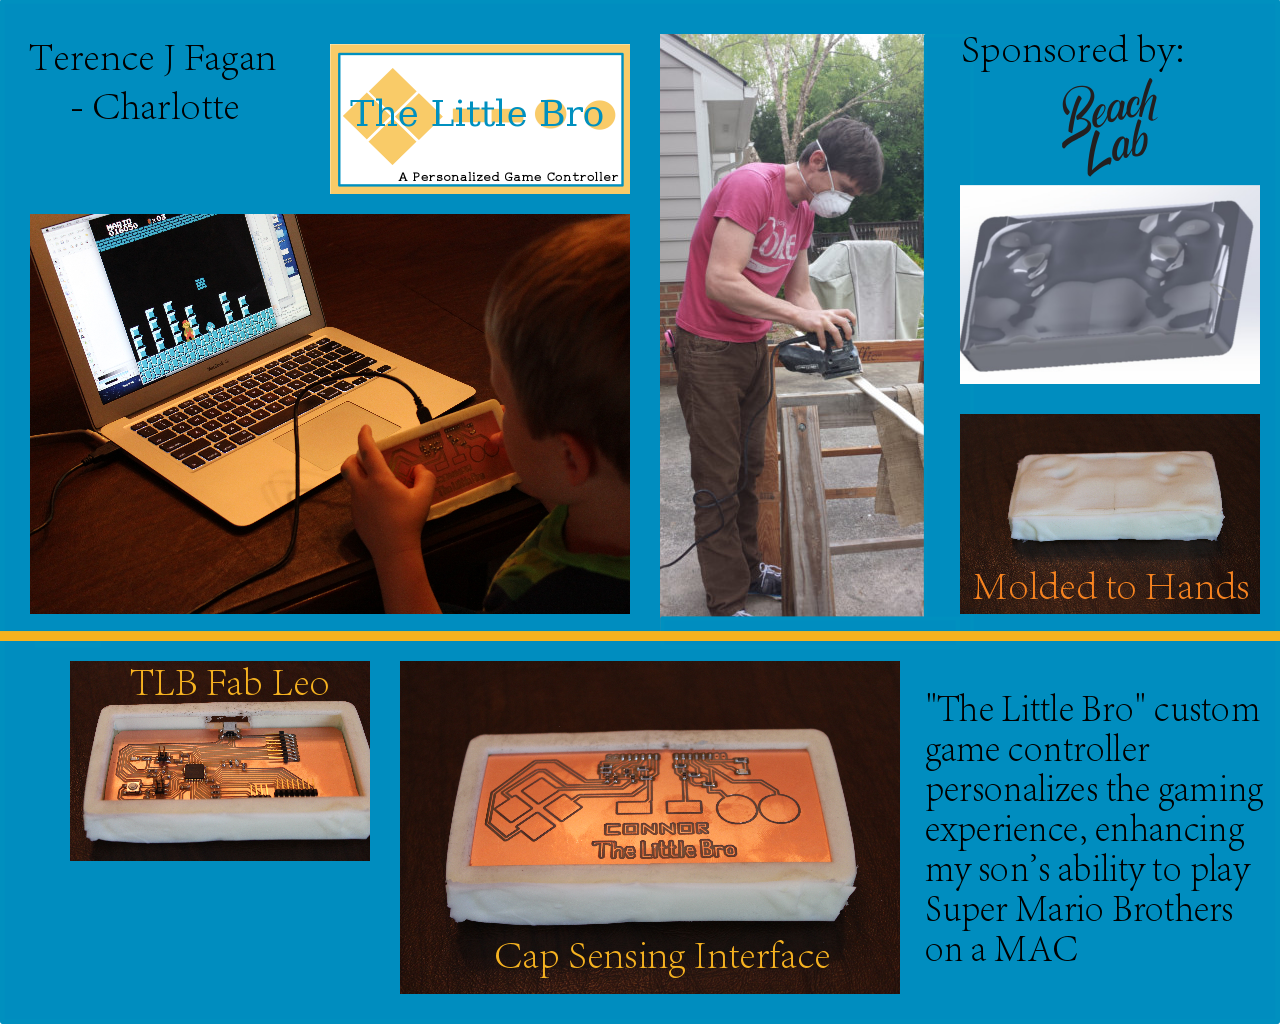
Created a Logo for the Little Bro Game controller in Inkscape for the final presentation HERE.
May 27th, 2014
The device "The Little Bro" will allow my son to play super brothers on my mac.
Fabrication Steps with pictures are below. ENJOY!!
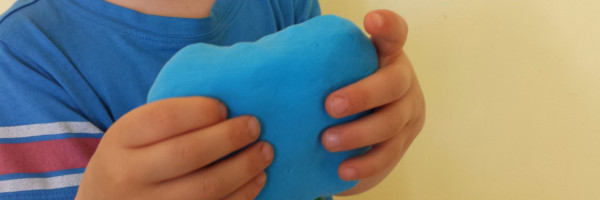
Imprint of son's fingers
\/
laser scaner
laser scanning on the Next Enginer
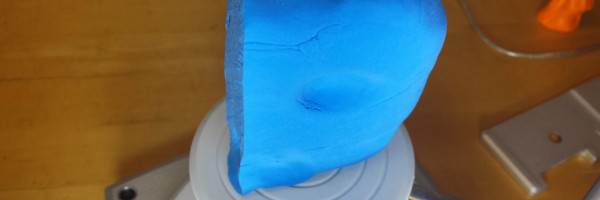
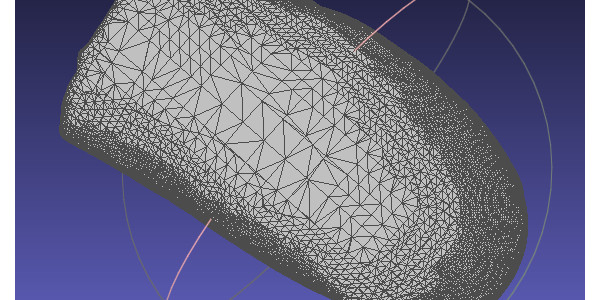
imprint to get an XYZ point cloud.
\/
Solid Model in Solidworks
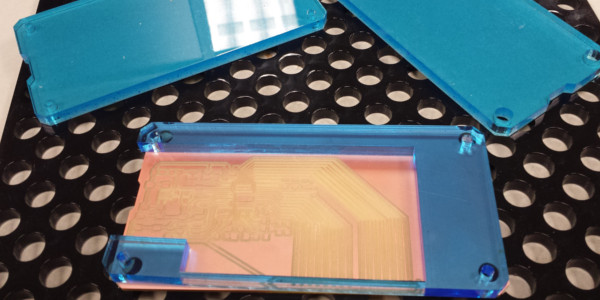
imprint
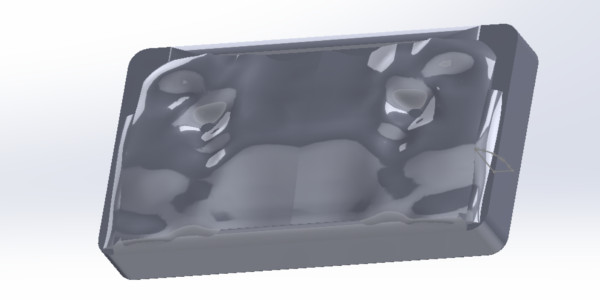
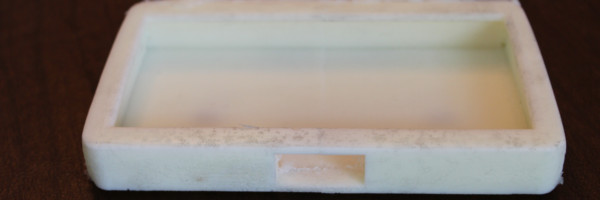
electronics case

\/
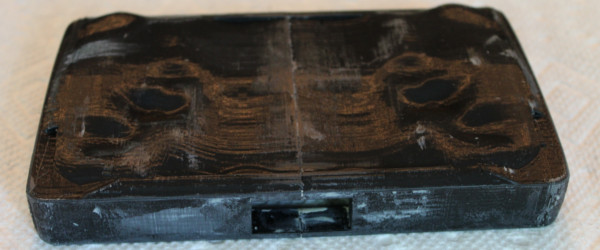
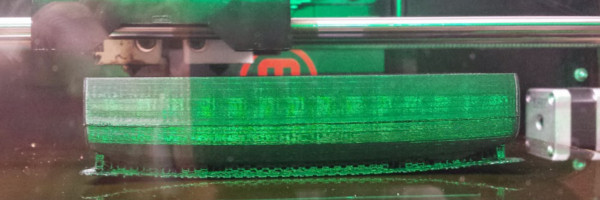
3D printing
pattern
\/
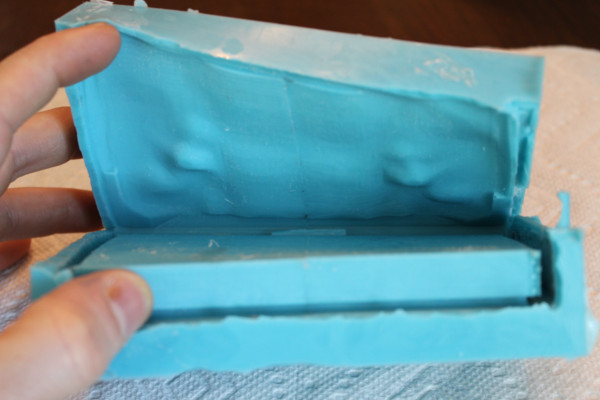
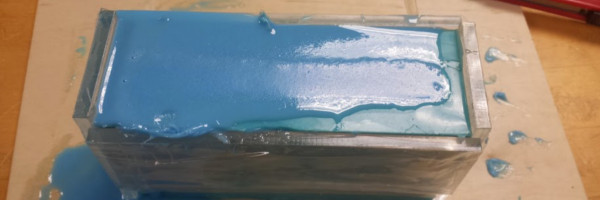
molding
\/
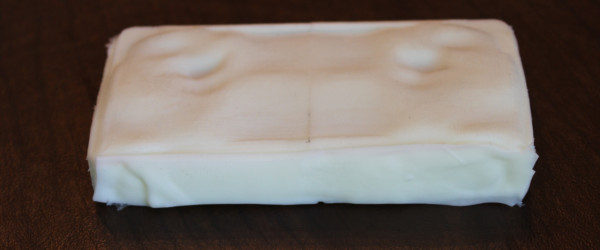
casting
imprint side of the case
electronic case side
\/
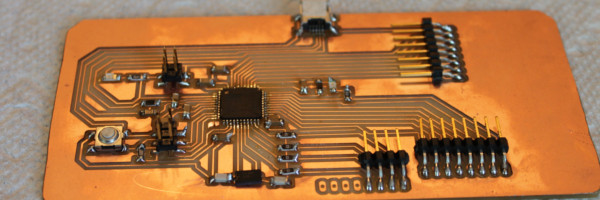
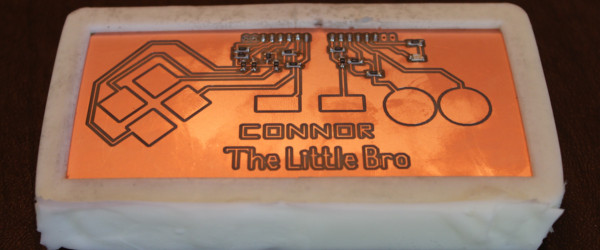
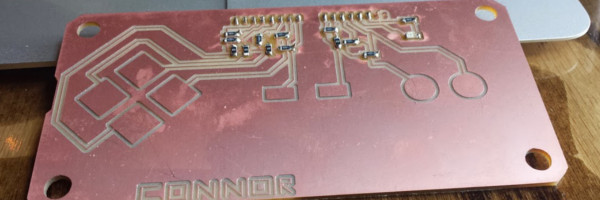
elctronic production
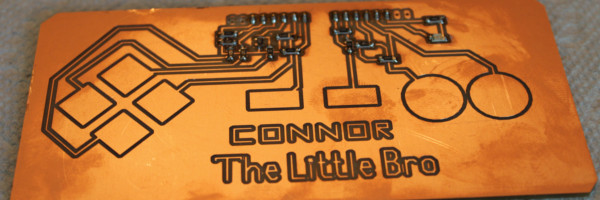
electronic design - The Little Bro Fab Leo
electronic output - LED light
electronic intput - reset button
\/
electronic input
\/
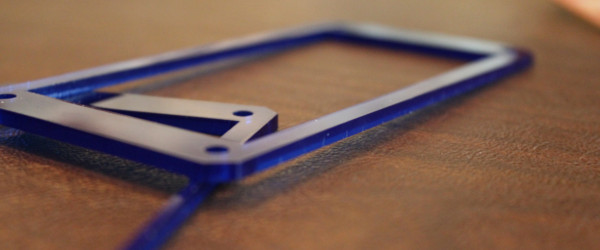
laser cutter - body and spacers
\/
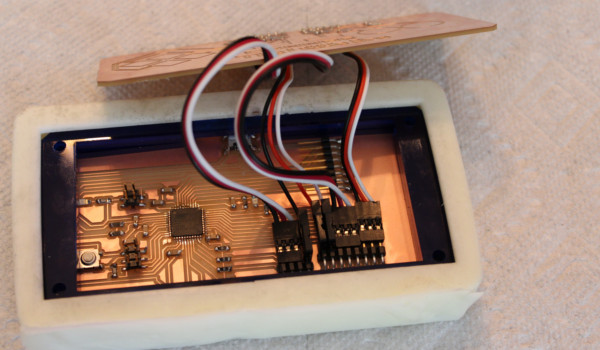
putting it altogether
wiring the interface
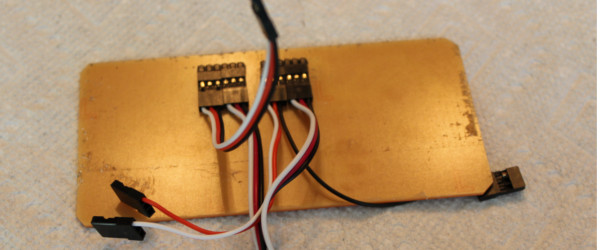
Connecting interface and The Little Bro Fab Leo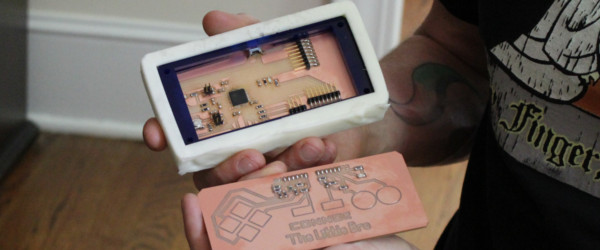
wiring the interfae with the The Little Bro Fab Leo
software
The Little Bro
Files
Laser Scanner/Next Engine- XYZ Point File - File to big for Fab Academy Server
Solidworks - 3D Model - File to big for Fab Academy Server
Modela/ EagleCad- The Little Bro Fab Leo
Modela/EagleCad - Human Interface
Input/Output/Design/ - Sketch - Software
Writings from week 17
Dessemination Plan
Goal
We intended to offer "The Little Bro" as a Kit for engineering summer camps. Each camper will make a personallized game controller.
Objectives
In fall of 2014 start a Kickstarter campaign to take it from prototype stage to production kit.
In 2015 the summer camps will be hosted at CPCC with 50 campers.
Users
The target market is for any persons interested in engineering/gaming with an age range of middle or High School.
Another target market is moms with kids interested in engineering.
Content
The camps will serve as a build, maintain, and use platform for students.
We have qualified camp instructors, Instructors are engineers or engineering high school teachers.
Sources
Partnering with Young Engineers of Today and allowing them to run camps so Creatrex
Medium
At frist the product will be dissemenated through our current network of engineering camps throughout NC and Texas.
Success
The product will be successful if the camps are successfully implemented with knowledgable teachers and support structure after the camp. The support structure may be in a form of a Facebook page or other social media.
Access
Our camps and products are displayed on our webpage and through the distribution channels of our know networks.
Availability
Yes, we will continue to visit schools to educate students and to forge partnerships with educational companies.
Barriers
The barriers of the product are as follows:
- We have not tested with the youth, however, showed a small group of game enthusist and they were very excited. Need to be tested in the market.
- The dissemenation strategy puts us in direct contact with the end users of the product.
Resources:
- http://www.researchutilization.org/matrix/resources/dedp/#ten
Writings from week 16
what will it do?
The device will allow my son to play super brothers on my mac.
who's done what beforehand?
Controllers for vidoe games have since video games. I am going to narrow it down a bit and discuss what has influenced my design. Influences on the game controller are below.
- Nintendo Entertainment System released in 1985 has a major influence in the design.
- Jason Poel Smith - hacked a NES Game Controller - http://makezine.com/2013/06/17/diy-hacks-how-tos-modify-a-game-controller-for-accessibility/
- DIY Cap Sense Controller - http://treehouseprojects.ca/capsensegame/
what materials and components will be required?
BOM
how much will it cost?
See BOM for FabLeo, List not complete yet.
what parts and systems will be made?
- Cap Sensors
- Second Fab Leo - notice the holes are not where I wanted. I missed

- First Attempt at a Pattern took 5 hours and the imprints were not very visible because of the
- Mold
- Cast
what processes will be used?
- Mill sensor board on Modela
- Mill Fab Leo board on Modela
- Solder components to both board
- Lasercut body
- Vinyl cut stickers
- Laser scan fingerprint
- Solid Model case with finger prints
- 3D print case
- Make two part mold of case
- Cast case for game controller
- Write input software
- Write output software
what tasks need to be completed?
- Finish input software
- Create two part mold of 3D printed part
- Cast Part
- Vinyl cut sticker
what questions need to be answered?
- What is the optimal way to fine tune jump button on the controller?
- How can I make a two part mold with a whole in it?
- How can I stop the 3D printer from curling up on the edges?
- Will the program work with the new Fab Leo board I made?
what is the schedule?
I should have the programming complete this weeked May 26th.
I should have the Mold and Cast complete by Thursdya May 23rd.
I should have the stickers cut and on the controller next week.
how will it be evaluated?
- If the game controller works with SuperMario Brother Simulator
- If the game controller fits into my son's hand correctly
April 17th, 2014
I am working the code for the game controller. I found the error from last itteration. The traces were not correct. I had multiple pads on one trace. This is not going to work. So I milled a new interface with the correct traces. I am getting the program to work. However, I realized when I touch the left circle on the board the right circle fires as well. This is reaking havock with the system. More analysis is required.
Identifying a Problem

I diverged from thinking of one project to 10 different project ideas listed in my notebook. I narrowed down to one. The process of elimination was to find what project I was most passionate about. I would like to design and build a game controller for smaller hands. The idea originated while I watched my three year old son play Playstation 3. He was having trouble getting past a portion of the game. As I observed his hands he was having difficulty getting his thumbs into the correct position due to the large real estate his thumbs traveled. From there I thought about if there were any game controllers for Playstation or other game consoles for kids. I started to ask the clerk at the store and she concluded she never heard of them. However, I kept searching and found them, however, I believe I can design one that fits a child's hands.
Week 2 Solid Model Design

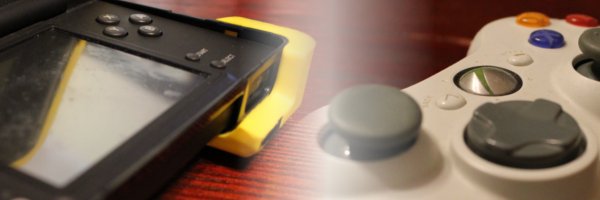
This week I started solid modeling the game controller. To see the different modeling packages I use please go to weekly projects. This week I am getting inspiration from the Xbox controller and the Nintendo DS. I originally thought about just shrinking the Xbox controller to fit the hands, however, observing my son play his Nintendo DS I noticed he did not have difficulty with the buttons. Although the buttons are smaller on the DS the shape of the controller is different. This got me thinking about alternative shapes to the overall controller. The shape of the DS is a rectangular prism which seems to fit quite nicely in his hands unlike the Playstation of the Xbox game controllers which seem to be to big for him.
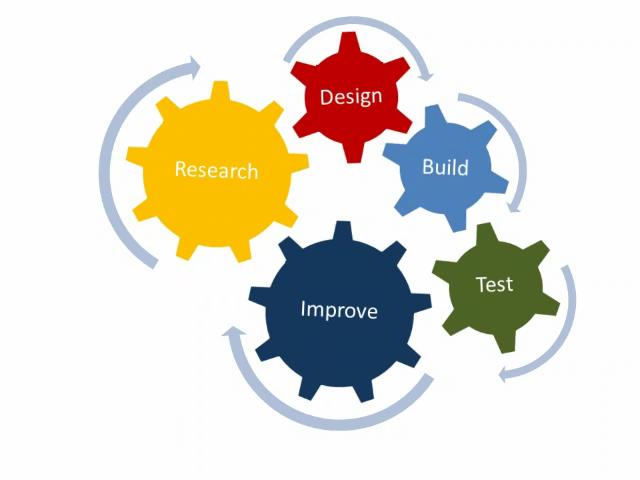
Engineering Design Process:
I found the picture below, which for the most part I like except it does not have "Identify the Problem."
Specifications:
- Work with MAC
- Comfortably fit into a 4 -6 year old's hands
- Be able to play the classic Super Mario Brothers
- jump
- fire
- move up/down/left right
- start/pause/stop game
- USB plug in
Possible Specs:
- Force Feedback (Although Classic Super does not have it)
- Wireless
Overall Project Plan:
Still working on it.
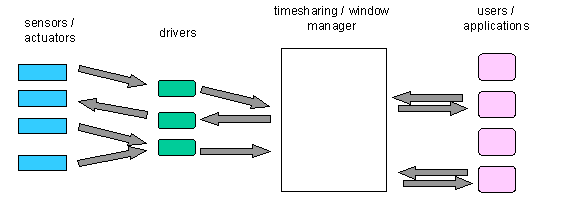
Software Architecture:
I am not sure about the architecture of the game controller,below is a quess.I assume this will change.
Game Controller (sensors/actuators)<-> Drivers <-> Computer <-> Applicaton
Components:
- Cover
- reylonds advanced materials 877 327 8789
- Need to contact Smooth-on to see if they know of a hard plastic for casting.
- talk to smooth-on
- platium silcone rubber for the casting
- smooth fill 50a
- smooth fill 945a
- sorta clear 37
- simpact 85 (85a)
- mold material
- mold star 15
- http://www.smooth-on.com/Silicone-Rubber-an/c2_1115_1341/index.html
- mold star 15
- Release agent -
- Brush ease release 205 then ease release 200
- derometer
- Shell
- 3D print
- Laser cut
- electronics
- Atmega32U4-AUA
- Has HID and keyboard capatbitlities
- Buttons for one side of the controller
- Atmega32U4-AUA
- Thumb joystick
- Similiar to PS/2 analog joystick
- connector
- USB
- VUSB Support
- USB
- Code
- Sketch
- a lot of the drivers and code is already available, need to be modified
- Click HERE to download the Leonardo code I wrote. It is very buggy still. I believe it is the time delay is not fined tuned.
- The Arduino provided an error
- "processing.app.SerialException: Error touching serial port." which I fixed by going into the Serial Monitor and changing the Baud rate to 9600. After this I could upload the new version of the code.
- This happens on occassion, need to press the reset button on the Arduino and then upload the sketch.
- The arrow keys kept getting stuck and would not release. I found a Keyboard.release() function and placed it in the code.
- The Arduino provided an error
- Mapping the controller to the MAC
-
Left LeftArrow Right RightArrow
Button A z Select Tab - Currently, I am having trouble jumping, I set the joystick preferences for Button A to to emulate z. When I press z Mario does small jumps. This is not suffiecent even to get over the first pipe in the game.
- C
- Sketch
Workflow for Game controller case
- Use Molding clay to get impression of son's hands
- Scan clay with laser scanner
- 3D print the pattern
- Create mold
- Cast the item
-----
"May not need extrenal clock? adjust the tolerance" -- advice from Francisco. Have some understanding, just don't know why or how to do it.
CAPACTIVE SENSOR GROUND IT MAY TAKE
TAKE WIRE TO A STEEL PIPE
Looking at ways to market and
Packaging
April29th
Making FabLeo from the Leonardo Schematic[2] needed to invert drilled holes.
I needed to color invert the drilled holes file.
May 1st
Made two layouts of the new Fab Leo. however, I relized after the pads were not milled out. So Basically I wasted two boards and about 2.5 hours. Live and learn, however at this point I would think I learned by know.
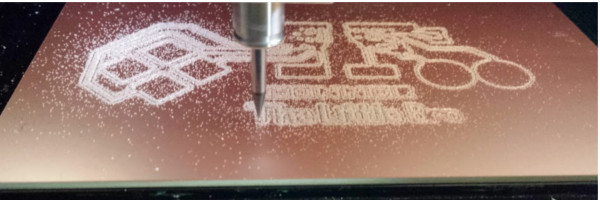
May a first go around of the body of the controller in Kokopelli and cut it on the laser cutter. The inspiration is from the Raspberry Pi cases. Tried to connect Kokopelli to the Laser cutter it would not work. Kokopelli generated the epi file, however, I was not able to. Something must be incorrect in the connection with Kokopelli on my MAC. Kokopelli does not connect to the Modela nor the Epilog. ??? The work flow for the was export png file from kokopelli and load into Fab modules. Convert the png file to epi file. I used 1/4" acryllic, 8% speed, 100% power, 5000 frequency.
Kokopelli file: body_v1.ko
Fableo untested png files: traces, drilled, cutout
May 2nd
Went to check the order for the 16 MHz crystal and we ordered the incorrect one, for some reason. The correct crystal is HERE.
I modified the Fab Leo some more and cut it out, however, I did not stuff it yet. For some reasone the traces came out like sloppy. I beleave the endmill was not fully secured in the chuck. I should know better. Chalk it up to another late night. Furthermore, I modified the design of the body of the game controller. I used .125 in and I cut four of them in acryllic and fixed the holes.
May 6th,2014
Attempting to make the Fableo. The first time I attempted it the traces came off the board. Not one but the first four. I have a lot of skill to learn in a short amount of time. I am currently cutting another board as I write.
Picture needed.
May 17th
Troubleshooting the electronics
    while(val3>1){
      Keyboard.press('z');
      Serial.println("Val3 = "+val3);
      Keyboard.releaseAll();
    }
When pressing and releasing the cap sensor the z button starts and does not release.???
while(val3>1){
	Keyboard.write('z');
	if(s1-millis() >100){
		val3 = 0;
	}
}
This releases to soon. I need somewhere in between.
Found KeyboardandMouseControl and it may work. I notided there is no delays. Interesting!!!
As for the up/down right/left buttons, I tinkered with the timing of the delay. For instance:
if(val2 > 1){
    Keyboard.press(KEY_LEFT_ARROW);
    delay(10);
  }
the delay of 10 ms does not move Mario like I would like. It makes Mario jitter.
if(val2 > 1){
    Keyboard.press(KEY_LEFT_ARROW);
    delay(100);
  }
A delay of 100 ms makes Mario move the way I would like.
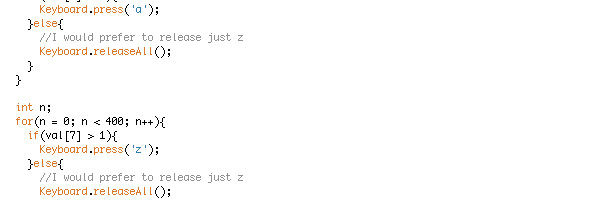
Furthermore the snipet of code below makes Mario jump. The longer you keep your finger on the cap sensor the higher jumps. This is all to a point. The below code works, however, the loops need adjusting.
int n;
for(n = 0;n<100;n++){
	if(val[7]>1){
		Keyboard.press('z');
	}else{
		//I would prefer to release just z
		Keyboard.releaseAll();
 	}
}
May 20th
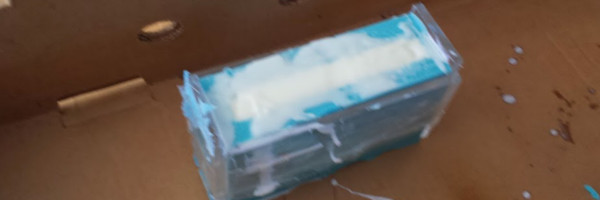
First attempt at casting, which did not come out like I planned.
May24th
Made the second casting of case for the game contoller. Thank you Fritz for helping.
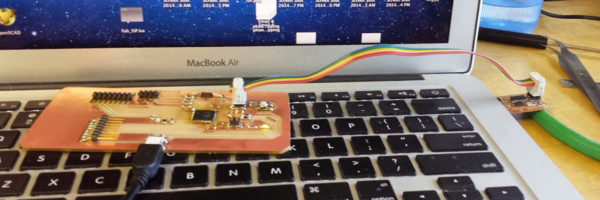
Modified and made a second Arduino Leonardo to fill in the case.
Started to make the cap sensor interface.
I was sitting down having coffee with a buddy of mine who is into gaming. He thought of the name "The Little Bro" which I thought was a fantastic name for it.
May 25th
The codes works with the modified Fab Laeo. (AWESOME) However the timing needs some adjusting.
Click HERE for the code
Resources:
- short overview of the PSX controller - http://electronics.howstuffworks.com/playstation3.htm
- http://en.wikipedia.org/wiki/Game_controller
- Instructables for USB BioFeedback game Controller - http://www.instructables.com/id/USB-Biofeedback-Game-Controller/
- Classic Super Mario Bros - http://www.youtube.com/watch?v=NJOuZM766dg
- Software Architecture - http://graphics.stanford.edu/projects/iwork/old/papers/humcent/
- Raided game controllers (Like the backdrop on the pictures)- http://www.techradar.com/news/computing-components/peripherals/best-pc-gamepad-6-reviewed-and-rated-984559
- How to Build Your Own USB Joystick - http://www.flightsim.com/vbfs/content.php?2112-How-To-Build-Your-Own-USB-Joystick
- NES gamepad to USB Conversion - http://www.bidouille.org/hack/nespadusb
- http://www.raphnet.net/electronique/snes_nes_usb/index_en.php
- https://code.google.com/p/sw3dprousb/
- Dreamcast Joystick to USB http://denki.world3.net/dcstick.html
- input device for controller http://fab.cba.mit.edu/classes/863.13/people/geoff/projects/project_10/index.html
- Atmel USB Kyboard configuration - http://www.atmel.com/Images/doc7602.pdf
- http://www.imaginaryindustries.com/blog/?p=80
- http://arduino.cc/en/Reference/MouseKeyboard#.UysqQq1dXmZ
- http://www.adafruit.com/products/1348
- https://www.youtube.com/watch?v=xLR4D9U47zA
- USB HID Keyboard with VUSB http://codeandlife.com/2012/06/18/usb-hid-keyboard-with-v-usb/
- http://www.tinkerkit.com/usb-controller/
- http://silverballsoftware.com/arduino-based-handheld-bluetooth-game-controller
- http://www.shortlist.com/tech/gaming/history-of-the-video-game-controller
- http://en.wikipedia.org/wiki/History_of_Nintendo
- http://mezzomill.com/NesController/Site/MM_Arduino_Nes_Controller.html
- http://hackaday.com/2012/08/08/making-a-game-with-capacitive-touch/?utm_source=feedburner&utm_medium=feed&utm_campaign=Feed%3A+hackaday%2FLgoM+%28Hack+a+Day%29
- http://treehouseprojects.ca/capsensegame/
- https://www.flickr.com/photos/johngineer/7329403498/
Programming
- Joystick - http://www.tinkerkit.com/feed/
Keyboard Mapping
- http://macbiblioblog.blogspot.com/2005/05/special-key-symbols.html
- http://www.pjrc.com/teensy/usb_keyboard.html
- http://www.fourwalledcubicle.com/LUFA.php
- http://blog.petrockblock.com/2012/05/19/usb-keyboard-with-arduino-and-v-usb-library-an-example/
Games
- http://nintendo8.com/game/629/super_mario_brothers/
- http://treehouseprojects.ca/capsensegame/
Leonardo Schematic
- http://arduino.cc/en/Main/arduinoBoardLeonardo
- Fab Leo -Final Project - http://fab.cba.mit.edu/classes/4.140/people/Jonathan_Grinham/index.html
- http://arduino.cc/en/uploads/Main/arduino-leonardo-schematic_3b.pdf
Solder small smds
- Flux - https://www.youtube.com/watch?v=yTV8gtSX6tg