
Electronics Programming
put some code on your board
Check and fix
First, I took my board, and with a bit of help, fixed it up. The switch had been designed to go to the reset pin. Which, I thought was a strange thing to do when I was designing it (why do we want it to reset the program every time you press the button??). So I moved it with a couple wires so that it was not on an open pin on the ATTINY.
Install all the things
It makes sense to instal things one at a time, checking that they work, but if you want you can go all at once and troubleshoot. high low tech out of MIT has a great tutorial for programming ATTINY’s and using them. First, let’s do Arduino. I also have used some other interfaces, like TI’s, but have not found any as fast to use.
Install Arduino, the attiny hardware (into the arduino folder, or use the board manager) and the ftdi drivers (in our case I had a little trouble because the normal ftdi drivers didn’t work and I had to also download some particular to the cp2102 board, but a quick trip to google found them. Jeff figured out that that was the issue, yay).
Make your board blink
Using the arduino IDE and the FabISP to program my whale circuit. My board has three LED’s (well, one rgb). So I made it blink, red, pink, blue, yellow, green, by overlapping when each turned on with simple writing HIGH then LOW to each of the three pins in turn.
Use a button
Just like the LED, I used arduino. This time I made my whale board blink when the button was not pressed and stop when I pressed it. The default button code using a button object and an if else statement was enough.
Use key inputs
This again required more software to make the serial connection work. You don’t have to change what serial port Arduino is pointing to, though it would make sense if you did, because the serial is coming through the ftdi cable, and the programming is going on via the hedgehog-FabISP plugged into a different port altogether.
To do this you can use, like I did, arduino IDE again. I did run into trouble this time. I tried to load both the serial communication libraries called in the header of the the example-softwareSerial as well as using strings. Apparently that’s already over the 5kb max for a program on my ATTINY. Yikes! I had wanted to type “blue” “green” etc and have it light up that particular color, or mix of colors. I didn’t feel like doing a loop and checking for each char, so instead I just did single letters. So, now typing letters make it blink once per letter. And the button enters text.
I also had some very weird troubles with the baud rates. Even when they matched if I was using a slower baud rate it would get the first letter right and then mess up subsequent letters in the same message. But when I used 19200 sending and receiving and it worked. I’m still not sure why! But it’s an interesting mystery.


Microcontroller
So, this week we also read through the huge long novel that is the microcontroller data sheets for the ATtiny44 and ATtiny45s. It's awesome, but super long. seeing some of the analog response graphs were pretty interesting! It's also neat to be able to find the clock speed and other basic, useful data. I noticed that a lot of the most basic data was grouped right at the begining, which is handy of course. And it's always interesting to read about what kinds of arithmatic somethings supports. The data sheets also tell you if there are a couple timers instead of just one and which pins are on which timers, which is neat. The most amusing (but useful!) piece of data was that the failure rate of the data on the chip is 1ppm after 100 years at about room temperature, but 1ppm after just 20 years at 85C. Well, actually it says, "much less than 1ppm" so that may even be meaningless data, but still, you'd hope they were comparing times at a comparable failure rate.
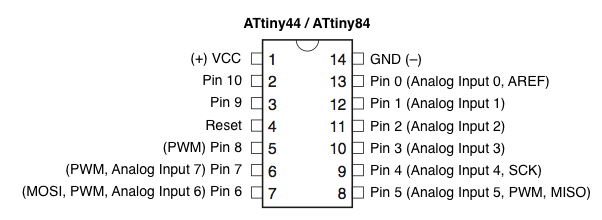
A very useful graphic from highlowtech, showing which pins to program on that correspond with the hardware pin positions.
Downloadables:
Find the instructions and files for making the board in week 6! And here is some blinking/button code for multiple colors (red, green, blue, white, and purple) also prints Hi! with button pressing.