-
01. Principles and practices
-
02. Project management
-
03. Computer-Aided design
-
04. Computer controlled cutting
-
05. Electronics production
-
06. 3D Scanning and printing
-
07. Electronics design
-
08. Computer controlled machining
-
09. Embedded programming
-
10. Input devices
-
11. Applications and implications
-
12. Output devices
-
13. Interface and application programming
-
14. Invention, intellectual property and income
-
15. Networking and communications
-
16. Molding and casting
-
17. Wildcard week
-
18. Machine design
-
19. Project development
-
Glossary
Week 12. Output devices
April 22, 2020
Assignment
Group assignment
- Measure the power consumption of an output device
Individual assignment
- Add an output device to a microcontroller board you've designed, and program it to do something
Individual assignment
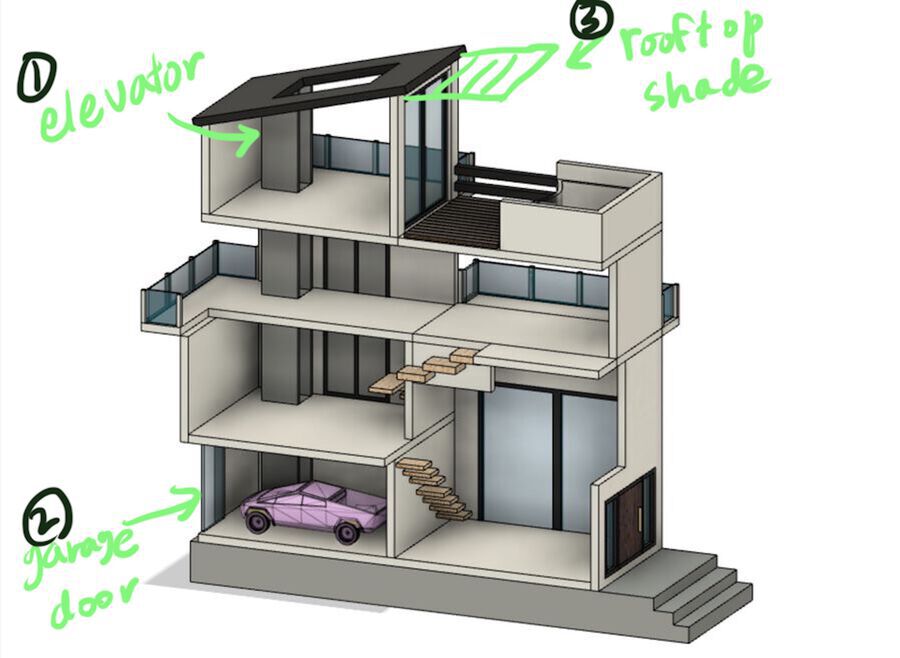
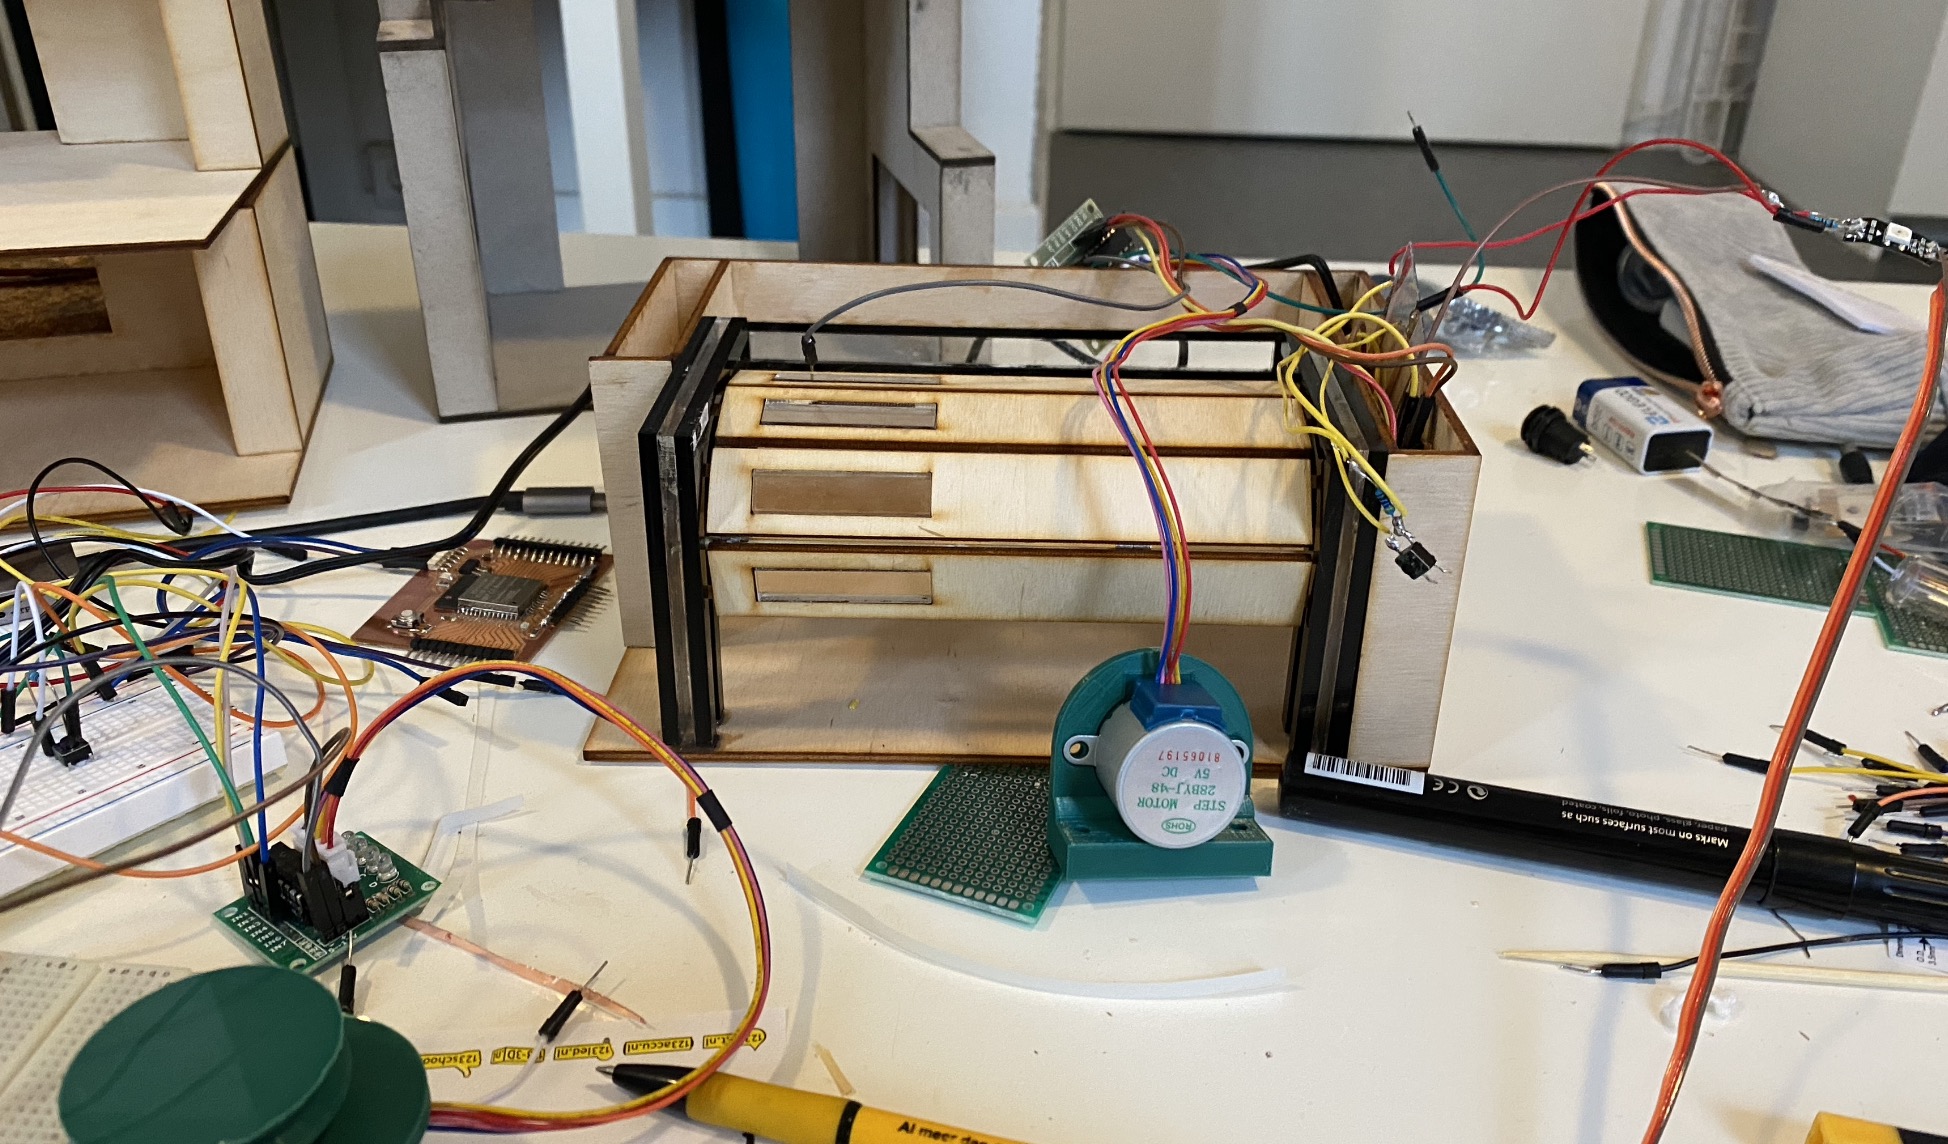
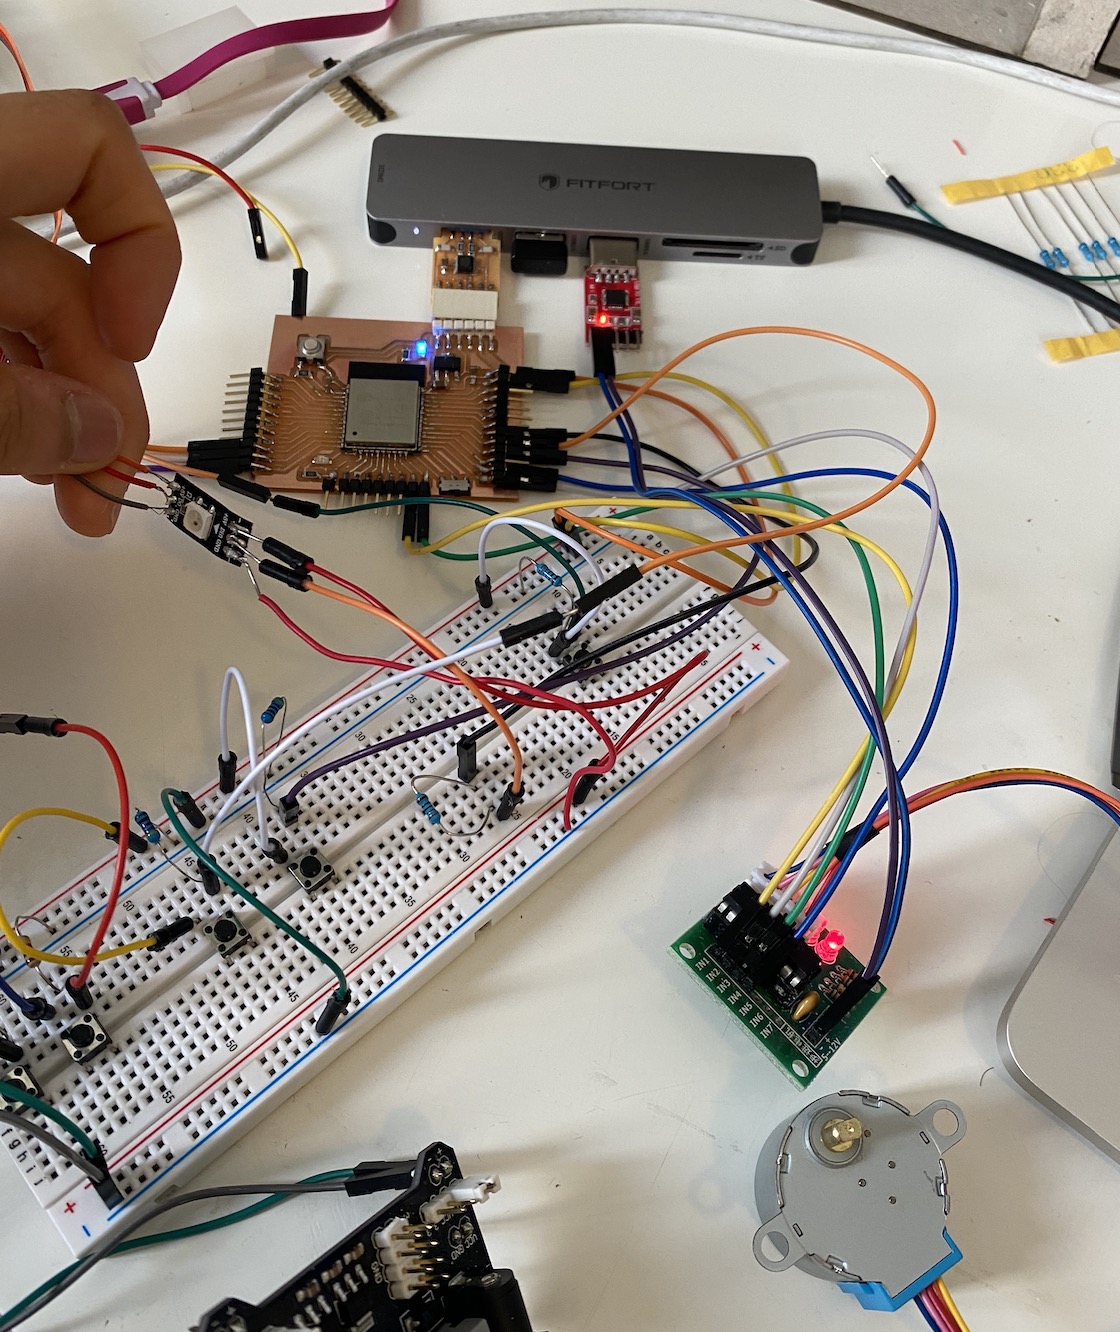
This week, I played with a 28BYJ-48 stepper motor and a ULN2003 driver. For my final project, I will use at least 3 stepper motors for the elevator, garage door and rooftop shade.
The 28BYJ-48 motor was good for playing around this week, but I think I will need a stronger motor than this for my final project. The motor torque was a little weak, so sometimes it struggled when the weight of the object was a little heavy. Also, the speed only goes upto 10-15 rpm which is pretty slow.
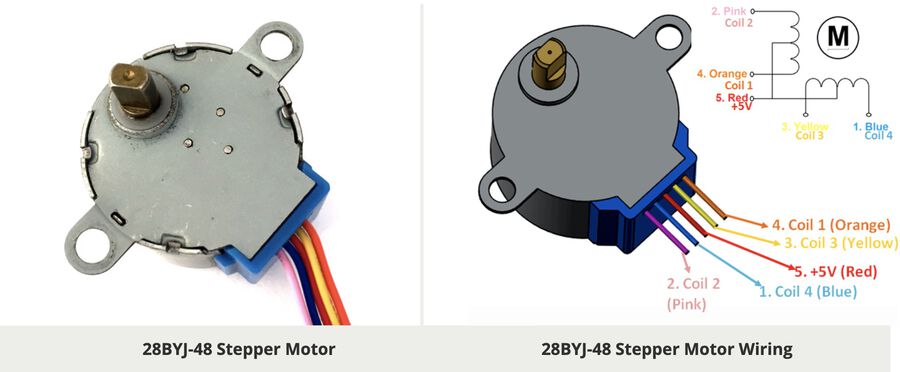
28BYJ-48 stepper motor
This Motor has a total of four coils. One end of all the coils is connected to +5V (red) wire and the other end of each coil is pulled out as wire colors Orange, Pink, Yellow and Blue respectively. You should supply +5V to this wire, and this voltage will appear across the coil that is grounded.
- Rated Voltage: 5V DC
- Number of Phases: 4
- Stride Angle: 5.625°/64
- Pull in torque: 300 gf.cm
- Insulated Power: 600VAC/1mA/1s
- Coil: Unipolar 5 lead coil
This is one of the most commonly used stepper motors. This motor runs only on 5V and hence cannot provide high torque, for high torque application you should consider the Nema17 motors. If you are looking for a compact easy to use stepper motor with decent torque then this motor is the right choice for you. This stepper motor consumes high current and hence a driver IC like the ULN2003 is mandatory.
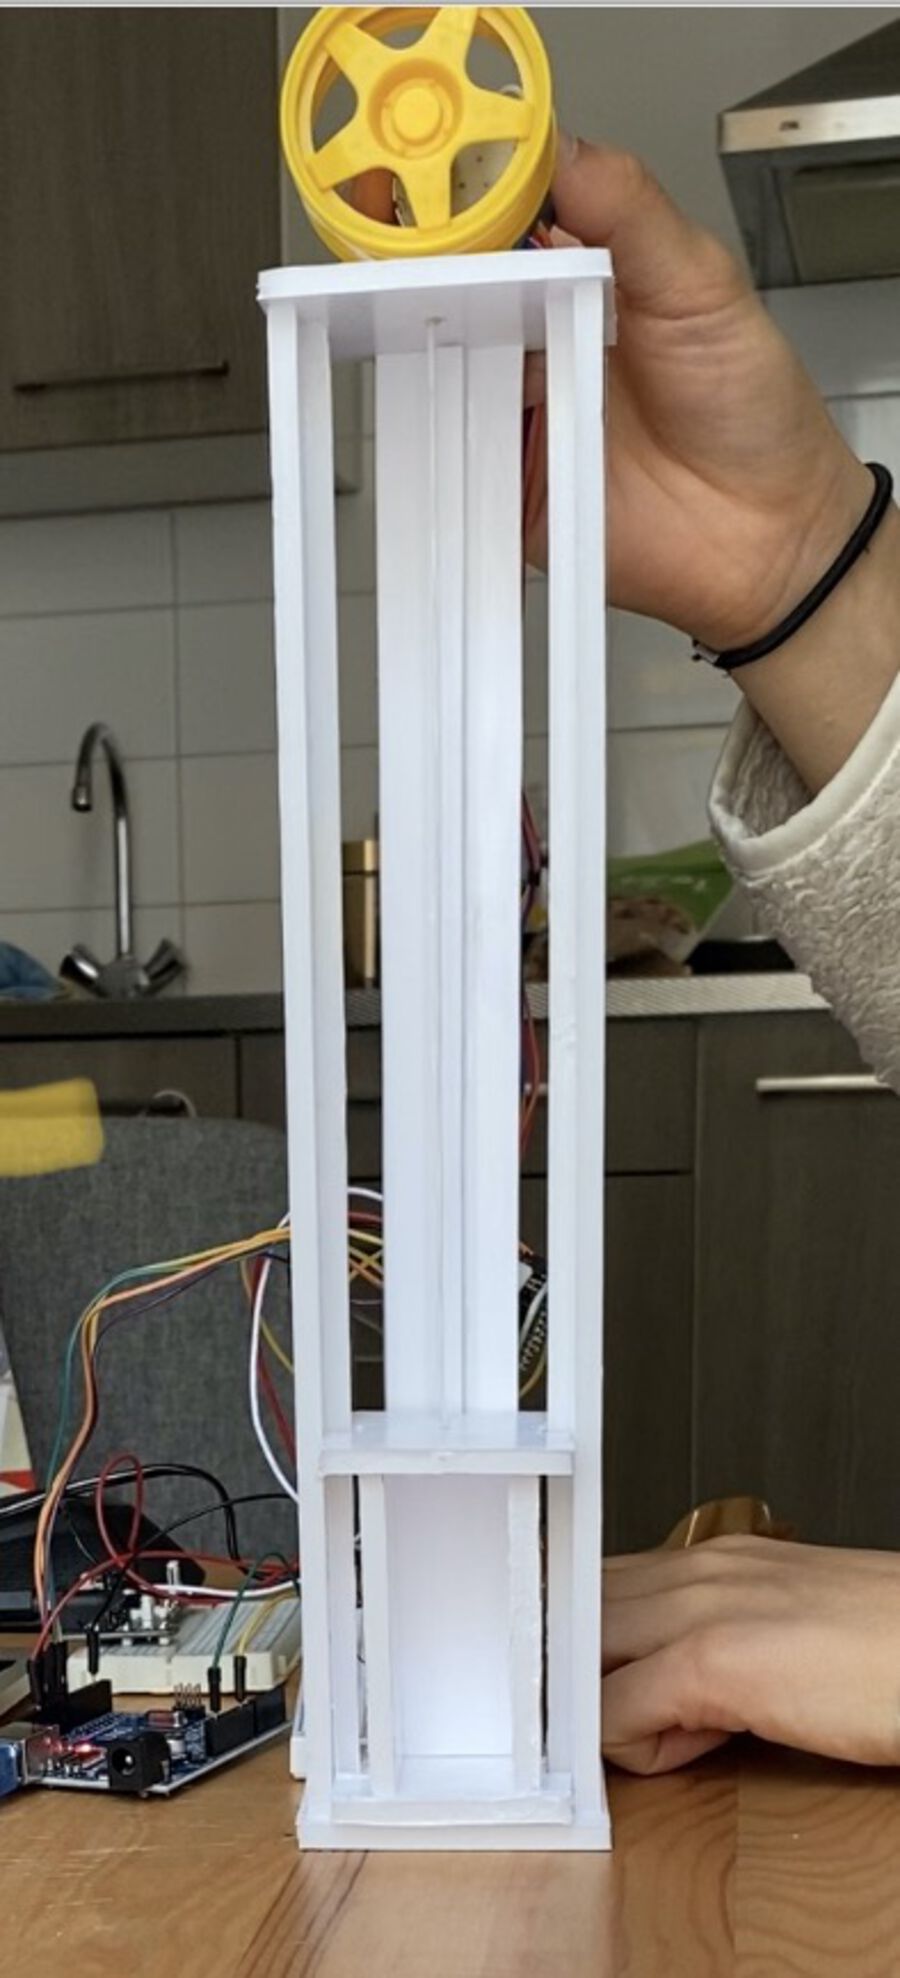
Stepper motor test 1. Elevator
After getting used to how to use the stepper motor, I decided to make something for my final project. First, I made an elevator with some foam boards and (unused!!!) dental floss. And I connected the string to the yellow wheel which was connected to the stepper motor.
Then, I set up an Arduino board, the stepper motor, and driver like the sketch below.
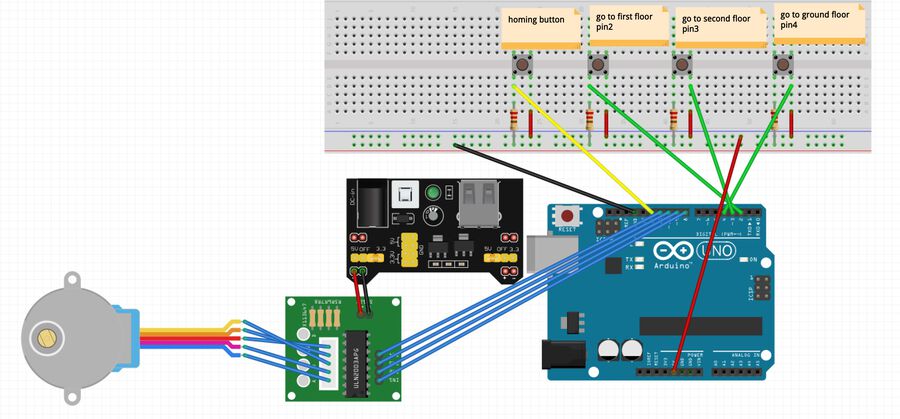
As you can see, I placed 4 buttons. The buttons were for setting the home of the elevator, and moving it to the first floor, the second floor and the ground floor. I used a button to manually home the elevator this time, but I will use either a limit switch or hall effect sensor for the final project. I also used the AccelStepper library and it worked well.
// Include the AccelStepper Library
#include <AccelStepper.h>

// Define step constants
#define FULLSTEP 4
#define HALFSTEP 8

// Define Motor Pins (2 Motors used)

#define motorPin1  8   // 28BYJ48 pin 1
#define motorPin2  9   // 28BYJ48 pin 2
#define motorPin3  10  // 28BYJ48 pin 3
#define motorPin4  11  // 28BYJ48 pin 4


AccelStepper stepperX(HALFSTEP, motorPin1, motorPin3, motorPin2, motorPin4);

// Define the Pins used

#define firstFloor  2
#define secondFloor  3
#define groundFloor  4
#define homingBtn 12

// Stepper Travel Variables
long TravelX;  // Used to store the X value entered in the Serial Monitor
int move_finished = 1; // Used to check if move is completed
long initial_homing = -1; // Used to Home Stepper at startup

long debouncing_time = 500; //Debouncing Time in Milliseconds
volatile unsigned long last_micros;

bool runToFirstFloor = false;
bool runToSecondFloor = false;
bool runToHome = false;


void setup() {
  Serial.begin(9600);  // Start the Serial monitor with speed of 9600 Bauds

  pinMode(homingBtn, INPUT_PULLUP);
  pinMode(firstFloor, INPUT_PULLUP);
  pinMode(secondFloor, INPUT_PULLUP);
  pinMode(groundFloor, INPUT_PULLUP);

  delay(5);  // Wait for EasyDriver wake up

  //  Set Max Speed and Acceleration of each Steppers at startup for homing
  stepperX.setMaxSpeed(1000.0);      // Set Max Speed of Stepper (Slower to get better accuracy)
  stepperX.setAcceleration(200);  // Set Acceleration of Stepper


  // Start Homing procedure of Stepper Motor at startup

  Serial.print("Stepper is Homing . . . . . . . . . . . ");

  stepperX.setCurrentPosition(0);  // Set the current position as zero for now
  stepperX.setMaxSpeed(1000.0);      // Set Max Speed of Stepper (Slower to get better accuracy)
  stepperX.setAcceleration(200);  // Set Acceleration of Stepper
  initial_homing = 1;

  while (!digitalRead(homingBtn)) { // Make the Stepper move CW until the switch is deactivated
    stepperX.moveTo(initial_homing);
    stepperX.run();
    initial_homing--;
    delay(5);
  }

  stepperX.setCurrentPosition(0);
  Serial.println("Homing Completed");
  Serial.println(stepperX.currentPosition());
  stepperX.setMaxSpeed(1000);      // Set Max Speed of Stepper (Faster for regular movements)
  stepperX.setAcceleration(200);  // Set Acceleration of Stepper
  delay(2000);
}

void loop() {
  if (!runToHome) {
    runToHome = digitalRead(groundFloor);
  }

  if (!runToFirstFloor) {
    runToFirstFloor = digitalRead(firstFloor);
  }

  if (!runToSecondFloor) {
    runToSecondFloor = digitalRead(secondFloor);
  }


  if (runToFirstFloor) {
    runToSecondFloor = false;
    runToHome = false;

    Serial.println(stepperX.currentPosition());
    stepperX.moveTo(2850);
    if ((stepperX.distanceToGo() != 0)) {
      stepperX.run();  // Move Stepper into position
    } else {
      runToFirstFloor = false;
    }
  } else if (runToSecondFloor) {
     runToFirstFloor = false;
    runToHome = false;
    Serial.println(stepperX.currentPosition());
    stepperX.moveTo(5700);
    if ((stepperX.distanceToGo() != 0)) {
      stepperX.run();  // Move Stepper into position
    } else {
      runToSecondFloor = false;
    }
  } else if (runToHome) {
     runToFirstFloor = false;
     runToSecondFloor = false;

    Serial.println(stepperX.currentPosition());
    stepperX.moveTo(0);
    if ((stepperX.distanceToGo() != 0)) {
      stepperX.run();  // Move Stepper into position
    } else {
      runToHome = false;
    }
  }
}
The video below is 4 times sped up. I like this stepper motor because it doesn't need that much voltage, but the big downside is that it's too slow. The motor torque was enough for lifting the foam board elevator, but it probably won't be able to lift the elevator made with heavier material like wood.
Stepper motor test 2. Garage door
Furthermore, I designed a simple garage and the door with rails. Since our lab was still locked down, our instructor, Henk, 3D-printed the rails on my behalf :). I bought other materials from a hardware store nearby. Like the elevator, I made the outside body of the garage with the foam board. The board I used for this was the Arduino Uno board.
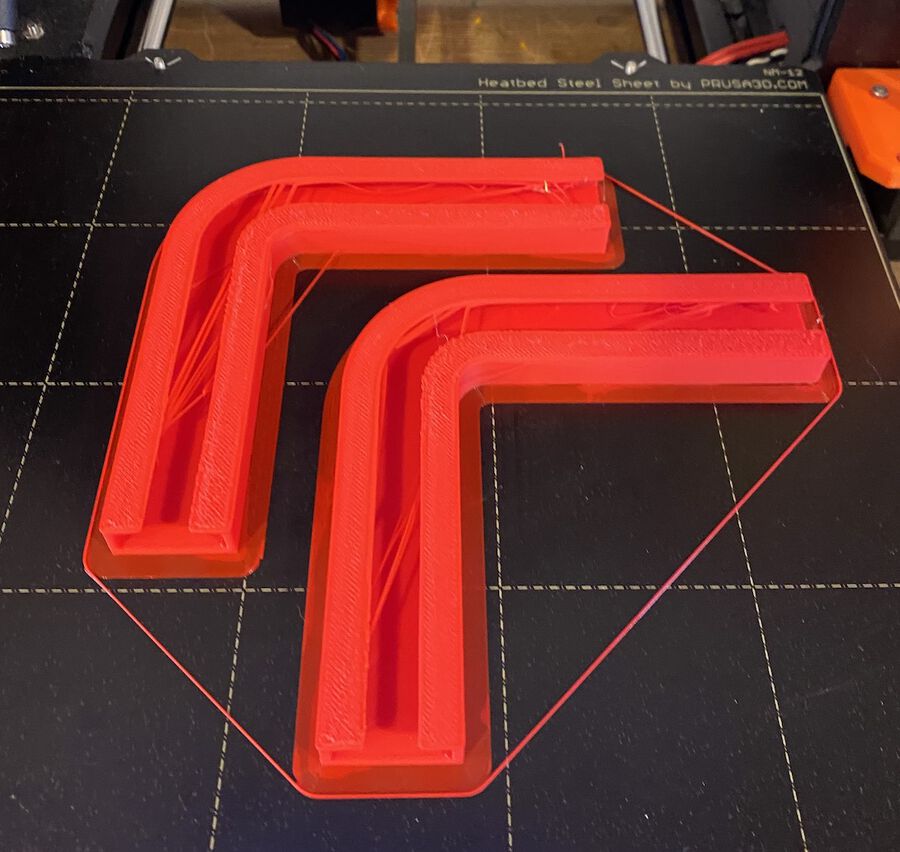
Because I didn't add support for the 3D model when I sliced it, there were some overhangs inside of the rails. I had to scrape them out because the wheel I made kept getting stuck on them.
// Include the AccelStepper Library
    #include <AccelStepper.h>

    // Define step constants
    #define FULLSTEP 4
    #define HALFSTEP 8

    // Define Motor Pins (2 Motors used)

    #define motorPin1  8   // 28BYJ48 pin 1
    #define motorPin2  9   // 28BYJ48 pin 2
    #define motorPin3  10  // 28BYJ48 pin 3
    #define motorPin4  11  // 28BYJ48 pin 4


    AccelStepper stepperX(HALFSTEP, motorPin1, motorPin3, motorPin2, motorPin4);

    // Define the Pins used

    #define openButton  2
    #define closeButton  3

    #define homingBtn 12

    // Stepper Travel Variables
    long TravelX;  // Used to store the X value entered in the Serial Monitor
    int move_finished = 1; // Used to check if move is completed
    long initial_homing = -1; // Used to Home Stepper at startup

    long debouncing_time = 500; //Debouncing Time in Milliseconds
    volatile unsigned long last_micros;

    bool openDoor = false;
    bool closeDoor = false;


    void setup() {
      Serial.begin(9600);  // Start the Serial monitor with speed of 9600 Bauds

      pinMode(homingBtn, INPUT_PULLUP);
      pinMode(openButton, INPUT_PULLUP);
      pinMode(closeButton, INPUT_PULLUP);

      delay(5);  // Wait for EasyDriver wake up

      //  Set Max Speed and Acceleration of each Steppers at startup for homing
      stepperX.setMaxSpeed(1000.0);      // Set Max Speed of Stepper (Slower to get better accuracy)
      stepperX.setAcceleration(200);  // Set Acceleration of Stepper


      // Start Homing procedure of Stepper Motor at startup

      Serial.print("Stepper is Homing . . . . . . . . . . . ");

      stepperX.setCurrentPosition(0);  // Set the current position as zero for now
      stepperX.setMaxSpeed(1000.0);      // Set Max Speed of Stepper (Slower to get better accuracy)
      stepperX.setAcceleration(200);  // Set Acceleration of Stepper
      initial_homing = 1;

      while (!digitalRead(homingBtn)) { // Make the Stepper move CW until the switch is deactivated
        stepperX.moveTo(initial_homing);
        stepperX.run();
        initial_homing--;
        delay(5);
      }

      stepperX.setCurrentPosition(0);
      Serial.println("Homing Completed");
      Serial.println(stepperX.currentPosition());
      stepperX.setMaxSpeed(1000);      // Set Max Speed of Stepper (Faster for regular movements)
      stepperX.setAcceleration(200);  // Set Acceleration of Stepper
      delay(2000);
    }

    void loop() {

      if (!openDoor) {
        openDoor = digitalRead(openButton);
      }

      if (!closeDoor) {
        closeDoor = digitalRead(closeButton);
      }


      if (openDoor) {
        closeDoor = false;

        Serial.println(stepperX.currentPosition());
        stepperX.moveTo(1000);
        if ((stepperX.distanceToGo() != 0)) {
          stepperX.run();  // Move Stepper into position
        } else {
          openDoor = false;
        }
      } else if (closeDoor) {
         openDoor = false;
        Serial.println(stepperX.currentPosition());
        stepperX.moveTo(0);
        if ((stepperX.distanceToGo() != 0)) {
          stepperX.run();  // Move Stepper into position
        } else {
          closeDoor = false;
        }
      }
    }
The code for the garage isn't that different from the elevator code. I will use either a hall effect sensor or limit switch for homing the garage door just like the elevator. The video below is also 3 times sped up since the motor went really slow. It's hard to see on the video, but the motor is on the back side of the object. I couldn't fix it onto something, so I had to hold it while taking the video.
It worked fine, but there was one issue. Before, when the motor rotated the reverse direction to release the string attached to the garage door, the door didn't go down. It was because the foam board door wasn't heavy enough to beat the friction between the rails and the wheels. To fix that, I added some heavy stuff on the backside bottom part of the door. This quick fix worked and the door went down when the string was released.
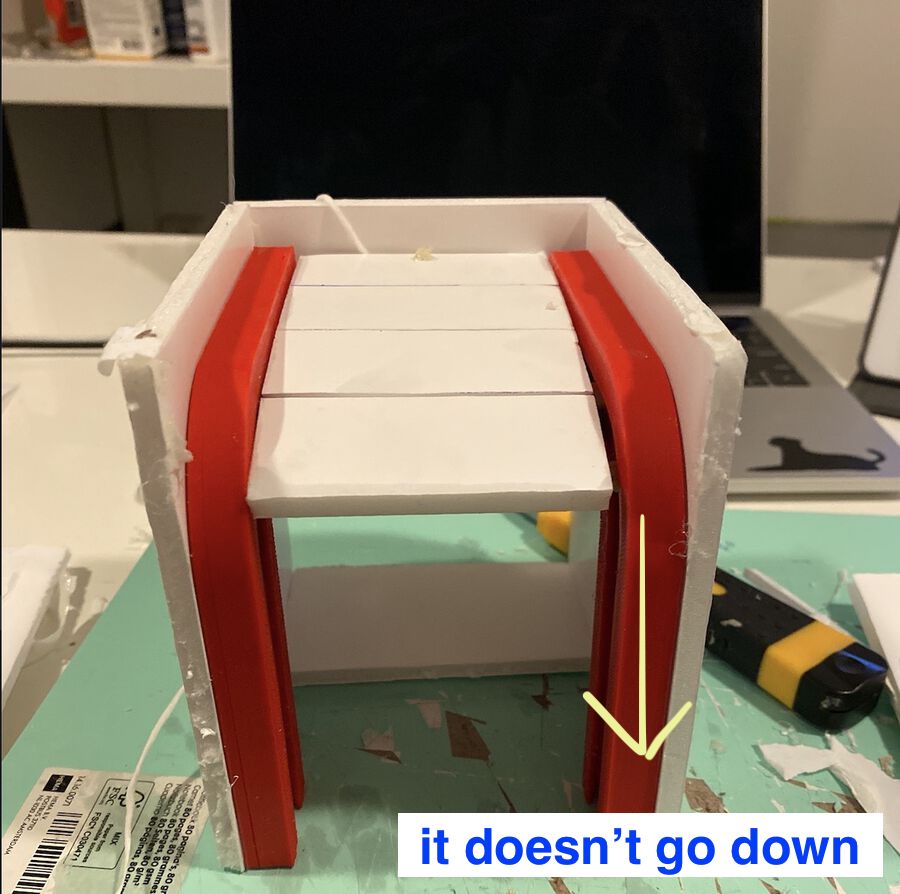
But I still couldn't open the door all the way, because if I did, the door would never go down even with the weight. I needed a better solution than relying on gravity.
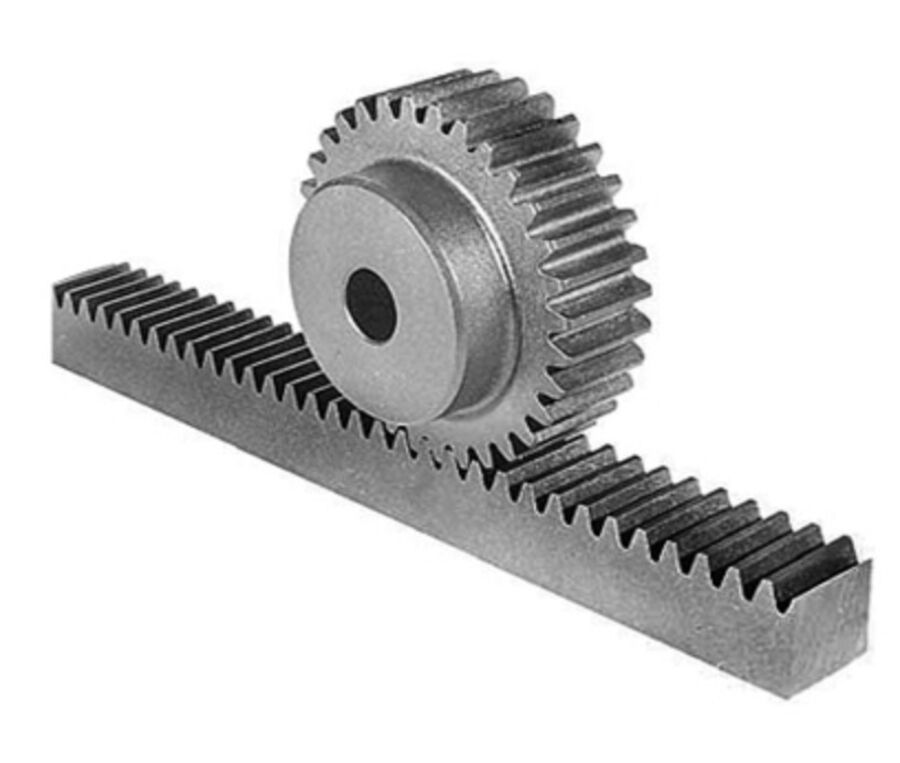
One solution I'm considering now is adding a gear rack to the rails and replacing the wheels with gears. This way, I think I can control the movement of the door with the motor better. I'll have to give more thought to it.
A stepper motor controller with ATtiny1614
Motor Drivers vs. Motor Controllers
I wanted to know what the difference between a motor driver and a motor controller is. The TLDR is that a motor driver simply handles the power to drive the motors, whereas the logic and digital control has to be done by an external microcontroller or microprocessor, whereas a motor controller has all of the logic circuitry built in and can be controlled by a higher-level interface such as a PWM signal, USB, analogue input etc…
Motor drivers
An H-bridge is the most common way to drive a brushed DC motor, and its operation is quite simple. It uses two pairs of transistors (usually MOSFETS) to control the direction that current is allowed to flow through the motor. By changing the direction of the current flow (reversing the voltage across the terminals), the direction of rotation will change.
Motor controllers
The idea of a motor controller is that you can just wire up your motor and power supply, drop the controller into an existing project, and communicate with it as easily as the protocol allows for.
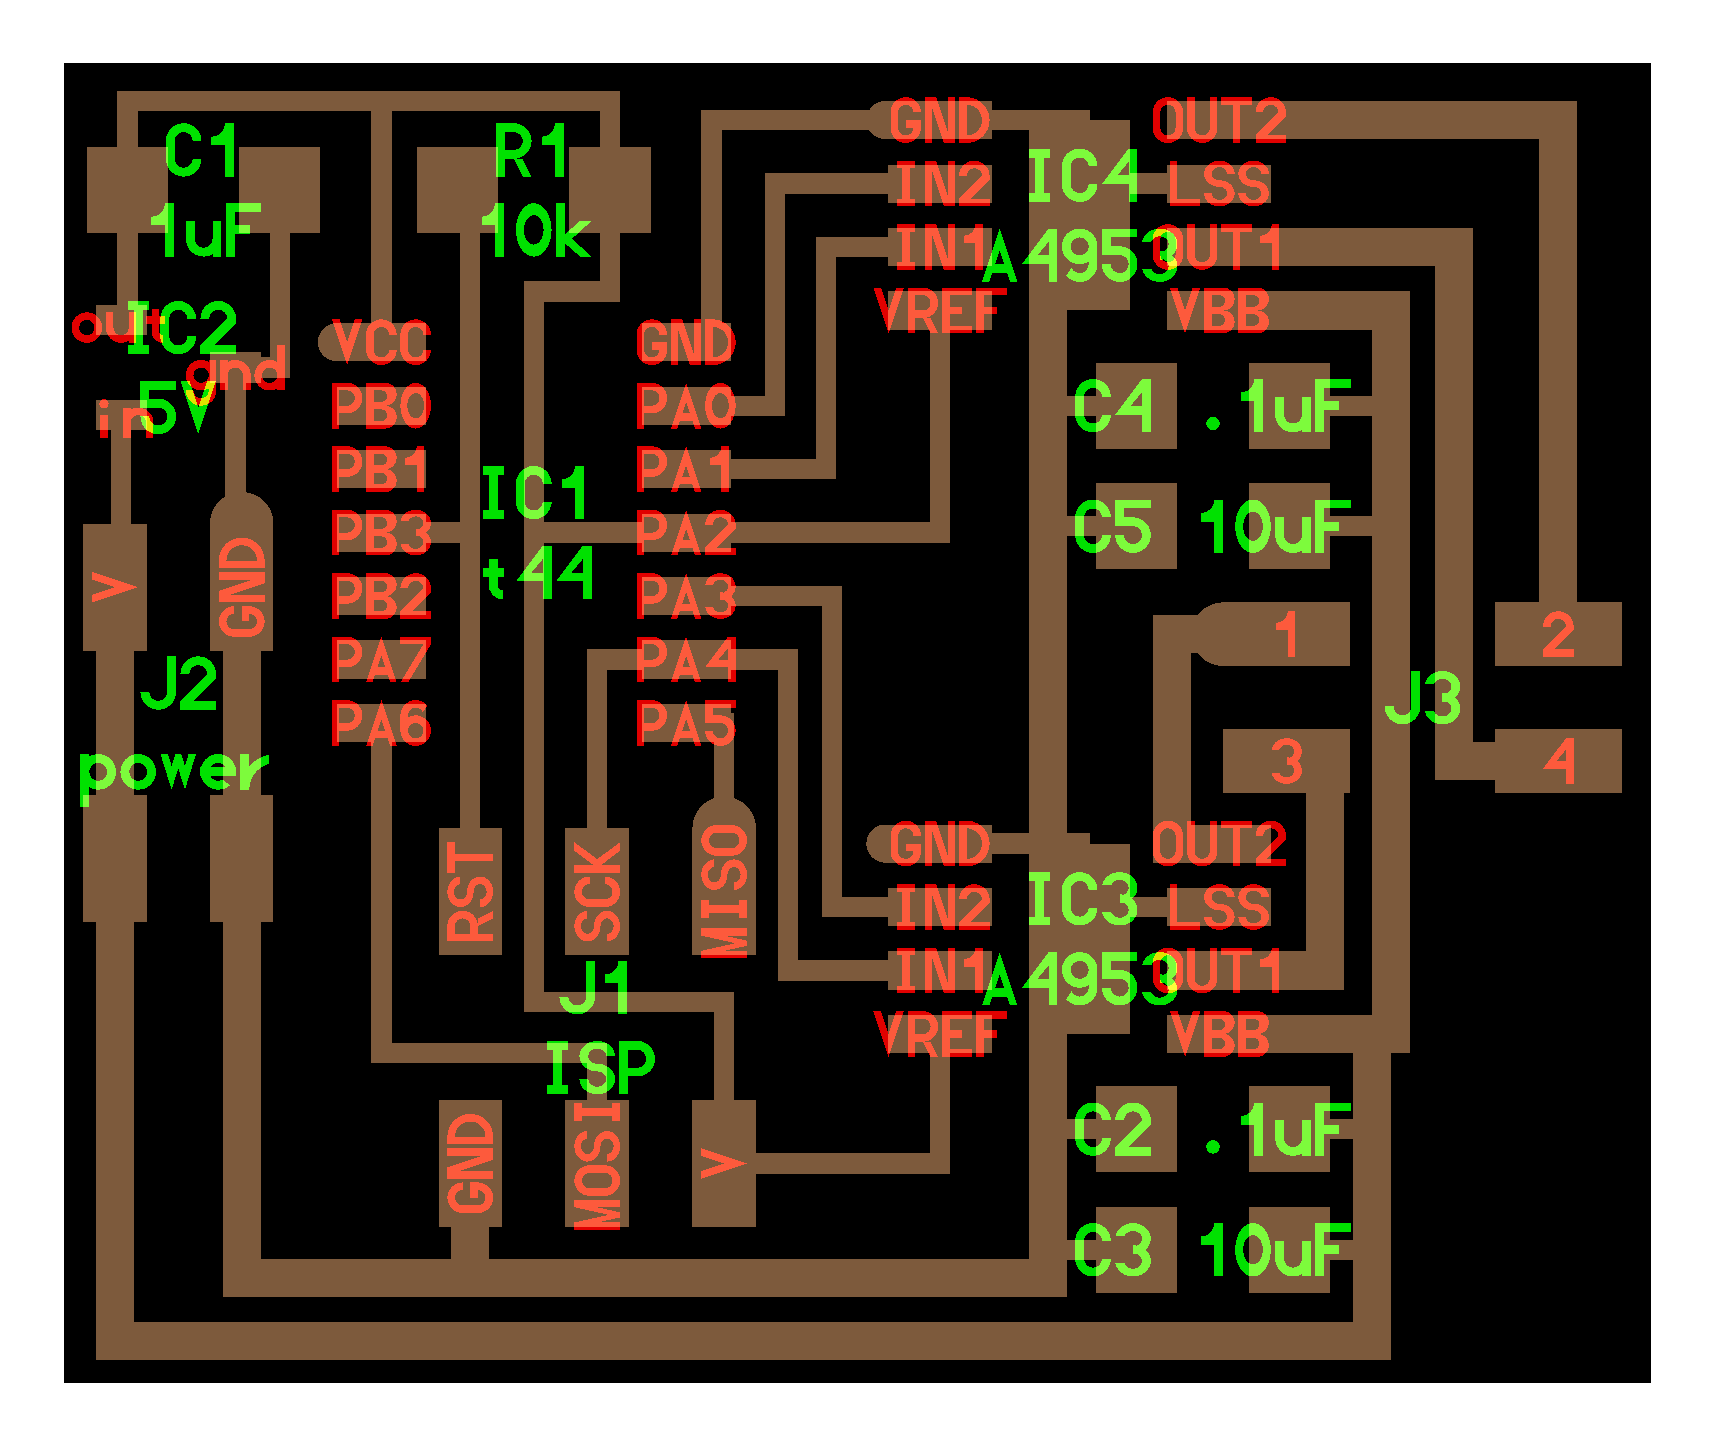
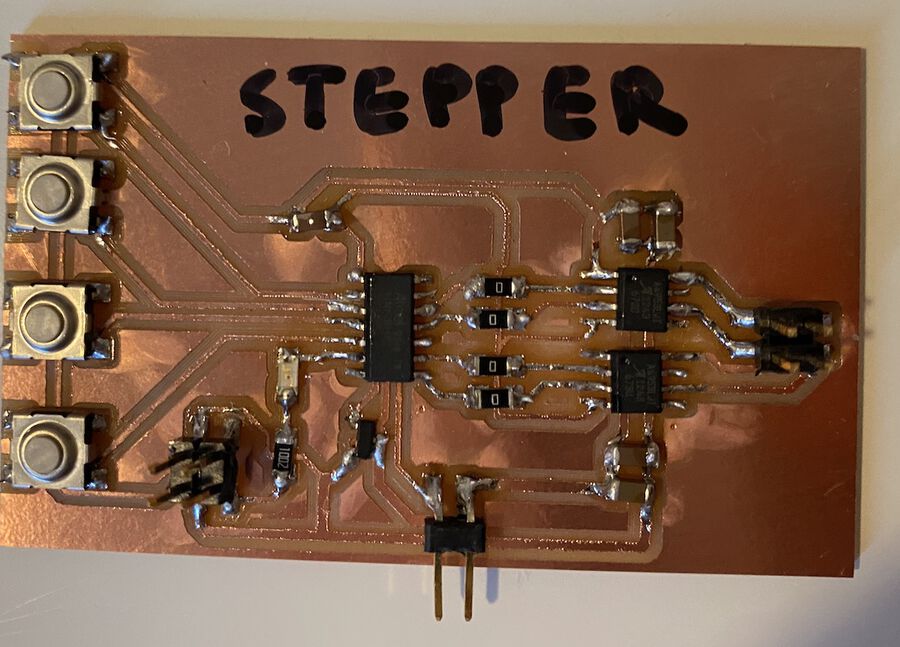
After experimenting with the ULN2003 stepper motor and driver and an Arduino, I designed a stepper motor controller using 2 H-bridges and an ATtiny1614 based on the hello stepper bipolar board. My goal was to make a board for the elevator, so I also added 4 buttons on the board.
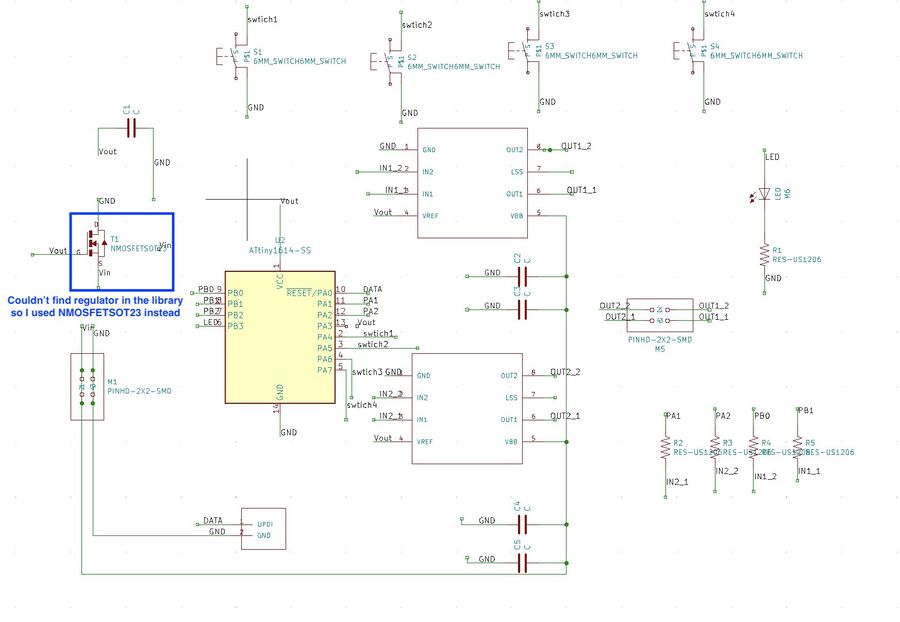
I couldn't find the 5V voltage regulator symbol on the fab library, so I used NMOSFETSOT23 instead.
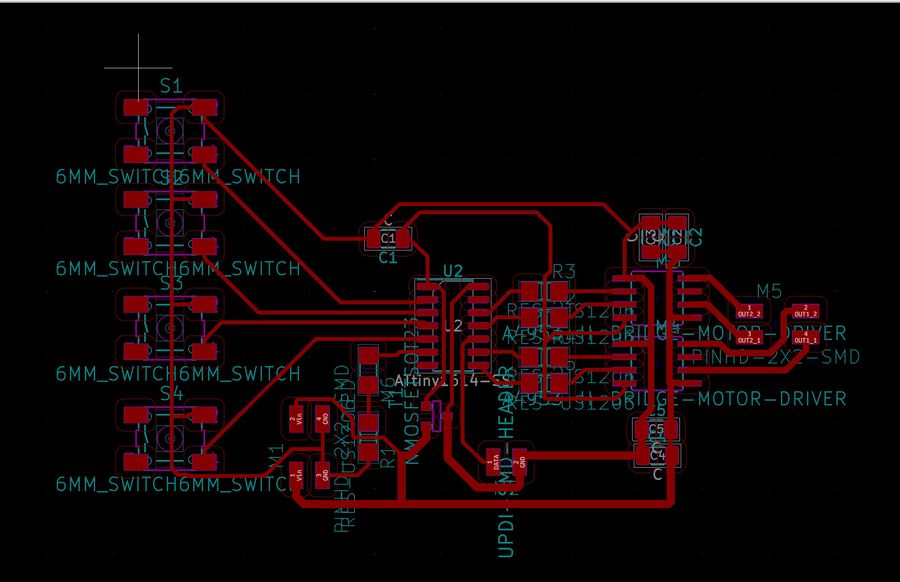
I also added an LED to indicate if the motor is running or not. Henk, again, milled the board for me, and I soldered it at home. I haven't programmed it yet though.
It turned out the motor I had(28BYJ-48) is an unipolar motor, but the board I made was for bipolar. So I couldn't get it work with this motor.
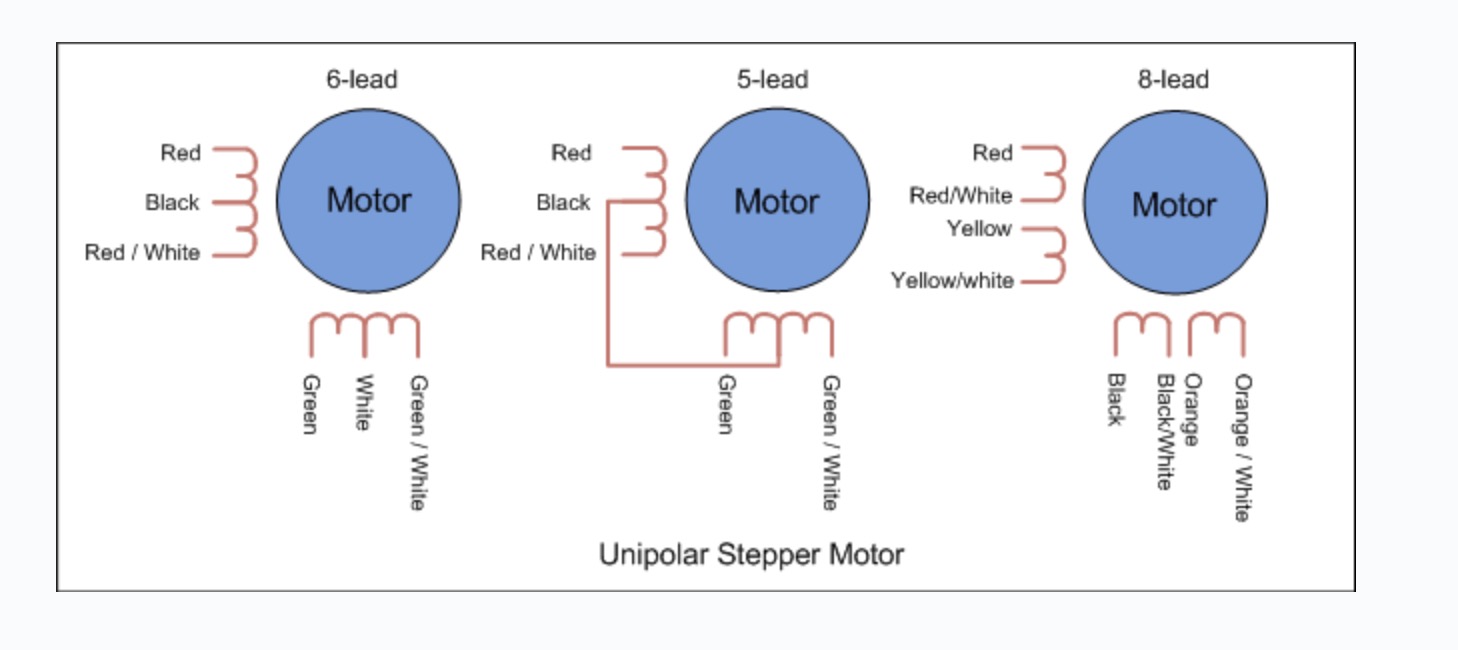
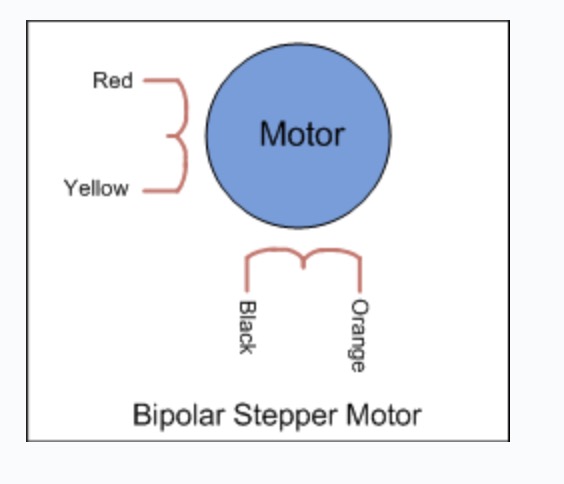
The unipolar stepper motor operates with one winding with a center tap per phase. Each section of the winding is switched on for each direction of the magnetic field. With bipolar stepper motors, there is only a single winding per phase. The driving circuit needs to be more complicated to reverse the magnetic pole, this is done to reverse the current in the winding.
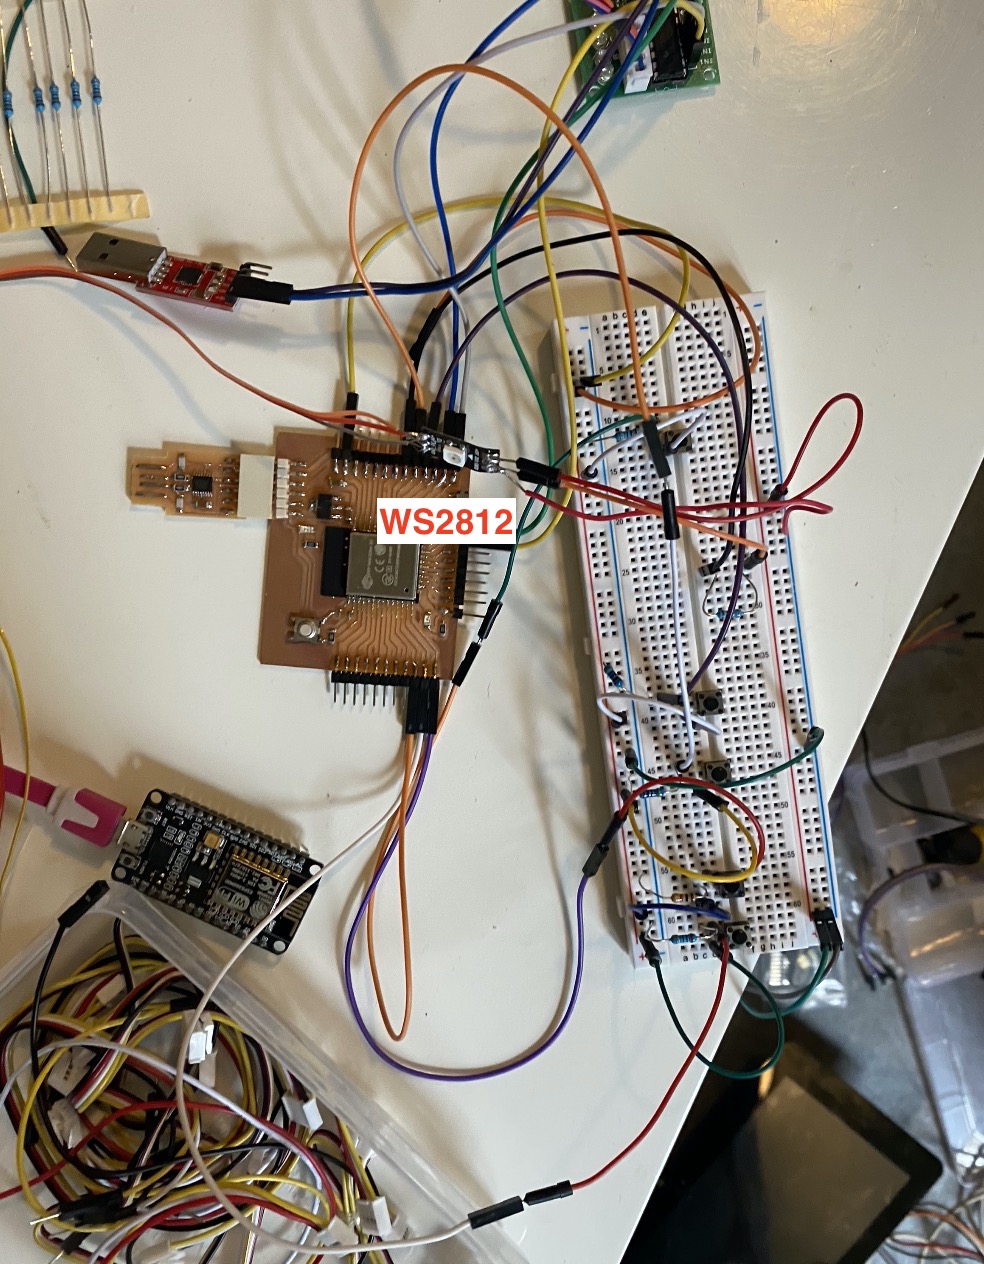
An ESP-WROOM-32 board with WS2812 and stepper motor
For the final project, I used a stepper motor and ws2812 with the board I made.
With stepper motor
With WS2812
Group assignment
For this week's group assignment, we measured the power consumption of a 28BYJ-48 stepper motor and SSD1306 128x64 OLED. Since we couldn't meet up at the lab, we had to use our own multimeters to measure it. The detailed group assignment document can be found here.