13. Interface and application programming
- This week I designed the app Which I will use in my Final project by using it to receive DHT11 Sensor values as Required in the Final Project.
Objective of the Design
-
I intend to design a smartphone application that will act as a UI to receive Humidity and temperature values from a DHT11 sensor to my smartphone, through Bluetooth connection.
-
The application should have space where I can type a command to request the data and also a button where I can click and delete old data. The application shall be designed using MIT App Inventor Website.
-
I will be using Arduino board as the processor and DHT11 sensor in order to receive the humidity and temperature values.
-
The sensor values from DHT11 are processed by the Arduino board using one wire interface and the Arduino shares them using serial Port to the HC-06 Bluetooth Module which sends them to the smartphone by using Bluetooth connection with help of the smartphone application to be designed.
-
The data frame shared between the mobile app and the Bluetooth module uses the Bluetooth Data Frame.
Application design
- The application was designed through MIT App Inventor Website which helps develop applications for Android smartphones.
- After opening the website I went to Create Apps! and logged in with my email, Next, I went to My Projects>Start Project then I started First by designing the UI elements as shown in the image below, First I created Three horizontal arrangements by going to Layout >Horizontal Arrangement This creates three spaces where I can put what I want to be shown in the space on the UI. For example in the first Hozintal space I put a listpicker which would allow me to select from a list of Bluetooth devices, I did this by going to User Interface>Listpicker and named it Bluetooth devices. After this in the Second Hozintal space I put there a TextBox , a Button which I named send and an extra Button called Clear. Lastly, In the last Horizontal space, I put a Label field which would allow me to receive printed text there. To complete the first design stage we need to add nonvisible components which are the ones that offer our UI some features like Bluetooth connectivity. In my case I added Bluetooth client by going to connectivity> Bluetooth client because I needed to send and receive messages via Bluetooth, next I added the Clock by going to Sensors > Clock and set the time interval to 100 ms because to receive Data we need to define the time interval that the receiver should expect a new message.
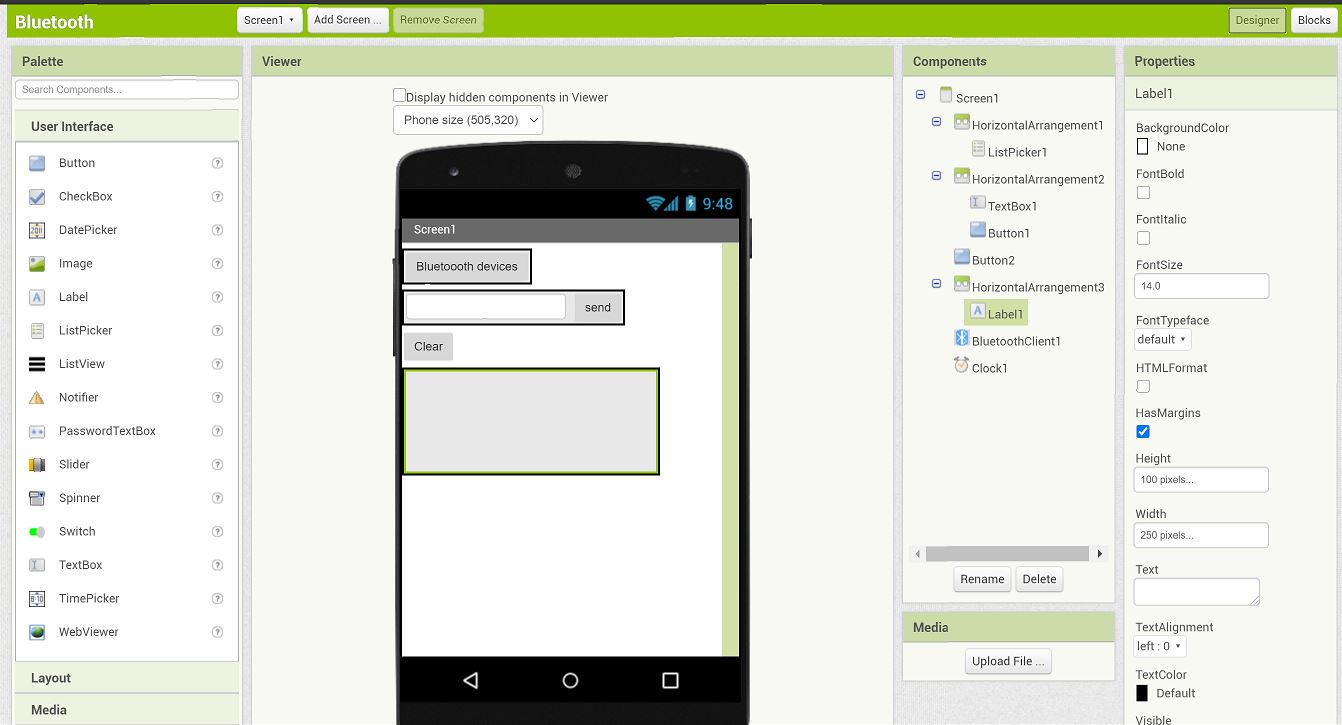 MIT App inventor
-
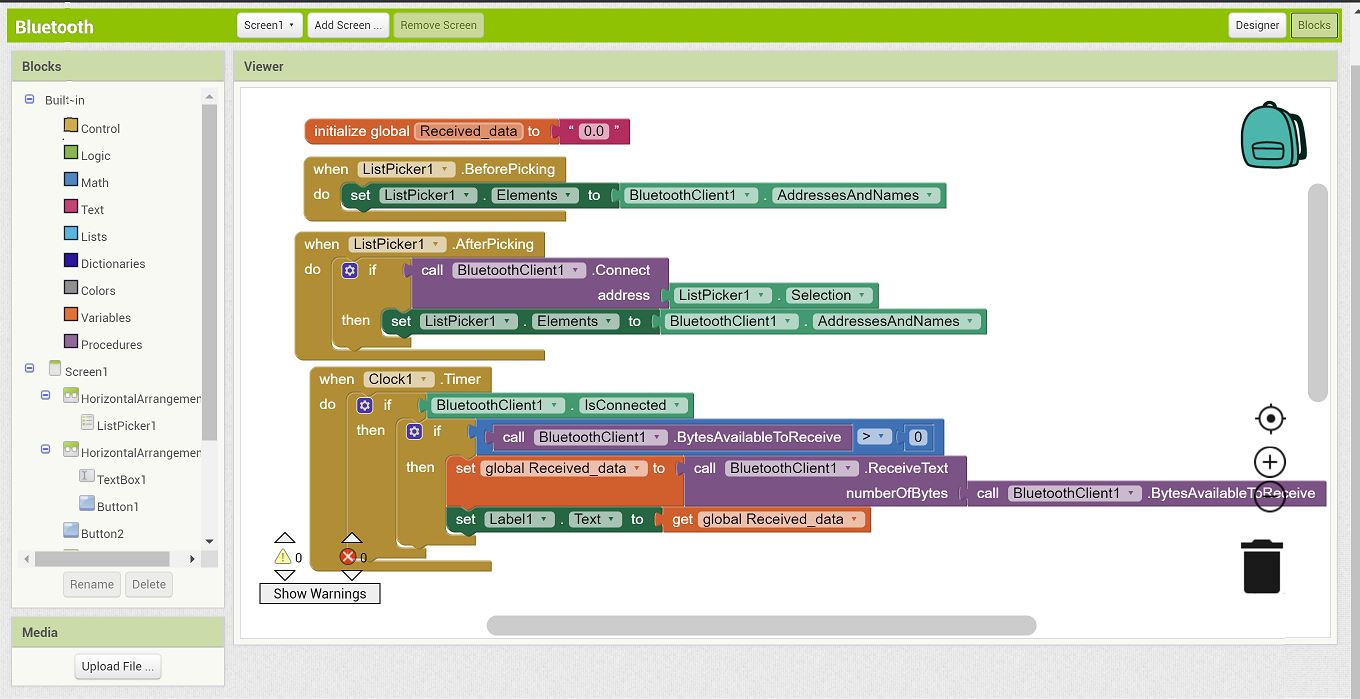
The Last step is to do the Block Coding so that the UI functionality is defined. As shown in the pictures below, First I started by defining a global variable Received_data and then initialized it to zero as nothing is received yet. Next, I proceeded to design the code for the previously selected listpicker and the Bluetooth client allows me to see available Bluetooth devices(Addresses and names), then after a device is picked (AfterPicking as shown in the block) then the specific Bluetooth device should be connected to.
-
Next I designed the Block code for the Clock and as shown in the picture after every set interval of time (100 ms in my case) if the Bluetooth client is connected and the message bytes received is greater than 0 then the Global variable Received_data is set to those bytes received and the Label field prints these values stored in Received_data variable.
-
I also design what the Buttons send and clear do. For the send button when clicked and the Bluetooth client is connected then the Bluetooth client Sends the Text in the TextBox . For the Button Clear when clicked it sets the TextBox to empty field.
-
After the App was fully designed I went to Build>save as .apk to my computer and the .apk file was saved in the computer which I then Installed in my smartphone to use.
 Blockcoding
 Blockcoding 2
 -
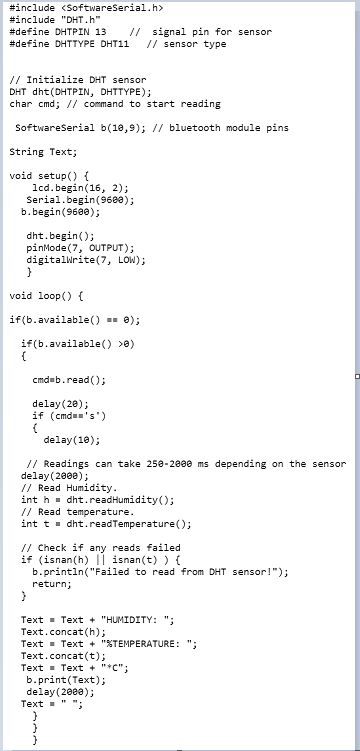
To verify if the app work I used the connection setup below where I connected the HC06 Bluetooth module and DHT11 sensor to the Manufactured Board and used the code shown below.

Connection setup
Program
- The Bluetooth module’s Tx and Rx pins are connected to PC3 and PC2 pins of ATmega 328 and the DHT11 sensor is connected to the PB1 pin Detailed schematic can be viewed here.
- The Bluetooth part of the program was mostly from here. In the program, I use 2 libraries. SoftwareSerial.h which allows me to make use of a software serial communication by using any digital pins on the Atmega and DHT.h which handles the single-wire communication used by the DHT11 sensor and allows us to use simple functions like dht.readTemperature() to read the temperature.
- My program is structured such that the Bluetooth app Values can also be read from a smartphone by the letter s in the text field of the UI (as shown in the presentation video).
- I did this by monitoring if there’s a message available from the Bluetooth by using the command b.available() (b is the user the defined name of the software serial function) then read it using b.read() and if it is the ‘s’ command typed in the text field of the Bluetooth app then, use b.print with the temperature and humidity as parameters (for example dht.readTemperature() for temperature) in order to print them on the smartphone screen.
- The ‘s’ letter sent to the board is a character (1 byte) and the board sends a string containing humidy and temperature values to the smartphone.

Output
Output
- The output is as shown in the video below.
- In general designing the app wasn’t very difficult. However, I did run into a challenging situation when I wanted to get many values at a time and the readings where overlapping. This was annoying and I solved it by adding a clear button so that I can clear old readings before reading new ones.
Files
(code/APK file/App source code/App aia file)
Group Assignment
- Our Group consists of Jari , Anssi , Hannu and I, we compared different platforms by Creating a “Hello World” App. Our combined comparison of various tools and documentation can be found on Jari’s page.