Week02
Week 2. Project management
Plan and sketch a potential final project
-
The goal for this week was to set-up myself on FabLab GitLab and download important softwares like Git, HomeBrew, Python (as i am using default template based on MkDocs provided by FabLab) to help me build my repository for the lab and create a web page and document progress.
MkDocs & Atom as static site generator made the web process much easier and gives more space to think about my concept, rather than focus on updating. However, look at the layout below!
GitLab is a web-based tool that provides a Git-repository manager providing wiki, issue-tracking and continuous integration and deployment pipeline features, using an open-source license, developed by GitLab Inc.
At the onset, I decided to benchmark some of the Fab Academy Alumni pages - and discovered the following:
There was so much of beautiful variety out there, and no matter how much we know, one is missing the signal for the noise.
Some Benchmarks for interesting web layouts from previous years:
Sheer Overlordship of form, content and functionality! In fact so good, I was half expecting to see a Subscription pop-out if I had to read further. A tough act to mimic!
Nicolo’s content and treatment of fonts and indentation - also beautiful breakdown of complex volume of material, well hyperlinked!
No. 1 showcase in terms of functionality, it combines checklists of our assignements - and a depth as well as breadth heavy navigation that makes the pages less crowded, yet more detailed. Also very beautiful functional diagrams.
A massive repository of information - broken down into all the details that others tend to override.
I love the simple and highly functional, modern look and feel - very readable like a magazine.
- So with such influences, I certainly want to move onto HTML and CSS from my boring standardized MKDocs.
At some point I would like my page to resemble something like Tactical Tech Berlin’s Data Detox kitbut for the moment the somewhat dry MKDocs is where I am!
Documentation source files were written in Markdown following the tutorial online by Krisjanis Rijnieks, and configured by installing python & PiP via the mac Terminal.
After running the mkdocs –version command on terminal, I have confirmation that it works.
## Ran Jit CAN’T run git?)!
-
Linus Torvalds (whose MOM actually visited in 2019 for our performance at THIS gig! - invented GIT over a weekend apparently to resolve the bigger pain of Version Control during highly collaborative or even solo software development.
-
Its fair to say I am fairly new to GIT and for an amateir, the code looks like gibberish & frustrating for now, but I am sure my muscle memory will soon be flying in the face of such odds.
Now I want to move onto the core of the action - and Roger Dudler’s wonderful git basics! was so effective in giving an overview of GIT - so many hours saved, I feel programming education really needs a visual makeover to make things less jargon-y and more elegant.
Likewise the wonderful documentation contributed by Julian Gallimore helped to get a quick overview without losing the holistic focus.
From that document, I like this definition of git.
**Git is a tool used for tracking to your project files Saving your changes is called a Commit Everything is stored in a Repository You can view all the commits in a repository to see who/what/when changes were made If anything breaks, look back at your commits and undo what you did You can also have a Git repository on your computer After any changes to files you can push your commits to the cloud (GitLab) The repository in GitLab is called the remote origin (this of it as the master version)
eg.
First I downloaded GIT for OSX. After downloading Homebrew I ran the command to install Git
-

Thanks to Krisjanis documentation combined with Roger Dudler’s basics I was able to internalize the workflow steps. It reads as follows as a summary of steps:
Download GIT for OSX
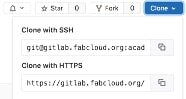
Create a new local repository & outside terminal, head to your GITLAB cloud page, and Generate a unique SSH (Secure Shell key) & update using command git pull.
The working directory holds the actual files and in my case - I go one level down from home directory into sub directory by the following simple command:

cd ranjit-menon


*The basic GIT commands are as follows:

**git status

The Git Status allows us to have a look at the working directory.

**git add filepath.md

The selected changed files, can be moved into a staging area.

** git commit -m "comment"

 Git Commit commits the changes to Git repository, with a message.

 ** git push

 Git Push - pushes the new commit to remote repository, Gitlab.

Commands to make a change (add or edit a file)
 Commands to commit the change (to your local repository)

  However, just like we initialized this repository by "pulling" from our cloud repository, we now need to finish the final step by "pushing"the changes from local working directory to remote repository.

  In my case this remote repository is located at the following path
Use git status to see changes

Use git add filename to add specific file you want to commit

Use git commit -m 'Your commit message' to add changes to Git history
Image MagicK!
-
Magick with a ‘K’ is used to differentiate mere legerdemain from serious occult practitioners - in case of our Terminal .. being able to avoid hours and hours of editing with photoshop gives it the stamp of legitimacy to even do away with the ‘c’ - presenting Image MagicK!
-
ImageMagick can do the following tricks without having to touch your photo editing tool with a bargepole (Eg gimp !)
-
Convert an image from one format to another.
- Resize, rotate, sharpen, color reduce, or add special effects to an image.
- Create a montage of image thumbnails.
- Turn a group of images into a GIF animation sequence.
- Create a composite image by combining several separate images.
-
Draw shapes or text on an image.
-
Want to convert an image from one format to another? no problem!
-
How about turning group of images into .GIF sequence / Or create thumbnails from batch images!
-
Image file size (the most commonly used)
Resize image dimension and change format
even rotate!
Someday - you can probably drive, park your car & even break the city speed limit via Terminal commands! :o
checking out image resize!

no errors, wow. Lets check out the result!

Do you see that tiny image with a terrible resolution? that happened because I simply copy pasted the command - resizing it 50% down and reducing an already poor resolution jpeg down to 30% leaving me w a 2kb image: mogrify -adaptive-resize 50% -quality 30%
So even if you are using Image Magick, pay attention to how much percentage of re-processing & resizing is being applied! No visual reference, pure feel.
in Terminal, you cannot UNDO! I already had this not so steep devastating learning curve with this UNHOLY command and wiped out my entire documents folder (luckily had backup on iCloud):

Mogrify command to select all jpeg instances inside a folder and render them at a certain quality and frame size. (Be careful though as this will render every image to that resolution & frame size irreversibly)

Here is an Excellent Resource to understand image compression using Image Magick from Smashing Magaziner.
Overtime in order to work effectively with JPEGs, I discovered a new way to keep the resolution within readable limits, especially if it is something of detail.
-
Use a slight gaussian blur in order to reduce the sharpness of the image.
convert -strip -interlace Plane -gaussian-blur 0.01 -quality 95% INPUT.JPG OUTPUT.JPG -
Compress to needed resolution after that.
mogrify -quality "97%" -resize 640 X 480 OUTPUT.JPG
A link example to “batch resize images” from Youtube
After making changes to local repository, it is time to test the website.
Editing video using FFMMPEG shortcuts via terminal
Basic conversions (especially to mp4) video conversion ffmpeg -i input.mov output.mp4
Speed modifications video speed editing ffmpeg -i X.mp4 -vf “setpts=0.25PTS” X_fast.mp4 note here that the output file needs to be saved separately to input.
Resizing Video video scaling scale down video with aspect ratio ffmpeg -i input.mp4 -vf scale=480:320 output_320.mp4
remove audio: ffmpeg -i $input_file -c copy -an $output_file
cool ways to keep resolution but scale down by half etc
https://ottverse.com/change-resolution-resize-scale-video-using-ffmpeg/
eg. ffmpeg -i input.mp4 -vf “scale=iw/2:ih/2” output.mp4
eg: ffmpeg -y -i “drill_faster.mp4” -vf “[in]scale=iwmin(480/iw\,320/ih):ihmin(480/iw\,320/ih)[scaled]; [scaled]pad=480:320:(480-iwmin(480/iw\,320/ih))/2:(320-ihmin(480/iw\,320/ih))/2[padded]; [padded]setsar=1:1[out]” -c:v libx264 -c:a copy “drill_faster_320.mp4”
Reverting to a previous state, deleting a git push to gitlab repository
https://opensource.com/article/18/6/git-reset-revert-rebase-commands
view commit history https://git-scm.com/book/en/v2/Git-Basics-Viewing-the-Commit-History
exiting gitlong with a Q: https://stackoverflow.com/questions/9483757/how-to-exit-git-log-or-git-diff