14. Networking and communications
This week’s individual assignment was to design, build, and connect wired or wireless node(s) with network or bus addresses. For the group assignment, we had to send a message between two projects.
Individual Assignment
Let me start out by mentioning that I have no experience with networking. At all. I watched Prof. Gershenfeld’s explanation, read over last year’s students’ documentation from my school, called some of my Fab classmates, and read through part of the SPI section on the ATtiny412 datasheet and was able to develop a basic understanding, but not enough where I feel like I could explain this to another person. I will just figure out everything as I go.
Purposes of Networking as defined by Prof. Gershenfeld:
-
location ~ connect from far distances
-
parallelism ~ to multitask, divide the work up, make a system out of many processors instead of one big one
-
modularity ~ instead of having one system that does everything, it can be broken up into smaller modules, develop modules separately and combine them to make one system
-
inference ~ split system so parts don’t interfere
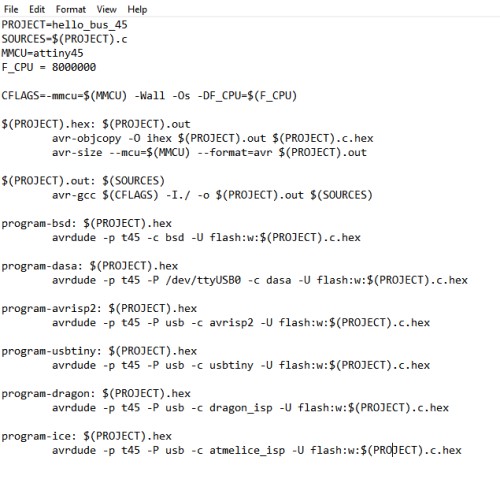
I want to have a basic wired connection between the master and slave boards, implementing a serial bus to connect all of them, and using RS-232, one of the three common serial data standards.
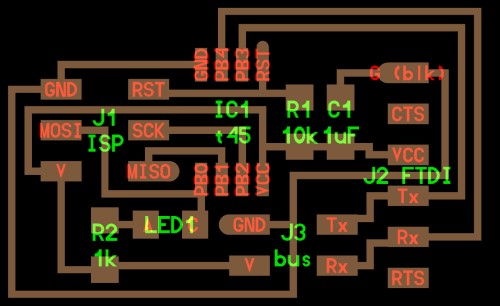
Here is Prof. Gershenfled’s board with the ATtiny45:
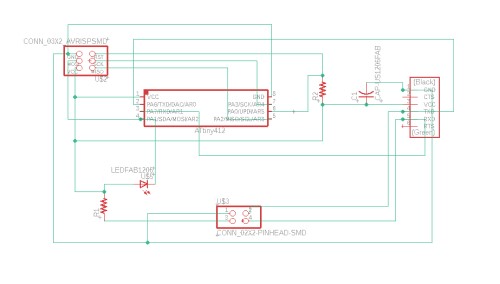
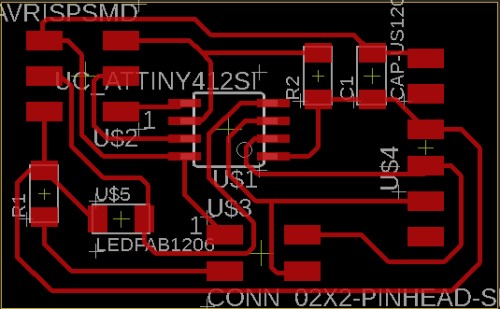
I am using the ATtiny412. Here is my schematic and board:
We are still practicing social distancing during this time, so I sent the board to my FabLab instructors for them to mill and will pick it up from outside the lab.
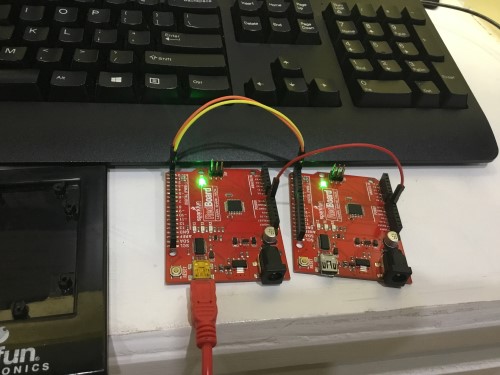
Here are my boards with the components on:
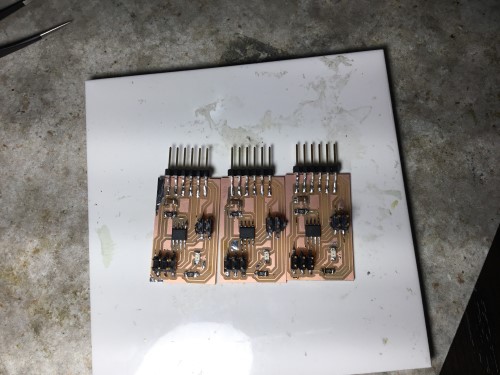
I decided to use the same board design for both the master and slave boards simply for convenience and flexibility.
Programming // Arduino
This is where things got difficult. I decided to use the code that Prof. Gershenfeld provided for this part. In his video for this week, he explained that the line:
#define node_id '0'
is used to identify which node is which - separating the master from the slave boards. The computer, essentially, only thinks that it is talking to one board when in actuality it’s communicating with multiple.
After uploading the code, I got this error message:
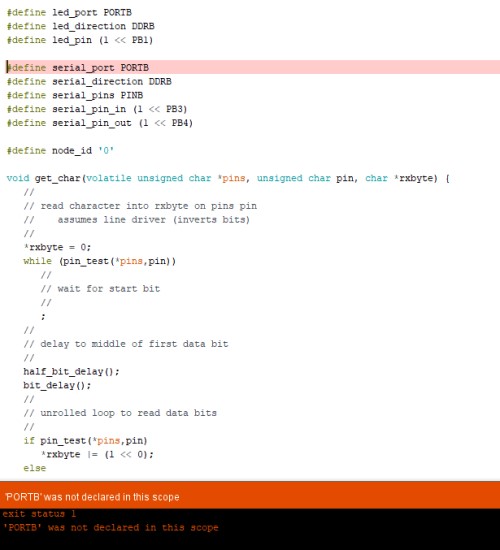
I was a bit confused as to why that happened. Then, after I thouht about it more, I questioned if the ATtiny even had a ‘PORTB’. I checked its pinout and sure enough the port pins were labeled ‘PA_’.

I changed
#define serial_port PORTB
to
#define serial_port PORTA
I uploaded the code again and got this error:
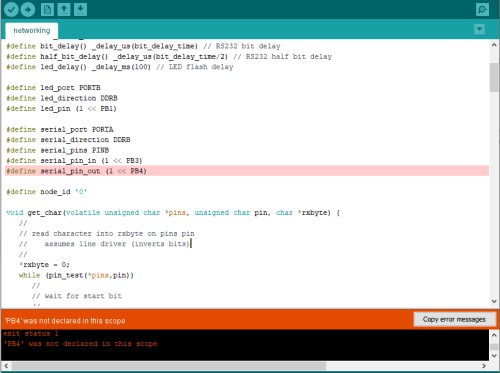
'PB4' was not declared in this scope
I looked at the ATtiny45 pinout this time and found that the pin ‘PB4’ was also pin 4/A2 on Arduino. I vaguely remembered one of my teachers mentioning that on the pinout for the ATtiny412, the analog pins were the numbering for Arduino. Using that info, I identified Arduino pin 4 as ‘PA3’ on the ATtiny.
I made the necessary altercations to the code, uploaded it, and recieved this message basically saying that what I changed did nothing and that it was still not working:
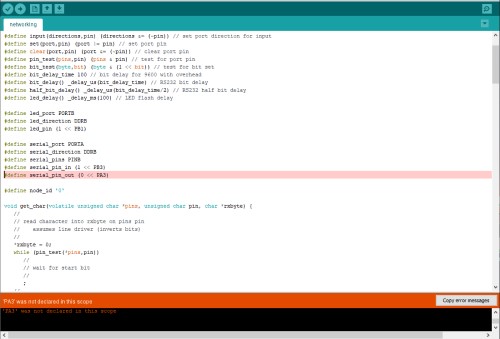
I made more changes to the code in hopes of getting everything work to where eventually the top part of the code looked like this:
#define led_port PORTA
#define led_direction DDRB
#define led_pin (1 << PA1)

#define serial_port PORTA
#define serial_direction DDRB
#define serial_pins PINA
#define serial_pin_in (1 << PA2)
#define serial_pin_out (1 << PA3)
However, this last line:
#define serial_pin_out (1 << PA3)
kept getting the same error message. I wasn’t sure why, so I tried to search to see if anyone else had ran into an issue similar to mine.
I looked at this explanation from Arduino on variables to try to figure out if it was a placement issue or something, but the site reasoned that in order to avoid this error message, I should make it global meaning that it can be referenced anywhere in the code. It already is.
I viewed last year’s Fab Academy students pages from my school and saw that Maxine Tan had run into the same issue I was having. In order to fix the issue, she added more electrical tape to the bottom of her programmer and it worked.
My current set up:
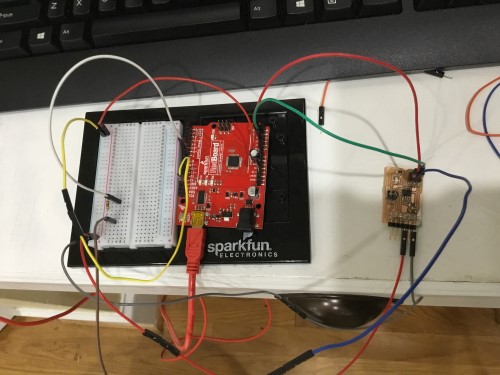
I loosely followed this tutorial again on how to make an arduino a programmer because I do not have the jtag one as of now.
I genuinely do not know what the issue is. I think it is a software problem because I unplugged the redboard just to make sure, and the same error appeared without anything connected. This by far has been the most difficult week so far. I’m at a standstill and don’t know where to go from here.
I found a woman named Liz Whitewolf’s site and she seemed to have run into the same issue. She just switched to terminal/powershell to complete this week. I think I am going to do that as well.
Powershell
I started by copying and pasting the code into Notepad. From there, I saved it as a .txt file then clicked ‘View’ and checked ‘File name extensions.’

From there, I renamed it to be a ‘.c’ file.  . I put them all into the folder that I had made for this week on my computer.
I also added the makefile from the assignment page into the same folder after copying and pasting it into Notepad as well.
I then removed the .txt extension from Makefile in the folder to make it just a file. 
Taking a Different Route (I²C)
For this week, I decided to do I²C. Here are some sites and videos that I used to learn about it:
I chose to create a modified version of a Satshakit which act like Arduino Unos. I learned about them from Katie Chai’s page. I went onto the satshakit pageand downloaded the schematic for the cnc version. I wanted to understand this conecpt better, so I decided to communicate between two red boards first before using the satshakits.
I connected their TX, RX, and GND pins and attempted to load on these codes which I got from May El-Dardiry’s site:
//Master

void setup() {
  Serial.begin(9600);
}

 void loop() {
  Serial.println ('H');
  delay (4000);
  Serial.println ('L');
  delay (4000);
 }

 //slave

const int ledPin = 13;          // the pin that the LED is attached to
int incomingByte;              // a variable to read incoming serial data into

void setup() {
  Serial.begin(9600);           // initialize serial communication:
  pinMode(ledPin, OUTPUT);     // initialize the LED pin as an output
  }

 void loop() {
  if (Serial.available() > 0) {   // see if there's incoming serial data:
  incomingByte = Serial.read();  // read the oldest byte in the serial buffer:
  if (incomingByte == 'H') {     // if it's a capital H (ASCII 72), turn on the LED:
  digitalWrite(ledPin, HIGH);
  }
  if (incomingByte == 'L') {    // if it's an L (ASCII 76) turn off the LED:
  digitalWrite(ledPin, LOW);
  }
 }
}
However, just like during Input week, they would not upload to arduino and the error “java.lang.NullPointerException” appeared. A quick Google search bestowed me with the knowledge that this means something in the set up on Arduino was incorrect. I did a thorough check of the set up. Programmer - AVR ISP, board - Arduino Uno, Port - COM4. Even after checking this multiple times, this error kept reappearing.
I decided to completely close out of Arduino and try again. Even with doing this, it still did not work. Now, it said that there was a problem uploading to the board. I made sure everything was plugged in and that the correct boards, COM ports, and programmer were selected again, but it was to no avail. It did not work. It may have something to do with my computer (?) because Arduino has worked every once in a blue moon on my personal computer.
I decided that I would go into the lab and test out the actual boards I milled instead in hopes of getting a successful outcome.
Making the Board
Satshakits are the fab version of Arduinos. I learned about them from Katie Chai’s page. I went onto the satshakit page and downloaded the schematic for the cnc version.
I ended up making around 3 boards because each time I tried to burn the bootloader after soldering them, it didn’t work. After discussing with my teachers and my peers, we came to the conclusion that the bit that I used to mill them was absolutely terrible. And when I mean terrible - it was horrific. I don’t know how I didn’t realize ( I guess I was on auto-pilot?), but the 1/64” bit that I used to initially mill the traces with must’ve been broken or had a small chip in it. When I took it off of the Othermill, the traces had a lot of burs on them which I thought I could just sand off. After sanding, there still were a lot, but I just went with it and started soldering. This wasn’t the best idea because I think tiny pieces of copper in beween the traces were touching pieces of solder and creating shorts. It took me 5 hours, but eventually, I got rid of all the shorts on both boards and each bootloader burned successfully. I also made sure that I was wiring directly instead of using multiple wires. I didn’t connect two wires together from the arduino to the satshakit as I was doing previously. I used one wire.
Programming
I started out by programming both satshakits to functions as arduinos, following the directions on the satshakit site. I had to burn the bootloader on each using the arduino.
Once everything is connected, follow these steps to upload Arduino bootloader:

open Arduino IDE
select proper programmer by clicking on Tools->Programmer (for example USBtinyISP)
select Arduino UNO as Tools->Board
click on Tools->Burn Bootloader
After that, I uploaded each code onto their respective satshakits (slave and master) using a basic FTDI programmer. I referenced the same satshakit page to do so and followed their instructions there.
I retrieved two new codes from Alex, by Nicholas Zambetti because the last ones gave me a lot of trouble and did not seem to be working. These are from the Arduino site. I changed the delay, baud rates, and what was printed on the serial monitor from the originals.
/ Wire Slave Receiver
// by Nicholas Zambetti <http://www.zambetti.com>

// Demonstrates use of the Wire library
// Receives data as an I2C/TWI slave device
// Refer to the "Wire Master Writer" example for use with this

// Created 29 March 2006

// This example code is in the public domain.


#include <Wire.h>

void setup()
{
  Wire.begin(4);                // join i2c bus with address #4
  Wire.onReceive(receiveEvent); // register event
  Serial.begin(115200);           // start serial for output
}

void loop()
{
  delay(100);
}

// function that executes whenever data is received from master
// this function is registered as an event, see setup()
void receiveEvent(int howMany)
{
  while(1 < Wire.available()) // loop through all but the last
  {
    char c = Wire.read(); // receive byte as a character
    Serial.print(c);         // print the character
  }
  int x = Wire.read();    // receive byte as an integer
  Serial.println(x);         // print the integer
}
// Wire Master Writer
// by Nicholas Zambetti <http://www.zambetti.com>

// Demonstrates use of the Wire library
// Writes data to an I2C/TWI slave device
// Refer to the "Wire Slave Receiver" example for use with this

// Created 29 March 2006

// This example code is in the public domain.


#include <Wire.h>

void setup()
{
  Wire.begin(); // join i2c bus (address optional for master)
}

byte x = 0;

void loop()
{
  Wire.beginTransmission(2); // transmit to device #2
  Wire.write(" ");
  Wire.write(x);
  Wire.endTransmission();

  x++;
  delay(500);
}
I used two separate programmers to program each of them. Finally, I hooked each of the satshakits up to their repsective programmers and also to each other. Once everything was running, they seemed to be working because the serial monitor was actively running as well.
Group Assignment
View our group assignment here!
My files:
Takeaways
I did not know about networking and communications before this exercise, but I learned so much during this week. It, by far, took me the longest out of all of the weeks. Even with all of my failures and frustration, it all contributed to my greater understanding of the topic. In the future, however, I would like to revisit the serial bus because I did not understand it at all and completely shifted gears before I could develop any sort of understanding.