1: principles & practices, project management
Welcome! Today I began my FabAcademy 2020 journey. The first step was learning how to use and navigate GitLab. After setting up my account, I completed the Student Agreement. Because I am a novice at GitLab, I was advised by a recent graduate of FabAcademy, Will Knight, to find a Markdown Cheat Sheet that I can use to help me document.
I had a discussion with my art teacher about my FabAcademy project. I am taking art second semester in order to have more time during the day to work on FabAcademy. My art teacher, Mr. Fletcher, is also a graduate of FabAcademy, so he understands the workload and time commitment involved. I showed him my inspiration for my current final project idea: a Neopixel Smart Mirror. We discussed how I would use my time in art to plan out the design of my project, work on documentation, and work in the engineering lab if need be.
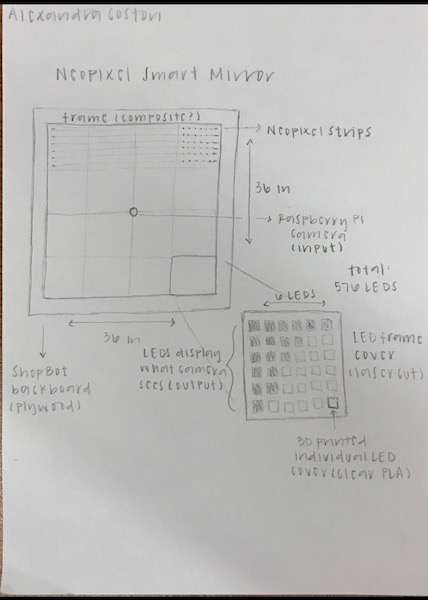
The Neopixel Smart Mirror is a “mirror” made out of Neopixel strip LED’s that view the input from a Raspberry Pi camera and project/output what it sees onto the LED’s to give the effect of a mirror. Super Make Something’s design involves 24 Neopixel strip, which amounts to 576 LEDs. This is a lot, so I will try to make it on a smaller scale first. The mirror uses a Raspberry Pi, but I will additionally need to mill my own PCB board. I want to make this project because the design is very cool and I think it will be a fun, interactive addition to mount at my school.
I created a Google Sheet that encompasses the materials I will need for this project and their costs.
The Neopixel Smart Mirror created by Super Make Something is pretty big, the wooden backboard being 36 in x 36 in. I talked with Mr. Fletcher about how large I could feasibly make my final project, in addition to planning out what components I can create for my final project each week. I will attempt to make a plan and follow it, in order to eliminate as much future stress as I can. Below is a basic sketch of my final project based on Super Make Something’s own smart mirror
| Week | Task |
|---|---|
| 1: principles & practices, project management | plan and sketch a potential final project, work through a git tutorial & build a personal site in the class archive describing you and your final project |
| 2: computer-aided design | model (raster, vector, 2D, 3D, render, animate, simulate, …) a possible final project, compress your images and videos, and post it on your class page -> I need to design as many components as I can of my smart mirror. I am going to use Fusion360 and FreeCad to start modeling |
| 3: computer-controlled cutting | group assignment: characterize your lasercutter’s focus, power, speed, rate, kerf, and joint clearance; individual assignment: cut something on the vinylcutter, design, lasercut, and document a parametric construction kit, accounting for the lasercutter kerf, which can be assembled in multiple ways, and for extra credit include elements that aren’t flat |
| 4: electronics production | group assignment: characterize the design rules for your PCB production process; individual assignment: make an in-circuit programmer by milling and stuffing the PCB, test it, then optionally try other PCB processes |
| 5: 3D scanning and printing | group assignment: test the design rules for your 3D printer(s); individual assignment: design and 3D print an object (small, few cm3, limited by printer time) that could not be made subtractively, 3D scan an object (and optionally print it) -> 3D print covers for LEDs |
| 6: electronics design | group assignment: characterize the design rules for your PCB production process; individual assignment: make an in-circuit programmer by milling and stuffing the PCB, test it, then optionally try other PCB processes |
| 7: computer-controlled machining | group assignment: test runout, alignment, speeds, feeds, and toolpaths for your machine; individual assignment: make (design+mill+assemble) something big -> make backboard and frame |
| 8: embedded programming | individual assignment: read a microcontroller data sheet program your board to do something, with as many different programming languages and programming environments as possible; group assignment: compare the performance and development workflows for other architectures |
| 9: input devices | individual assignment: measure something- add a sensor to a microcontroller board that you have designed and read it; group assignment: probe an input device’s analog levels and digital signals -> Raspberry Pi camera |
| 10: applications and implications | |
| 11: output devices | individual assignment: add an output device to a microcontroller board you’ve designed, and program it to do something; group assignment: measure the power consumption of an output device -> Neopixels displaying what the input sees |
| 12: molding and casting | group assignment: review the safety data sheets for each of your molding and casting materials, then make and compare test casts with each of them; individual assignment: design a mold around the stock and tooling that you’ll be using, mill it (rough cut + (at least) three-axis finish cut), and use it to cast parts |
| 13: networking and communications | individual assignment: design, build, and connect wired or wireless node(s) with network or bus addresses; group assignment: send a message between two projects |
| 14: interface and application programming | individual assignment: write an application that interfaces a user with an input &/or output device that you made -> Neopixels displaying what the Raspberry Pi sees; group assignment: compare as many tool options as possible |
| 15: mechanical design, machine design | group assignment: design a machine that includes mechanism+actuation+automation, build the mechanical parts and operate it manually, document the group project and your individual contribution |
| 16: wildcard week | learn how to use our lab’s embroidery machine |
| 17: invention, intellectual property, and income | develop a plan for dissemination of your final project, prepare drafts of your summary slide (presentation.png, 1920x1080), and video clip (presentation.mp4, 1080p HTML5, < ~minute, < ~10 MB) and put them in your root directory |
| 18: project development | complete final project |
My FabAcademy peers and I spent some time developing our sites, playing around with fonts and themes. I utilized the provided Mkdocs color palette to choose how I wanted my site to look. I ultimately chose a purple theme (because it’s my favorite color).
 .
.
Additionally, another past graduate, Maxine Tan, showed us how to compress images so that they would be the required size. I have a Mac, so below shows the process of compressing an image and converting it to a jpg. This is especially helpful for screenshots, which start off as PNG’s that are too large.

The first step is to resize the image. I was recommended to size it down to between 400-600 pixels.

Once you have compressed the image, if you close out of the tap, you will be prompted to name your photo and can also change the format of the image. This is how I change the images from PNG’s to JPEG’s.

Once you’ve compressed and saved the image, you have to upload it to the images folder in Gitlab.


With this I began creating my About Me page. Markdown has been pretty simple to use thus far, and I have learned how to upload images using the format: .

As far as documentation goes, I was advised by past graduates to create a Google Doc and to write everything there. Google Docs has autocorrect and it will also be an easier way for me to keep up with my documentation as I have the app downloaded on all my devices. I read the FabCharter and signed the Student Agreement in my About Me page.


Here is how the student agreement looks on my website:

As part of this week’s assignment, to go through a git tutorial and try out different ways to document my site, I looked into creating a gitbook account. Gitbook is a website where you can write and document in collaboration with others. I can foreshadow this being useful when I do group assignments with my peers. Gitbook also allows you to import documents from Google Docs, HTML pages, GitHub content, DropBox notes, and more. It uses markdown, just as gitlab does. If I know how to insert something or change the style of the text, for example making a heading or list or table, I can write it into gitbook and it will automatically make the changes. Though Gitbook has a nice layout, I ultimately think using a Google Doc to document will be sufficient for what I need.