15. Networking and Communications
Adding board definition
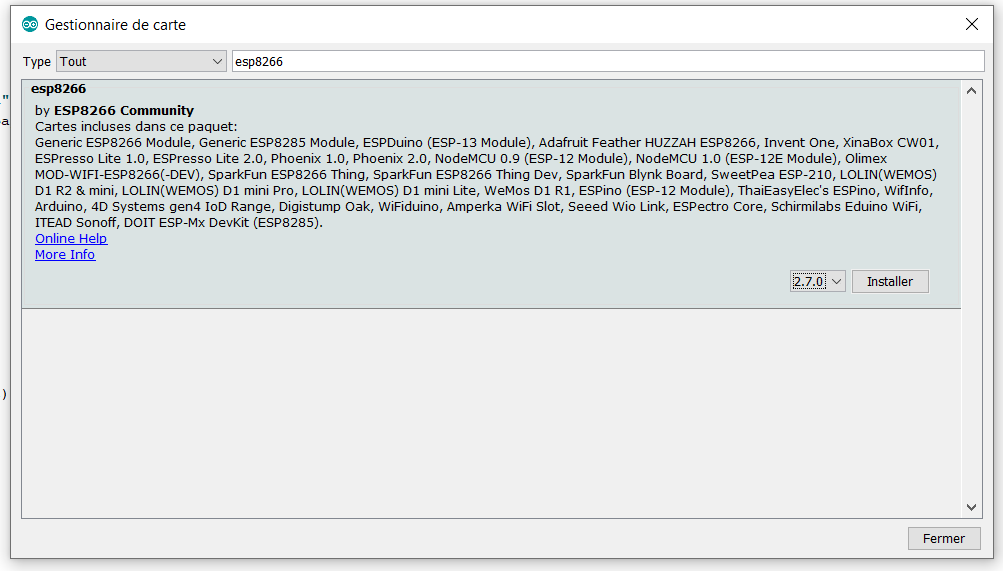
This week, I work with Wemos D1 mini pro (ESP8266 based board). You have to add the board on arduino IDE, first add this url : https://arduino.esp8266.com/stable/package_esp8266com_index.json
into the Additional Boards Manager URLs: field (comma separate multiple URLs) and (B) click OK, then install this package :
ATSAMD11C <- I²C -> ESP8266 (Wemos D1 mini pro)
Because, I want to put that kind of communication in my final project (for the full online version on further spirals), I work on I²C communication between a SAMD11C µc (my SAMD1C multi purpose board) and an ESP8266 (here a Wemos D1 mini pro).
I will use the SAMD11C as master and the ESP8266 as slave.
The code is pretty simple, here the SAMD11C part (master):
#include <Wire.h>

void setup()
{
  Wire.begin(); // join i2c bus (address optional for master)
}

byte x = 0;

void loop()
{
  Wire.beginTransmission(2);        // transmit to device #2
  Wire.write("Here a value: ");     // sends fourteen bytes
  Wire.write(x);                    // sends one byte
  Wire.endTransmission();           // stop transmitting

  x++;
  delay(500);
}
And the ESP8266 part (slave) :
#include <Wire.h>

void setup()
{
  Wire.begin(2);                // join i2c bus with address #2
  Wire.onReceive(receiveEvent); // register event
  Serial.begin(9600);           // start serial for output
}

void loop()
{
  delay(100);
}

// function that executes whenever data is received from master
// this function is registered as an event, see setup()
void receiveEvent(int howMany)
{
  Serial.println("EVENT RECEIVED");
  while (1 < Wire.available()) // loop through all but the last
  {
    char c = Wire.read(); // receive byte as a character
    Serial.print(c);      // print the character
  }
  int x = Wire.read();    // receive byte as an integer
  Serial.println(x);      // print the integer
}
For using embedded wire capabilities and avoid using 3rd parties libraries, I have to find correct pinout.
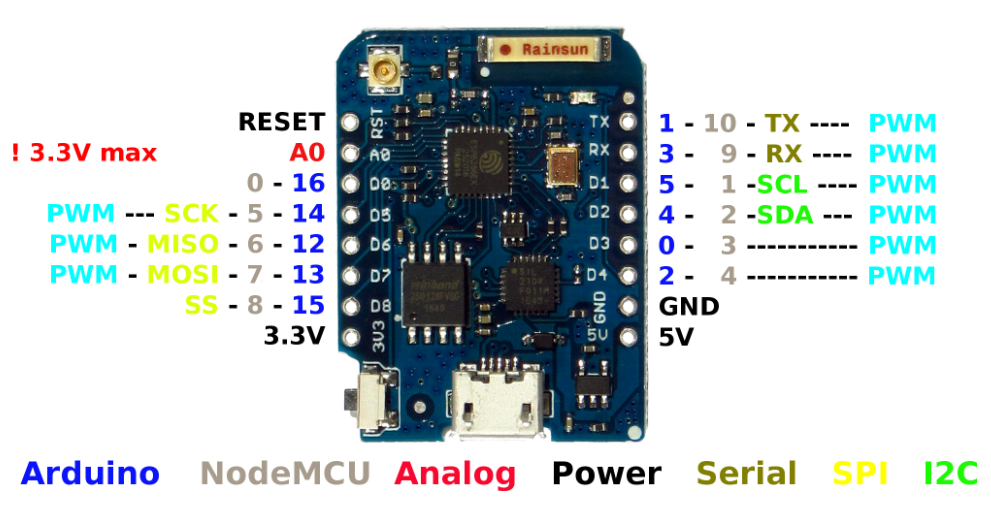
Finding the pinout of the wemos is very easy :
But finding the correct pinout for the ATSAMD11C with arduino IDE and the mattairtech configuration is such a headache! Finally, after hours of searching, I found the information here : https://github.com/mattairtech/ArduinoCore-samd/blob/master/variants/Generic_D11C14A/README.md
PIN_MAP_COMPACT
Arduino Port Alternate Function Comments (! means not used with this peripheral assignment) 0 PA02 DAC EIC/EXTINT[2] ADC/AIN[0] PTC/Y[0] DAC/VOUT 1 PA04 REFB / TX2* / TCC00 EIC/EXTINT[4] REF/ADC/VREFB ADC/AIN[2] AC/AIN[0] PTC/Y[2] SERCOM0/PAD[2] !SERCOM0/PAD[0] !TC1/WO[0] TCC0/WO[0] 2 PA05 RX2* / TCC01 EIC/EXTINT[5] ADC/AIN[3] AC/AIN[1] PTC/Y[3] SERCOM0/PAD[3] !SERCOM0/PAD[1] !TC1/WO[1] TCC0/WO[1] 3 PA08 TX1 / MOSI / TCC02 EIC/EXTINT[6] SERCOM1/PAD[2] !SERCOM0/PAD[2] TCC0/WO[2] !TCC0/WO[4] Xin32 / Xin 4 PA09 RX1 / SCK / TCC03 EIC/EXTINT[7] SERCOM1/PAD[3] !SERCOM0/PAD[3] TCC0/WO[3] !TCC0/WO[5] Xout32 / Xout 5 PA14 SDA / TC10 EIC/NMI ADC/AIN[6] PTC/X[0] PTC/Y[6] SERCOM0/PAD[0] !SERCOM2/PAD[0] TC1/WO[0] !TCC0/WO[0] 6 PA15 SCL / TC11 EIC/EXTINT[1] ADC/AIN[7] PTC/X[1] PTC/Y[7] SERCOM0/PAD[1] !SERCOM2/PAD[1] TC1/WO[1] !TCC0/WO[1] 7 PA24 USB_NEGATIVE USB/DM 8 PA25 USB_POSITIVE USB/DP 9 PA28 Reset Reset, BOOT (double tap bootloader entry) 10 PA30 MISO / SWD CLK !EIC/EXTINT[2] SERCOM1/PAD[0] !SERCOM1/PAD[2] !TC2/WO[0] !TCC0/WO[2] SWD CLK, leave floating during boot 11 PA31 SS / SWD IO EIC/EXTINT[3] SERCOM1/PAD[1] !SERCOM1/PAD[3] !TC2/WO[1] !TCC0/WO[3] SWD IO
To resume, I need 2 wires :
- SDA for data, D2 on the wemos (4 in arduino IDE), PA14 on the SAMD11C (5 in arduino IDE)
- SCL for clock, D1 on the wemos (5 in arduino IDE), PA15 on the SAMD11C (6 in arduino IDE)
In Arduino, be careful to select a serial config containing “ONE_WIRE” before flashing or this won’t work!

What the f#### ?????
I test many codes, many wiring, with or without pull resistors. Thinking of a problem SAMD side, I change to test 2 wemos, trying direct connect, pullup resistors and so on. I spend hours of testing and finally… using a esp8266 as a slave doesn’t work according to a bug in board library : https://github.com/esp8266/Arduino/issues/3046
Fallback
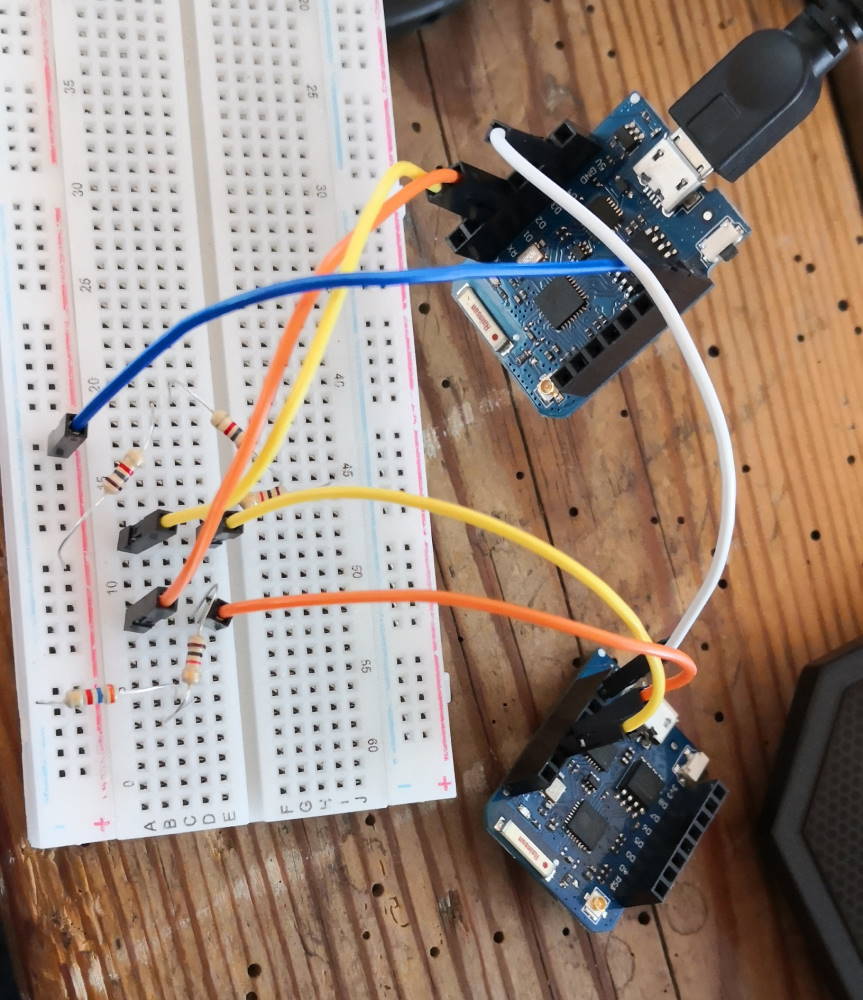
FINALLYYYYYYYYY in a last minute run, I invert SAMD11C and wemos, so I use my SAMD as slave, I modify my code and :
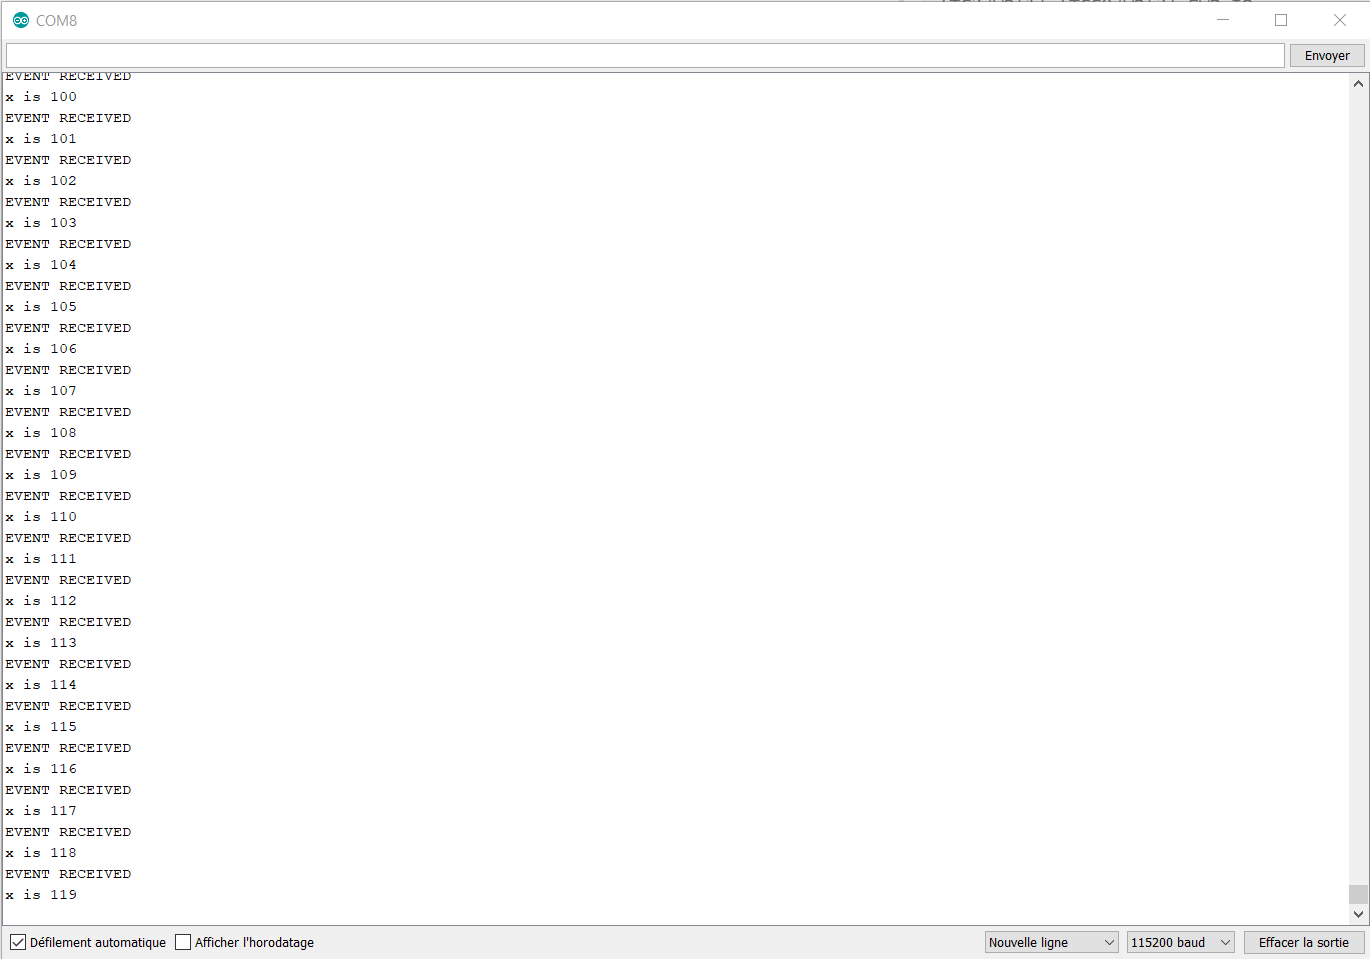
It’s workiiiiiiiiiiiiiiing !
So my final wiring :

In conclusion using ESP8266 as slave in I2C is a very bad idea !!!
Some network explanation
As requested by reviewer, I add some details on how it works with websockets (I already use them in interface & application programming week but locally, I also reuse WS in machine week with more network tricks).
I use here Lolin Wemos ESP8266 board that have Wifi onboard, I use here network protocols that also work with classical computer, smartphone, tablet and so on.
WebSocket is a computer communications protocol, providing full-duplex communication channels over a single TCP connection. This protocol is very powerful because it can use classical HTTP ports (80 & 443) so it can pass trough firewalls without configuration when acting as a client.
Here it’s the start of hard work. In my following projects on this page, I create WS clients (easy) and also the WS servers (the hard part), and when we start to have distant client & server, we have to manage network on server side. I work on a rebound server on machine week (on a Azure, a big big headache and time consuming part) to avoid configuration part for people who can’t manage they network (because they haven’t access to this part or they don’t know how it’s work).
(disclaimer: I explain following lines with IPv4, when internet and all network will be full IPv6, normally all devices would be able to have their own internet IP address) First you need to know what is Network address translation (NAT), it’s IP address remapping by a traffic routing device. To resume the most common case is your local network VS internet. You have many devices on your local network, all of them have at least one local IP address. All your network have just one internet IP address and the work of your router is to remap external network request VS local network request.
When you are a client, you push a request, it goes to the router, it follows request to internet (or another network) if needed, when you receive the answer, router know which device send request and push back to it.
But when you are the server, you just wait and listen requests from clients. How router can know it have to follow request to you ? The basic idea is to open a specific port dedicated to this requests and follow traffic to the correct server, for this you need to apply network rules on you router. There are many options like reverse proxy, routing to different servers depending of kind of protocol or content of the request but it will not make a network & server course here, it’s a full subject.
I can’t make tutorial for router configuration because all router are different.
I also have a specific problem on my side, I’m using 4G network to have internet access for my entire home and 4G carrier already translate network addresses on internet side so it’s impossible to me to host server at home because I can’t manage carrier NAT. I bypass all this problems with a Websocket rebound server I build on Azure for the machine week.
Drive a relay by websocket - local
For this I use 2 wemos :
One with a button shield (the client)
// WIFI
#include <ESP8266WiFi.h>
const char* ssid     = "XXXXX";
const char* password = "XXXXX";
WiFiClient wifi;

// websocket
#include <WebSocketsClient.h>
WebSocketsClient webSocket;

//PINS
const int buttonPin = 0; //D3
const int ledPin = BUILTIN_LED;

// the current state of the LED and button
// on wemos d1 mini, led is inverted : LOW = on
int ledState = HIGH;
int buttonState = LOW;

// the current and previous readings from the input pin
int thisButtonState = LOW;
int lastButtonState = LOW;

void webSocketEvent(WStype_t type, uint8_t * payload, size_t lenght) {

    switch(type) {
        case WStype_DISCONNECTED:
            Serial.printf("[WSc] Disconnected!\n");
            break;
        case WStype_CONNECTED:
            Serial.printf("[WSc] Connected to url: %s\n",  payload);
            break;
        case WStype_TEXT:
           Serial.printf("[WSc] get text: %s\n", payload);

            // send data to back to Server
            webSocket.sendTXT(payload, lenght);
            break;
        case WStype_BIN:
            Serial.printf("[WSc] get binary lenght: %u\n", lenght);
            hexdump(payload, lenght);

            // echo data back to Server
            webSocket.sendBIN(payload, lenght);
            break;

        case WStype_ERROR:
            Serial.printf("We received an error \n");
            break;

        default:
            break;
    }

}

void connect() {
  Serial.println();
  Serial.print("Connecting to ");
  Serial.println(ssid);

  /* Explicitly set the ESP8266 to be a WiFi-client, otherwise, it by default,
     would try to act as both a client and an access-point and could cause
     network-issues with your other WiFi-devices on your WiFi-network. */
  WiFi.mode(WIFI_STA);
  if (password == "")
    WiFi.begin(ssid);
  else
    WiFi.begin(ssid, password);

  while (WiFi.status() != WL_CONNECTED) {
    delay(500);
    Serial.print(".");
  }

  Serial.println("");
  Serial.println("WiFi connected");
  Serial.println("IP address: ");
  Serial.println(WiFi.localIP());

}

void setup() {
  Serial.begin(115200);

  pinMode(buttonPin, INPUT);
  pinMode(ledPin, OUTPUT);

  // set initial LED state
  digitalWrite(ledPin, ledState);

  // init wifi
  connect();

  //init websocket
  Serial.println("Start Websocket Client");
  webSocket.begin("XXXXXX", 81);
  webSocket.onEvent(webSocketEvent);
}

void loop() {
  thisButtonState = digitalRead(buttonPin);

 // if the button state has changed
    if (thisButtonState != buttonState) {
      buttonState = thisButtonState;

      // toggle when pressed (button wired to gnd)
      if (buttonState == LOW) {
        ledState = !ledState;
        // toggle the LED
        digitalWrite(ledPin, ledState);
        webSocket.sendTXT(!ledState? "on" : "off");
        //Serial.println(" sending: "+ledState? "on" : "off");

        Serial.println(!ledState? "on" : "off");
      }
    }

  // persist for next loop iteration
  lastButtonState = thisButtonState;

  delay (100);
  webSocket.loop();
}
And one wemos with DC shield + relay shield (the server)
/****************************
* Websocket directconnect motor shield demo
*
* @author Florent Lemaire
*
 ****************************/

const int relayPin = 5; //D1

// WIFI
#include <ESP8266WiFi.h>
const char* ssid = "XXXXXXXXXX";
const char* password = "XXXXXXXXXXX"; //password or empty
WiFiClient wifi;

// websocket
#include <WebSocketsServer.h>
WebSocketsServer webSocket = WebSocketsServer(81); //change port of WS host here

////////// Code ////////////

void webSocketEvent(uint8_t num, WStype_t type, uint8_t * payload, size_t length) {

    switch(type) {
        case WStype_DISCONNECTED:
            Serial.printf("[%u] Disconnected!\n", num);
            break;
        case WStype_CONNECTED: {
            IPAddress ip = webSocket.remoteIP(num);
            Serial.printf("[%u] Connected from %d.%d.%d.%d url: %s\n", num, ip[0], ip[1], ip[2], ip[3], payload);

            // send message to client
            webSocket.sendTXT(num, "Connected");
        }
            break;
        case WStype_TEXT:
            Serial.printf("[%u] get Text: %s\n", num, payload);
              String _payload = String((char *) &payload[0]);
              if (_payload.equals("on")) {
                digitalWrite(relayPin, HIGH);
                Serial.println("set relay to ON");}
              if (_payload.equals("off")) {
                digitalWrite(relayPin, LOW);
                Serial.println("set relay to OFF");
            }
            break;

    }
}

void connect() {
  Serial.println();
  Serial.print("Connecting to ");
  Serial.println(ssid);

  /* Explicitly set the ESP8266 to be a WiFi-client, otherwise, it by default,
     would try to act as both a client and an access-point and could cause
     network-issues with your other WiFi-devices on your WiFi-network. */
  WiFi.mode(WIFI_STA);
  if (password == "")
    WiFi.begin(ssid);
  else
    WiFi.begin(ssid, password);

  while (WiFi.status() != WL_CONNECTED) {
    delay(500);
    Serial.print(".");
  }

  Serial.println("");
  Serial.println("WiFi connected");
  Serial.println("IP address: ");
  Serial.println(WiFi.localIP());
}

void setup() {
  // Init serial
  Serial.begin(115200);
  while (!Serial);

  // init motor shield
  pinMode(relayPin, OUTPUT);

  // init wifi
  connect();

  //init websocket
  Serial.println("Start Websocket Server");
  webSocket.begin();
  webSocket.onEvent(webSocketEvent);
}

void loop() {
  webSocket.loop();
}
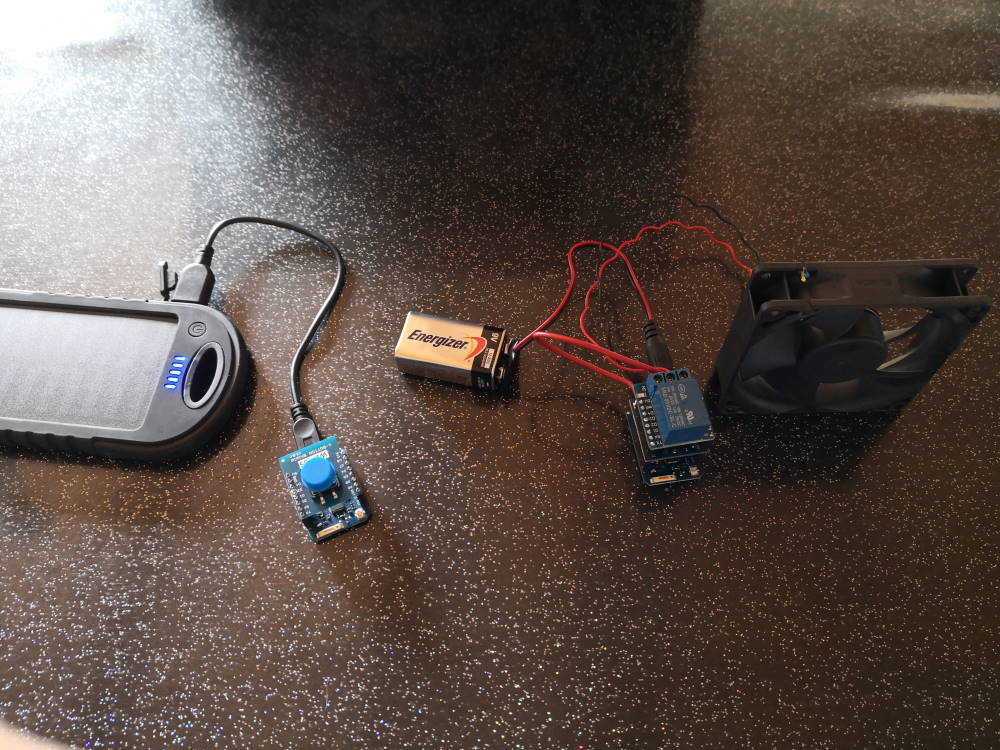
The result in local with a fan :
Drive a relay by websocket - 200km online test
Thanks to Luc that assemble the same wemos with relay at his home, with my code and NAT routing, I can test with relay on his side and button on my side :
Interspecies chat by websocket (+ SPI) - 200km online test
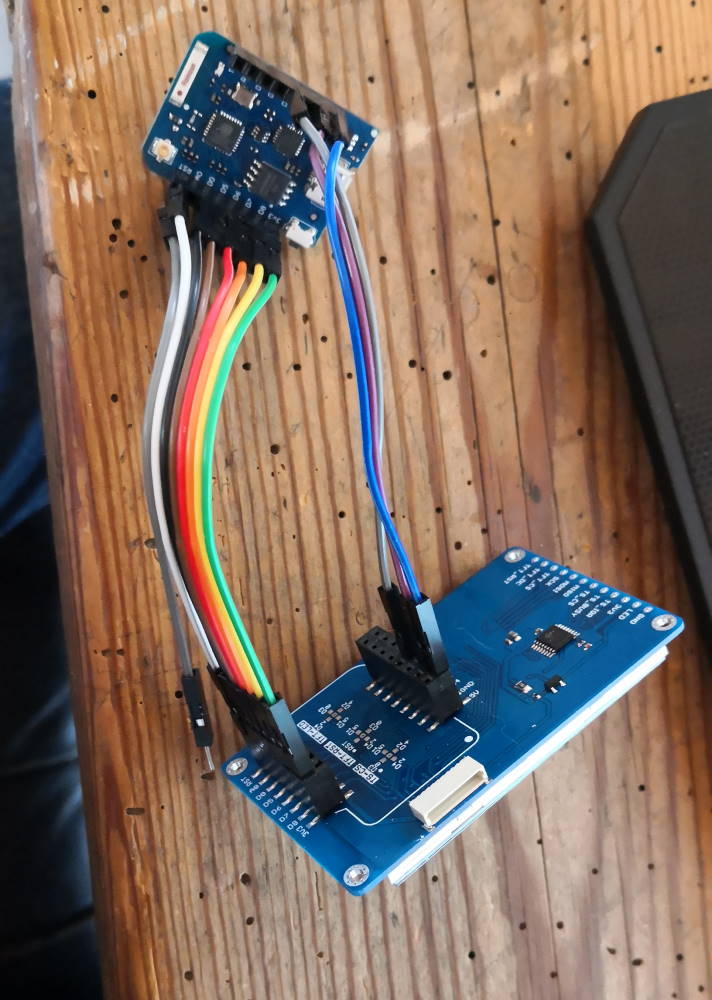
For this part, I use a wemos d1 mini pro and a lolin tft 2.4” shield
Because the pin on my wemos aren’t the good ones for the tft, I have to add dupont cables and plug pins needed for SPI for TFT and touchscreen.
Here we have like 2 networks at the same time. An SPI network locally with the wemos, the tft and the touchscreen. And I useing the wifi network and websockets to go trough the internet.
Because I have only one TFT, I made all the code before sending one part to Luc for the demo.
Like the relay demo, one wemos will act as a websocket server and the other one will connect directly to it over the internet.
The wiring :
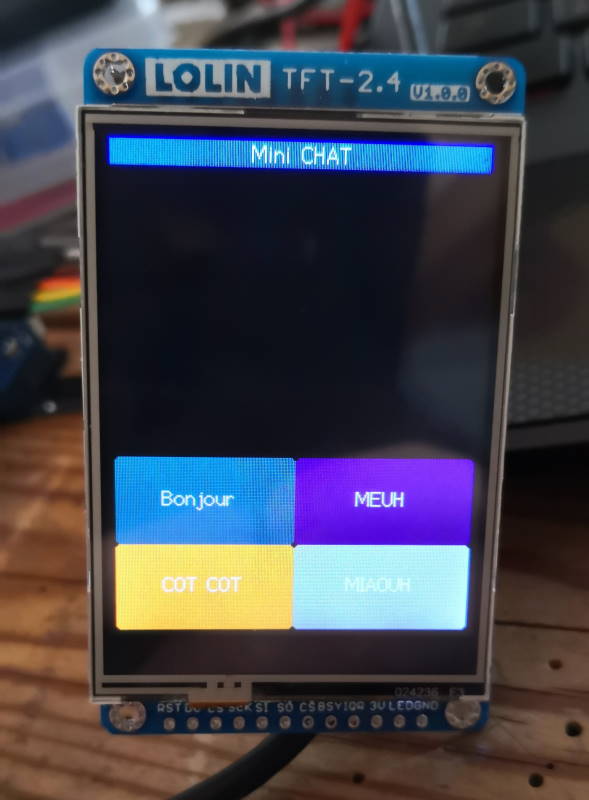
The UI on touchscreen, there are 4 buttons :
- top left : bonjour (hello in french)
- top right : MEUH (sound of cow in french)
- bottom left : COT COT (sound of chicken in french)
- bottom right : MIAOUH (sound of cat in french)
The server part :
/****************************
* Websocket directconnect mini chat demo
*  client side
*
* @author Florent Lemaire
*
 ****************************/

// WIFI
#include <ESP8266WiFi.h>
const char* ssid     = "XXXXXXXX";
const char* password = "XXXXXXXXX";
WiFiClient wifi;

// websocket
#include <WebSocketsServer.h>
WebSocketsServer webSocket = WebSocketsServer(81); //change port of WS host here

//screen
#include <TFT_eSPI.h> // Hardware-specific library
#include <SPI.h>

TFT_eSPI tft = TFT_eSPI();       // Invoke custom library

// The scrolling area must be a integral multiple of TEXT_HEIGHT
#define TEXT_HEIGHT 20 // Height of text to be printed and scrolled
#define BOT_FIXED_AREA 124 // Number of lines in bottom fixed area (lines counted from bottom of screen)
#define TOP_FIXED_AREA 16 // Number of lines in top fixed area (lines counted from top of screen)
#define YMAX 320 // Bottom of screen area

// The initial y coordinate of the top of the scrolling area
uint16_t yStart = TOP_FIXED_AREA;
// yArea must be a integral multiple of TEXT_HEIGHT
uint16_t yArea = YMAX-TOP_FIXED_AREA-BOT_FIXED_AREA;
// The initial y coordinate of the top of the bottom text line
uint16_t yDraw = YMAX - BOT_FIXED_AREA - TEXT_HEIGHT;

// Keep track of the drawing x coordinate
uint16_t xPos = 0;

// For the byte we read from the serial port
byte data = 0;

// A few test variables used during debugging
boolean change_colour = 1;
boolean selected = 1;

// We have to blank the top line each time the display is scrolled, but this takes up to 13 milliseconds
// for a full width line, meanwhile the serial buffer may be filling... and overflowing
// We can speed up scrolling of short text lines by just blanking the character we drew
int blank[19]; // We keep all the strings pixel lengths to optimise the speed of the top line blanking

//force good pins for wemos shield and avoid to modify user_setup config
#define TFT_CS   PIN_D0  // Chip select control pin D8
#define TFT_DC   PIN_D8  // Data Command control pin
//#define TFT_RST  PIN_D4  // Reset pin (could connect to NodeMCU RST, see next line)
#define TFT_RST  -1

//touchscreen
#define TOUCH_CS PIN_D3

// to stock connected client (just one for demo ^^)
uint8_t cli;

void setup() {
  // Setup the TFT display
  tft.init();
  tft.setRotation(0); // Must be setRotation(0) for this sketch to work correctly
  tft.fillScreen(TFT_BLACK);

  // Setup baud rate and draw top banner
  Serial.begin(115000);

  // init wifi
  connect();

  tft.setTextColor(TFT_WHITE, TFT_BLUE);
  tft.fillRect(0,0,240,16, TFT_BLUE);
  tft.drawCentreString(" Mini CHAT ",120,0,2);

  // Change colour for scrolling zone text
  tft.setTextColor(TFT_WHITE, TFT_BLACK);

  // Setup scroll area
  setupScrollArea(TOP_FIXED_AREA, BOT_FIXED_AREA);

  // Zero the array
  for (byte i = 0; i<18; i++) blank[i]=0;

  // init touchscreen
  uint16_t calData[5] = { 465, 3271, 429, 3170, 3 };
  tft.setTouch(calData);

  // draw buttons
  tft.setTextColor(TFT_WHITE);
  tft.fillRoundRect(0, 200, 120, 60, 3, TFT_DARKCYAN);
  tft.drawString(" Bonjour ",25,220,2);
  tft.fillRoundRect(120, 200, 120, 60, 3, TFT_PURPLE);
  tft.drawString(" MEUH ",155,220,2);
  tft.fillRoundRect(0, 260, 120, 60, 3, TFT_ORANGE);
  tft.drawString(" COT COT ",25,280,2);
  tft.fillRoundRect(120, 260, 120, 60, 3, TFT_SILVER);
  tft.drawString(" MIAOUH ",150,280,2);

  //init websocket
  Serial.println("Start Websocket Server");
  webSocket.begin();
  webSocket.onEvent(webSocketEvent);

}

void connect() {
  Serial.println();
  Serial.print("Connecting to ");
  Serial.println(ssid);

  /* Explicitly set the ESP8266 to be a WiFi-client, otherwise, it by default,
     would try to act as both a client and an access-point and could cause
     network-issues with your other WiFi-devices on your WiFi-network. */
  WiFi.mode(WIFI_STA);
  if (password == "")
    WiFi.begin(ssid);
  else
    WiFi.begin(ssid, password);

  while (WiFi.status() != WL_CONNECTED) {
    delay(500);
    Serial.print(".");
  }

  Serial.println("");
  Serial.println("WiFi connected");
  Serial.println("IP address: ");
  Serial.println(WiFi.localIP());
}

void webSocketEvent(uint8_t num, WStype_t type, uint8_t * payload, size_t lenght) {

    switch(type) {
        case WStype_DISCONNECTED:
            Serial.printf("[%u] Disconnected!\n", num);
            break;
        case WStype_CONNECTED: {
            IPAddress ip = webSocket.remoteIP(num);
            Serial.printf("[%u] Connected from %d.%d.%d.%d url: %s\n", num, ip[0], ip[1], ip[2], ip[3], payload);

            // send message to client
            webSocket.sendTXT(num, "Connected");
            cli = num;
        }
            break;
        case WStype_TEXT:
            Serial.printf("[%u] get Text: %s\n", num, payload);
           for (int i=0;i<lenght; i++) {
            data = payload[i];
              // If it is a CR or we are near end of line then scroll one line
              if (data == '\r' || xPos>231) {
                xPos = 0;
                yDraw = scroll_line(); // It can take 13ms to scroll and blank 16 pixel lines
              }
              if (data > 31 && data < 128) {
                xPos += tft.drawChar(data,xPos,yDraw,2);
                blank[(18+(yStart-TOP_FIXED_AREA)/TEXT_HEIGHT)%19]=xPos; // Keep a record of line lengths
              }
           }
            break;

        default:
            break;
    }

}


void loop(void) {
  webSocket.loop();

  uint16_t x = 0, y = 0; // To store the touch coordinates
  // Pressed will be set true is there is a valid touch on the screen
  boolean pressed = tft.getTouch(&x, &y);

  if (pressed)
  {
//    Serial.print("x,y = ");
//    Serial.print(x);
//    Serial.print(",");
//    Serial.println(y);

    //touch start at 0,0 top right & 240,320 bottom left
    if (y > 160) { //left
      if (x > 200) { //down
        webSocket.sendTXT(cli, " COT COT \r");
        Serial.println(" COT COT \r");
      } else {
        if (x > 150) { //up
         webSocket.sendTXT(cli, " Bonjour \r");
         Serial.println(" Bonjour \r");
        }
      }
    } else { //right
      if (x > 200) { //down
        webSocket.sendTXT(cli, " MIAOUH \r");
         Serial.println(" MIAOUH \r");
      } else { if (x >150) { //up
         webSocket.sendTXT(cli, " MEUH \r");
         Serial.println(" MEUH \r");
        }
      }
    }
  }

  while (Serial.available()) {
    data = Serial.read();
    // If it is a CR or we are near end of line then scroll one line
    if (data == '\r' || xPos>231) {
      xPos = 0;
      yDraw = scroll_line(); // It can take 13ms to scroll and blank 16 pixel lines
    }
    if (data > 31 && data < 128) {
      xPos += tft.drawChar(data,xPos,yDraw,2);
      blank[(18+(yStart-TOP_FIXED_AREA)/TEXT_HEIGHT)%19]=xPos; // Keep a record of line lengths
    }
    //change_colour = 1; // Line to indicate buffer is being emptied
  }
}

// ##############################################################################################
// Call this function to scroll the display one text line
// ##############################################################################################
int scroll_line() {
  int yTemp = yStart; // Store the old yStart, this is where we draw the next line
  // Use the record of line lengths to optimise the rectangle size we need to erase the top line
  tft.fillRect(0,yStart,blank[(yStart-TOP_FIXED_AREA)/TEXT_HEIGHT],TEXT_HEIGHT, TFT_BLACK);

  // Change the top of the scroll area
  yStart+=TEXT_HEIGHT;
  // The value must wrap around as the screen memory is a circular buffer
  if (yStart >= YMAX - BOT_FIXED_AREA) yStart = TOP_FIXED_AREA + (yStart - YMAX + BOT_FIXED_AREA);
  // Now we can scroll the display
  scrollAddress(yStart);
  return  yTemp;
}

// ##############################################################################################
// Setup a portion of the screen for vertical scrolling
// ##############################################################################################
// We are using a hardware feature of the display, so we can only scroll in portrait orientation
void setupScrollArea(uint16_t tfa, uint16_t bfa) {
  tft.writecommand(ILI9341_VSCRDEF); // Vertical scroll definition
  tft.writedata(tfa >> 8);           // Top Fixed Area line count
  tft.writedata(tfa);
  tft.writedata((YMAX-tfa-bfa)>>8);  // Vertical Scrolling Area line count
  tft.writedata(YMAX-tfa-bfa);
  tft.writedata(bfa >> 8);           // Bottom Fixed Area line count
  tft.writedata(bfa);
}

// ##############################################################################################
// Setup the vertical scrolling start address pointer
// ##############################################################################################
void scrollAddress(uint16_t vsp) {
  tft.writecommand(ILI9341_VSCRSADD); // Vertical scrolling pointer
  tft.writedata(vsp>>8);
  tft.writedata(vsp);
}
And the client part
/****************************
* Websocket directconnect mini chat demo
*  client side
*
* @author Florent Lemaire
*
 ****************************/

// WIFI
#include <ESP8266WiFi.h>
const char* ssid     = "XXXXXXXX";
const char* password = "XXXXXXXXXXX";
WiFiClient wifi;

// websocket
#include <WebSocketsClient.h>
WebSocketsClient webSocket;
String WSserver = "XXXXXXXX";
int WSport = 81;

//screen
#include <TFT_eSPI.h> // Hardware-specific library
#include <SPI.h>

TFT_eSPI tft = TFT_eSPI();       // Invoke custom library

// The scrolling area must be a integral multiple of TEXT_HEIGHT
#define TEXT_HEIGHT 20 // Height of text to be printed and scrolled
#define BOT_FIXED_AREA 124 // Number of lines in bottom fixed area (lines counted from bottom of screen)
#define TOP_FIXED_AREA 16 // Number of lines in top fixed area (lines counted from top of screen)
#define YMAX 320 // Bottom of screen area

// The initial y coordinate of the top of the scrolling area
uint16_t yStart = TOP_FIXED_AREA;
// yArea must be a integral multiple of TEXT_HEIGHT
uint16_t yArea = YMAX-TOP_FIXED_AREA-BOT_FIXED_AREA;
// The initial y coordinate of the top of the bottom text line
uint16_t yDraw = YMAX - BOT_FIXED_AREA - TEXT_HEIGHT;

// Keep track of the drawing x coordinate
uint16_t xPos = 0;

// For the byte we read from the serial port
byte data = 0;

// A few test variables used during debugging
boolean change_colour = 1;
boolean selected = 1;

// We have to blank the top line each time the display is scrolled, but this takes up to 13 milliseconds
// for a full width line, meanwhile the serial buffer may be filling... and overflowing
// We can speed up scrolling of short text lines by just blanking the character we drew
int blank[19]; // We keep all the strings pixel lengths to optimise the speed of the top line blanking

//force good pins for wemos shield and avoid to modify user_setup config
#define TFT_CS   PIN_D0  // Chip select control pin D8
#define TFT_DC   PIN_D8  // Data Command control pin
//#define TFT_RST  PIN_D4  // Reset pin (could connect to NodeMCU RST, see next line)
#define TFT_RST  -1

//touchscreen
#define TOUCH_CS PIN_D3

void setup() {
  // Setup the TFT display
  tft.init();
  tft.setRotation(0); // Must be setRotation(0) for this sketch to work correctly
  tft.fillScreen(TFT_BLACK);

  // Setup baud rate and draw top banner
  Serial.begin(115000);

  // init wifi
  connect();

  tft.setTextColor(TFT_WHITE, TFT_BLUE);
  tft.fillRect(0,0,240,16, TFT_BLUE);
  tft.drawCentreString(" Mini CHAT ",120,0,2);

  // Change colour for scrolling zone text
  tft.setTextColor(TFT_WHITE, TFT_BLACK);

  // Setup scroll area
  setupScrollArea(TOP_FIXED_AREA, BOT_FIXED_AREA);

  // Zero the array
  for (byte i = 0; i<18; i++) blank[i]=0;

  // init touchscreen
  uint16_t calData[5] = { 465, 3271, 429, 3170, 3 };
  tft.setTouch(calData);

  // draw buttons
  tft.setTextColor(TFT_WHITE);
  tft.fillRoundRect(0, 200, 120, 60, 3, TFT_DARKCYAN);
  tft.drawString(" Bonjour ",25,220,2);
  tft.fillRoundRect(120, 200, 120, 60, 3, TFT_PURPLE);
  tft.drawString(" MEUH ",155,220,2);
  tft.fillRoundRect(0, 260, 120, 60, 3, TFT_ORANGE);
  tft.drawString(" COT COT ",25,280,2);
  tft.fillRoundRect(120, 260, 120, 60, 3, TFT_SILVER);
  tft.drawString(" MIAOUH ",150,280,2);

  //init websocket
  Serial.println("Start Websocket Client");
  webSocket.begin(WSserver, WSport);
  webSocket.onEvent(webSocketEvent);

}

void connect() {
  Serial.println();
  Serial.print("Connecting to ");
  Serial.println(ssid);

  /* Explicitly set the ESP8266 to be a WiFi-client, otherwise, it by default,
     would try to act as both a client and an access-point and could cause
     network-issues with your other WiFi-devices on your WiFi-network. */
  WiFi.mode(WIFI_STA);
  if (password == "")
    WiFi.begin(ssid);
  else
    WiFi.begin(ssid, password);

  while (WiFi.status() != WL_CONNECTED) {
    delay(500);
    Serial.print(".");
  }

  Serial.println("");
  Serial.println("WiFi connected");
  Serial.println("IP address: ");
  Serial.println(WiFi.localIP());
}

void webSocketEvent(WStype_t type, uint8_t * payload, size_t lenght) {

    switch(type) {
        case WStype_DISCONNECTED:
            Serial.printf("[WSc] Disconnected!\n");
            break;
        case WStype_CONNECTED:
            Serial.printf("[WSc] Connected to url: %s\n",  payload);
            break;
        case WStype_TEXT:
           Serial.printf("[WSc] get text: %s\n", payload);
           for (int i=0;i<lenght; i++) {
            data = payload[i];
              // If it is a CR or we are near end of line then scroll one line
              if (data == '\r' || xPos>231) {
                xPos = 0;
                yDraw = scroll_line(); // It can take 13ms to scroll and blank 16 pixel lines
              }
              if (data > 31 && data < 128) {
                xPos += tft.drawChar(data,xPos,yDraw,2);
                blank[(18+(yStart-TOP_FIXED_AREA)/TEXT_HEIGHT)%19]=xPos; // Keep a record of line lengths
              }
           }

            break;
        case WStype_BIN:
            Serial.printf("[WSc] get binary lenght: %u\n", lenght);
            hexdump(payload, lenght);

            // echo data back to Server
            webSocket.sendBIN(payload, lenght);
            break;

        case WStype_ERROR:
            Serial.printf("We received an error \n");
            break;

        default:
            break;
    }

}


void loop(void) {
  webSocket.loop();

  uint16_t x = 0, y = 0; // To store the touch coordinates
  // Pressed will be set true is there is a valid touch on the screen
  boolean pressed = tft.getTouch(&x, &y);

  if (pressed)
  {
//    Serial.print("x,y = ");
//    Serial.print(x);
//    Serial.print(",");
//    Serial.println(y);

    //touch start at 0,0 top right & 240,320 bottom left
    if (y > 160) { //left
      if (x > 200) { //down
        webSocket.sendTXT(" COT COT \r");
        Serial.println(" COT COT \r");
      } else {
        if (x > 150) { //up
         webSocket.sendTXT(" Bonjour \r");
         Serial.println(" Bonjour \r");
        }
      }
    } else { //right
      if (x > 200) { //down
        webSocket.sendTXT(" MIAOUH \r");
         Serial.println(" MIAOUH \r");
      } else { if (x >150) { //up
         webSocket.sendTXT(" MEUH \r");
         Serial.println(" MEUH \r");
        }
      }
    }
  }

  while (Serial.available()) {
    data = Serial.read();
    // If it is a CR or we are near end of line then scroll one line
    if (data == '\r' || xPos>231) {
      xPos = 0;
      yDraw = scroll_line(); // It can take 13ms to scroll and blank 16 pixel lines
    }
    if (data > 31 && data < 128) {
      xPos += tft.drawChar(data,xPos,yDraw,2);
      blank[(18+(yStart-TOP_FIXED_AREA)/TEXT_HEIGHT)%19]=xPos; // Keep a record of line lengths
    }
    //change_colour = 1; // Line to indicate buffer is being emptied
  }
}

// ##############################################################################################
// Call this function to scroll the display one text line
// ##############################################################################################
int scroll_line() {
  int yTemp = yStart; // Store the old yStart, this is where we draw the next line
  // Use the record of line lengths to optimise the rectangle size we need to erase the top line
  tft.fillRect(0,yStart,blank[(yStart-TOP_FIXED_AREA)/TEXT_HEIGHT],TEXT_HEIGHT, TFT_BLACK);

  // Change the top of the scroll area
  yStart+=TEXT_HEIGHT;
  // The value must wrap around as the screen memory is a circular buffer
  if (yStart >= YMAX - BOT_FIXED_AREA) yStart = TOP_FIXED_AREA + (yStart - YMAX + BOT_FIXED_AREA);
  // Now we can scroll the display
  scrollAddress(yStart);
  return  yTemp;
}

// ##############################################################################################
// Setup a portion of the screen for vertical scrolling
// ##############################################################################################
// We are using a hardware feature of the display, so we can only scroll in portrait orientation
void setupScrollArea(uint16_t tfa, uint16_t bfa) {
  tft.writecommand(ILI9341_VSCRDEF); // Vertical scroll definition
  tft.writedata(tfa >> 8);           // Top Fixed Area line count
  tft.writedata(tfa);
  tft.writedata((YMAX-tfa-bfa)>>8);  // Vertical Scrolling Area line count
  tft.writedata(YMAX-tfa-bfa);
  tft.writedata(bfa >> 8);           // Bottom Fixed Area line count
  tft.writedata(bfa);
}

// ##############################################################################################
// Setup the vertical scrolling start address pointer
// ##############################################################################################
void scrollAddress(uint16_t vsp) {
  tft.writecommand(ILI9341_VSCRSADD); // Vertical scrolling pointer
  tft.writedata(vsp>>8);
  tft.writedata(vsp);
}
And the demo (with humans) 200km long :
Interspecies chat by websocket (+ SPI) - bonus
Because it’s also made for animals, we’ve tested it of course :)
With cats on my side :

And with chicken at Luc side :
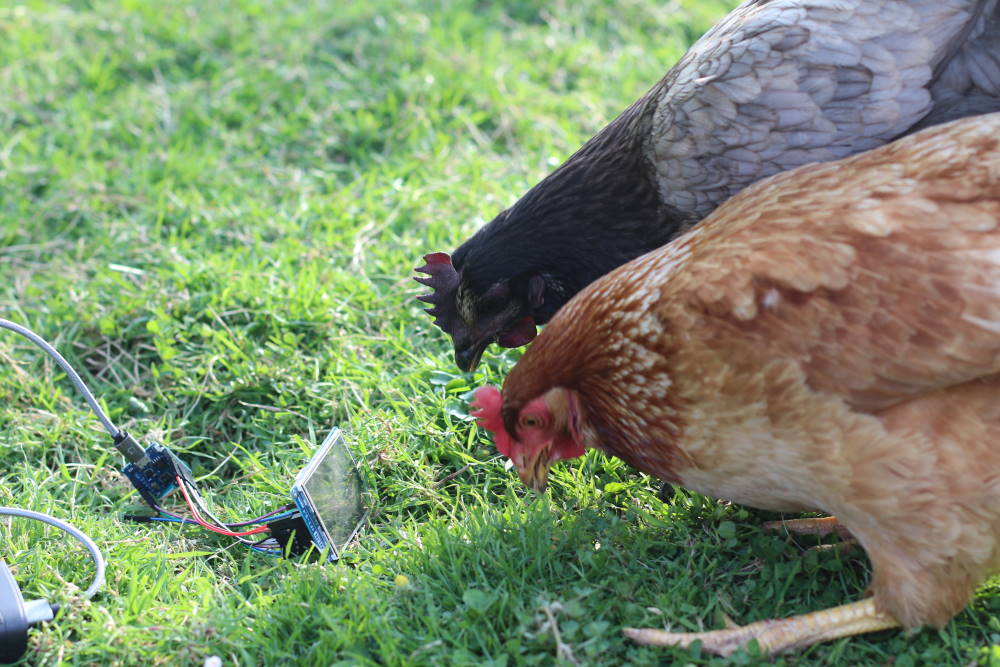
Cows aren’t at home this week so I can’t test with her yet!
Libraries
websocket library

tft e_spy (for the tft & touchscreen)

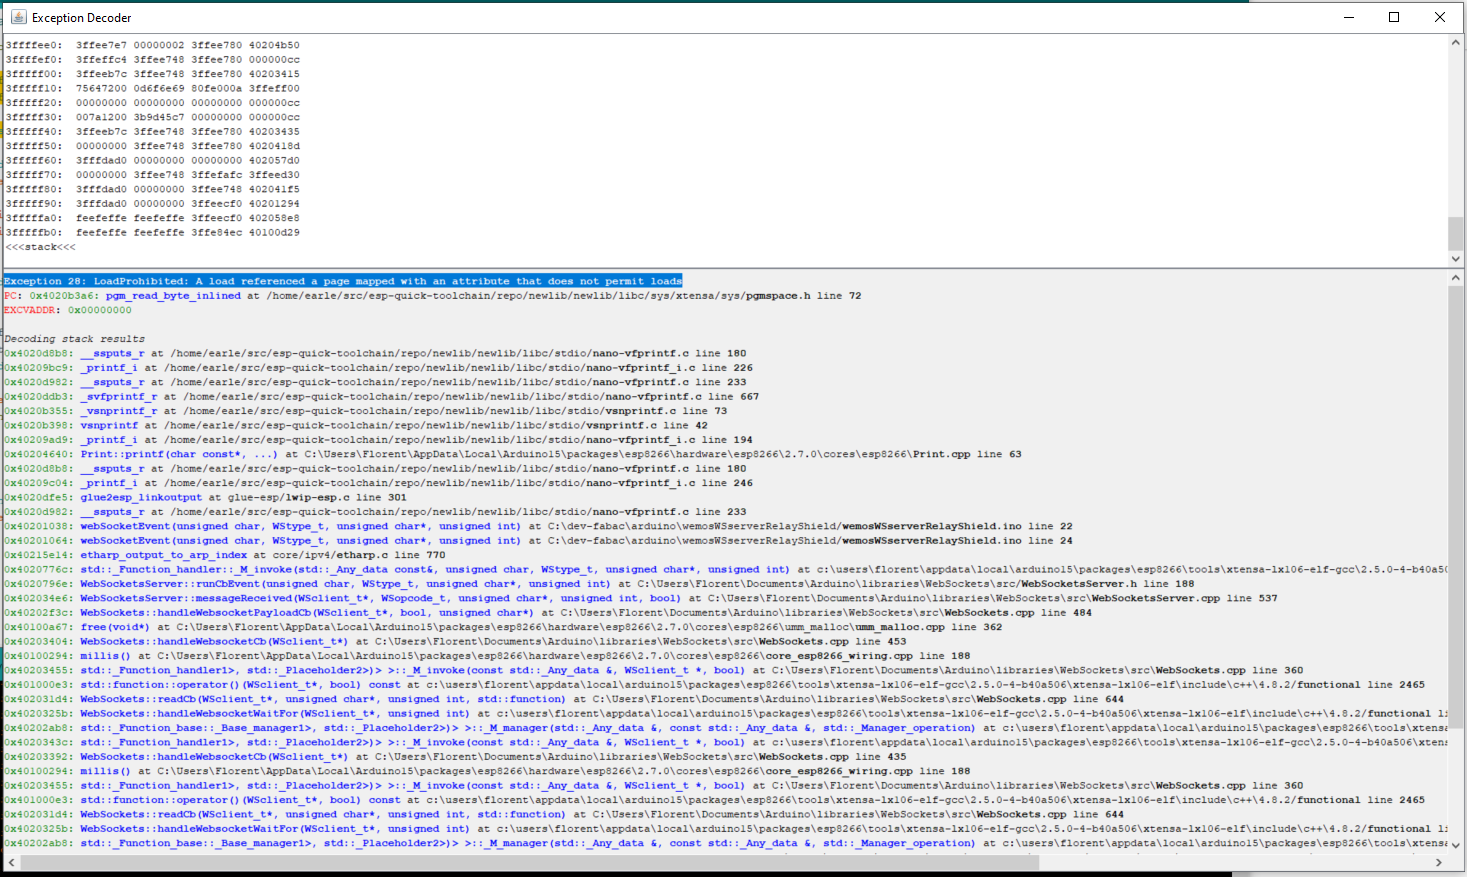
Tip of the week
When building and testing my code on the websocket part, I’m so bored of stack traces and reboot in serial monitor. Finally I found a very useful tool for arduino IDE to decode the stack trace and find the faulty code :
https://github.com/me-no-dev/EspExceptionDecoder