11. Input devices
This week I worked on making an input device.
Assignment
individual assignment:
measure something: add a sensor to a microcontroller board that you have designed and read it
group assignment:
probe an input device’s analog levels and digital signals
What we did
FabAcademy2019-FabLab Kannai lab site
Input device
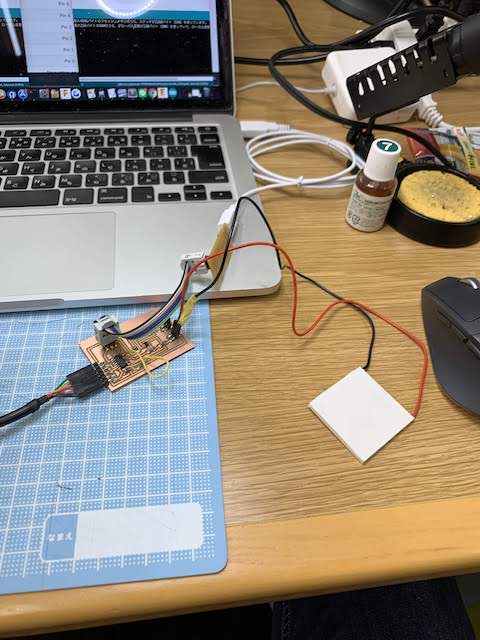
For this week assignment, I choose Peltier Cell for a sensor device. Peltier cell is usually used for small refrigerator since it is compact and silent. Peltier Cell is using Peltier effect which you give electric current, it creates a difference of temperature. But you can use it the opposite way: If you create a difference of temperature with Peltier cell, it gives electric current. This is called the Seebeck effect. So I focused on Seebeck effect and used it as an input device which sensed the temperature of heat of your hand palm.
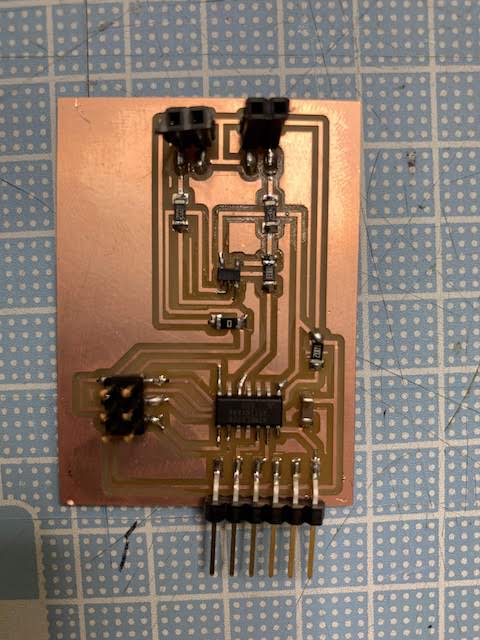
Device/Parts list
- Peltier Cell(Heibei TEC1-12705)
- ATTiny 44(datasheet)
- 0 ohm resistor(311-0.0ERCT-ND) x1
- 10K(311-10.0KFRCT-ND) ohm resistor x5
- 100K(311-100KFRCT-ND) ohm resitor x1
- Ope amp(AD8615AUJZ-REEL7CT-ND)
- capasiter 1μF(445-1423-1-ND)
- 6 pin header
- 1x2 pin socket x2
Circuit Design
I used EAGLE to design the circuit. Based on knowledge of the board I made in week 6, I redesign my board.


I added 2 1x2 pin sockets which we can jack in peltier cell and OPamp to amprify 10X of analog signal from peltier cell. I checked datasheet to determine which pins are best to assign analog IN.
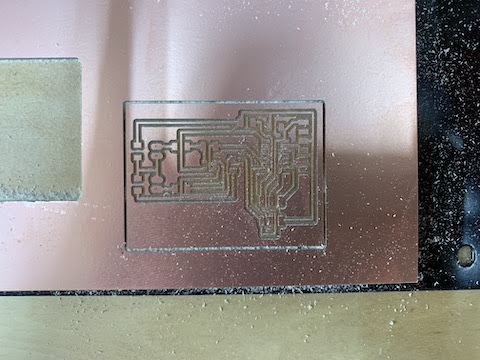
PCB production
Cutting with MDX-15 and FabModules on Ubuntu
Cutting with 1/64 square drill
Soldered all parts
Writing
I wrote arduino on ATTINY 44 through FabISP.
- Opened the preferences in the Arduino.
- Put this URL: https://raw.githubusercontent.com/damellis/attiny/ide-1.6.x-boards-manager/package_damellis_attiny_index.json
- Opened the boards manager in the “Tools > Board” menu.
- Searched ATTiny
- Installed.
- Then hit “Burn Bootroader”
cf.HiLowTech
At first I assined Analog IN to pin 5 but this is not used as analog in for attyny 44 so I cut circuit and soldered jumper wire to pin 6.

Code
#include <SoftwareSerial.h>
SoftwareSerial mySerial(0, 1); // RX, TX

int analogPin = 7;

int val = 0;

void setup() {
  pinMode(8, INPUT);
  mySerial.begin(9600);
}

void loop() {
  val = analogRead(analogPin);
  mySerial.println(val);
  delay(100);
}
Sensing
Turned on Arduino, and clicked serial monitor. By default, it gives us back 512(1024/2).

After I put on my hand for a while, it went up to around 600. This means it can sensor the difference of temperature causing by my hand.