Output Devices
For this week's assignment we had to add an output device to a self-designed microcontroller board and programm it to do something. Since the goal was to combine this task with the Input Device Week, I used the board I made for that week. The idea was to show the score on a display. In order to display it I decided to use a 8x8 LED Matrix display. Moreover I thought about having some speakers and using a Micro SD card reader to transmit the song.
Group Assignment
For this week's group assignment we had to measure the power consumption of an output device. The documentaion of this task can be found on our Group Assignment Website.
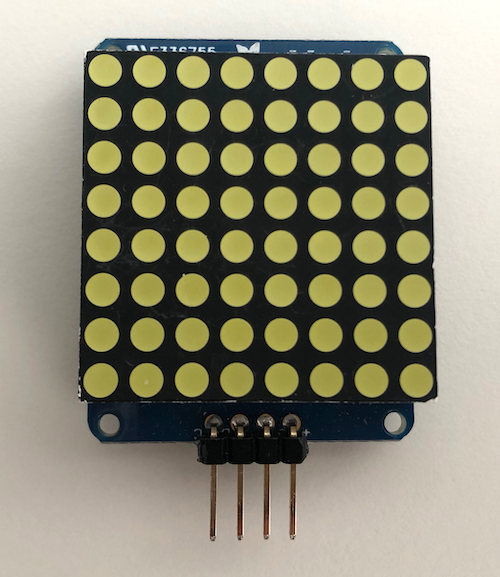
8x8 LED Matrix Display
LED displays are often packaged as matrixes of LEDs arranged in rows of common anodes and columns of common cathodes, or the reverse. The LED Matrix contains 64 LED's and all of them can be easily addressed via the integrated MAX7219 chip. In addition, several chips can be connected in series to create a longer scrolling text.
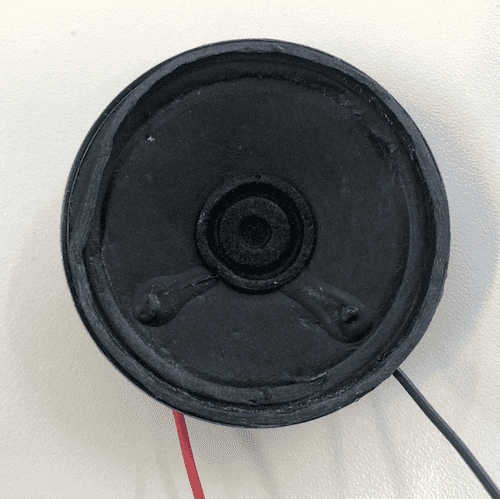
Speakers
The Arduino creates tones of different frequencies and plays it through the speaker. The variation of the frequency of the tone with correct timings creates music. The Arduino generates a signal and outputs it via the digital pin to which the speaker is connected. To create a tone you can use the function tone(). But keep in mind that only one tone can be generated at a time.
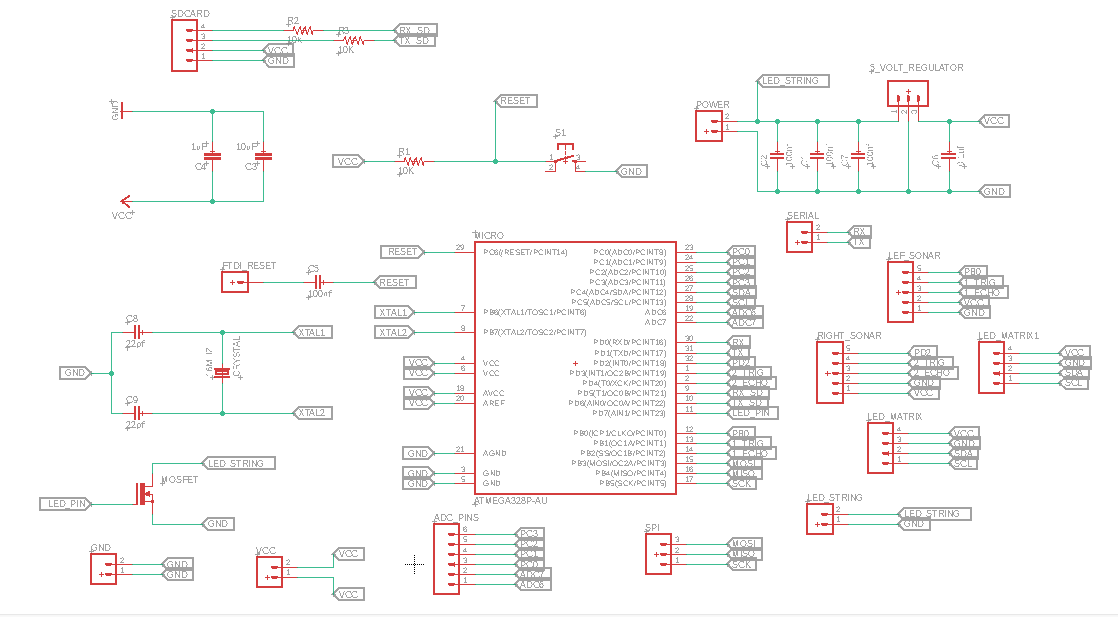
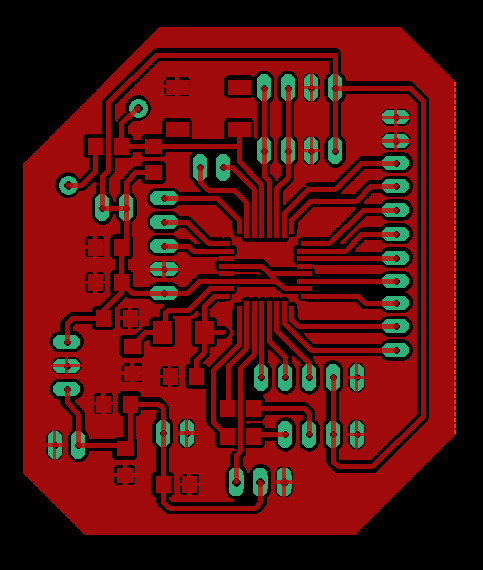
Schematic & Board Layout
To read the construction of the PCB and explanation of the Schematic go to the Input Device assignment. To get a full introduction on how to make a Schematic and Board Layout with Eagle go to the Electronics Design week.
Programming
Unfortunately, we didn't have a Micro SD card reader in our FabAcademy inventory, so I couldn't play a song and didn't add the speakers. I also noticed that it is not possible to display the score on the LED matrix and measure the distance of the ball with the sonar sensor at the same time. I would have had to create two separate boards and then transfer the values from the sonar sensor from one board to the other. But that's a task for next time. Underneath you can find the Code for this week's assignment.
For this week's assignment I used the button pin as an interrupt pin. Interrupts are useful for making things happen automatically in microcontroller programs and can help solve timing problems. I decided to do this, to ensure that the sonar sensor resumes reading the distance values as soon as you press the button.
// libraries included
#include <Wire.h>
#include <NewPing.h>

#include <Adafruit_GFX.h>
#include "Adafruit_LEDBackpack.h"


Adafruit_8x8matrix matrix = Adafruit_8x8matrix();

//decleares two digital Pins as Trig and Echo
#define trig 3
#define echo 4
#define max_distance 8
#define trigPin 9
#define echoPin 10
#define buttonPin 2
#define LEDpin 7

// NewPing setup of pins and maximum distance
NewPing sonar(trig, echo, max_distance);

// defines variables
long duration;
int distance;
int spacing;
boolean flag = true;
int buttonState = 0;
int red_score = 0;
int blue_score = 0;

void setup() {
pinMode(trigPin, OUTPUT); // Sets the trigPin as an Output
pinMode(echoPin, INPUT); // Sets the echoPin as an Input
pinMode(buttonPin, INPUT_PULLUP);
pinMode(LEDpin, OUTPUT);
attachInterrupt (digitalPinToInterrupt (buttonPin), raiseFlag, LOW);
Serial.begin(4800);
matrix.begin(0x70);  // pass in the address
    matrix.setTextSize(1);
    matrix.setTextWrap(false);  // we dont want text to wrap so it scrolls nicely
    matrix.setTextColor(LED_ON);
  for (int8_t x=0; x>=-65; x--) {
    matrix.clear();
    matrix.setCursor(x,0);
    matrix.print("LET'S PLAY!");
    matrix.writeDisplay();
    delay(100);
    }
}


void Sonar () {
  // Clears the trigPin
digitalWrite(trigPin, LOW);
delayMicroseconds(2);
// Sets the trigPin on HIGH state for 10 micro seconds
digitalWrite(trigPin, HIGH);
delayMicroseconds(10);
digitalWrite(trigPin, LOW);
// Reads the echoPin, returns the sound wave travel time in microseconds
duration = pulseIn(echoPin, HIGH);
// Calculating the distance
distance= duration*0.034/2;

// Prints the distance on the Serial Monitor only if the flag is true
if (flag == true ) {
Serial.print("Distance of Team Red: ");
Serial.print(distance);
Serial.println("cm");
// If the value is between 0 - 8 a Goal has been made
if (distance <9 && distance >0) {
  //counts the score
  red_score = red_score +1;
  digitalWrite(LEDpin, HIGH);
    matrix.setTextSize(1);
    matrix.setTextWrap(false);  // we dont want text to wrap so it scrolls nicely
    matrix.setTextColor(LED_ON);
  Serial.println(" GOAL !!! FOR TEAM RED");
  Serial.println("Score: Team Blue | Team Red");
  Serial.print(blue_score);
  Serial.print(" | ");
  Serial.println(red_score);
  delay(100);
  // stops the output on the serial to reset it (to restart the game) push the button
  for (int8_t x=0; x>=-72; x--) {
    matrix.clear();
    matrix.setCursor(x,0);
    matrix.print("GOAL! GOAL!");
    matrix.writeDisplay();
    delay(80);
    }
  flag = false;
}
}
}

void Sonar_using_Lib() {
delay(50);
spacing = sonar.ping_cm();
// Prints the distance on the Serial Monitor only if the flag is true
if (flag == true) {
Serial.print("Distance of Team Blue: " );
Serial.print(spacing);
Serial.println("cm");
// If the value is between 0 - 8 a Goal has been made
if (spacing <9 && spacing > 0) {
  digitalWrite(LEDpin, HIGH);
  //counts the score
  blue_score = blue_score +1;
    matrix.setTextSize(1);
    matrix.setTextWrap(false);  // we dont want text to wrap so it scrolls nicely
    matrix.setTextColor(LED_ON);
  Serial.println(" GOAL !!! FOR TEAM BLUE");
  Serial.println("Score: Team Blue | Team Red");
  Serial.print(blue_score);
  Serial.print(" | ");
  Serial.println(red_score);
  delay(50);
  // stops the output on the serial to reset it (to restart the game) push the button
   for (int8_t x=0; x>=-72; x--) {
    matrix.clear();
    matrix.setCursor(x,0);
    matrix.print("GOAL! GOAL!");
    matrix.writeDisplay();
    delay(80);
    }
    flag = false;
    }
  }
}
void raiseFlag (){
  flag = true;
  digitalWrite(LEDpin, LOW);
}
void loop() {
  Sonar();
  Sonar_using_Lib();

}