5. Electronics Production
my experience with circuit boards prior to the FabAcademy
This is Sculpture I made using found electronic components and circuit boards from a local dump.
This week I worked alongside my classmates to characterize the design rules for your PCB production process. In addition individually I made an in-circuit programmer by milling the PCB and programed it.
Machines
Roland MonoFab SRM-20
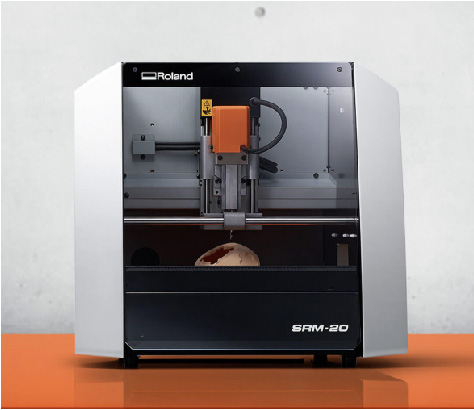
Key Parameters
- Tool Diameter
- Cut Depth
- Max Depth
- Offset number
- Speed
- Working 0
Materials
- PCB circuit board FR1
- Machinable Wax (Molding and Casting)
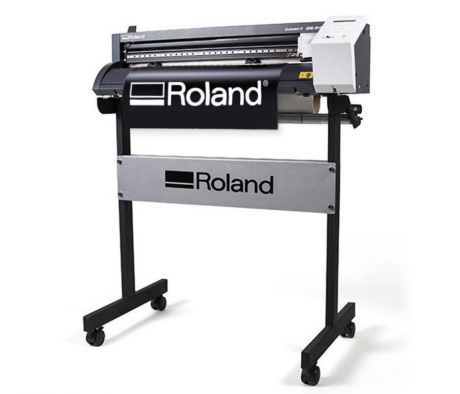
Vinyl Cutter
Key Parameters
- Force
- Speed
- Cut Depth
Materials
- Vinyl
- Transfer Adhesive
- Masking Tap
- Copper Adhesive
Group Assignment Results:
This is the design we are going to use for the process; as you can see it allows us to study the minimum thickness of a line, or cable, that the machine is able to cut, also it allows to check the maximum slot thickness you can do between 2 cables.
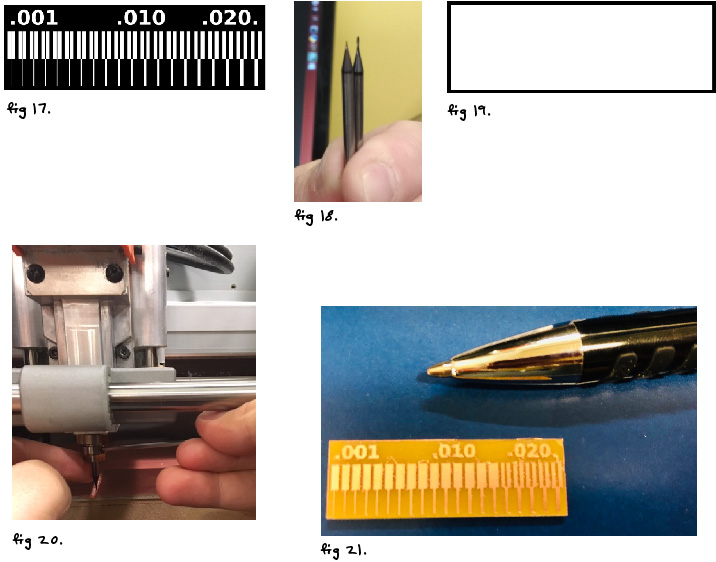
- fig 17: This is the Traces design we used for the process; as you can see it allows us to study the minimum thickness of a line, or cable, that the machine is able to cut, also it allows to check the maximum slot thickness you can do between 2 cables.
- figure 18: 1/64 end mill used for traces (on left), 1/32 end mill for the interior (on right)
- figure 19: Interior design for traces
- figure 20: Once the x & y axis are set you need to zero the z axis by gently releasing it on the PCB board
- figure 21: Result
- To program the machine to create the final result we used Mods
Mods & Milling
Steps for Mods:
-
Start the mods server and to open a local/server program.
-
Upload the .png file.
-
Check parameters, tool diameter, cut depth, max depth, offset number.
-
Select Traces or cutline depending on the file.
-
Zero the axis
-
See video below for detailed process
This video shows my process for milling PCB boards.

Soldering Guide
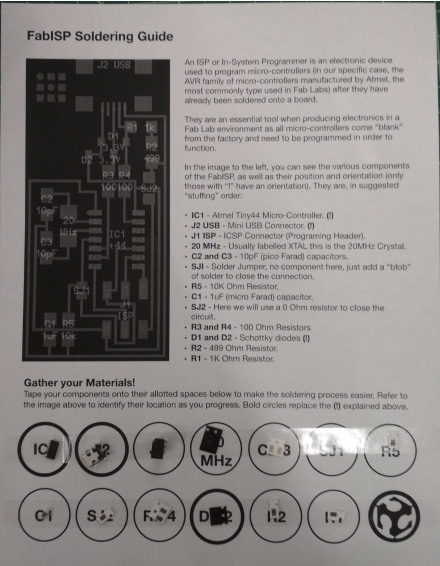
Courtesy of my brilliant instructor Luciano.
Materials
- electronic components (listed above)
- Solder
- Solder station
- Fume extractor
- Electric solder gun
- Braid
- Solder sucker
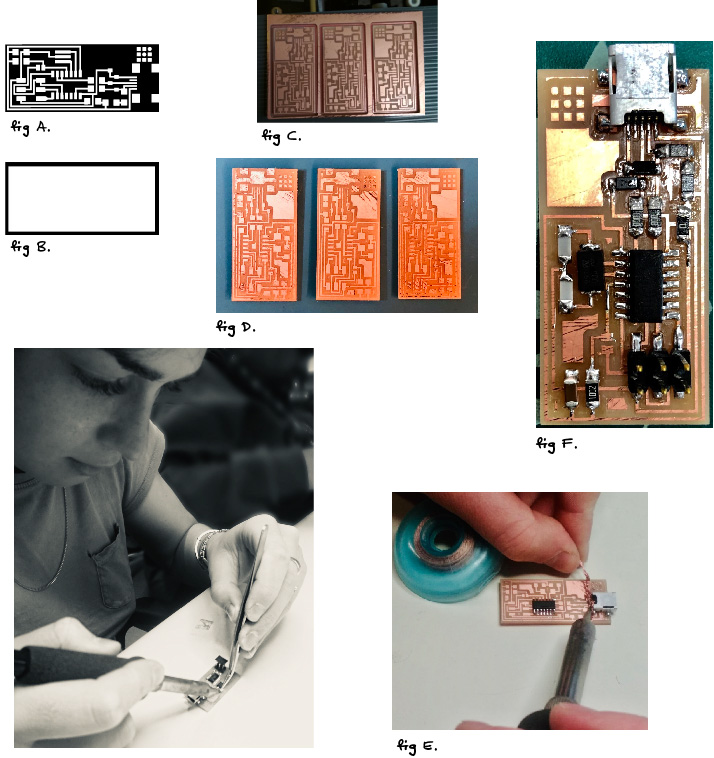
- figure A: boards trace design .png file
- figure B: boards interior design .png file
- figure C: result using mods (steps above)
- figure D: boards after removing and cleaning
- figure E: using the handy braid tool to remove excess solder
- figure F: result after my first time ever soldering
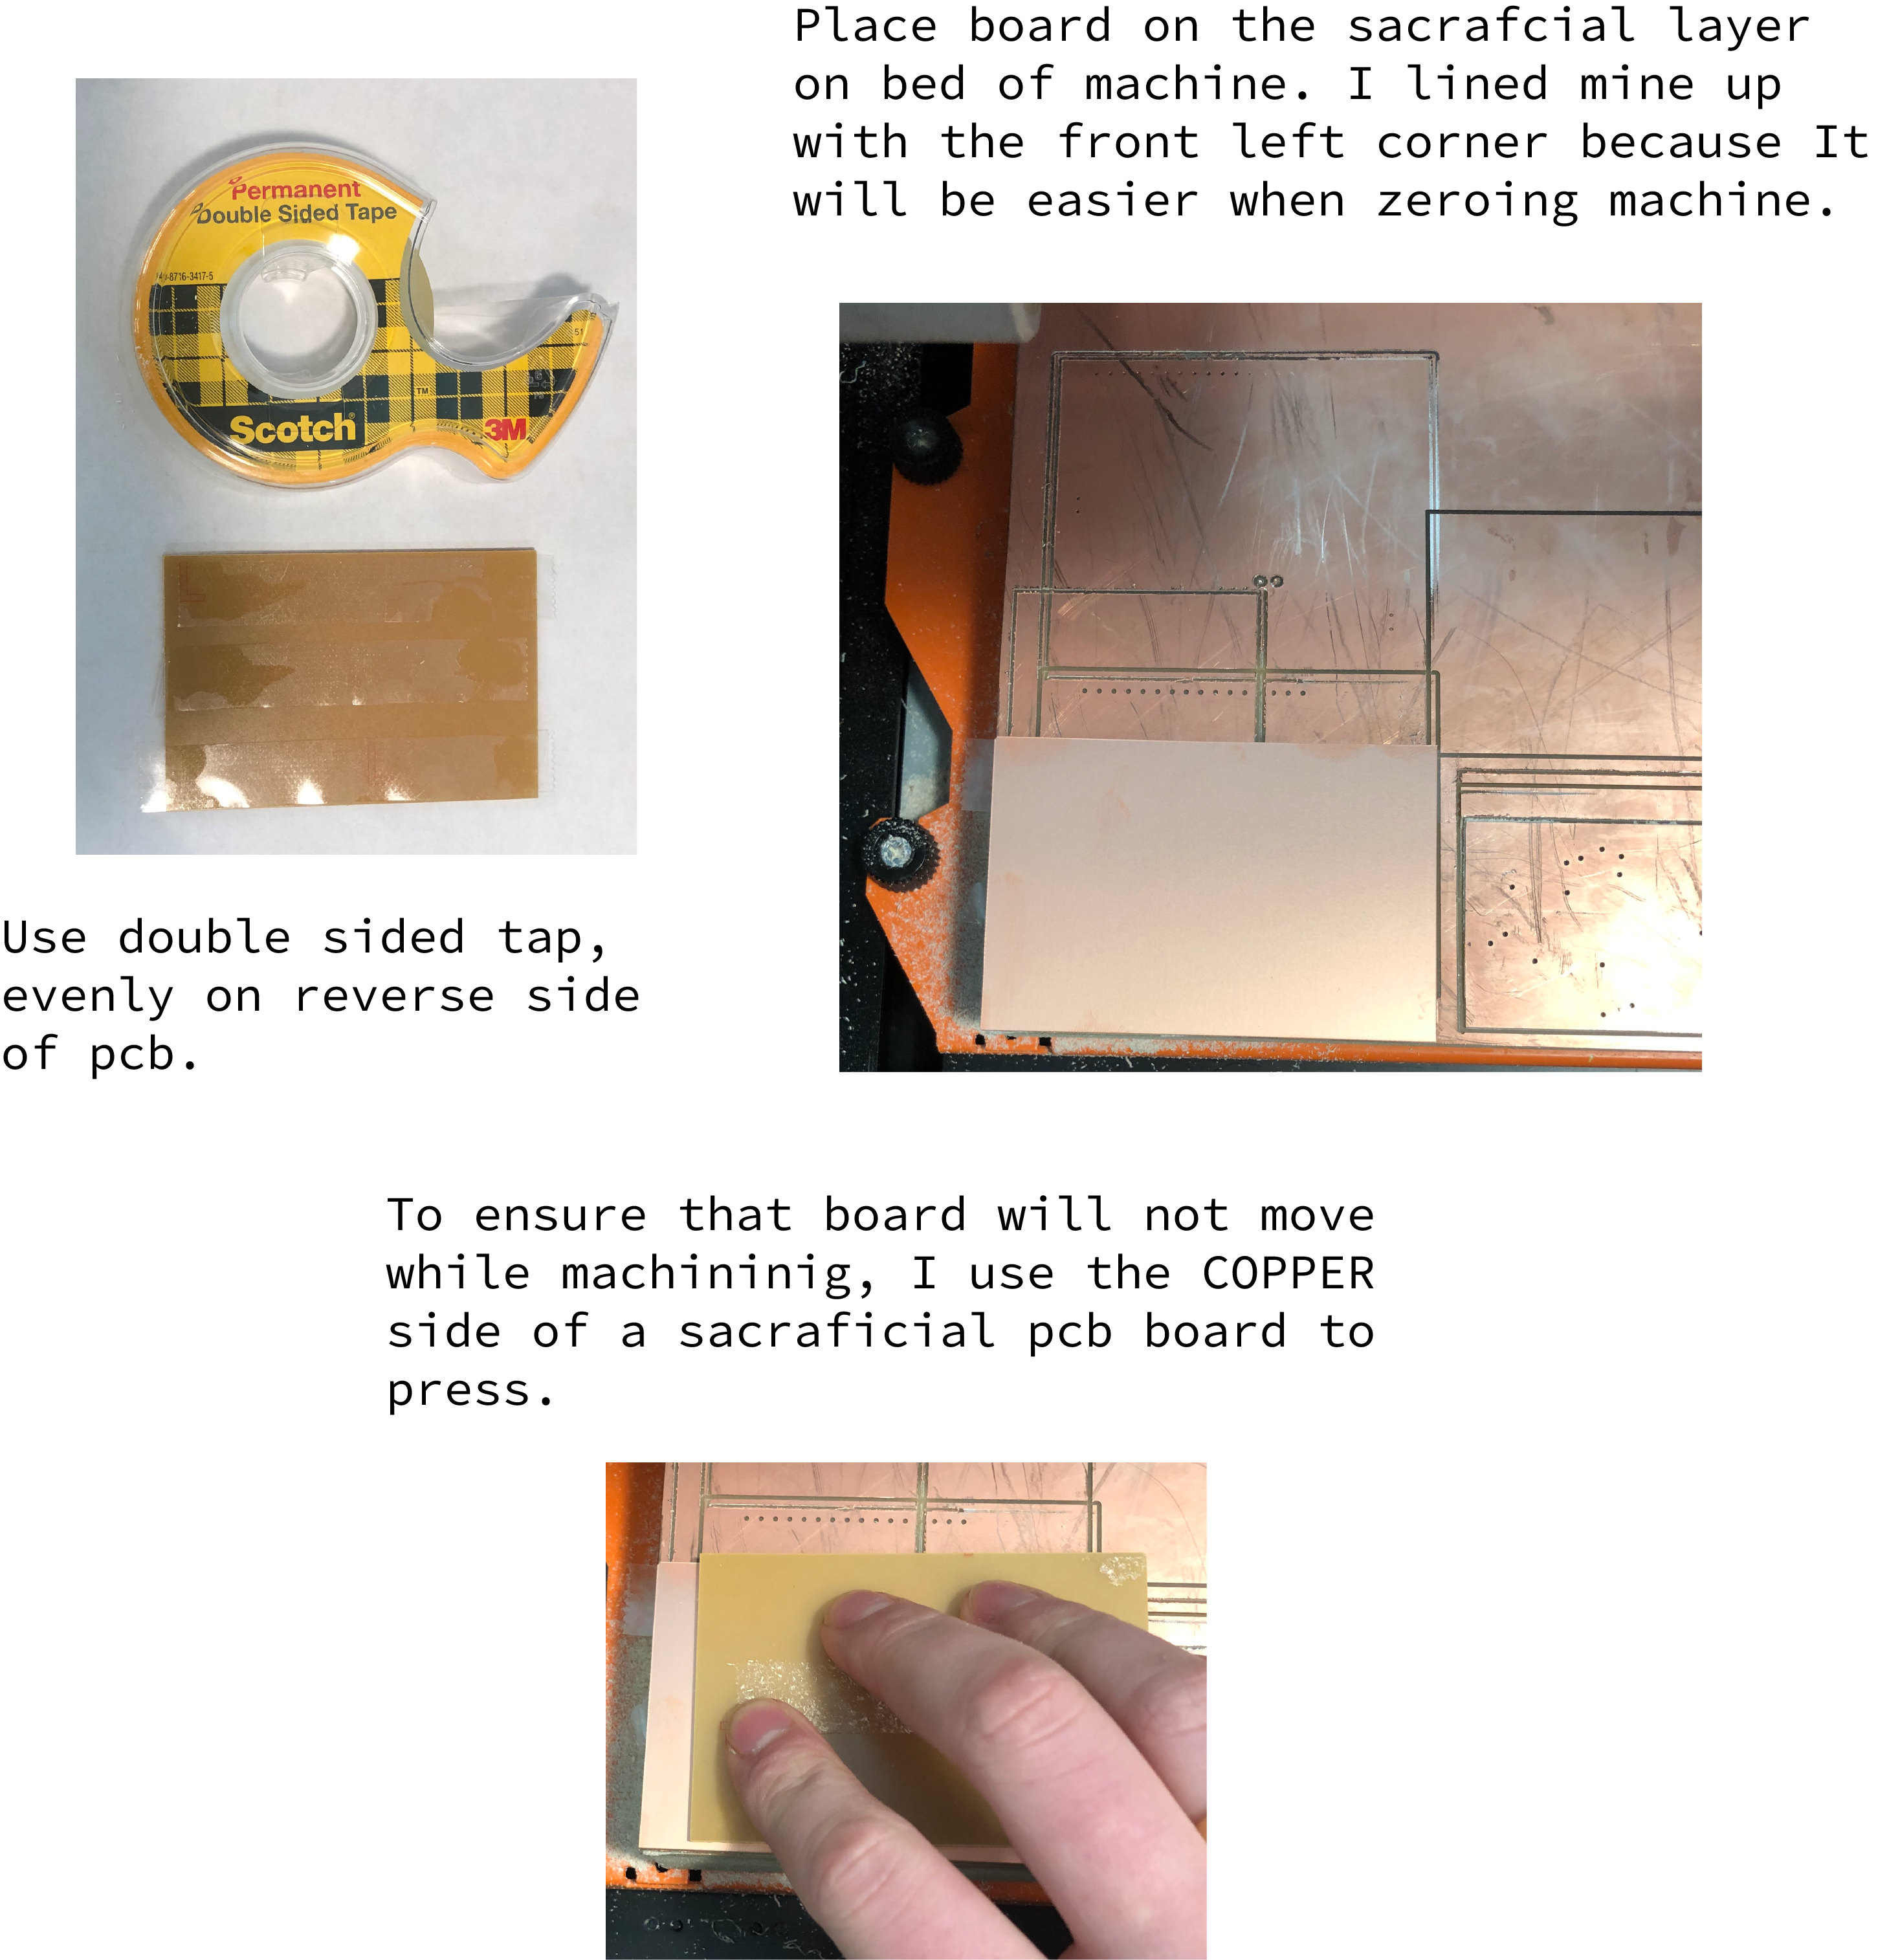
I love working with my hands so I really enjoyed this week. It was my first time ever milling a board and soldering components, so I was a little anxious, however I found soldering to be very therapeutic. I started soldering the inner components and work out. I used the braid technique for the IC after adding lots of solder, I also had fun individually legs, one by one. The braid defiantly comes in handy with more legs. When soldering if I wasn’t happy with a ‘glob’ of solder I used a solder sucker to clean it up. I started with a temperature of 600F and realized as I turned it up to 700F the heat the soldering flowed faster, I liked this more. I found double sided tape to be very useful to stick my board to the table so it did not move while soldering.
I built three ISP boards before I got one successfully programmed and I gotta say it was was so exciting because of the built up anticipation.
I hit a few road blocks when programming. Along with a new board I also downloaded Ubuntu Operating System (its FREE) on my Mac to successfully program my board. Everything was working fine until the make hex step, and then I received an error message. After trouble shooting and eventually asking my instructor, we couldn’t find anything wrong with my board. So next thing I went to check was my operating system (classmates using Linux system were getting boards working) and sure enough I programmed it using Ubuntu.
SUCCESSS!!! WOOHOOO UBUNTU!!!
fab@fab-OptiPlex-3040-7:~/Desktop/fabISP/fabISP_mac.0.8.2_firmware$ make clean
rm -f main.hex main.lst main.obj main.cof main.list main.map main.eep.hex main.elf *.o usbdrv/*.o main.s usbdrv/oddebug.s usbdrv/usbdrv.s
fab@fab-OptiPlex-3040-7:~/Desktop/fabISP/fabISP_mac.0.8.2_firmware$ make hex
avr-gcc -Wall -Os -DF_CPU=20000000   -Iusbdrv -I. -DDEBUG_LEVEL=0 -mmcu=attiny44 -c usbdrv/usbdrv.c -o usbdrv/usbdrv.o
avr-gcc -Wall -Os -DF_CPU=20000000   -Iusbdrv -I. -DDEBUG_LEVEL=0 -mmcu=attiny44 -x assembler-with-cpp -c usbdrv/usbdrvasm.S -o usbdrv/usbdrvasm.o
avr-gcc -Wall -Os -DF_CPU=20000000   -Iusbdrv -I. -DDEBUG_LEVEL=0 -mmcu=attiny44 -c usbdrv/oddebug.c -o usbdrv/oddebug.o
avr-gcc -Wall -Os -DF_CPU=20000000   -Iusbdrv -I. -DDEBUG_LEVEL=0 -mmcu=attiny44 -c main.c -o main.o
main.c:88:13: warning: always_inline function might not be inlinable [-Wattributes]
 static void delay ( void )
             ^
avr-gcc -Wall -Os -DF_CPU=20000000   -Iusbdrv -I. -DDEBUG_LEVEL=0 -mmcu=attiny44 -o main.elf usbdrv/usbdrv.o usbdrv/usbdrvasm.o usbdrv/oddebug.o main.o
rm -f main.hex main.eep.hex
avr-objcopy -j .text -j .data -O ihex main.elf main.hex
avr-size main.hex
   text    data     bss     dec     hex filename
      0    1986       0    1986     7c2 main.hex
fab@fab-OptiPlex-3040-7:~/Desktop/fabISP/fabISP_mac.0.8.2_firmware$ make fuse
avrdude -c usbtiny -p attiny44  -U hfuse:w:0xDF:m -U lfuse:w:0xFF:m

avrdude: AVR device initialized and ready to accept instructions

Reading | ################################################## | 100% 0.00s

avrdude: Device signature = 0x1e9207 (probably t44)
avrdude: reading input file "0xDF"
avrdude: writing hfuse (1 bytes):

Writing | ################################################## | 100% 0.00s

avrdude: 1 bytes of hfuse written
avrdude: verifying hfuse memory against 0xDF:
avrdude: load data hfuse data from input file 0xDF:
avrdude: input file 0xDF contains 1 bytes
avrdude: reading on-chip hfuse data:

Reading | ################################################## | 100% 0.00s

avrdude: verifying ...
avrdude: 1 bytes of hfuse verified
avrdude: reading input file "0xFF"
avrdude: writing lfuse (1 bytes):

Writing | ################################################## | 100% 0.00s

avrdude: 1 bytes of lfuse written
avrdude: verifying lfuse memory against 0xFF:
avrdude: load data lfuse data from input file 0xFF:
avrdude: input file 0xFF contains 1 bytes
avrdude: reading on-chip lfuse data:

Reading | ################################################## | 100% 0.00s

avrdude: verifying ...
avrdude: 1 bytes of lfuse verified

avrdude: safemode: Fuses OK (E:FF, H:DF, L:FF)

avrdude done.  Thank you.

fab@fab-OptiPlex-3040-7:~/Desktop/fabISP/fabISP_mac.0.8.2_firmware$ make programavrdude -c usbtiny -p attiny44  -U flash:w:main.hex:i

avrdude: AVR device initialized and ready to accept instructions

Reading | ################################################## | 100% 0.00s

avrdude: Device signature = 0x1e9207 (probably t44)
avrdude: NOTE: "flash" memory has been specified, an erase cycle will be performed
         To disable this feature, specify the -D option.
avrdude: erasing chip
avrdude: reading input file "main.hex"
avrdude: writing flash (1986 bytes):

Writing | ################################################## | 100% 2.00s

avrdude: 1986 bytes of flash written
avrdude: verifying flash memory against main.hex:
avrdude: load data flash data from input file main.hex:
avrdude: input file main.hex contains 1986 bytes
avrdude: reading on-chip flash data:

Reading | ################################################## | 100% 2.32s

avrdude: verifying ...
avrdude: 1986 bytes of flash verified

avrdude: safemode: Fuses OK (E:FF, H:DF, L:FF)

avrdude done.  Thank you.

avrdude -c usbtiny -p attiny44  -U hfuse:w:0xDF:m -U lfuse:w:0xFF:m

avrdude: AVR device initialized and ready to accept instructions

Reading | ################################################## | 100% 0.00s

avrdude: Device signature = 0x1e9207 (probably t44)
avrdude: reading input file "0xDF"
avrdude: writing hfuse (1 bytes):

Writing | ################################################## | 100% 0.00s

avrdude: 1 bytes of hfuse written
avrdude: verifying hfuse memory against 0xDF:
avrdude: load data hfuse data from input file 0xDF:
avrdude: input file 0xDF contains 1 bytes
avrdude: reading on-chip hfuse data:

Reading | ################################################## | 100% 0.00s

avrdude: verifying ...
avrdude: 1 bytes of hfuse verified
avrdude: reading input file "0xFF"
avrdude: writing lfuse (1 bytes):

Writing | ################################################## | 100% 0.00s

avrdude: 1 bytes of lfuse written
avrdude: verifying lfuse memory against 0xFF:
avrdude: load data lfuse data from input file 0xFF:
avrdude: input file 0xFF contains 1 bytes
avrdude: reading on-chip lfuse data:

Reading | ################################################## | 100% 0.00s

avrdude: verifying ...
avrdude: 1 bytes of lfuse verified

avrdude: safemode: Fuses OK (E:FF, H:DF, L:FF)

avrdude done.  Thank you.

fab@fab-OptiPlex-3040-7:~/Desktop/fabISP/fabISP_mac.0.8.2_firmware$ lsusb
Bus 002 Device 001: ID 1d6b:0003 Linux Foundation 3.0 root hub
Bus 001 Device 106: ID 1781:0c9f Multiple Vendors USBtiny
Bus 001 Device 003: ID 0461:4e22 Primax Electronics, Ltd
Bus 001 Device 062: ID 413c:2113 Dell Computer Corp.
Bus 001 Device 100: ID 0b75:039f Roland DG Corp.
Bus 001 Device 101: ID 1781:0c9f Multiple Vendors USBtiny
Bus 001 Device 001: ID 1d6b:0002 Linux Foundation 2.0 root hub
fab@fab-OptiPlex-3040-7:~/Desktop/fabISP/fabISP_mac.0.8.2_firmware$ lsusb
Bus 002 Device 001: ID 1d6b:0003 Linux Foundation 3.0 root hub
Bus 001 Device 003: ID 0461:4e22 Primax Electronics, Ltd
Bus 001 Device 062: ID 413c:2113 Dell Computer Corp.
Bus 001 Device 100: ID 0b75:039f Roland DG Corp.
Bus 001 Device 107: ID 1781:0c9f Multiple Vendors USBtiny
Bus 001 Device 001: ID 1d6b:0002 Linux Foundation 2.0 root hub
fab@fab-OptiPlex-3040-7:~/Desktop/fabISP/fabISP_mac.0.8.2_firmware$
Ubuntu VirtualBox
After Ubuntu saved the day I downloaded and installed it on my Mac OS using Virtual machine.


VirtualBox is a software that allows you to create a virtual machine in a Linux environment and Ubuntu is a Linux-based operating system that is open sourced. Virtual Box allows me to run Ubuntu on my Mac while also preserving my computers original operating system. I like being able to choose between Linux and Mac OS, however duel booting makes my computer pretty slow.
Experiment: Flexible ATiny44
One of my final project ideas is to create a smart jacket and to do so I need to create a board that is flexible and bends with the clothes, and does not break when thrown around. My classmate José Tomás (JT) was also interested in creating a flexible circuit board so we collaborated to get it done.
Machine
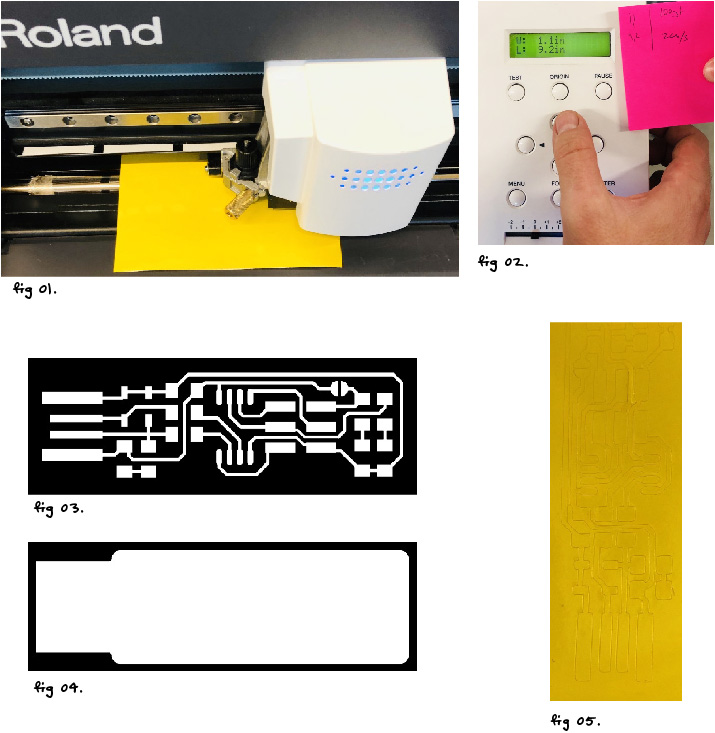
- figure 01: vinyl loaded
- figure 02: position (very important to record)
- figure 03: traces file
- figure 04: interior file
- figure 05: traces cut into vinyl
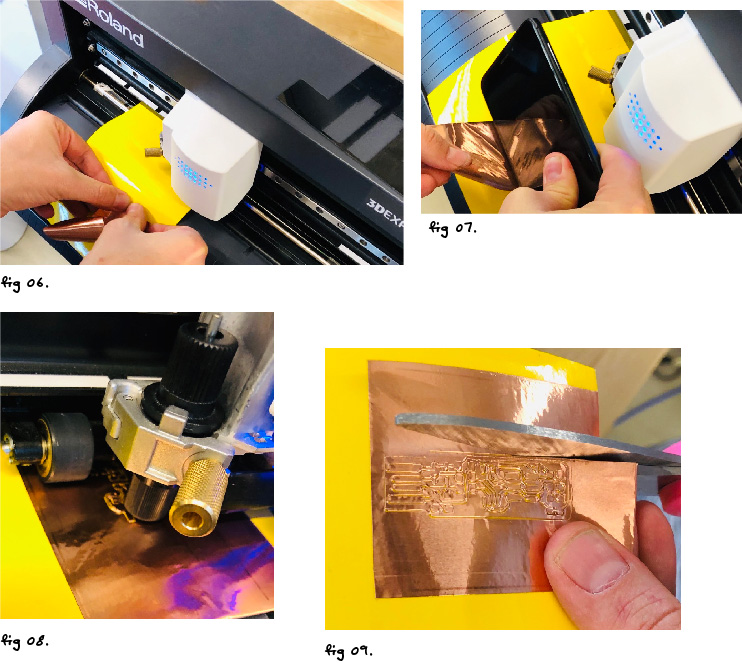
- figure 06: placing copper sticker on the vinyl
- figure 07: using phone to secure an even layer
- figure 08: machine cutting traces on top of vinyl
- figure 09: removing excess
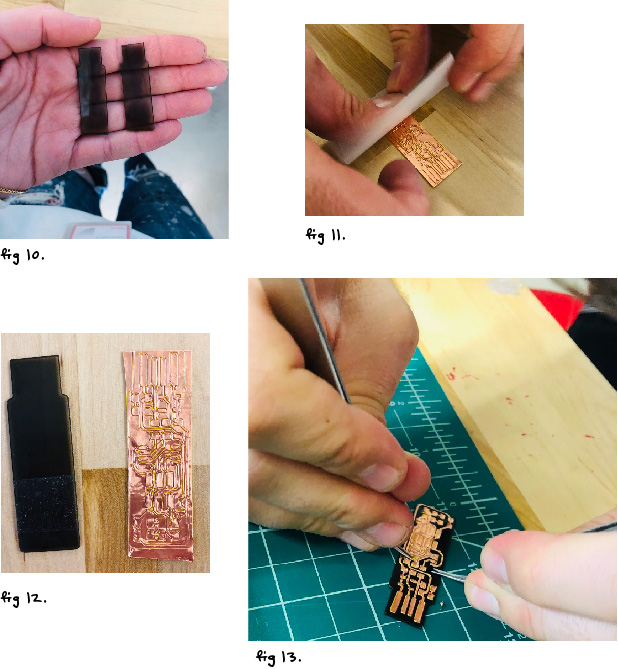
- figure 10: laser cut board interior on flexible material
- figure 11: removing vinyl backing
- figure 12: adding the flexible material to the board
- figure 13: manually ‘milling’
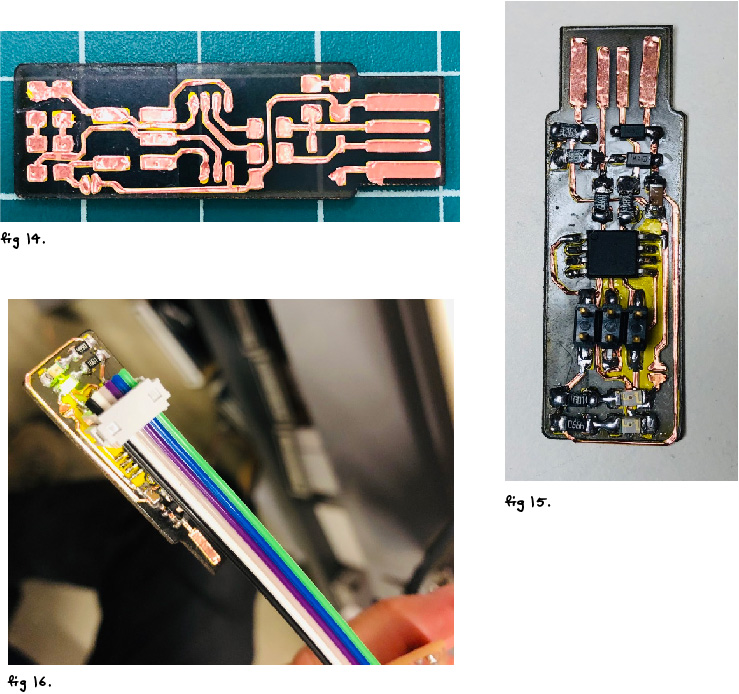
- figure 14: result
- figure 15: result after soldering components
- figure 16: testing led
It took at least 40 tries before successfully transferring the copper onto a flexible medium. The major problem was trying to peel away the unneeded copper without stripping the circuitry paths.
Components

Created by JT
- 1x ATtiny45 or ATtiny85 [U1]
- 2x 1kΩ resistors [R1 & R6]
- 2x 499Ω resistors [R2 & R5]
- 2x 49Ω resistors [R4 & R3]
- 2x 3.3v zener diodes [D1 & D2]
- 1x red LED [D3]
- 1x green LED [D4]
- 1x 100nF capacitor [C1]
- 1x 2x3 pin header [ISP]
It was very satisfying to successfully create a flexible board, however the amount of trials materials used was inefficient . I still have not tried this but, if I could find a way to mill the flexible copper in the SRM-20 MonoFab, the results would be faster and more precise.
In conclusion I really enjoyed the making of the circuit board, but found the programming to be very difficult. So I defiantly want to increase my understanding and skills when it comes to programming.