2. Project management
This week I worked through a git tutorial and built a personal site in the class archive describing final project ideas. This is the first time dabbling in the world of synchronization, version control, Web development, blogs, wikis, content management systems, videoconference, remote desktop, cloud computing, project management programs (this whole unit). This is actually very exciting for me because it means I am going to learn a lot of new concepts, skills, and tools. To begin I reviewed different principles of project management and found spiral development to be an organized practice to follow. I tend to think very large when It comes to my design dreams, but they remain dreams, utilizing a systematic way of working may actually help me reach them.
Project Management Principles:
Spiral Development
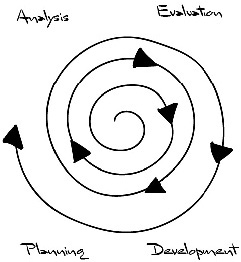 -
-“The key is continual development; it is intended to help manage risks. You should not define the entire system in detail at first. The developers should only define the highest- priority features. This type of development relies on developing prototypes and then giving them back to the user for trial. With this feedback the next prototype is created. Define and implement this, then get feedback from users / customers (such feedback distinguishes ‘evolutionary’ from ‘incremental’ development). With this knowledge, you should then go back to define and implement more features in smaller chunks, until an acceptable system is delivered....
The advantages of using the spiral model are varied: its design flexibility allows changes to be implemented at several stages of the project; the process of building up large systems in small segments makes it easier to do cost calculations; and the client, who will be involved in the development of each segment, retains control over the direction and implementation of the project. In addition, the client’s knowledge of the project grows as the project grows, so that they can interface effectively with management.” -Reference“
After researching different coding languages, text editors, and static site generators, I choose which to work with ATOM Text Editor, using Markdown language, and mkdocs as my static site generator. I began learning HTML using Code Academy’s lessons, however I decided to use Markdown for this course.
“Learning to write programs stretches your mind, and helps you think better, creates a way of thinking about things that I think is helpful in all domains.” —Bill Gates, Co-Chairman, Bill & Melinda Gates Foundation, Co-Founder, Microsoft”
Installing git & github on Mac OS X
1) I started by navigating to my computers (Mac OS X) built in terminal: Applications -> Utilities folder. - The OS X Terminal is configured using a syntax/command set called Bash. Bash is the shell, or command language interpreter, for the GNU operating system.
“Git is a free and open source distributed version control system designed to handle everything from small to very large projects with speed and efficiency.”
![]()
2) Next I Download Git
3) And set my username and email using the git config tool:
$ git config --global user.name "your name"

$ git config --global user.email "your email@domain.com”
4) After I created a SSH Key: An SSH key lets your computer uniquely identify itself when it connects to servers.
# Point the terminal to the directory that would contain SSH keys for your user account.
$ cd ~/.ssh
-
I received this message: “No such file or directory” You need to generate a new key.
-
So i created a new ssh key using the email I used when creating my Github account.
$ ssh-keygen -t rsa -C "your email@domain.com”
Next, I needed to tell Github the contents of the SSH key I just generated.
# I copied the generated key to my computer's clipboard using the command below:

$ pbcopy < ~/.ssh/id_rsa.pub
After logging into GitHub I followed these steps: - Visit your account settings. - Click Add SSH key. - Enter a descriptive title for the computer you’re currently on, e.g. “Aleza MacBook” into the Title field. - Paste your key into the Key field (it has already been copied to your clipboard). - Click Add Key. - Enter your Github password.
To test if it worked:
# Attempts to connect to Github using your SSH key.
 # Don't change the address shown below
 $ ssh -T git@github.com
I received this message:
 The authenticity of host 'github.com (207.97.227.239)'
 cant be established.
 RSA key fingerprint is 16:27:ac:a5:76:28:2d:36:63:1b:56:4d:eb:df:a6:48.
 Are you sure you want to continue connecting (yes/no)?
I typed yes and pressed return and entered my recently selected passphrase
Once I successfuly completed connecting my SSH key I received this message:
Hi aleza.epstein! You've successfully authenticated,
Initializing a Repository in an Existing Directory
Prior to the start of the program the FabAcademy kindly created projects for all of us, so I needed to start tracking the existing project in GitLab. I followed these commands in my terminal to initialize a repo in my existing directory:
First I manually created a folder on computer named “git” and inside that folder I created another one named “fab-academy” the I used the following commands:
cd git/fab-academy

$ git init
This command created a new subdirectory named .git that contains all of my necessary repository files — a Git repository skeleton.
I had already started version controlling files within Github so I needed to begin tracking those files and do an initial commit using the commands below:
$ git add *.c
$ git add LICENSE
$ git commit -m 'initial project version'
Cloning an Existing Repo
After initializing my repository i know wanted to clone it. In my GitLab I navigated to my account overview and copied my url. I followed the commands below to do this:
$ git clone https://gitlab.fabcloud.org/academany/fabacademy/2019/labs/dassault/students/aleza-epstein.git
These are the messages I recvived:
Cloning into
Spoon-Knife… remote: Counting objects: 10, done. remote: Compressing objects: 100% (8/8), done. remove: Total 10 (delta 1), reused 10 (delta 1) Unpacking objects: 100% (10/10), done.
After I used the git status command to check if I successfully cloned my repo.
$ git status
# On branch master
nothing to commit (working directory clean)
MkDocs
MkDocs has become one of my favorites. It’s built-in “dev-server” allows me to preview my documentation as I writing it. It even auto-reloads and refreshes my browser whenever I save changes.
Installation In order to install MkDocs I need Python installed on your system, as well as the Python package manager, pip. The first thing I did was check to see if my system had python using this command in my terminal:
$ python --version
$ pip --version
I did not have either installed, so I installed Python by downloading the appropriate installer for your system from (python.org)[https://www.python.org/downloads/] and running it.
Recent versions of Python, have the Python package manager, pip, already installed by default. However, I used this command to make sure my version was up to date:
pip install --upgrade pip
Now that I have pip to date I can install mkdocs using this commmand:
pip install mkdocs

# to check that everything is working I used this command:
$ mkdocs --version
Now every time I save a change in my text editor I can view it locally using “mkdocs serve” command in my terminal.
Managing git repo size:
I MADE IT ON A LIST…
(not the good kind)
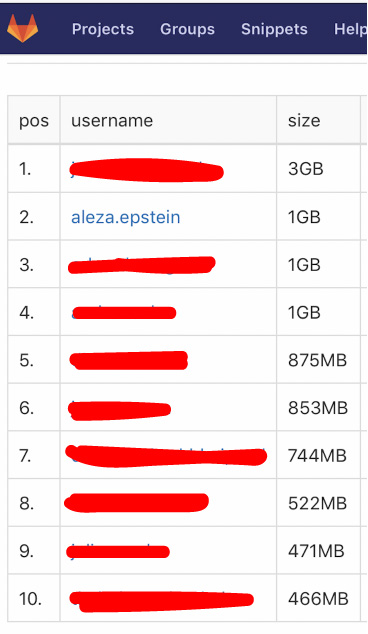
- Neil released a list of Fabers who had VERY LARGE repo sizes. Once I saw my name on “the list,” I made it a priority to get off. The reason my repo was so large was because I was working on my website in the GitHub web platform and every time I would make a change I would commit it. Git repo has a wonderful history function that stores every change you commit, however I was stacking up a very large repo size with the way I was working. In addition I realized that I was being careless with my image file sizes so I calculated a standard size.
The Fix
Using git filter-branch
cd git/fab-academy/aleza-epstein

git checkout master

git filter-branch --force --tree-filter 'rm -f path/to/big_file.mpg' HEAD

git reflog expire --expire=now --all && git gc --prune=now --aggressive

git push --force origin master
After the whole “list” debacle I started to work locally to make edits to my GitLab website, instead of making a single change and then pushing and committing it, I wait until I have made all my changes for the day , save them locally, and use the following commands in my terminal.
git add *
git push
git commit -m "updates"
git push
Git status
# I use git status a lot. It never hurts to check.
Below is a diagram mapping workflow. It is very important to understand where to git pull and git push your files. I am currently editing my website in GitLab and pulling my changes to my local terminal. However as the course progresses and the complexity increases I will most likely make changes to my website using Sublime Text Editor and save locally.
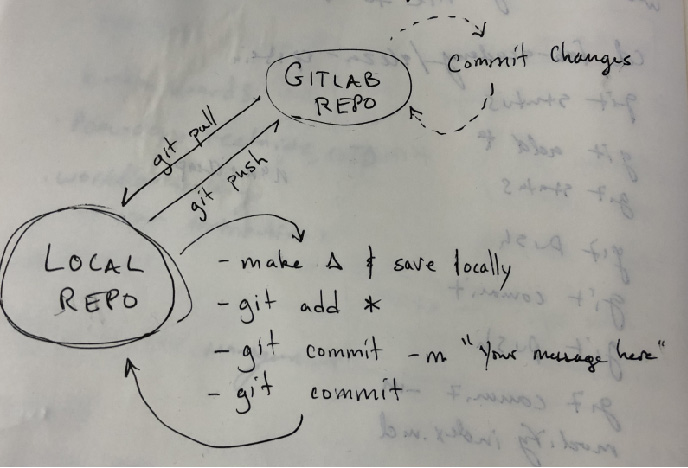
Drawing courtesy of my Instructor Greg Buckland :)
At the beginning of this week I felt like a deer in headlights, after some practice I now fell like an inexperienced doe (moving up!) I have barely scratched the surface of the tools I have learned this week, and I am happy to report that I want more! I learn best by doing so I really liked Code Academy’s style of teaching. It has a “learn” platform that allows you to practice what you have learned each chapter in a virtual terminal.
Markdown Guide
Welcome to my experience learning basic markdown syntax following this Markdown Tutorial.
The *quick* brown fox, jumped **over** the lazy [dog](https://en.wikipedia.org/wiki/Dog).
The quick brown fox, jumped over the lazy dog.
Learn how to do this ^
Formatting
Headings:
# Heading 1
## Heading 2
### Heading 3
Text
*italic*

**bold**

***bold-italic***
[link](http://example.com)
italic
bold
bold-italic
Images


When hosting a photo locally:

Lists
* Milk
* Bread
    * Wholegrain
* Butter
- Milk
- Bread
- Wholegrain
- Butter
1. Tidy the kitchen
2. Prepare ingredients
3. Cook delicious things
- Tidy the kitchen
- Prepare ingredients
- Cook delicious things
For a bullet list, you can prefix each item with a * - or - or + and they will be converted to dots. You can also create nested lists; just indent a line with 4 spaces and it will be nested under the line above.
Quotes
> To be or not to be, that is the question.
To be or not to be, that is the question.
Markdown syntax
Horizontal Rules
Want to throw-down a quick divider in your article to denote a visual separation between different sections of text?
#HTML
<hr>
#Markdown
---
***
___
Code Snippets
Some text with an inline `code` snippet
Some text with an inline code snippet
Reference Lists & Titles
**The quick brown [fox][1], jumped over the lazy [dog][2].**

[1]: https://en.wikipedia.org/wiki/Fox "Wikipedia: Fox"
[2]: https://en.wikipedia.org/wiki/Dog "Wikipedia: Dog"
The quick brown fox, jumped over the lazy dog.
Escaping
What if you literally want to type literally - without it appearing in italics?
\*literally\*
*literally*