20. Project development
This Weeks’ Task:
Complete your final project, tracking your progress: 1. What tasks have been completed, and what tasks remain? 2. What has worked? What hasn’t? 3. What questions need to be resolved? 4. What will happen when? 5. What have you learned?
What tasks have been completed, and what tasks remain?
Design
I am using solidworks to design my device. Although I know exactly what I want to design and how to do it, I still have some of the parts left to design.
I will have a base which will hide the output circuit in it. On top of that will be the main body of the device to connect between the base and the top. I have still not figures out how to design the middle part of my device in which it will hold the mug. Lastly, There will be a top lid to cover the mug which wil have the input circuit hidden in it. There will also be a mechanism to open and close the lid but I still have to try it out in solidworks assembly to check whether it will work fine with the main body or not.
Electronic design
I am going to have two circuits for my project.
Input ciruit
It consists of thermistor and hall effect sensors.
The thermistor is going to take the temperature of the drink and the hall effect sensor is going to sense whether the top lid is closed or open. This indication is going to initiate the whole programming. Once the lid is closed, it will send a signal to the thermistor to start taking temperature readings upon the given time interval. Basic programming of these two sensors have been done. Details of how I programmed them are in this page.
Output circuit
Consists of potentiometer, heating pad and 2 LEDs.
The potentiometer is a method for the user to choose its desired heating temperature by rotating the knob. The 2 LEDs will indicate the heating process. Red LED to indicate heating is taking place and green LED to indicate that the desired temperature has been reached. The heating pad is going to heat the drink. However, the heating pad that I tested with was only able to reach at a temperature of 36 degree celsius, therefore, I have found another material to heat up my drink with, which is the carbon fibre. These fibre strands work on low voltage, which is exactly what I want since I will be powering up my device using usb port (5V) and drags high current through them which will be able to heat up to a high temperature. Details of how I programmed them are in this page.
The two circuits that I am going to use for my final project are ready since I have designed and programmed them in the input and output week. But, I did test the carbon fibre and it can reach to a temperature of more than 100 degree celsius but I still dont know how to incorporate it in my design physically.
Networking and communication
Basic communication testing was done between the two circuits to ensure that they deliver and recieve signals between them. However, I still have to update the code to do exactly what I want it to do.
The communication that I have in mind between the two circuits is as follow:
- User chooses a desired temperature by rotating the knob of the potentiometer.
- Thermistor will compare the desired temperature with the actual temperature.
- If the temperature is lower than the desired temperature, the heating pad will start to heat up and the red LED will turn on. This indicates that heating is taking place.
- Thermistor will continue to take readings every 5 seconds for instance. Once the desired temperature has been reached, the heating will stop, red LED will turn off and the green LED will turn on. This indicates that the desired temperature has been reached.
- Hall effect sensor can sense when the lid is closed and can initiate the thermistor to start taking readings and start the heating process. Once the lid is open, heating will stop.
Here are more details of how I did the communication testing.
Manufacturing
The circuits that im using are already ready, but the manufacturing of my model have still not been done. Most probably I will 3D print and laser cut my design.
Preparation
I will still have to prepare my slide and video for the final presentation.
What has worked? What hasn’t?
I have bits and pieces working all individually in the circuits but I will have to connect them altogether and program them in order to work simultaneosly with each other. I still didnt figure out how to add the carbon fibre in my design and where to place it. I havent yet manufactured my model since im still working on my design.
What questions need to be resolved?
The main question that is concerning me is that how will I be able to incorporate the heating element in my design and how can I place it safely without causing any harm since they do get very hot and it is dangerous to touch them with naked hands.
The circuit and its communication work properly, I just have to update the code and test them a couple of times to ensure everything works systematically.
The cad design is not an issue since I check everything in solidworks assembly to avoide any future problems after manufacturing them.
Manufacturing will be done as soon as the design is completed. It might take 2 days in total to manufacture everything.
So, the only concern is about the carbon fibre.
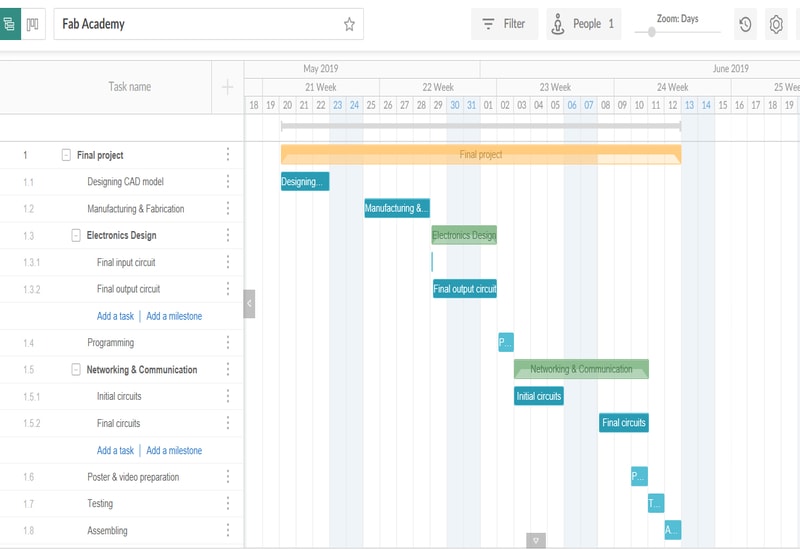
What will happen when?
I am already half way through my design and can manufacture it directly.
While its getting manufactured, I will work on programming the circuits to communicate with each other. This may take 2-3 days depending on the erros that may appear while programming.
After the programming is done, I will place circuits in them and test if it works fine. Once everything looks normal without any issues, I will assemble the parts all together.
What have you learned?
I have learnt that even when developing and creating a small project, it does take time and effort to think of all the things and combine them together. And as you proceed deeper into the project, more things will appear that you havent thought about it, even if its a minor thing. Sometimes these minor issues take more time to solve than the big ones.
Gantt Chart