Assignment 8
Embedded Programming

Again, we were asked to do a group assignment: compare the performance and development workflows for other architectures. You can find the documentation on the Group project page.
Read a Microcontroller Datasheet
The so-called Microcontroller datasheet used to be a big mystery for me. I always admired people that were able to make this awesome logical and correct conclusions to program boards after reading these sheets. So definitely time for me to get hold of that mystery. Therefore, I had a look at two datasheets of already used microcontrollers.One was The Atmel datasheet Attiny45 which is built as the microcontroller on the 'Fab-ISP' in assignment 4.
The other one was the Atmel datasheet Attiny44 which is built as the microcontroller on the 'Hello-World board' of assignment 6.

Things learned from Datasheets
For gaining knowledge about the pinouts of a microcontroller the datasheet is necessary, i.e. which pins are analog and which one are digital. Because for certain components e.g. a switch a digital output is suitable as it is either on or off. If you need an analog output for e.g. a potentiometer. Another aspect mentioned in the datasheet are the clocks of a microcontroller. They have an internal clock but if you want to make sure e.g. that when you communicate between two microcontrollers both have the same clock you can add an external one. The datasheet also shows you how to integrate this external clock into the circuit. Furthermore, a datasheet gives you information about the registers that are used when programming in plain C. I am using plain later in this assignment.For my final project I need more pins than the Attiny 44 or 45 provides. For that reason I also started to read other microcontroller datasheets. For example I had a look at the ATMega328P. This microcontroller is by the way also the one that is build onto an Arduino Uno, which is a microcontroller board. I have not decided yet which microcontroller to use in the end and will for sure do some more research on that to find the best suitable controller for the requirements of my crib. Already spending focus time to read through these three datasheets and with some tips of colleagues in our lab now that mystery 'datasheets' feels solved for me.
After I have done my final project now, a short explanation why I chose the ATMega328P. One main reason was that I wanted the microcontroller to be replacable in case it might be broken when I am working with it. Therefore, I decided to use a not SMD microcontroller and a header on my PCB where it can be stacked onto. Another reason for using this microcontroller is, that the amount of pins is sufficient for my interactive features of my final project. There are also other microcontrollers that have enough pins. As the field of electronics was new for me I decided to use a microcontroller for my final project that I have worked with before and that has a lot of documentation. As the ATMega328P is the one used on an Arduino Uno and there exists a lot of documentation for it, the ATMega328P fitted all the mentioned reasons.
Methods to Program Board
You can choose different approaches to program a microcontroller board. I will introduce two of them:
1. C using the Arduino IDE
Programming with Arduino IDE takes most of the space of microcontroller because the libraries take much space of the chip.
For writing code install Arduino IDE. Arduino is an open source software which makes
it very easy to use. It runs on Windows, Mac OS X and Linux.
2. Plain C using AVR Development
From the C-source code the avr GCC compiler (together with the Preprocessor directives and the linker) produces machine code for the AVR microcontroller. Download avr GCC compiler and avr libc to program
using AVR development.
Program Microcontroller using Arduino
In our lab we can easily access Arduino boards to use them for programming. For my FabISP I did use the AVRdude, so this time I wanted to make use of the Arduino as an ISP. I used an Arduino Uno to program my 'Hello World board'. To understand how to connect the Arduino and the board and how to program it I used this tutorial (sadly only in german language).1. First I wanted to use this nice and handy pin-connector seen in picture a.). But when trying to flash the board the ArduinoIDE did throw an error.
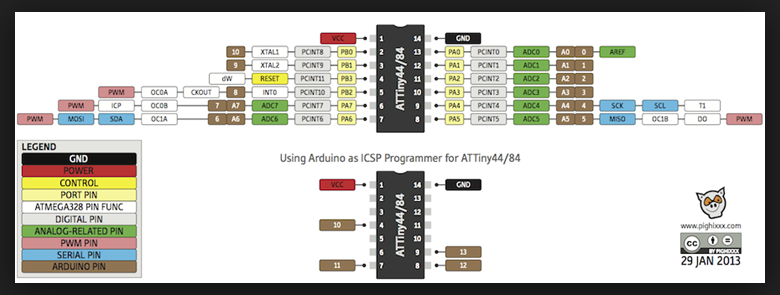
2. Fortunately, the IDE also provides help to make the Arduino be usable as an ISP. Under 'File/Examples/ArduinoISP/ArduinoISP' you find the code that is used to use the Arduino as an ISP. This file provides the advice 'Use pin 10 to reset the target rather than SS' (viewed in picture b.)). Connecting the board and the Arduino Uno using pin 10, so you can flash the board.


Program my board with Arduino IDE
You can find a zip of all programming files at the end of the page.1. I used the free Arduino IDE to flash my board after connecting it. I used an Arduino Uno, which was flashed with the example program: ArduinoISP. The is necessary to let the Arduino function as an ISP for programming other boards.
2. For programming the board I checked the schematic of my board to find out which pin of the Attiny is connected to the LED and the button. These pins need to be defined as variables in the Arduino IDE.
Important: I also learned that it is better to double check that the pins of the used microcontroller have the same name as the pins on the Arduino Uno. Otherwise it might happen that the wrong pins are defined as input or output variables in your code. To assure this, before programming my board I had a look at a pinout of an Attiny44 created by the Arduino community. This shows me the name of the Attiny pins to use when programming with the Arduino IDE.
Start flashing the self made board
Before you can start programming your board you have to do 'Tools/Burn Bootloader' on your self made board. You can find more information on how to do that in the beginning of section 'Programming'.


Program Board with Plain C and AVR
As a second approach I will introduce Plain C code using AVR board development. I did have a course in my bachelor degree for hardware close programming and using register to communicate with a microcontroller. But as it was long ago I had to fresh up my mind. Thanks to our teammate Matthias that gave a very good introduction again into AVR and plain C. The AVR family of microcontrollers is developed by Atmel. The AVR is an architecture machine, where the registers of the microcontroller are called directly to program. I found this tutorial that helped me programming after Matthias explained the basic concept: TutorialFor programming the same board is used as above: the hello world board. My programs again will let an LED blink and turn on/off the LED using the button of the board.
Very important before you can start programing: Download and install all necessary software for AVR development on your computer. You can do this by e.g. the terminal. Use the following commands to install everything:
              1. ruby -e "$(curl -fsSL https://raw.githubusercontent.com/Homebrew/install/master/install)" < /dev/null 2> /dev/null
                //I installed brew already in the FabISP assignment.
              2.  brew install avrdude //Download avrdude here.
              3.  brew install avr-libc
              4.  brew install libc6-dev
Now I did write a short program with registers to make me LED blink:
#include
And here the code of short program with registers to make me LED light up by pushing a button:
                #include
                #include

                #define F_CPU 1000000L


                int main(void)
                {
                  DDRA = 0b10000000; //Makes LED pin 7 of PORTA as Output & Makes Button pin 3 of PORTA as Input

                  while(1) //infinite loop
                  {
                    if(PINA & (1<< PA3) == 1) //If switch is pressed
                    {
                      PORTA |= (1<< PA7); //Turns ON LED
                      _delay_ms(3000); //3 second delay
                      PORTA &= ~(1<< PA7); //Turns OFF LED
                    }
                  }
                }
Now compile your program using the following terminal commands line by line:
1. avr-g++ -mmcu=attiny44 main.cpp
2. avr-objcopy -j .text -j .data -O ihex a.out main.hex
3. avrdude -p t44 -c usbtiny -U lfuse:w:0x62:m -U hfuse:w:0xDF:m -U efuse:w:0xFF:m -U flash:w:main.hex:i