Wk9. Embedded Programming
Assignment: Read a micro-controller data sheet. Program your board to do something, with as many different programming languages and programming environments as possible. For extra credit experiment with other architectures.
Microprocessor vs microcontroller
There is often some confusion between these two, which I will try to clarify:
-
A microprocessor is an integrated circuit or “computer chip” which typically contains the central processing unit (CPU) or “brain” of the laptops, tablets and smartphones we all use. Typically these chips rely on external Random Access Memory (RAM), Read-Only Memory (ROM), and other peripherals that work together as part of a larger computer system.
-
A microcontroller (or MCU for microcontroller unit) is a simpler computer, which contains a CPU, a fixed amount of RAM, ROM and other peripherals all embedded onto a single chip. It’s basically a micro computer on a single chip. While MCU’s vary in memory and processing speed, these are typically programmed to execute specific, less complex tasks.
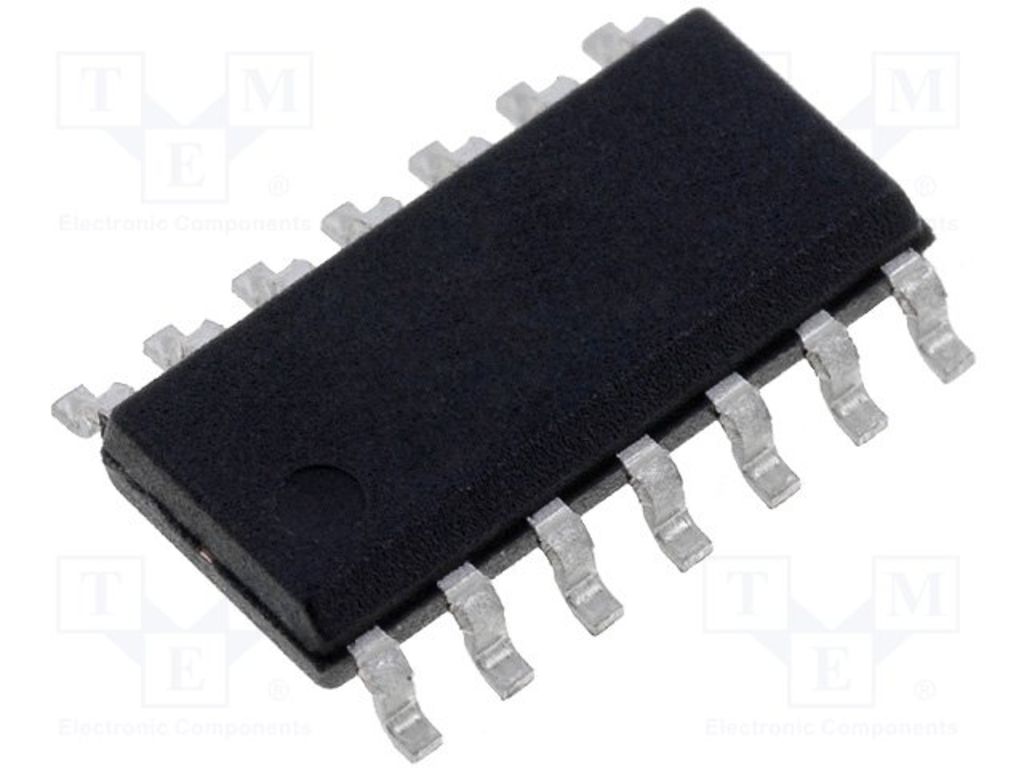
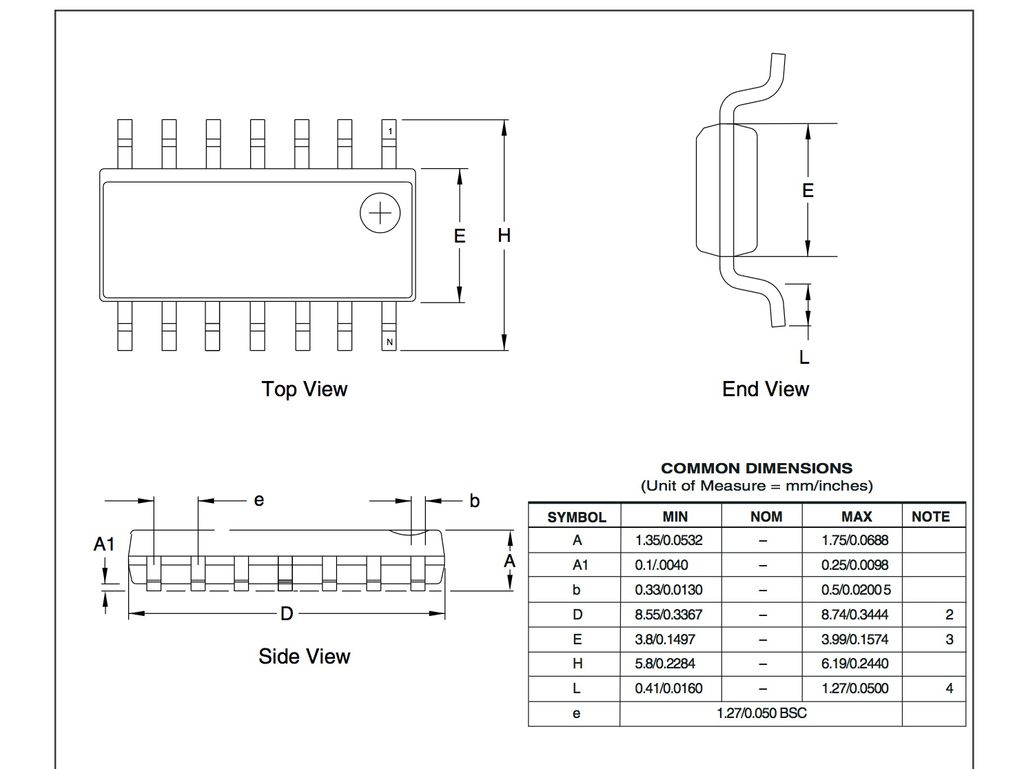
Here is the ATtiny44 (enlarged, it actually is teeny!) which we will be programming this week:
 |
 |
Architectures
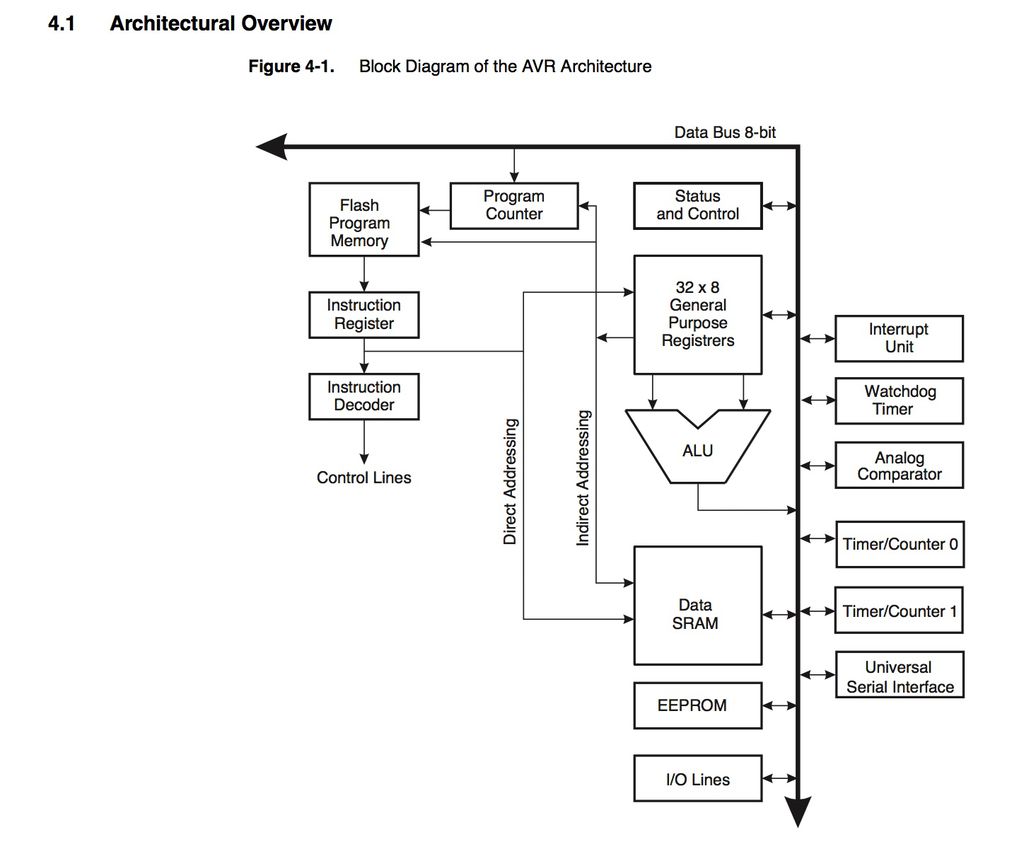
Most microcontrollers are based on Harvard architecture where program memory and data memory are kept separate, while microprocessors are based on von Neumann model where program and data are stored in same memory module. A Harvard architecture generally looks like this:

As we will be learning to program AMTELS AVR family of micro-controllers, these use the Harvard architecture with RISC (Reduced Instruction Set Computer) because it is better for real time performance. RISC-based systems generally have lower cycles per instruction (CPI) than a complex instruction set computer.
AVR Family
AVR (which is now owned by microchip) is only one of many family of processors, but there are a few reasons why we are using the AVR family for FabAcademy:
- They are cheap, the ATtiny44 costs $0.76 per part while it’s bigger brother the ATmega328P which are the chips used by Arduino cost $2.13 per part.
- They have excellent real time performance. The ATtiny44 sends data close to 1 MIPS (1 Million of Instructions Per Second) per MHz (clock cycle). This allows us to optimize power consumption versus processing speed.
- AVRs are available from small to bigger packages and have a nice range of peripherals. A “peripheral” is basically a small section of the silicon real estate, distinct from the CPU (the brains of the microcontroller that processes machine instructions), dedicated to handling some specific task such as voltage reading and writing, measuring Pulse Width Modulation (PWM) or communication via USB or Serial.
- AVR supports great open-source software - namely GCC, an open source compiler that converts C code into Hex which the processor understands. Above that development tools like Arduino have used AVRS to make it extra easy to program these microprocessors.
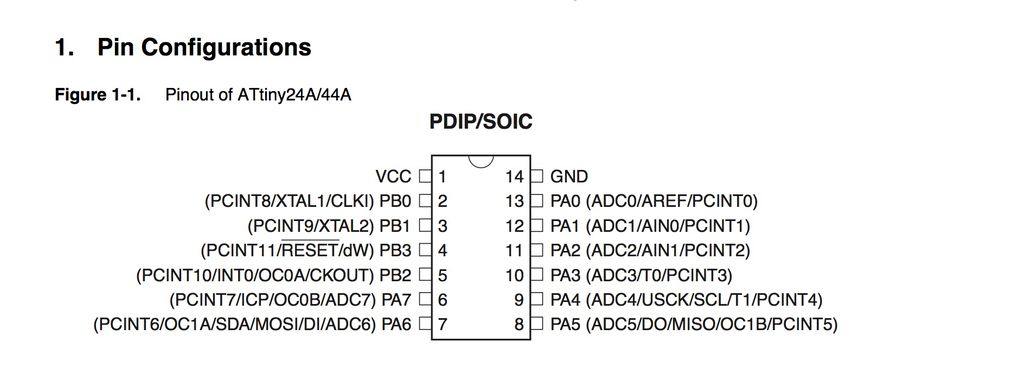
Here is the ATtiny44 pin layout:
Reading the Data Sheet
The ATtiny44 is a low-power CMOS 8-bit micro-controller based on the AVR enhanced RISC architecture. These tiny little brains are actually quite powerful, and as Neil says none of the software in the world will make any sense until we understand how the hardware works. So lets dissect the Attiny44:
First of all some basic specs. The ATtiny44 provides:
-
2K/4K byte of In-System Programmable Flash, 128/256 bytes EEPROM, 128/256 bytes SRAM
-
12 general purpose Input/Output lines. If you look at the
-
32 general purpose working registers. All 32 registers are directly connected to the Arithmetic Logic Unit (ALU), allowing two independent registers to be accessed in one single instruction executed in one clock cycle.
-
One 8-Bit Timer/Counter with Two Pulse Width Modulation Channels. The timer/counter allows accurate program execution timing, event management, and wave generation. It has Pulse Width Modulation support. Chapter 11
-
One 16-Bit Timer/Counter with Two Pulse Width Modulation Channels. Chapter 12 One 10-bit Analog to Digital Converter. It converts an analog input voltage to a 10-bit digital value. The minimum value represents GND and the maximum value represents the reference voltage. The voltage reference can be selected between the VCC supply, a specific pin or an internal 1.1V voltage reference. Chapter 16
-
One Analog Comparator. It compares two analog input voltages and outputs a signal level indicating which of the inputs is greater or lesser. Chapter 15 Universal Serial Interface for I2C communications. It provides the basic hardware resources needed for serial communication allowing significantly higher transfer rates and less code than software solutions. Chapter 14
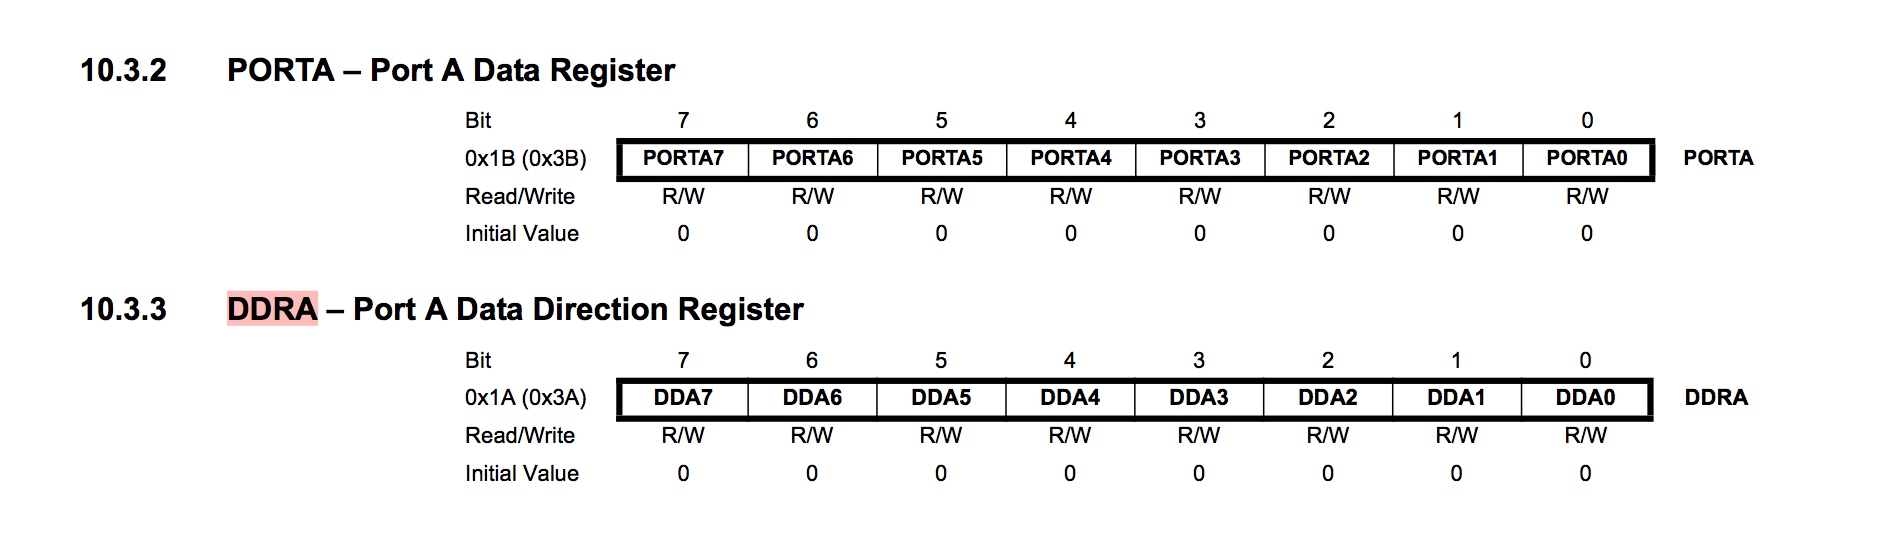
Memory
The AVR Architecture has two main memory spaces, the Data memory and Program memory. In addition, the ATtiny44 features an EEPROM Memory for data storage.
-
Data Memory (Static and Dynamic RAM)
-
SRAM memory is used for storing your data which is processed during the run time (including also the registers) volatile memory
-
FLASH memory which your program stored - non volatile. Endurance: 10,000 Write/Erase Cycles
-
EEPROM memory which can be used for storing non volatile data and changeable during run-time. (for example: setting values) Endurance: 100,000 Write/Erase Cycles
So in a nutshell we have:
- 2K/4K byte of In-System Programmable Flash
- 128/256 bytes EEPROM, 128/256 bytes SRAM, 12 general purpose I/O lines
- 32 general purpose working registers
- An 8-bit timer/counter with two PWM channels
- A 16-bit timer/counter with two PWM channels
- Internal and External Interrupts, a 8-channel 10-bit ADC, programmable gain stage (1x, 20x) for 12 differential ADC channel pairs, a programmable Watchdog Timer with internal oscillator, internal calibrated oscillator, and four software selectable power saving modes.
Peripherals
A/D: Reads in analogue voltages.
Comparator: compares voltages.
D/A: writes out voltages.
- Timer: Measures time.
- Counter: Measures events.
- PWM: Measures pulses that vary in size.
These are all essential for controlling lights and motors.
USART and USB communicate to the outside world.
Word size
Attiny is an 8 bit processors.
In computing, a word is the natural unit of data used by a particular processor design. A word is a fixed-sized piece of data handled as a unit by the instruction set or the hardware of the processor. The word size or number of bits in a word (most embedded MCUs use 8, 16, 32 or 63 bits) is an important characteristic of any specific processor design or computer architecture.
According to Neil, there is a common misunderstanding about word sizes. An 8 bit processor can execute millions of instructions per second. Say you want to play audio, like playing back a .WAV file. Audio takes a thousands of cycles per second, so the processors can do a thousand instructions per audio cycle. So an 8-bit processor can use a 64 bit numbers but it takes more than one instruction to do it.
Programming with the FabISP
ISP stands for In-System Programming just incase. Back in week 5 we made our own FabISP programmer, which is basically a ATtiny44 micro-controller setup to load programs into other micro-controllers. Which begs the question, who programmed the first micro-controller? But I digress…
So how does this work? The computer tells the FabISP via a USB connection how to load the program, it gets transferred into the board I am going to program via the 6-pin ISP header.
This setup looks something like this:

Typically we are gonna use the ISP header to program the board but there are many ways to do this.
To load the program you need a programmer.
Arduino
- Standard board
- Standard library
- IDE
- Bootloader
- Header
Here I did a blink test with the Arduino IDE using the Port Direction Registers I found here:

Leaving registers aside, programming the Attiny44 via Arduino IDE is very stragihtforward. HigTechLowTech has a very easy tutorial on how to install the right libraries and configure the Attiny to run at the correct clock speed.
That pretty ugly duckling called C
C is basically a general-purpose language that we are using in FabAcademy to program our micro-controllers. It is straightforward to compile, provides low-level access to a processor’s memory, and maps efficiently to machine instructions. As you can see from this graph, there is a huge difference in speed performance between a RaspberryPi running in C and the same one using Python.
Here is Hello World in C.
#include <stdio.h>
int main()
{
   // printf() displays the string inside quotation
   printf("Hello, World!");
   return 0;
}
- The
#include <avr/io.h>is a preprocessor command. This command tells compiler to include the contents of avr/io.h (standard input and output) file in the program. - The
stdio.hfile contains functions such asscanf()andprint()to take input and display output respectively. - If you use
printf()function without writing#include <stdio.h>, the program will not be compiled. - The execution of a C program starts from the
main()function. - The
printf()is a library function to send formatted output to the screen. In this program, theprintf()displays Hello, World! text on the screen. Thereturn 0; statement is the “Exit status” of the program. In simple terms, program ends with this statement.
The Dude Abides
For all this magic to work we need to install AVRDUDE which for all you Macphiles comes included with CrossPack which I installed back in week 5 to program my FabISP. CrossPack contains GCC an open source compiler, a C library for the AVR, the AVRDUDE uploader and several other very useful tools.
So how does this work? GCC compiles our C code into an instruction set or hex code that the micro-controller understands, then we use AVRDUDE to upload it to the micro-controller via the FabISP.
Hex looks something like this, and if I am not mistaken each character represents an 8bit unit unit of 1s and 0s. Shall I compare thee to a summer’s day?
:020000020000FC
:1000000028C019E11A95F1F708950AE0309508948F
:1000100010F4D99802C0D99A0000F3DFF2DF3695C8
:100020000A95B1F7089509E0C899FECFEADFE9DF44
:10003000E8DF8894C89908940A9511F04795F7CF9E
:100040000895C895302D303019F0DFDF3196F9CFA3
:10005000089510E820E016BD26BD11E01EBF1FE583
:100060001DBFD99AD19ADFDFEEE6F0E0EADF6865DE
:100070006C6C6F2E667464692E34342E6563686F01
:100080002E61736D3A20796F7520747970656420E4
:0C0090000000342FBADF3AE0B8DFE5CF03
:00000001FF
Hello World Again
Since I had already programmed the Hello Board from week 7 to blink using the Arduino IDE, I decided I would test how my computer communicates with the board over Serial. For this I managed to program the Hello Board with the hello.ftdi.44.echo.c example provided by Neil using my FabISP programmer. He provides a cryptic little tutorial here.
Because we will be talking to the board via an FTDI cable, it was recommended that we install libFTDI which is an an open source library to talk to FTDI chips. Crazy right. For this the Homebrew package manager again to the rescue:
$ brew install libFTDI
Then check to which USB port your board is connected with:
$ ls -l /dev/cu.usb*
This gives me:
crw-rw-rw- 1 root wheel 19, 15 18 Mar 18:32 /dev/cu.usbserial-A505DVC9
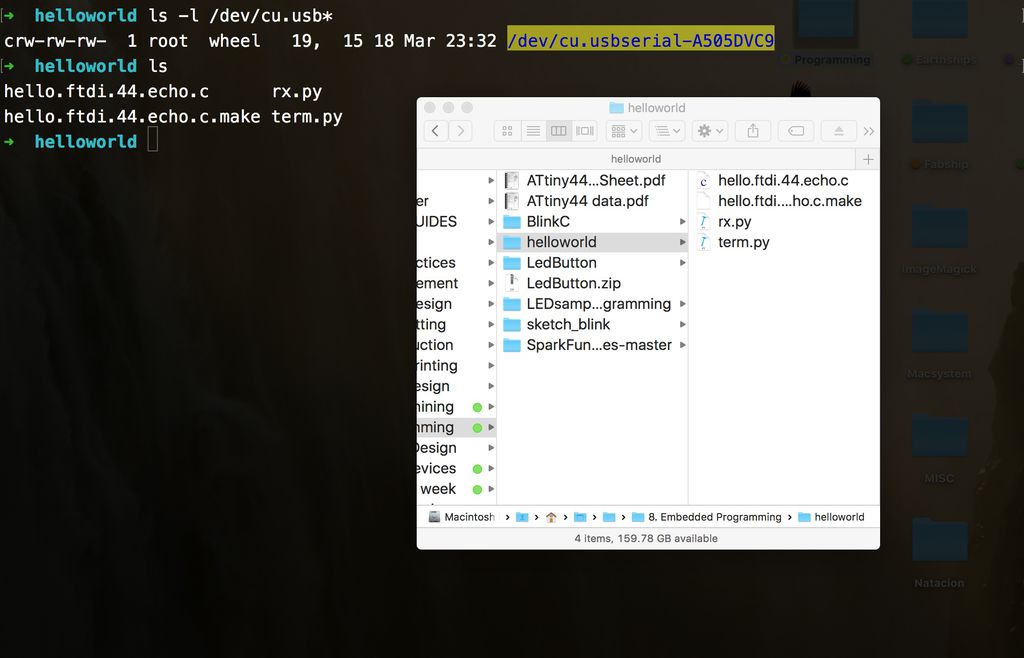
Then I hooked up my FabISP to the computer via USB, connected the ISP ribbon cable between the FabISP and my Hello World board using the two six-pin headers, and connected the Hello board to the other USB using the FTDI cable.
CHECK to make sure that the ground line (usually black) corresponds with your circuit ground connection like so:
Now:
$ make -f hello.ftdi.44.echo.c.make
$ make -f hello.ftdi.44.echo.c.make program-usbtiny-fuses
$ make -f hello.ftdi.44.echo.c.make program-usbtiny

Running the term.py
So to interface with between the Hello World board and the computer we are using serial communication and a sweet little term.py program Neil wrote in Python. The command for this is:
$ python term.py /dev/tty.usbserial-A505DVC9 115200
In the C code we can see that 15200 is the baud rate or speed we will be communicating with the host computer over the FTDI cable. And as we checked above, cu.usbserial-A505DVC9 is the USB port to which it is connected.
So here i started getting syntax errors, of the sort:
File "term.py", line 57
  widget_text.insert(INSERT,'\n')
                                ^
TabError: inconsistent use of tabs and spaces in indentation
I initially thought was something to do with the code but actually on my Mac I use Python with the Anaconda open-source distribution and Conda package management. This helps keep all the various Python versions, packages and dependencies up-to date and easy to find.
Anaconda, however, runs on the latest version of Python 3.6 and this meant I couldn’t run Neil’s little Hello World interface he wrote it eons ago in Python 2.7. To avoid pip installing overlapping versions of Python, I just created a new environment and installed Python 2.7 like so:
$ conda create -n py27 python=2.7 anaconda
This installed Python 2.7 with all it’s packages (probably overkill I know) and then all I had to do is activate my py27 environment in the terminal.
$ source activate py27
You can always check what version you are in running by:
python --version to which gave me: Python 2.7.14
And to go back to default Python 3.6, just hit:
$ source deactivate
Then I installed PySerial which provides backends for Python running on Windows, OSX, Linux to access your computers serial port.
$ conda install pyserial
So that done I could proceed with:
$ python term.py /dev/tty.usbserial-A505DVC9 115200
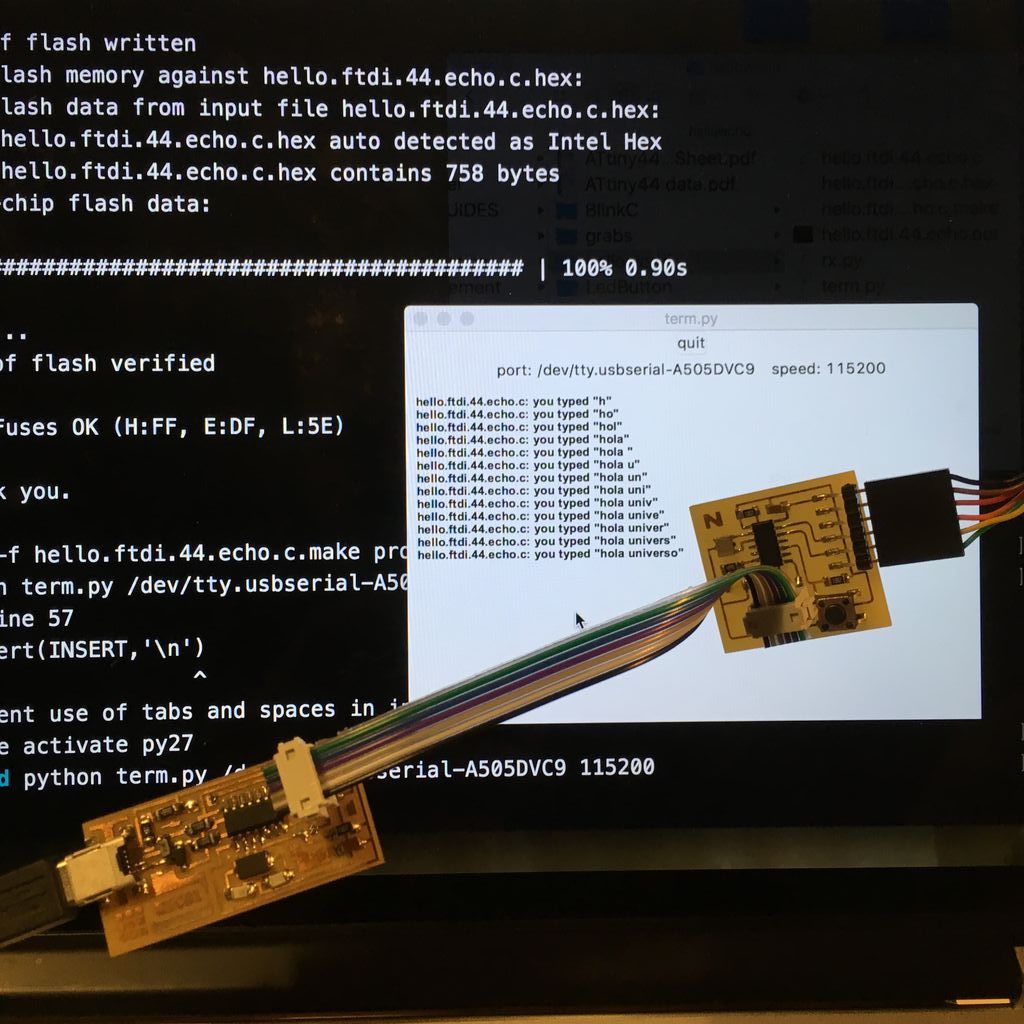
YAY! ATtiny speaks back.
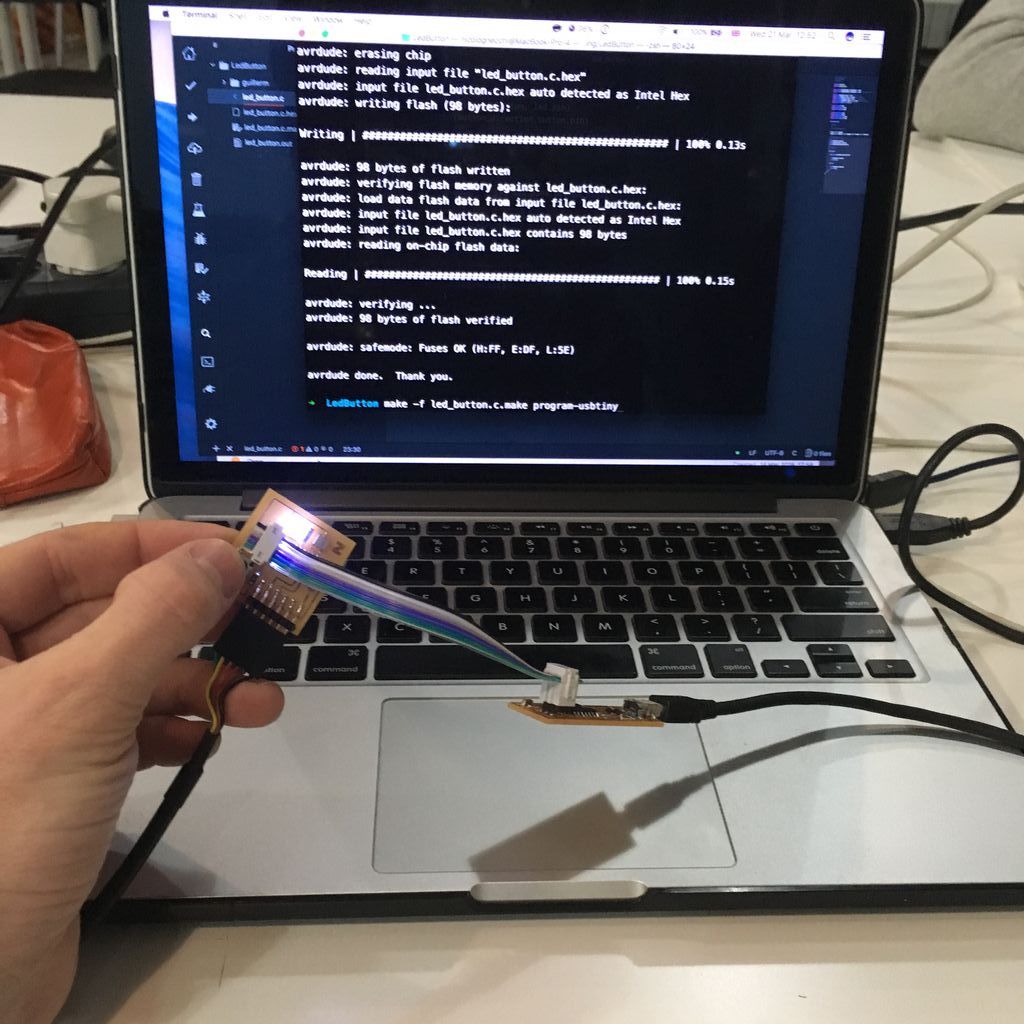
Blinking the Hello Board in C
This was a little more complicated, but I finally got it working. Here is the code below which I modified from Neil’s original Hello Board, changing a few variables for my input and output pins:
#define led_port PORTA
#define led_direction DDRA
#define led_pin (1 << PA7)

#define serial_pins PINA
#define button_port PORTA
#define button_direction DDRA
#define button_pin (1 << PA3)
Here below is my main function:
// initialize LED pin
//
clear(led_port, led_pin);
output(led_direction, led_pin);
input(button_direction,button_pin);
//
// main loop
//
while (1) {

   if(pin_test(serial_pins,button_pin)){

      set(led_port, led_pin);
      led_delay();

   } else {

      clear(led_port, led_pin);
      led_delay();
   }
}
}
Then I ran the programmer with:
make -f led_button.c.make
make -f led_button.c.make program-usbtiny
You can download all my C code files for week 9 from my Gitlab repository.