Wk6. 3D Scanning and Printing
Group assignment:
- Test the design rules for your 3D printer(s).
Individual assignment:
- Design and 3D print an object (small, few cm) that could not be made subtractively.
- 3D scan an object (and optionally print it).
3D Printing
Someday, long after I am dead, scientists will recreate my brain with a kind of three-dimensional printing press and use it to create new quotes by me, instead of phoney ones like this one.” Albert Einstein
3D scanning and printing turned out to be very exciting. I spent a good amount of time researching the different additive manufacturing technologies involved in 3D printing, and found this nice infographic from 3D hubs. The also provide a neat guide of the ins and outs of additive technology here .

3D Printing one of many additive manufacturing processes that creates a physical object from a digital design. There are different 3D printing technologies and materials you can print with, but all are based on the same principle: a digital model is turned into a solid three-dimensional physical object by adding material layer by layer.
There is a lot of hype, and rightly so, about 3D printers taking over the office, workshop, home and factory. It is true that they have become increasingly affordable technology to prototype in, and it is a technology that is being used by everyone from your dentist to aerospace engineers. However far from eclipsing other means of fabrication, it remains one of many (at times useful at times not) digital fabrication technologies.
Here I will discuss some the pros and cons:
- Complexity
The main difference between additive vs subtractive manufacturing is complexity. While subtractive (laser cutters, CNC machines) remove material where the tool cuts, 3D printers add materials adds material layer by layer.
- Access
With 3D printing you are able to construct objects inside out, effectively allowing from much more complex geometry.
- Less waste
You are adding material where you want it rather than discarding material where you don’t.
It also has its share of disadvantages:
-
Materials: there is a limit to the materials you can print, even though there is a lot of innovation into adapting new materials for 3D printing.
-
Low resolution: The most affordable forms of 3D printing
-
3D printing is generally quite slow.
Group Assignment
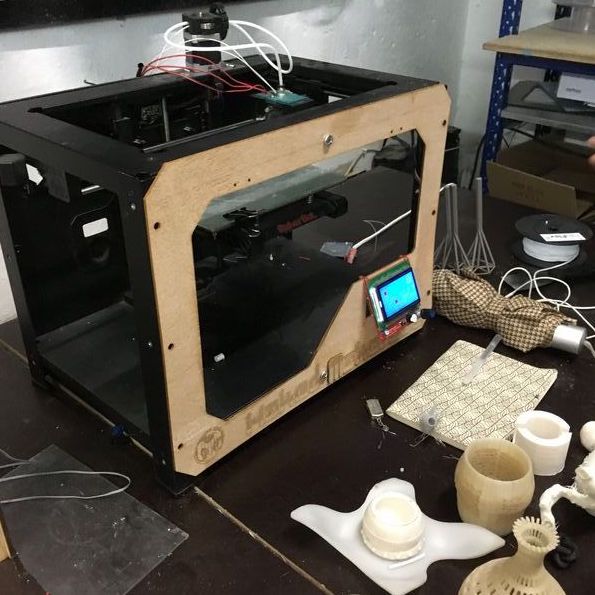
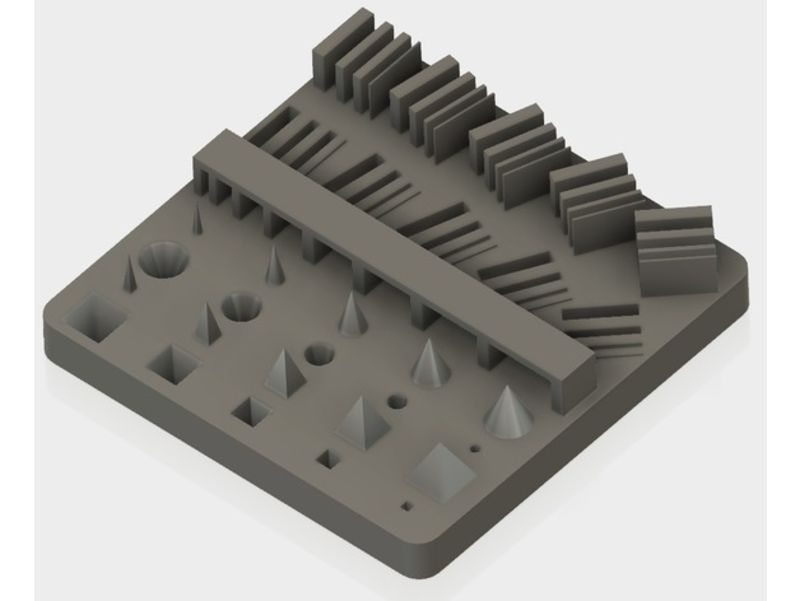
For our group assignment me, Oscar, Kris, Andres, and Joris did a test print on our Makerbot. We found this test model on thingiverse and decided it was a good one to check the design rules on our printer.
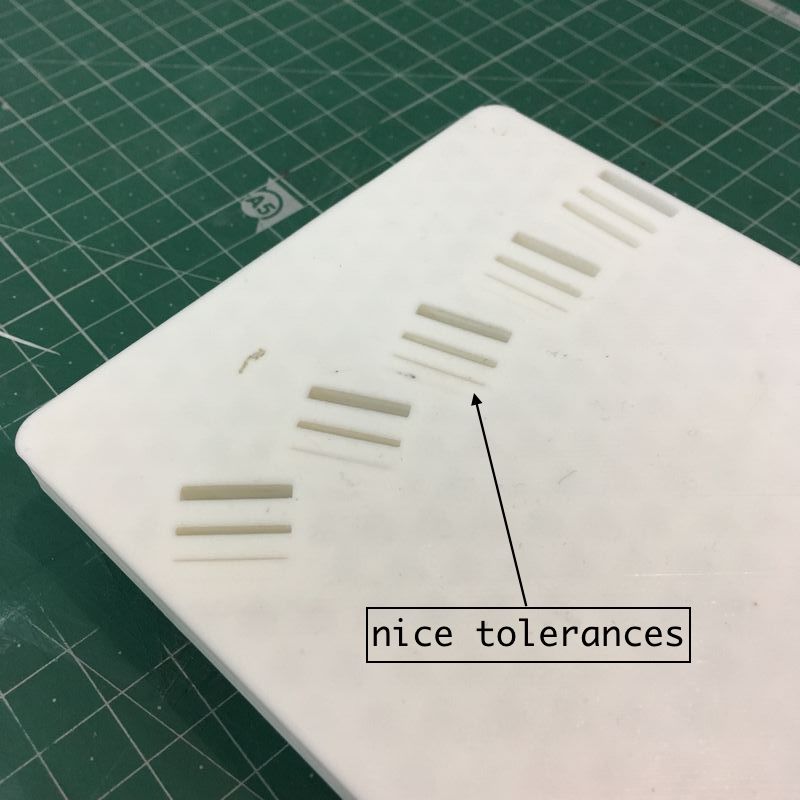
This model contains different tests for vertical walls and material rigidity, minimal wall width in various orientations, and minimum pyramidal and conical extrusion with different diameters.
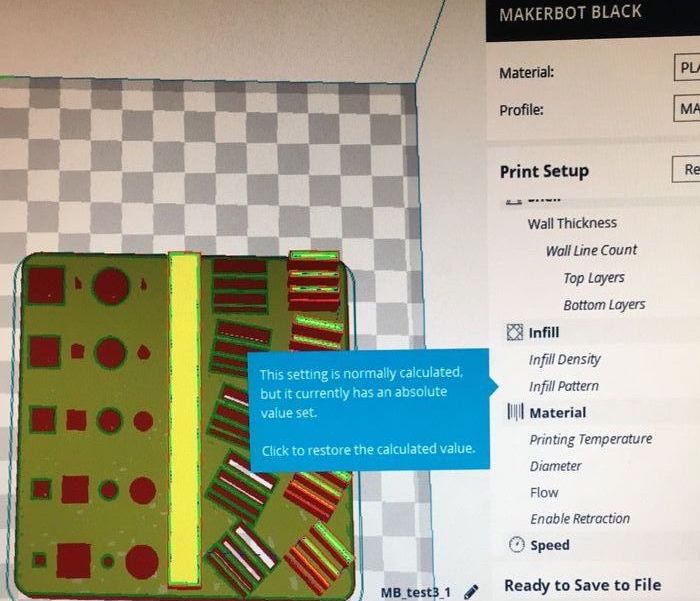
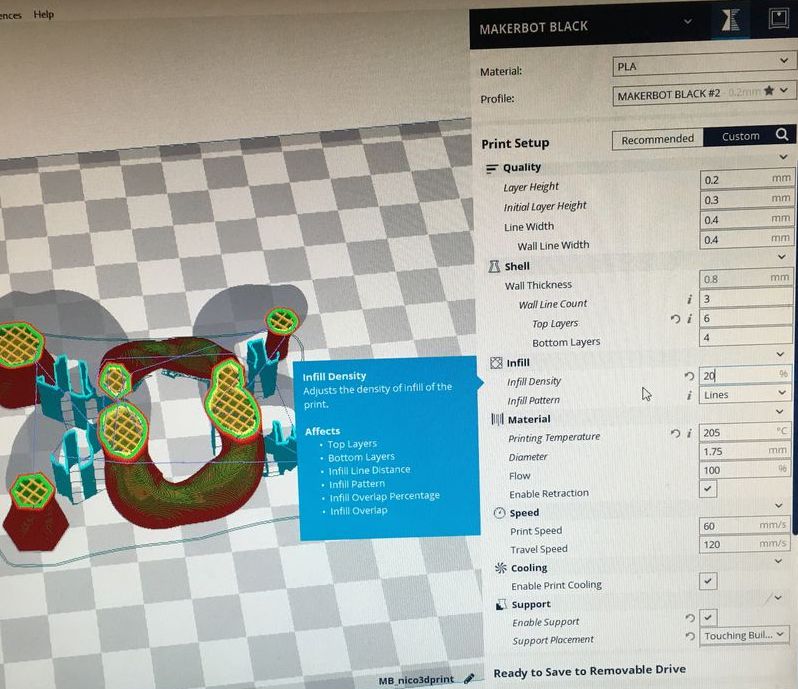
We printed the model using white 1.75mm PLA, widely available at the lab, with the following printing settings done in CURA:
- Infill: 20% - Cubic
- Layer height: 0.15mm
- Initial layer height: 0.3mm
- Line width: 0.4mm
- Wall line count: 3mm
- Printing temperature: 205degC
- Filament: 1.75mm
- Flow 100%
- Travel Speed: 120mm/s
- Print speed: 60mm/s
- Retraction: 6.5mm
Makerbot
The Makerbot is the least used 3d printer in our lab because it’s old (one of the first ones in FabLab Barcelona) and pretty basic. Unlike other printers, it doesn’t have a heat bed, requires an SD card to run the G-code and to get this grand-daddy going we have to follow the next steps:
-
- Heat up machine: Prepare > Preheat PLA (up until 205-210C for PLA)
-
- Extrude some material: Prepare > Move axis > Extruder > 10mm by 10mm - until a sufficient amount of melting plastic has gone down
-
- Put SD card in with the Cura/Slic3r generated G-Code and select Print from sd
-
- Send to print and immediately after calibration, adjust the Z-axis by hand to make sure it it just above the print bed.
Results
 |
 |
Design meets reality
 |
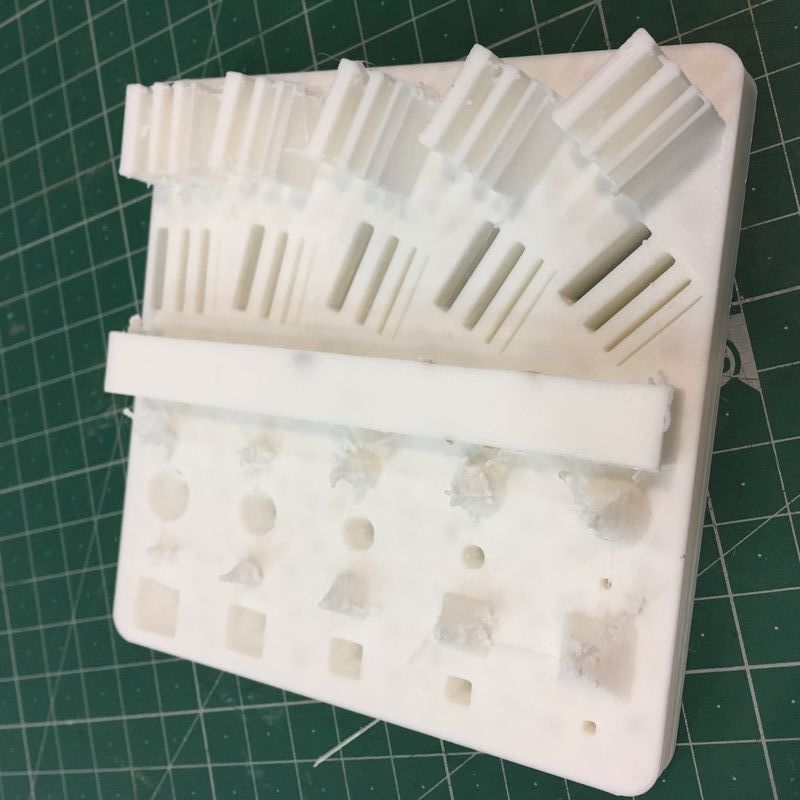 |
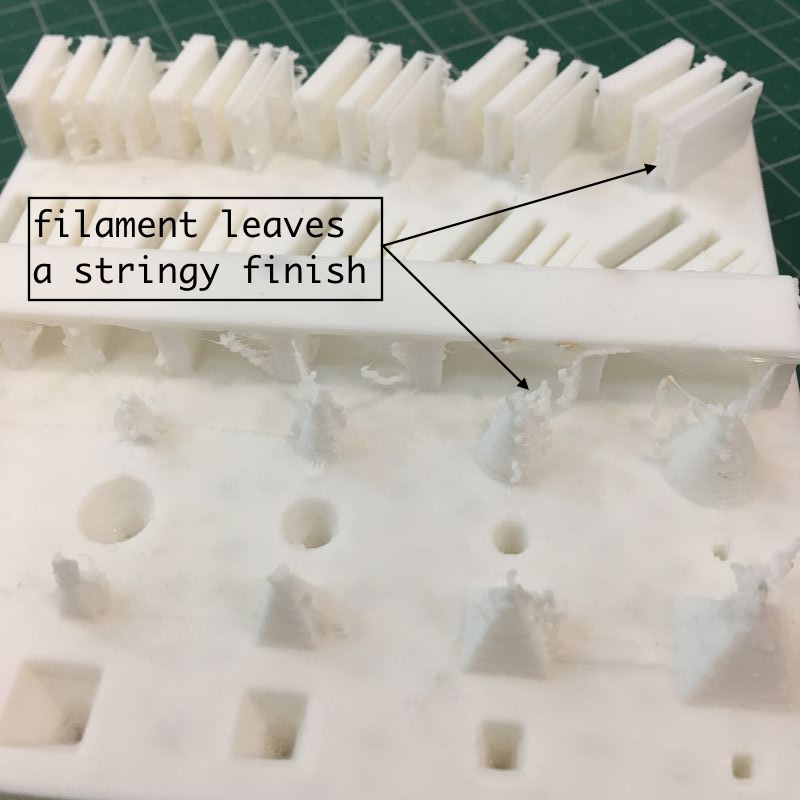
A closer look
 |
 |
Conclusions:
The stringy finishing on the pyramidal and conical parts is probably due to the fact we did not enable retraction during the slicing in Cura. Retraction means to ease pressure in the nozzle and stop filament from coming out between non-print moves. This prevents excess material from being dragged from one area of the print to another leaving a spaghetti finish.
It is also important to adjust the travel speed for non-printing moves: increasing nozzle speed during non-printing moves could help improve stringing. As a rule of thumb, the slower the nozzle moves during non-print moves, the more filament has to ooze out. Also if the nozzle temperature is too high, it’s likely that the filament will have tendency to ooze while not printing.
Individual Assignment:
For the individual assignment, I was keen to try and 3D print some generator parts as I have recently discovered quite a few examples of 3D printed generators for my wind turbine.
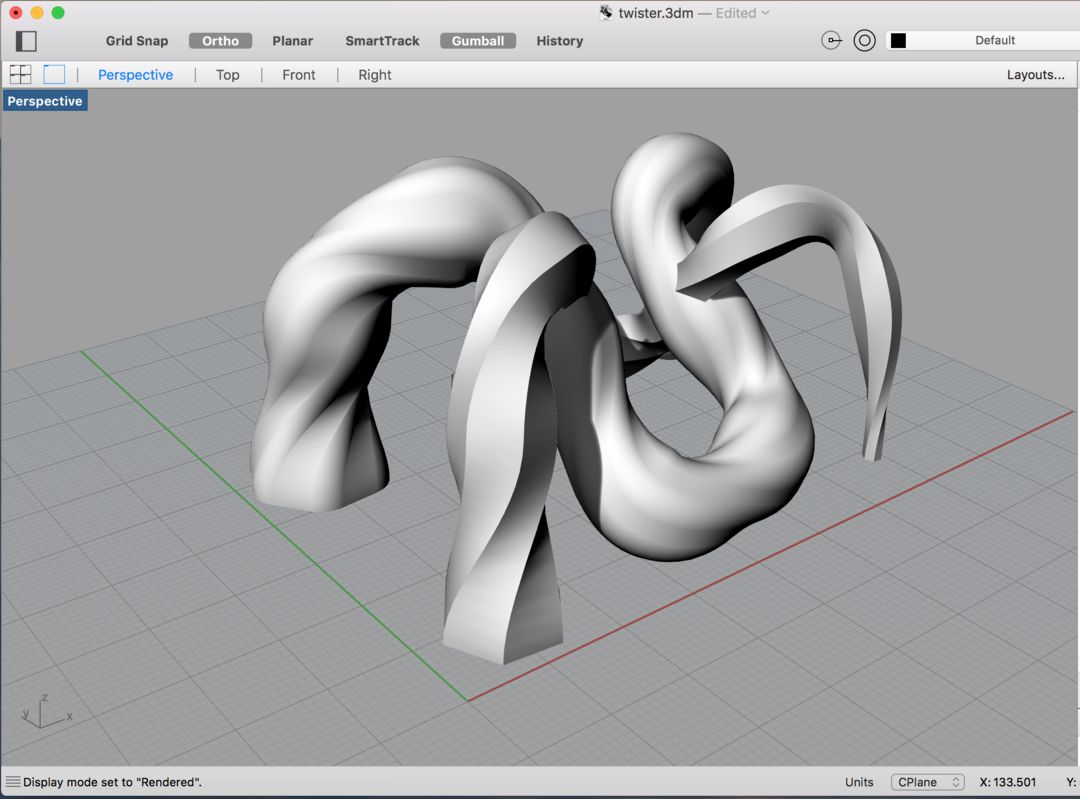
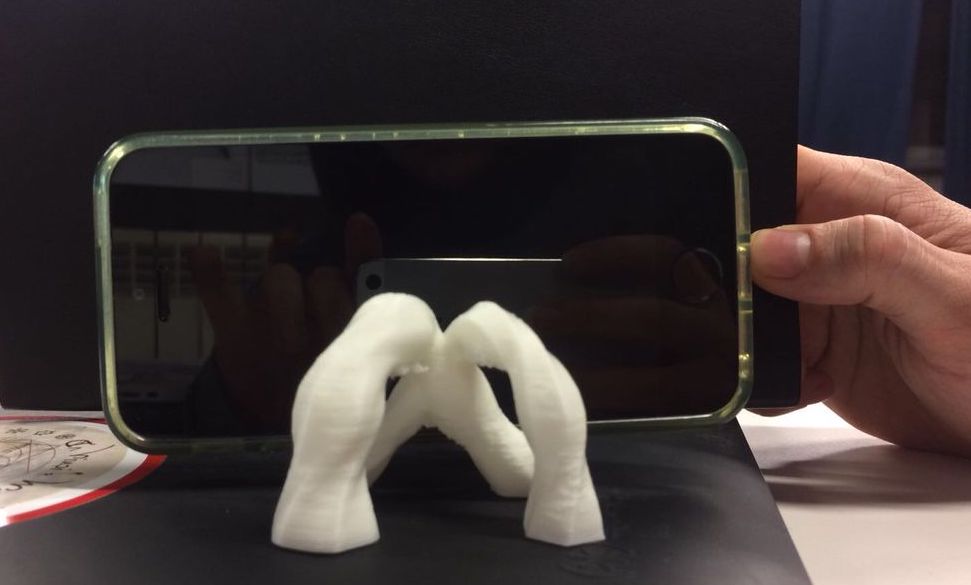
However, time was a large constraint this week due to the group assignment, number of printers we had to use (with 20 students!), and the long printing times. Since I am in the middle of exploring the parametric possibilities of Grasshopper I decided to design a rather funky mobile holder, that could definitely not be made subtractively.
This means that you could not (or would need a mega multiaxis kuka from the future) to mill this design. Notice it has complex curved surfaces which would be very hard to reach, let along follow, with any milling machine.
Designing in Grasshopper
First one leg
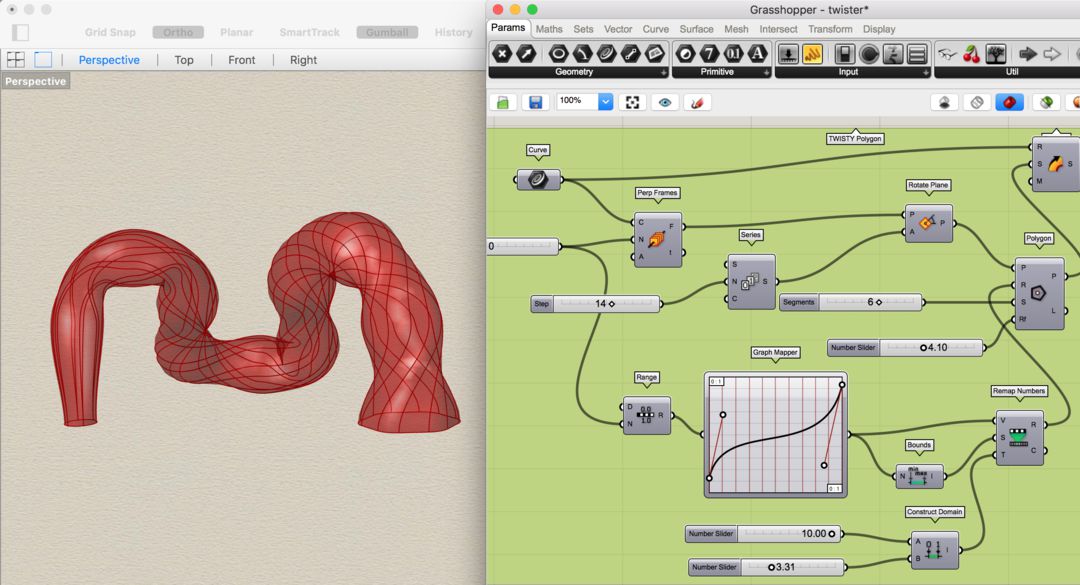
Then the other
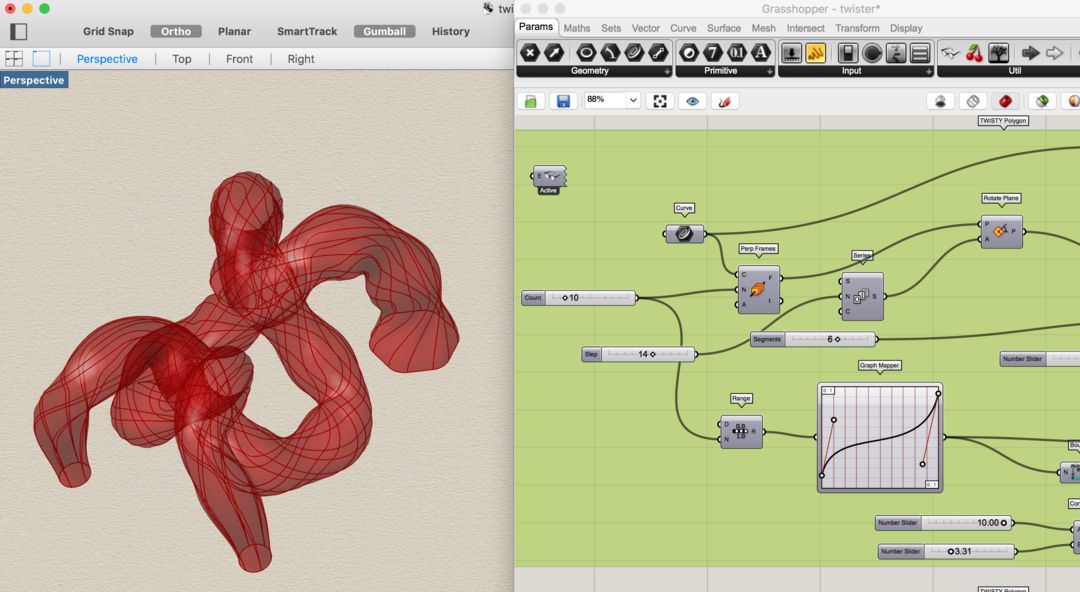
Arrr it’s aliive!
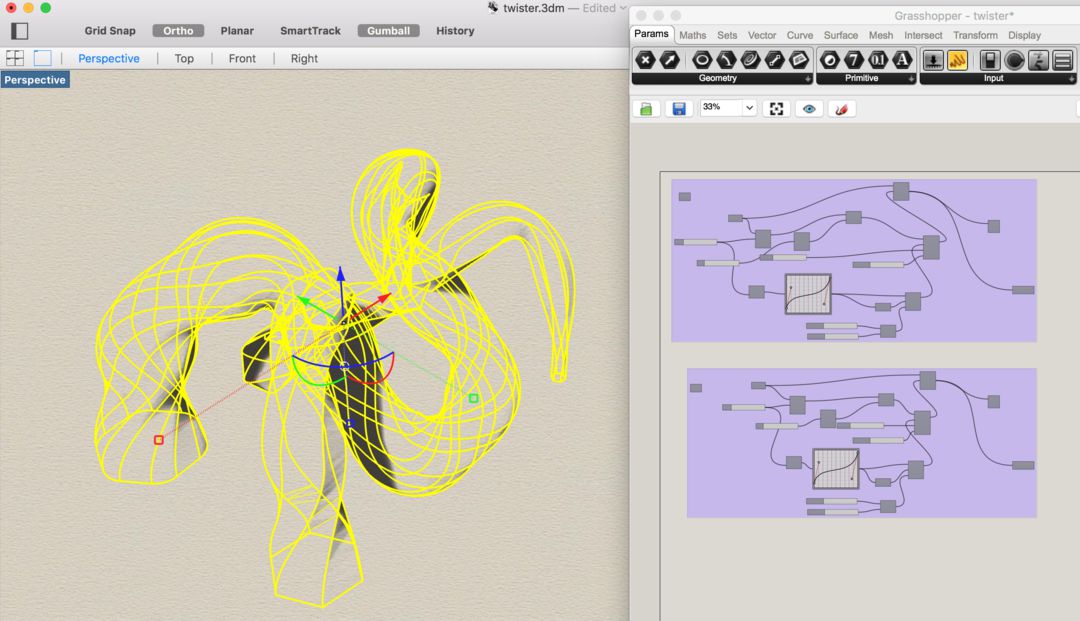
An alien is born
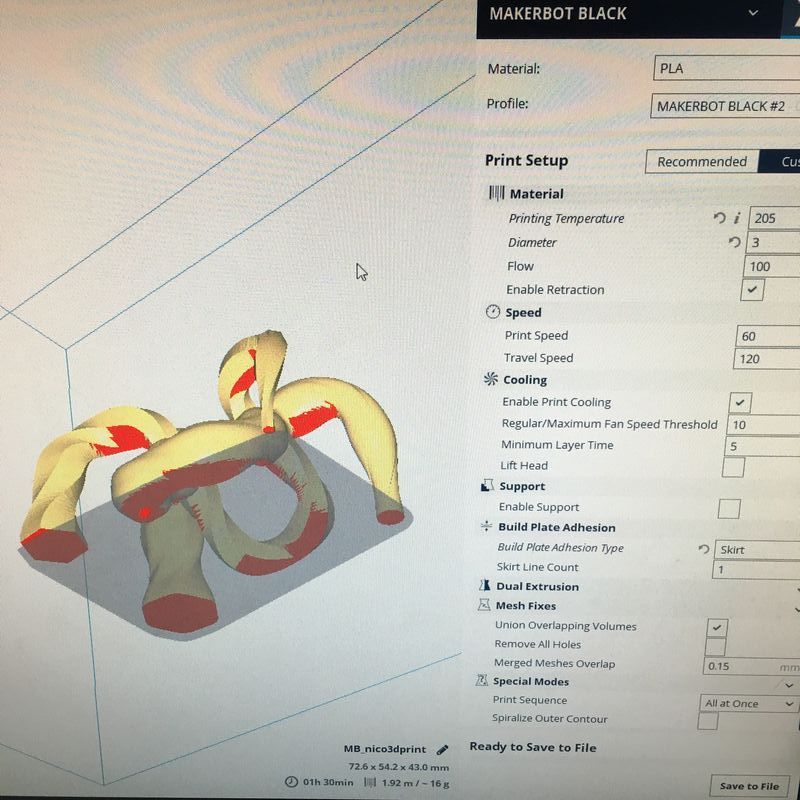
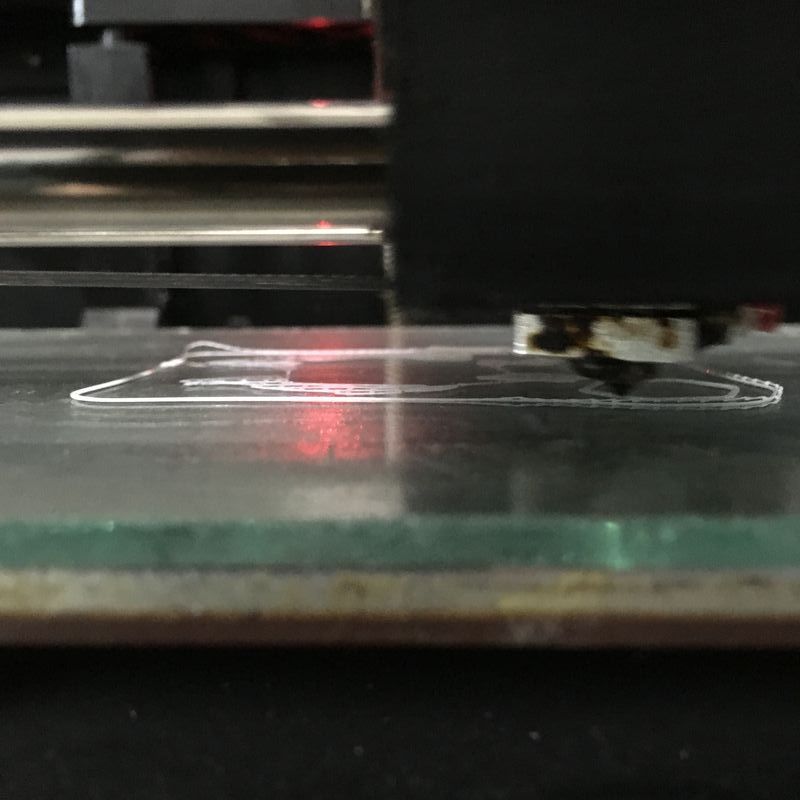
Slicing
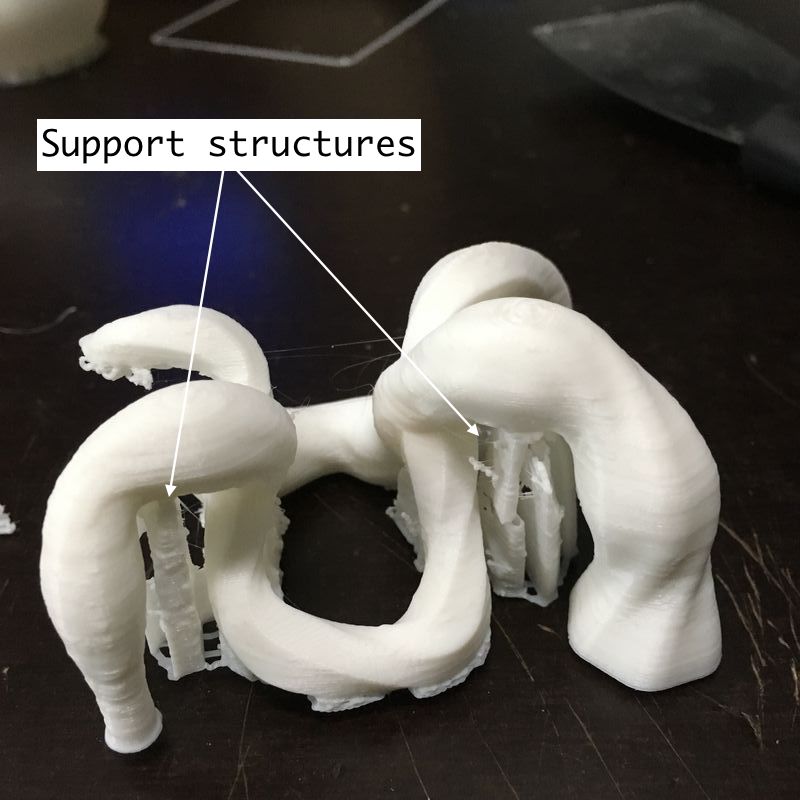
I was hoping that I could get away without using any support structures to 3d print this but turns out my alien will require crutches. Sigh.
 |
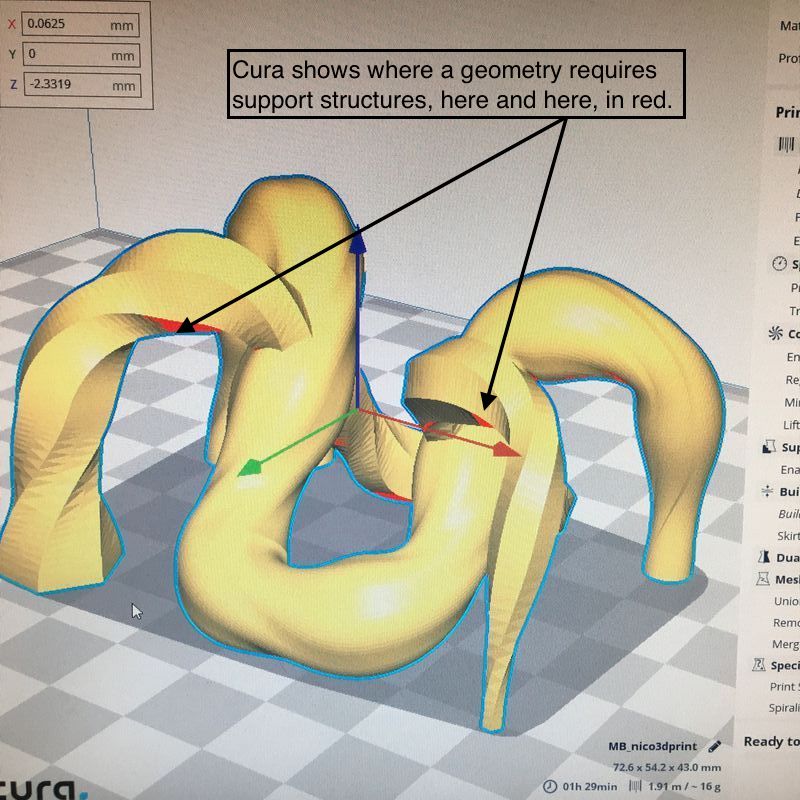 |
Here you can see my support structures enabled:
Ran the my G-code on granpa Makerbot:
- Infill: 20% - Linear
- Layer height: 0.2mm
- Initial layer height: 0.3mm
- Line width: 0.4mm
- Wall line count: 3mm
- Printing temperature: 205degC
- Filament: 1.75mm
- Flow 100%
- Travel Speed: 120mm/s
- Print speed: 60mm/s
- Enable support: Touching Build plate
- Support density 15%
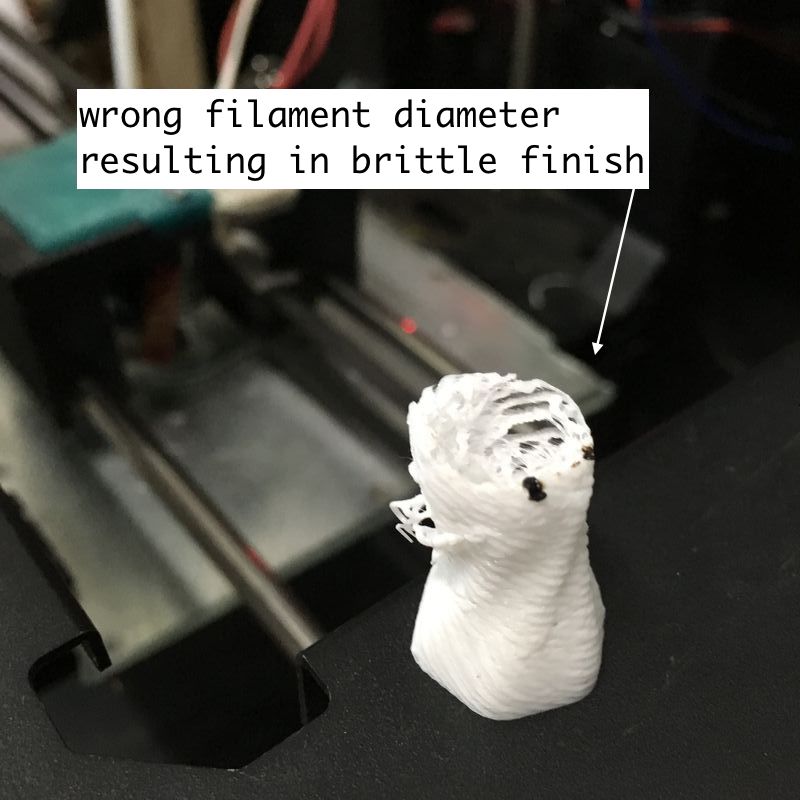
Aaaaand hold it right there. My alien is looking weird.
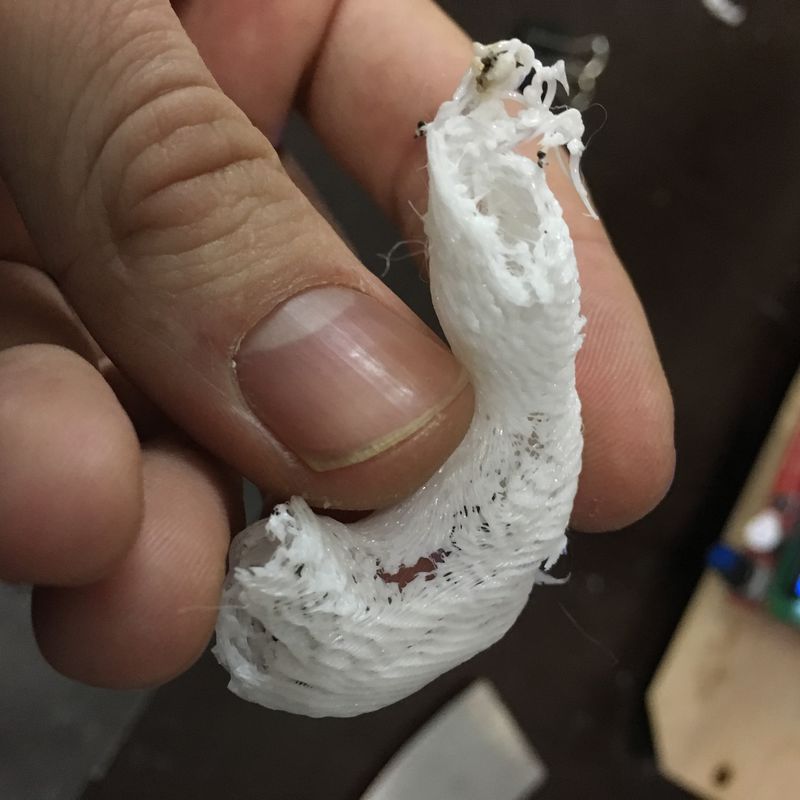
Turns out I had selected the wrong filament diameter. Woops!
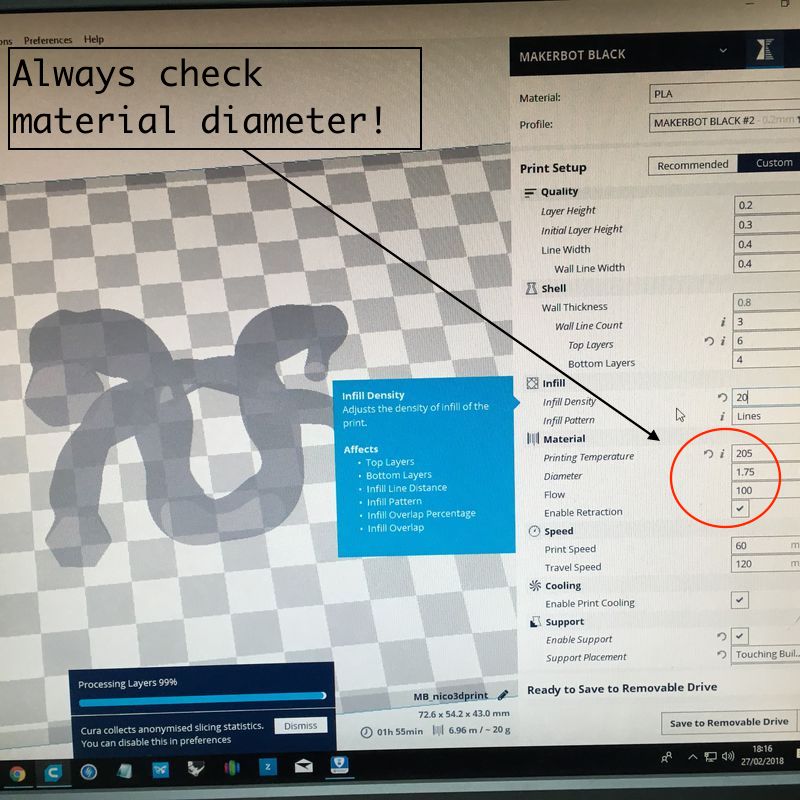
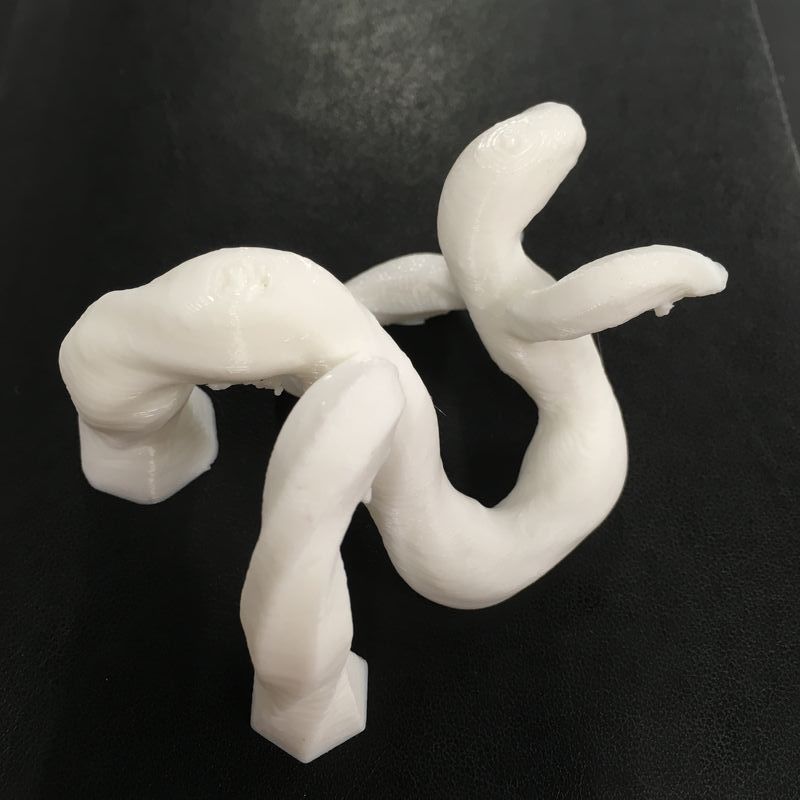
Ran again, and here she is, born again albino hydra, with crutches.
 |
 |
And it even holds mobile phone!
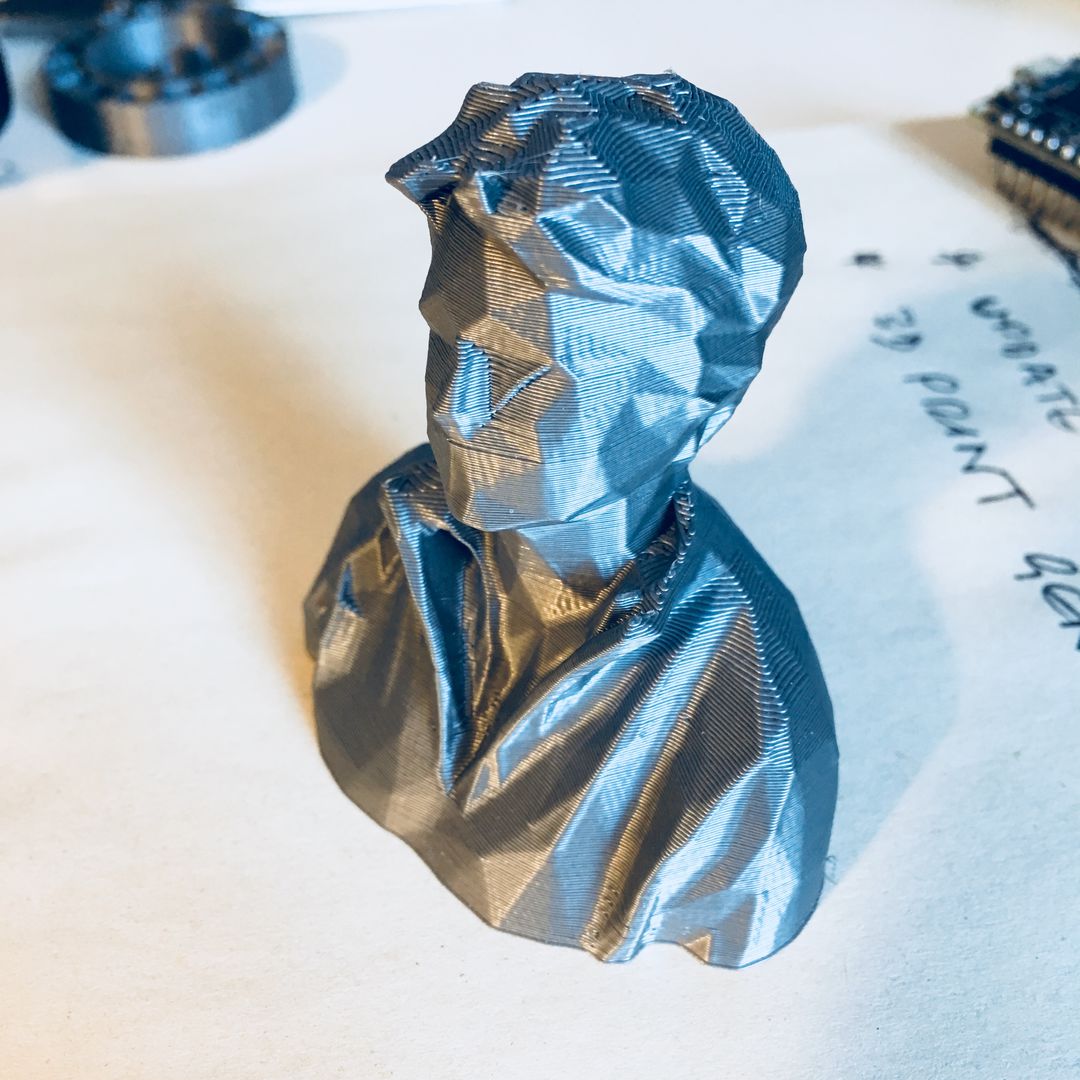
3D scanning
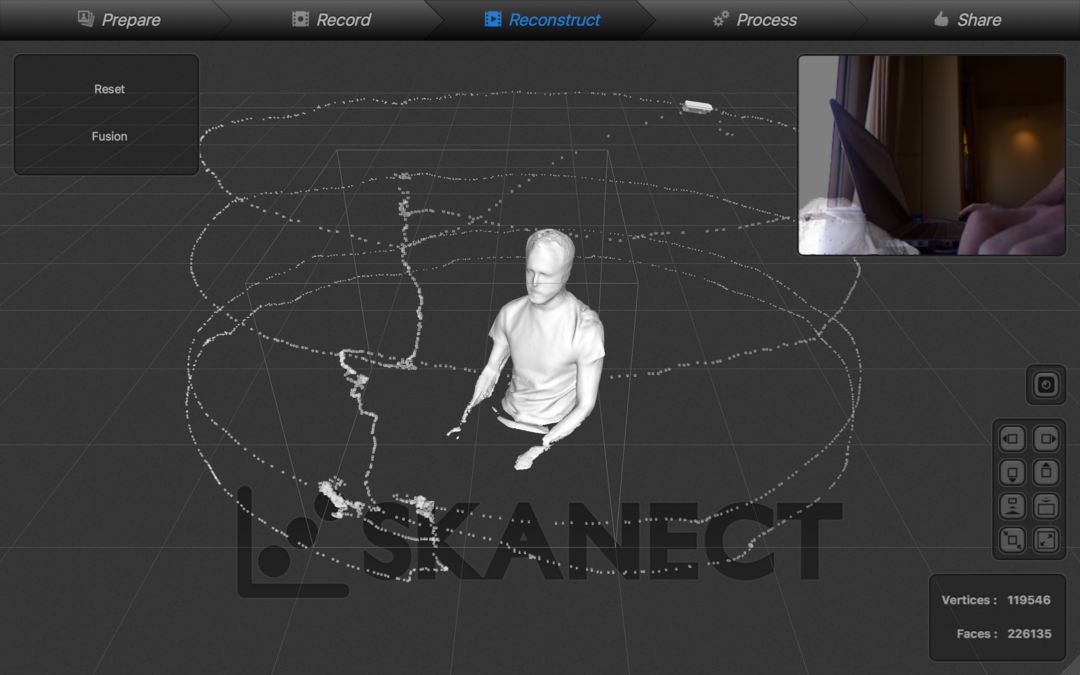
For the 3D scanning I decided to have a play with the Microsoft Xbox 360 Kinect. This is a motion sensing device that was produced by Microsoft for Xbox 360 and Xbox One video game consoles and Microsoft Windows PCs. They look like this:

Since this device came out in the late naughties, hackers have since managed to repurpose this cheap device (video games just got a whole lot more crazy now with VR) for a whole range of interesting applications. For scanning purposes, we are using a free software Scanect which uses the Kinect’s infra-red sensors as a scanning device.
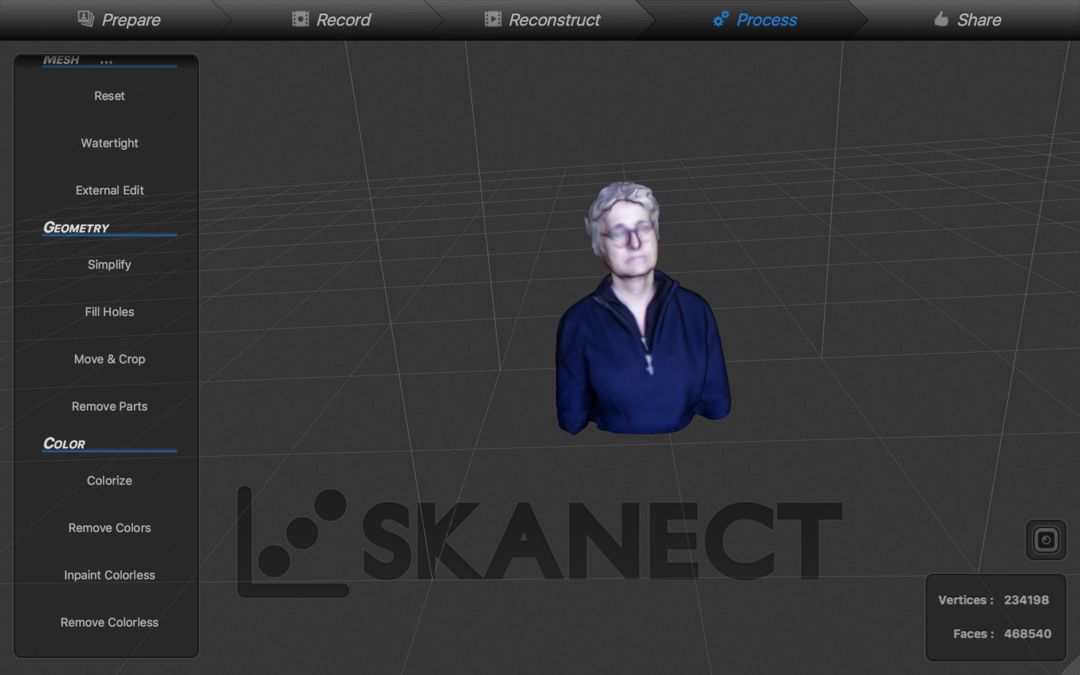
Scanecting:
A very still portrait
Slow rotation:
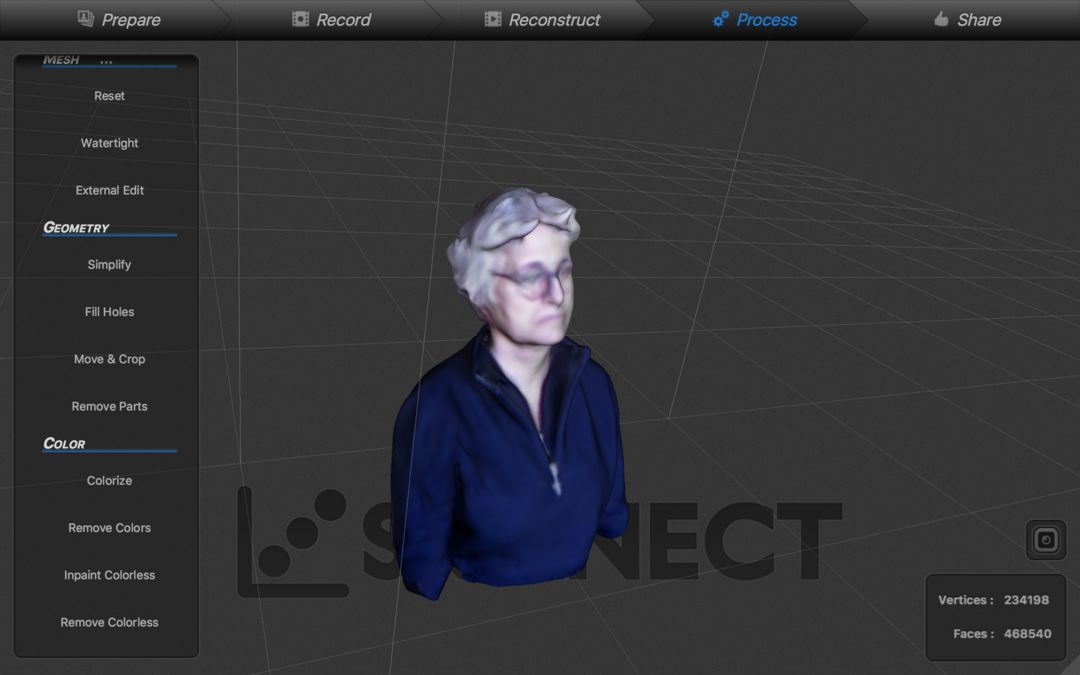
Basically you want the Kinect to capture a 360 view by either rotating around the subject or even better, varying a vertical capture while the subject rotates. Protip: using a revolving chair!
As you can see sometimes, the result comes out a bit fuzzy.
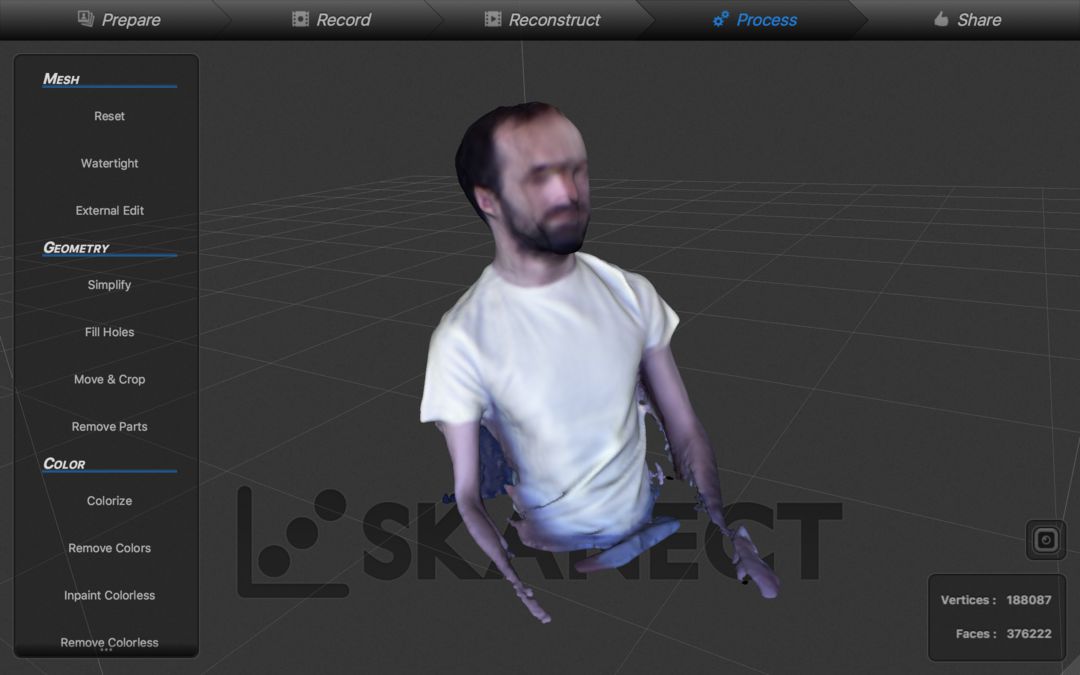
Exporting to an .stl and tidying the mesh in Rhino.
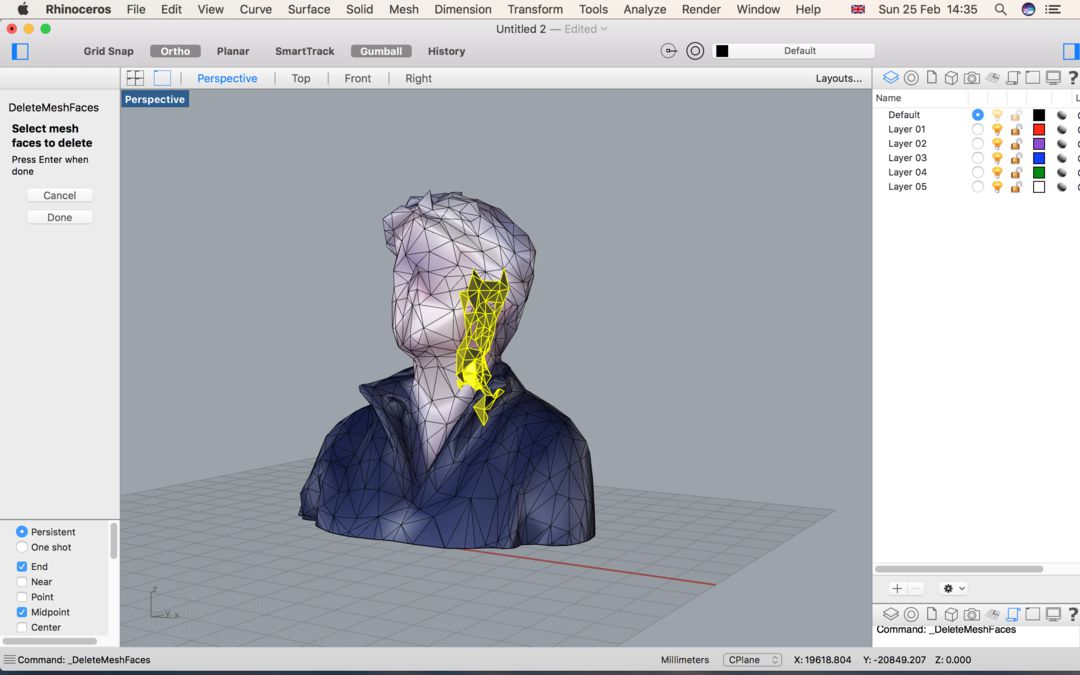
Exorcising rogue polygons.

Re-export to stl. and print.
You can download all my 3d printing design files from my Gitlab repository.