Wk4. Computer-Controlled Cutting
-
Group assignment: characterise your laser-cutter, making test part(s) that vary cutting settings and dimensions.
-
Individual assignment:
- Design, make, and document a parametric press-fit construction kit which can be assembled in multiple ways. Account for the laser-cutter kerf and how you included your material tolerances.
- Cut something on the vinyl-cutter
Group assignment:
For our group Jean-Baptiste, Coral, Daniel and I used the Trotec Speedy 400 for our first experiments in Laser cutting. The FabLab Barcelona has a quite complex workflow to use the laser cutters, but this helped us understand how to go from design to cut and finally test some parts.
Laser Specs
The Speedy 400 is a CO2 Laser, air-cooled and with a Laser Power between 40 - 120 Watts. It has a 1000 x 610 mm (39 x 24 in) cutting surface and it is run by a Brushless DC servomotor that moves the head at a whopping 355 cm/sec. It uses 1.5” and 2.0” (misaligned) standard lenses to hone the laser beam up to a supposed accuracy of to 5µm. For good bed-time reading, here is the operation manual and the Job Control Guide.
Designing some Test cuts.
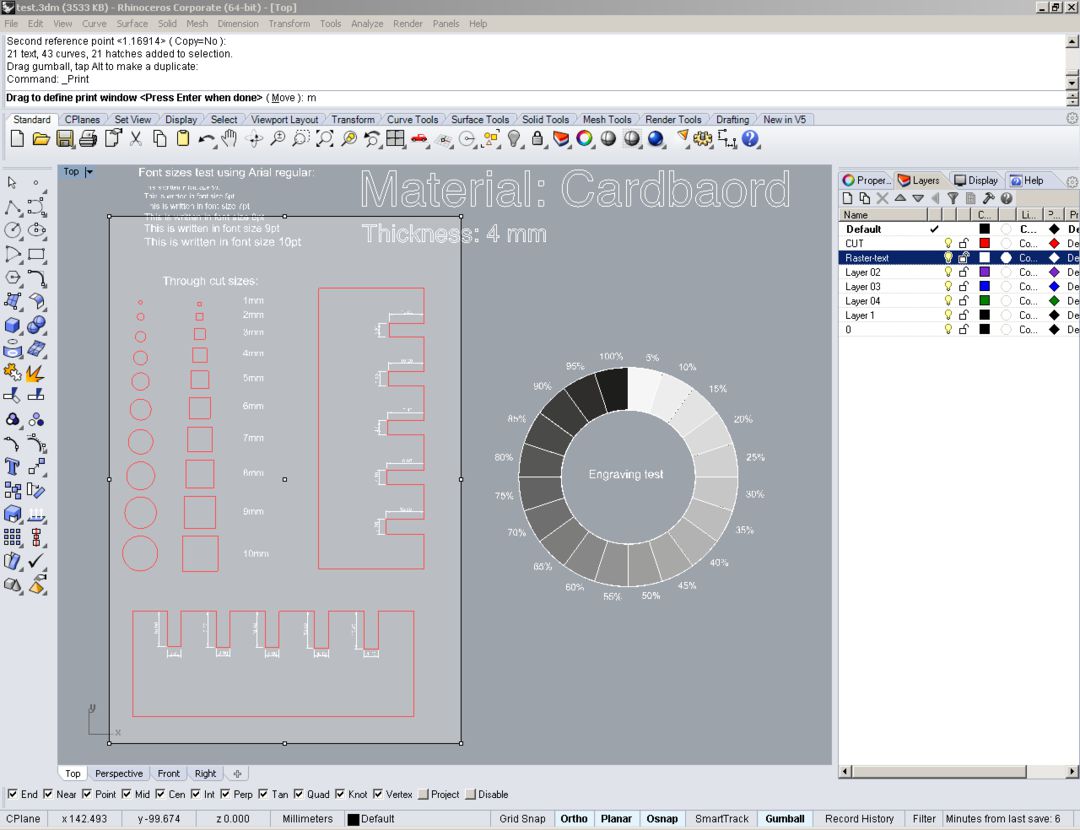
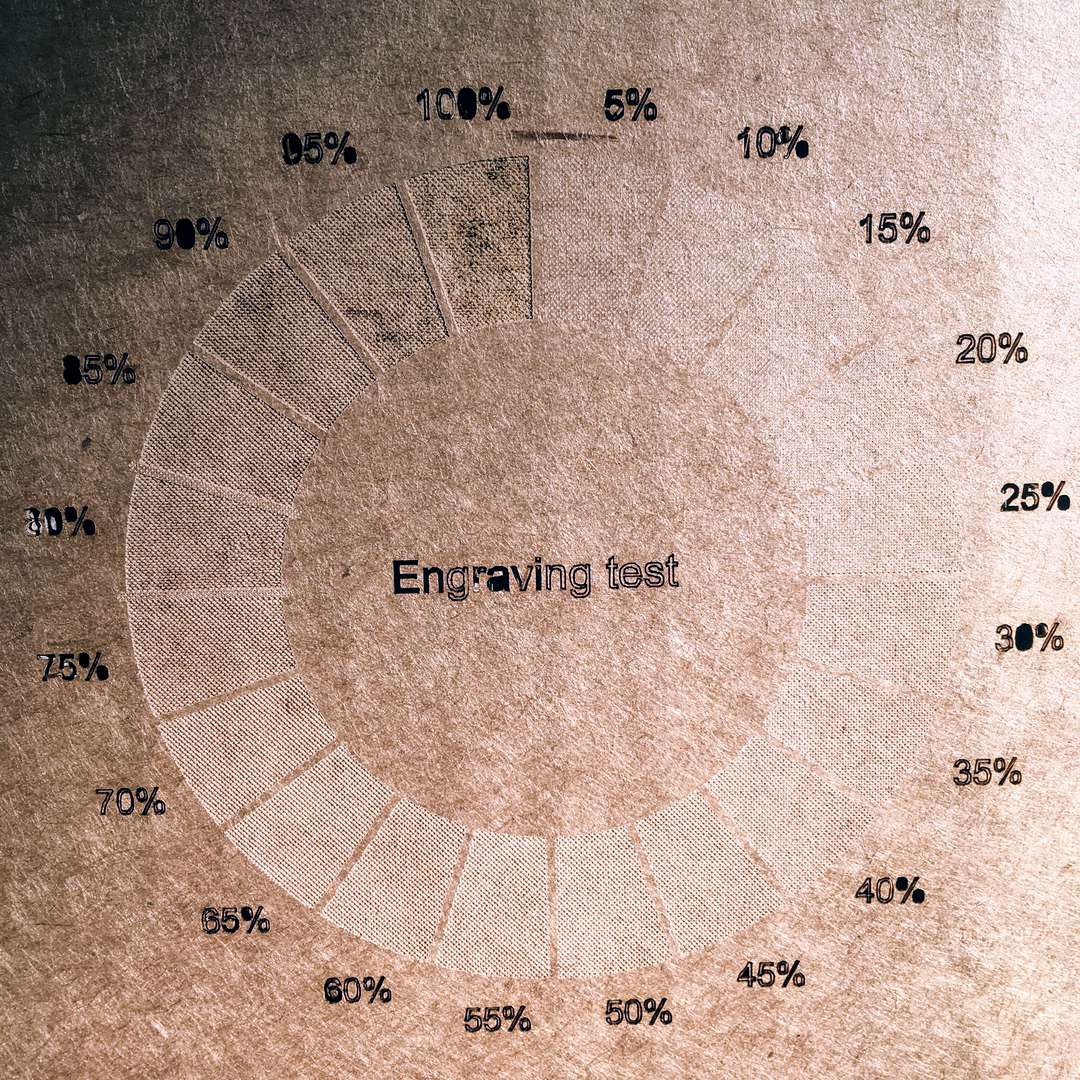
Seeing we were going to be doing our pressfit in cardboard, we decided to test the power, speed and rate of our Trotec as well as check the kerf dimensions for a pressfit design. First we downloaded a lasercutting material template from Thingyverse. This is a simple way of showcasing difference of between raster and vector images, using 20 different engraving shades, precision using different font sizes as well as square and circular shapes. In Rhino I also designed a pressfit test cut.
We calculated with the calliper the cardboard thickness at 4mm so the test cut looked at varying 5 slot widths ranging from 3.80 mm to 4.20 mm increasing with increments on 0.10 mm.
We also varied the slot length between 10.00 mm and 10.80 mm increasing in increments of 0.20 mm. This test cut was also copied on both a horizontal and vertical axis to see how the cardboard corrugation affected the slots.

TROTEC Setup
Machines
-
Turn on power (for either the Trotec 100 or Trotec 400) and then the ventilation from their separate cupboards. For the ventilation the TURBINA 1 switches should all be on, including the black start switch.
-
Switch on the machine (Trotec 400 requires a key) and wait for the machine to stretch its axes. Absolute 0,0 is always in the top lefthand corner.
-
Put in the material and calibrate the focus of the machine using the measure stick. When the stick falls of the red dot should be in focus.
Computer control terminal
-
FabLab Barcelona uses Rhino to “print” or send files to the Trotec software and then to the laser cutters. Follow these steps and all should be well.
-
Go to the FabLab IAAC cloud network in the documents and import or download your file from the FabAcademy file station. Remember to upload your document here before approaching the machines.
This will save you time and make sure you don’t waste others’ who are waiting behind you.
RHINO: PRINT SETUP
- In Rhino, use the LAYERS yo separate the lines you want to cut at different powers and speeds, and the ones you want to engrave. Put these into different layers marked clearly in BLACK, RED or BLUE or the other primary colors.

-
If this is a new material and/or design, ALWAYS MAKE A TEST CUT. Easiest way is to make a square or circle - if it is for a pressfit this is a good way to also check your kerf tolerances - and then select print under the printer icon.
-
This brings up a PRINT SETUP menu. Here you select your machine: TROTEC ENGRAVER v10.3.0 and then select PROPERTIES.
-
Here under the PRINT tab you can define the width and height of the laser cutting surface. Measure this on your actual material. You can also select the material, and if this is a raster or engrave job you can here define the
Resolution,Cut LineandHalf Tone.
When done select the J/C icon for OK.
- Back in PRINT SETUP under
Output Typeselect either a)VectororRasterand underOutput Colormake sure to checkDisplay Colorso that the machine reads our color layers.

SET WINDOW
- Then under
Viewmake sure you are on the correct viewport in Rhino (Usually Top), and MAKE SURE yourScale = 1:1then select:Window: Set
 |
 |
- This brings you back to Rhino with a highlighted working area that represents the cutting surface you defined in Properties.
YELP!! Don’t just grab and move the working area or it will redefine itself. To move this surface, type the command MOVE into Rhino and then select and move the cutting surface so that your object fits into the top left hand corner of the working surface. Make sure to leave some margin. Set the window and press print.
TROTEC JOB CONTROL
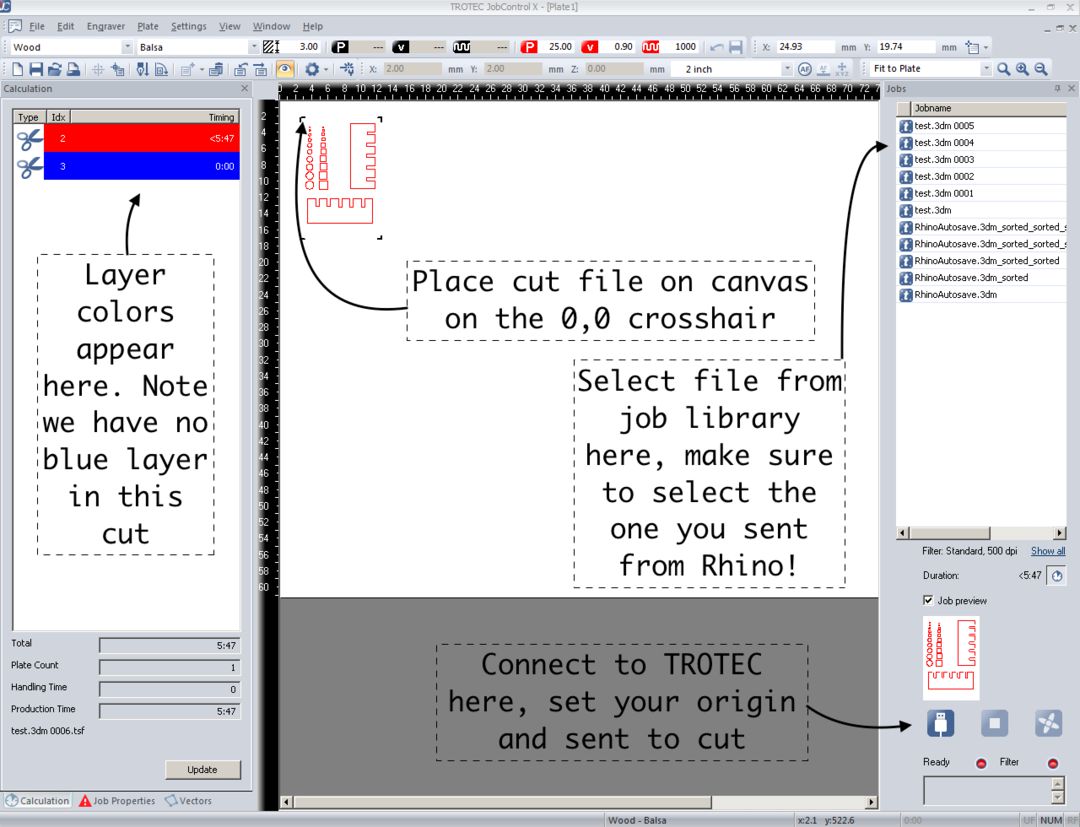
- By default it may show you the last job file that was cut previously. This may be confusing. To get rid of this, delete. If it is a job you still want to access later drag it into the job library on the right. Your file should be in at the top of this column. Drag it onto the canvass. Click Connect, this connects the machine.
-
Now you should also see the pointer that defines where the laser head is sitting in the machine. Go back to the machine and manually move it to you 0,0 (always making sure that the material covers your preset cutting area) then select your file and snap the top left corner to the pointer.
-
Under
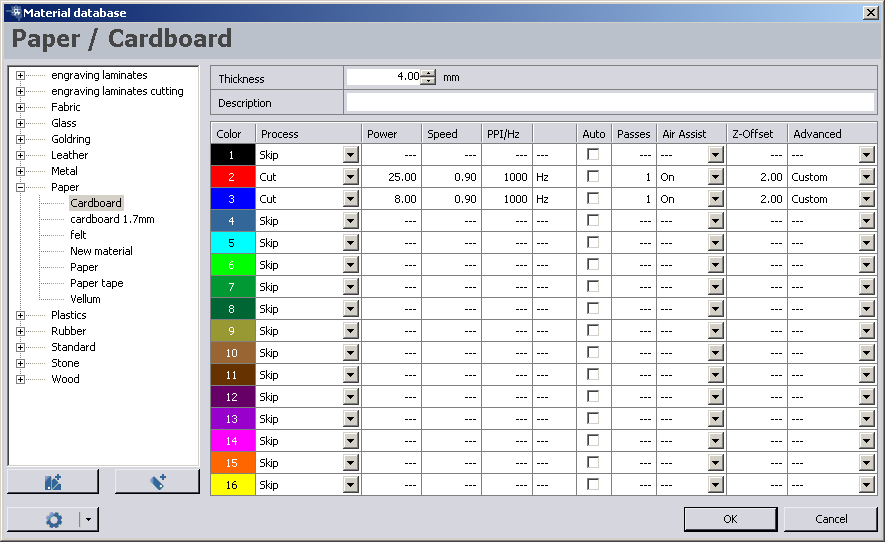
Settings: MATERIAL TEMPLATESettings, this is where you can define your material and more importantly the POWER, SPEED and FREQUENCY values. Make sure your colors reflect the layers you selected in Rhino.
VECTOR ORDERING
Finally, before sending to cut, under menu tab Plate go to Vector Ordering this brings up an option box. Make sure to select a quick ordering, this tells the Trotec to follow the vectors in an ordered sequence rather than randomly. It will reduce time and possible mistakes on bigger cuts.
Send to Cut
PRESS SEND AND GO WATCH THE LASER WORK ITS MAGIC
Some Common Errors and Bugs
- Double Passing
Sometimes the laser will appear to repeat cut across a vector twice. This may cause some material damage as the cut piece is already loose from the rest of the material, or at very least affect your kerf.
This is usually because you have double or triple copy of your Rhino lines sitting on top of each other in the design file. The Trotec will read these as extra lines so will go over them twice or thrice.
If you see this happen, stop the cut and go back and check your design file, then start over. The cut settings and area will usually be pre-saved, so you can save some steps.
- Laser Cutter Stops and Starts
In the Trotec 400 there is a bug in the x-axis belt, so it is recommended that we don’t change the speed to more that 1. Often the Laser will stop in mid-flight. Sometimes all that is needed is to hit the play button on the machine and it should keep going.
- Power too low (doesn’t cut) or too high (I see fire!)
From a small test cut you should be able to gage the power levels for your material. On wood or cardboard if the cut creates black burn marks, it is usually too high. Set it lower or up the speed, you should not be seeing flames.
It is good practice to start low and increase power. The aim is to use a little amount of power as fast as possible for a clean cut.
- Laser Cutter cutting super random
You didn’t set your VECTOR ORDERING See above.
- Laser Cutter cuts fine on half of the material and not the rest
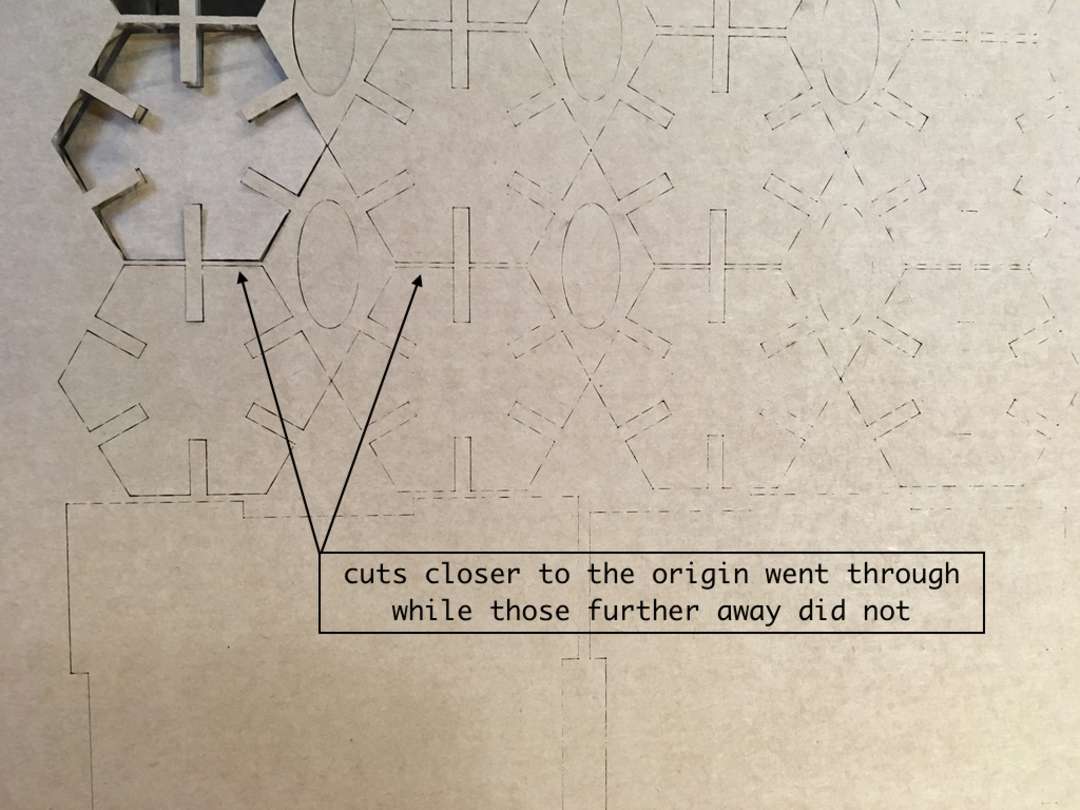
According to our FabLab technician Martin, the Trotec 400 has some misalignment with its lenses. This means that the further away from the 0.0 machine origin (Top Left corner of the machine) the further the laser has to travel and so the more it looses focus.
To remedy this, separate the files further from the 0,0 machine origin into different layers. Those further from the 0,0 slightly increment the cut power and this should work.
Alternatively, separate your cuts and work on a smaller cutting area closer to the origin.
Laser Cutting
 |
 |
Test results
Our group test cut was successful in the sense that it helped us find the optimal cutting and engraving power, speed and rate (see below) for cardboard. Ideally, it would have been nice to try out different materials, but we did not get round to this. Importantly, it also showed us how to manage the rather complex workflow on the Fablabs lasercutters, and we worked out both the kerf on a material as well as the optimal width for a press-fit join.
Kerf
Our first step was to cut simple 10 mm x 10 mm square. Here we followed the approach of starting with a low power and slowly incrementing between 20, 22, and 25 maintaining our speed at 0.9 (1 is the max) and frequency at 1000Hz.
At 20 the laser cut through only the first layer of cardboard, at 22 it barely cut right through but left some strings attached of the bottom layer (not a clean cut) while at 25 it went through like butter.
 |
 |
Calliper and the Cardboard
With the calliper we were able to calculate the cut square at 10.20 mm, which means the laser removed 0.1 mm of material on either side. We noted that this should be repeated in a harder material, as it is difficult to measure a soft material like cardboard accurately with the sharp teeth of the calliper.
Engraving
With our engraving tests we used the raster setting in the Rhino print setup. We set the various shades to engrave and made the percentage values and “engraving test” text another layer for cutting at a lower power.
The first engrave we set the power to 70 the speed at 80 and the frequency at 1000 ppi. Note that because it is a raster, the frequency is calculated in pixels per inch and not Hertz. The low cut parameters we set for the vector engrave we set at 3 for power, 0,9 for speed and 1000 Hz.
Result
This completely burnt through the darker shades of our raster, but it gave a very complete view of the different effects. In fact the pattern left by the burnt-through darker shades reminded us a little bit like the patters moths leave when they chew your clothes. The low cut however, engraved the text nicely.
 |
 |
Repeat
On a repeat run we used 50 power, 80 speed and 1000 ppi for the engrave settings and got a very nice variation on the shades with no burn. However, our text engrave which we upped to 5 power, keeping same 0.9 speed and 1000 Hz frequency, actually cut through some of the cardboard.
Conclusion
This table shows the optimal cut and engrave parameters for our 4mm cardboard:
VECTOR CUTTING
| Power | Speed | Frequency |
|---|---|---|
| 25-27* | 0.9 | 1000 Hz |
RASTER ENGRAVE
| Power | Speed | Frequency |
|---|---|---|
| 50 | 0.9 | 1000 ppi |
Vector Cut is between 25 and 27 because, as you can see below, I found out much later doing the individual assignment that the lenses on our Trotec 400 is actually misaligned. This means, the further the laser moves from it’s origin (the further the light has to travel) and the less focus the laser has on the material, which means it is likely not to cut all the way. To remedy this, change your layers to increase the power if you are cutting a design that goes far from the origin.
Pressfit
The final part of out test shows us that the optimal (snug) pressfit dimension happened to be 3.8 mm. This confirms that 0.20 is the total material removed (0.1 mm kerf n either side) so we should make a slot tolerance of 0.20.
 |
 |
INDIVIDUAL ASSIGNMENT
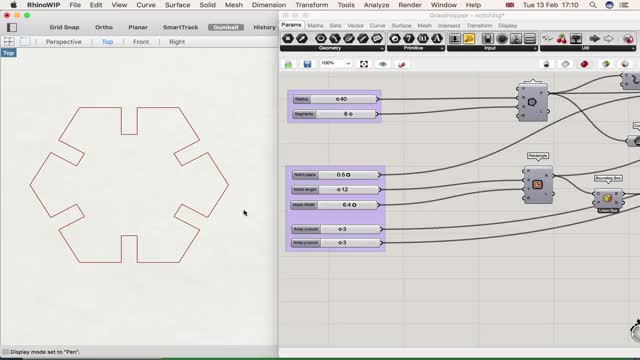
For the individual assignment I spent a significant amount of time designing a pressfit design in Grasshopper.
While this was a tough hill to climb, it was totally worth it. The more I explore Grasshopper the more powerful I find the possibilities of algorithmic design. Granted, at the moment its sometimes seems hard labour to create definitions for every parameter – something a software like Fusion360 or SolidWorks does with two clicks of a button – but it is really helping me understand the concepts behind the geometry, and like it or not, by the end you become intimately familiar with your design.
Pressfit with Grasshopper
As you can see above the design is a notched polygon that, which is parametric in number of sides/segments (>3), the radius, then the notch/slot position, length and width, as well as setting a x/y number of arrays to “bake” into Rhino. The magick of this definition is that you can change polygon shape keeping the same notch angle, length and width.
First cut is the deepest?
Since we did our group assignment, I already knew to create a notch tolerance of 0.1mm to account for the laser kerf on 4mm cardboard. It is worth remembering that this changes as per material and cut settings. A slower cut speed will increase your kerf.
On the Trotec I ran the same 25 power, 0.9 Speed and 1000 Hz that worked well for our group assignment.
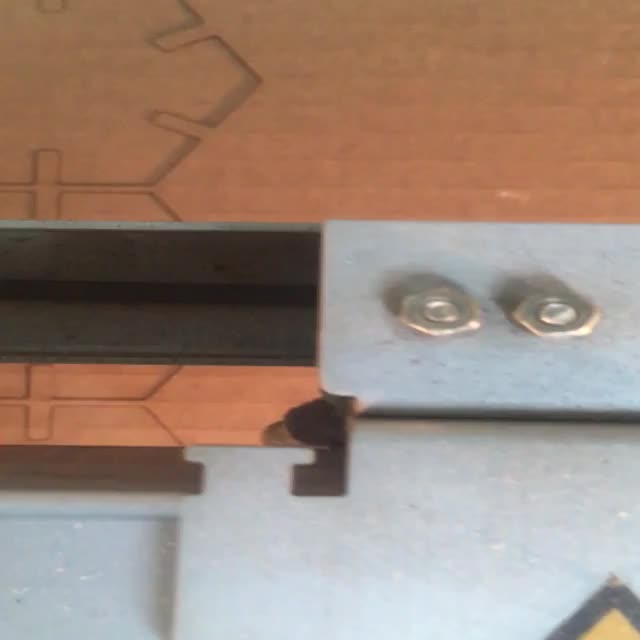
The problem was that my cutting area was quite large, and as has been mentioned above, the lenses on the Trotec 400 are misaligned and have not been repaired yet. This means that the laser lost power the further it had to cut from the origin.
As you can see, I ended up with some nicely cut pieces and others I had to scalpel out manually, leaving some horrible torn edges. After seeing the smooth operation of the laser in action for our group assignment, this was a bit of a let down :(
 |
 |
The plus side is my pieces did press fit together nicely with a 3.8 mm notch width. I was happy with this. However, I saw I also needed to make two adjustments to the initial design.
-
Firstly my notch length for both the hexagon and triangle was too long (12mm) meaning that when the pieces pressed together they met at the middle, so I could not comportably fit more than two together.
-
Secondly, my initial design did not add a chamfer or fillet to the edge as you can see. This meant the pressfit notches met at sharp 90 degree angles and sometimes needed a lot of wiggle to put together.
And so it was I returned to Grasshopper and created a 1mm fillet to round those sharp angles. See here:
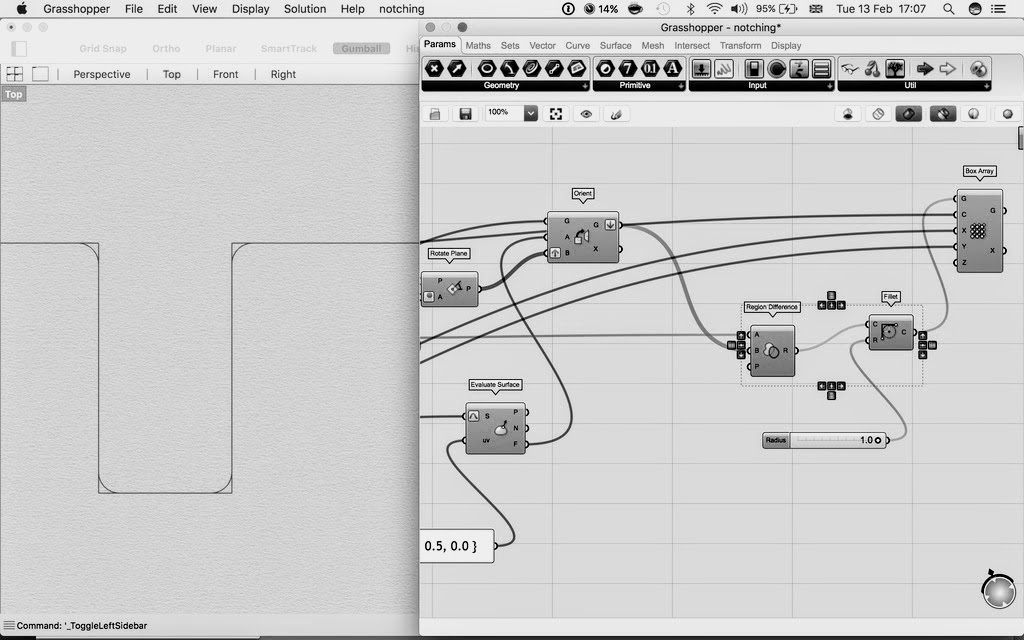
Here the lesson is I should have test cut two pieces together to gage the settings and the fit rather than a whole array. This would have saved material and time. ALWAYS DO A TEST CUT
Round 2
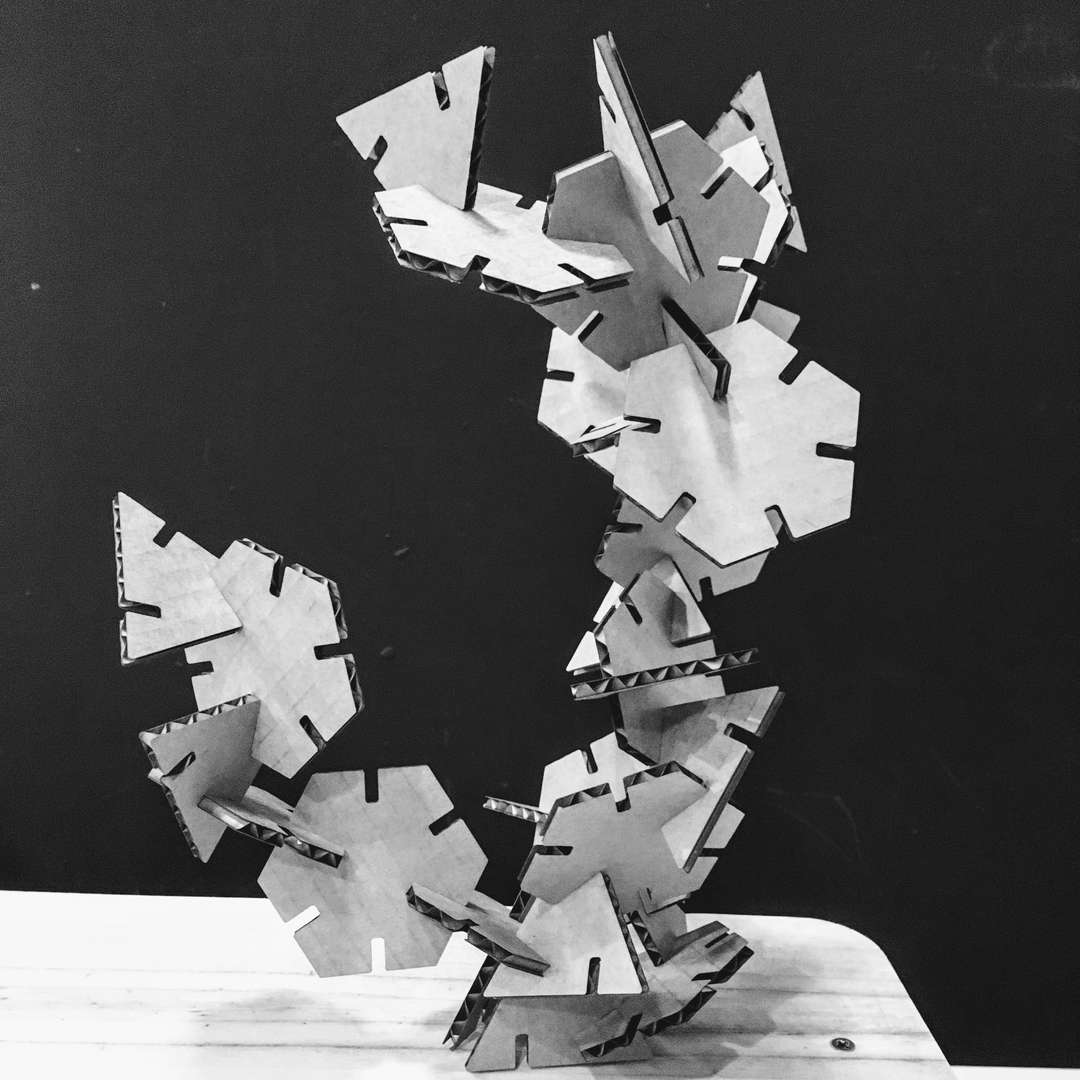
This time I was more successful by upping the power to 30. For the triangle I also offset the notch off-centre a bit to see what fun I could have assembling the pieces. See the laser in action creating my lovely filleted notches, and cutting like it should.
Here you can see my Cactus pressfit!
 |
 |
Plywood Living Hinges
With fellow Fab student Oscar I got a chance to flex the lasercutter on some living hinges. These are cut patterns that can be applied to a hard material like plywood and make them flexible.
We first tested various cut settings on a small square gradually upping the power and lowering the speed. Initially we got a few flames but we then managed to find the sweet spot with 65 power and 0.7 speed.
Our first test cut in 5mm hard ply was a bit of a crop. The pattern cut nicely (I think we even had a slower speed here) but it sort of left a crip-like and inflexible honeycomb that snapped at the slightest bend.
Our second test with the Fabric pattern worked out much nicer. We got a beautiful finish and made some FLEXIBLE PLYWOOD!!
 |
 |
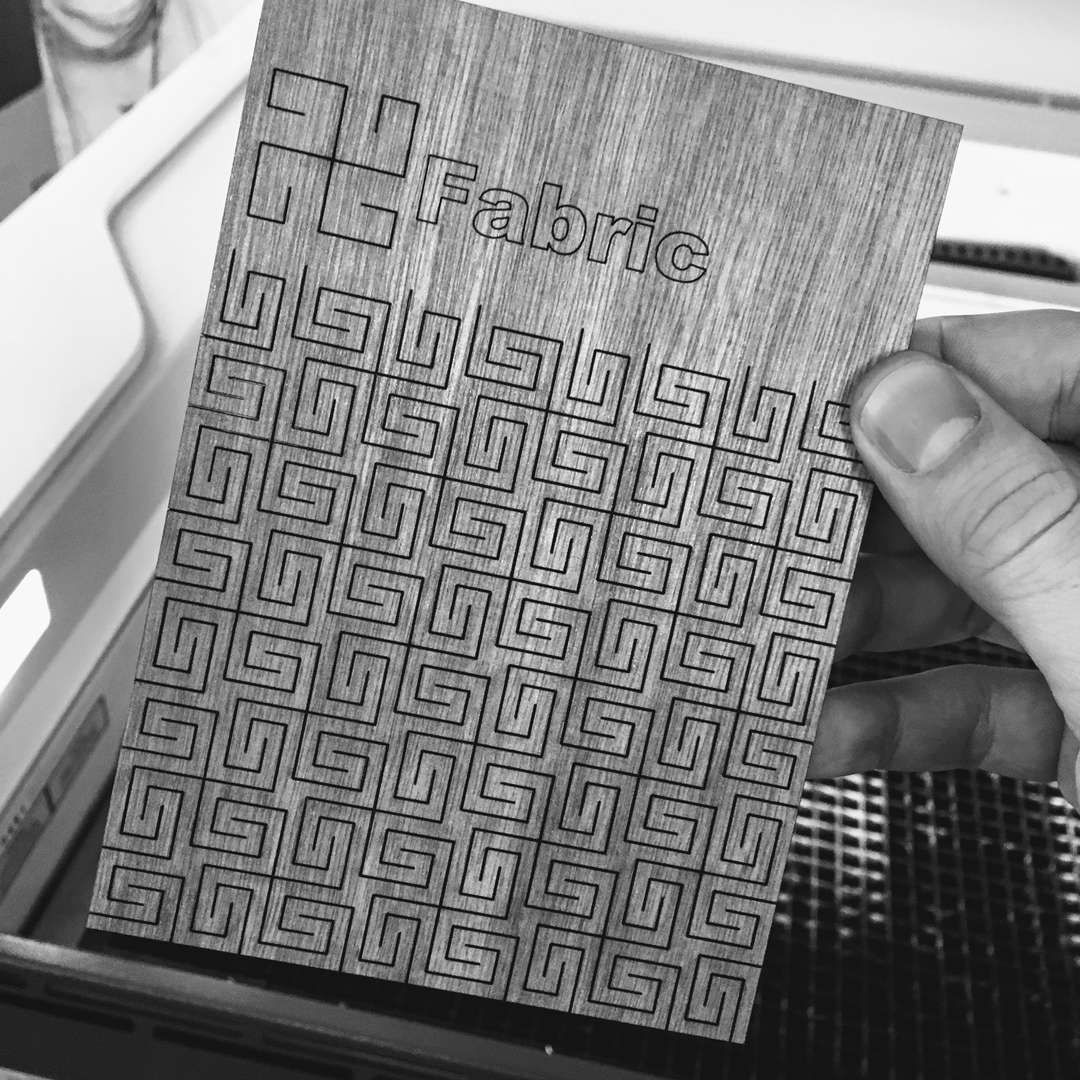
I can’t wait to start trying this out with some more complex designs. But now it’s on to Vinyl cutting. Oh, I also made a cheeky raster image on a spare offcut of plywood. I really like this effect.
To end with a quick raster
 |
 |
Vinyl Cutting
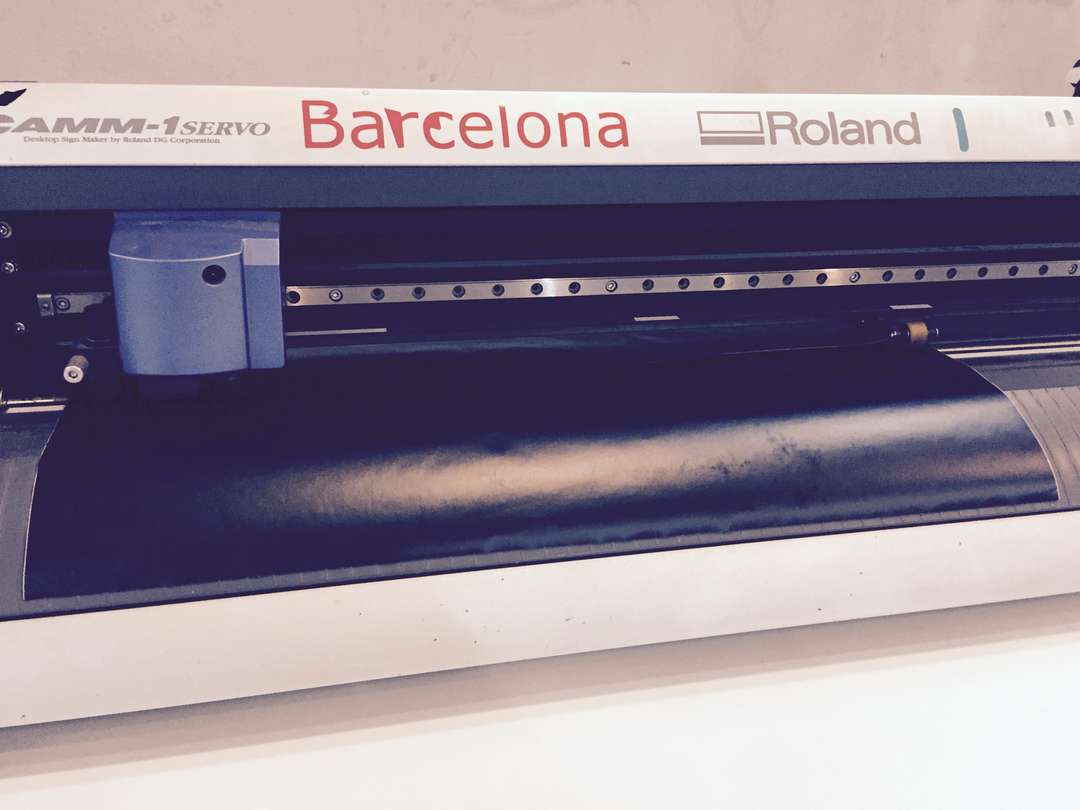
According to Neil, the vinylcutter is the most useful machine in the Lab but is also the most ignored. I can see why as it takes some skill to use the vinylcutter, and the Roland is a capricious machine on the best of days.
Designing an impossible triangle
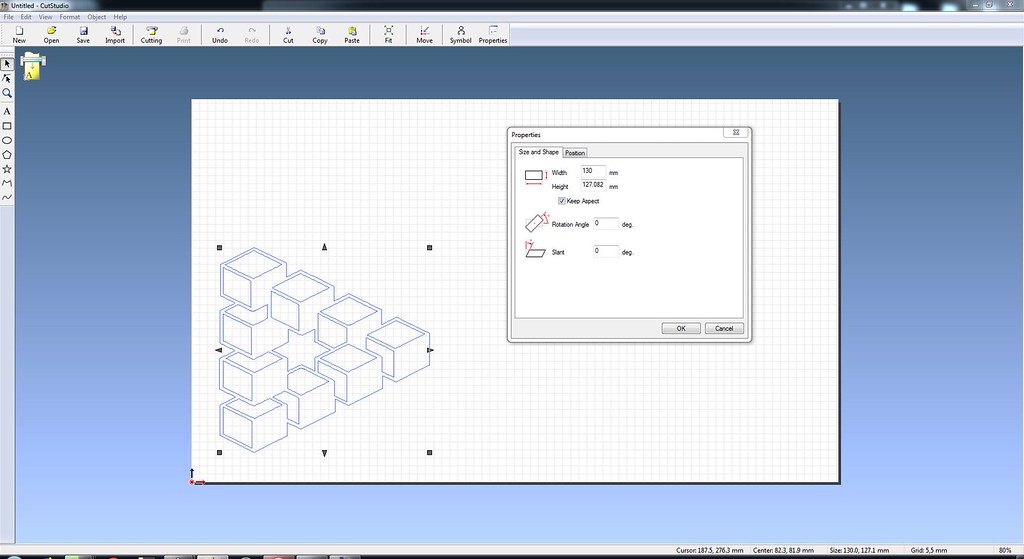
I decided to start with the simple sticker plan, but make it impossible. Here I designed a version of the Penrose Triangle that was popularised by the artist M.C Escher, calling it “impossibility in its purest form”. For this I mainly used Inkscape, but then went into more familiar territory with Illustrator to create the thin vector paths required by Roland’s rather annoying cut studio. For further reading, I recommend this tutorial.
Rolling with Roland
The work flow of the Roland vinyl cutter requires a few hacks.
-
SELECT SHEET: ROLL, PIECE or EDGE > this will tell the machine what width of material to expect and accordingly calibrate the carriage.
-
Set the origin by pressing the “Origin” button on the control panel.
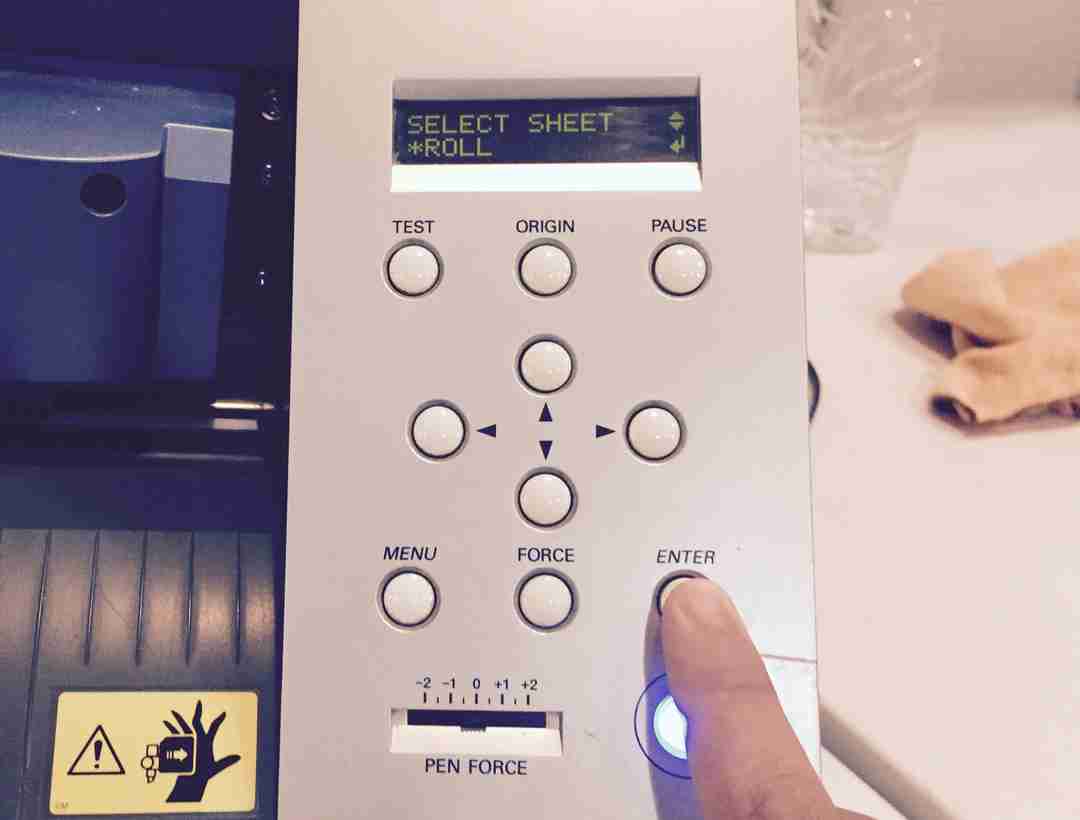
Select cutting test.
This will cut out a small square of your material and you can see if the knife (which is manually calibrated) is suficently exposed. If your file has lots of small curves or tiny details, you may need to slow down the speed. The slower the speed of the machine, the more precisely it will cut.
Adjusting the force:
Rotate the wheel under the LCD screen on the vinyl cutter to the right. When the menu reads “Force”, then press the menu button. To reduce / increase the force setting, rotate the wheel up or down, you will see the values change in the LCD screen. When finished, press ENTER.
Adjusting the speed:
Rotate the wheel under the LCD screen on the vinyl cutter to the right until the the menu reads “Speed”, then press the menu button. To reduce / increase the speed setting, rotate the wheel up or down, you will see the values change in the LCD screen. When finished, press the ENTER.
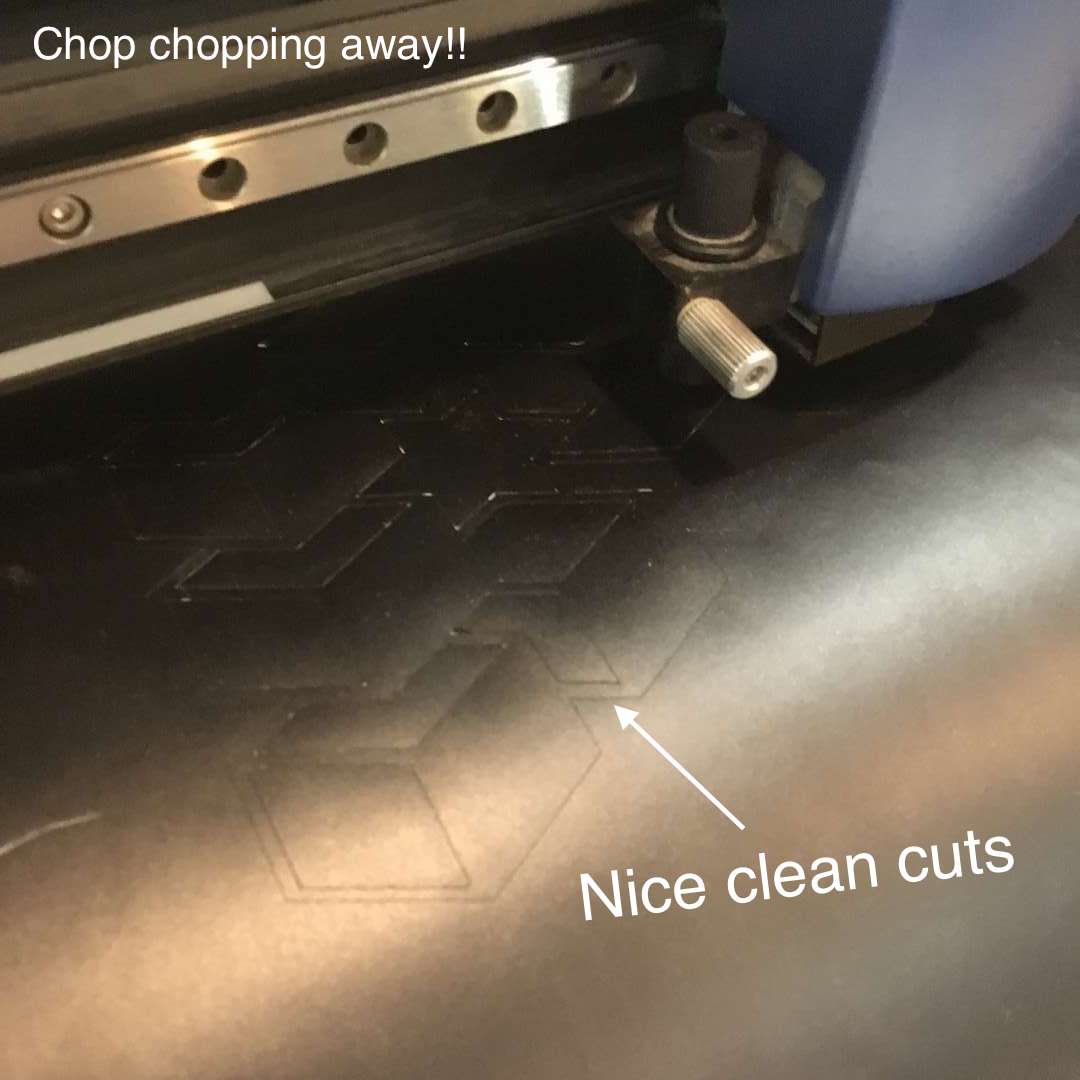
Now comes the tedious job of weeding. This involves removing the unwanted areas from the final cut design with tweezers. However my impossible triangle came to the rescue here because I was actually intending to use both the positive and negative parts of my cut. Tadaaaa!
 |
 |
Vinyl Cutter materials:
These are some other material I would love to get to try out when I get the time.
- masking tape
- transfer adhesive - transferring the stick side of the material to another surface.
- Copper for flexible circuits
- Epoxy film -Carpet tape
Thats all for this week folks! Keep making it happen.
You can download all my design files for week 4 here from my Gitlab repository.
