
Whilst the cutting is straight forward enough I find that populating the board is anything but, I am not used to handling such small components and can see no reason why when there is a cable leading to and from the circuit that it needs to be so small.
Miniaturising the components make them difficult to handle, difficult to solder.
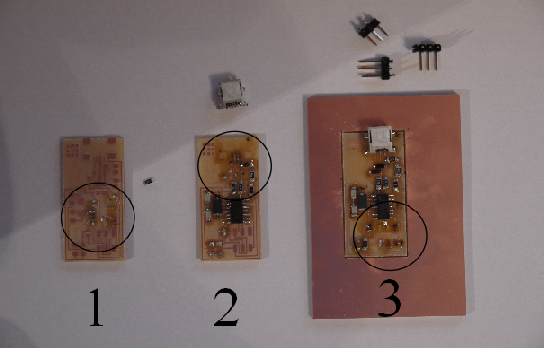
Circuit 1 failed at the very first soldering stage where on recommendation I put a spot of solder on the pads for the chip -
Circuit 2 by this point I had discovered that if you solder the pads and then use desoldering braid a clean flat surface could be left onto which the component could be placed and attached. However this circuit was part completed and on return the soldering iron was at a higher temperature where on touching a pad it instantly loosened the pads from the board.
Circuit 3 went well until the attachment of the pins, these were pin through hole pins that were bent to 90 degrees leaving a very heavy leg to be soldered to the board and once again this loosened off the pads and the track
Hence to date I have cut three boards and populated almost two however I still do not have a working circuit.
I would like to thank my colleagues who have managed the task for putting up with my outbursts as I attempt this again and again.
I have managed and in fact have practiced cutting circuits, these have been cut on a Roland MDX40 machine using a piece of software called V Carve.
The software has been relatively easy to use and is quite comprehensive in what it can do, with the size of the circuit and the size of the cutter it takes about 45 minutes to cut one circuit, so the three you see to the left represent a fair investment of time.