Assignment Brief
📐 Applications & Implications
- Plan a final project masterpiece integrating the full range of units covered: 2D & 3D design, additive & subtractive fabrication, electronics design & production, embedded programming, and system integration.
- Make rather than buy where possible. Projects must show individual mastery and be independently operable.
- See Final Project Requirements for the complete list.
🎬 Project Development
- Prepare a final project summary slide (
presentation.png, 1920×1080 px) and video clip (presentation.mp4, 1080p HTML5, under ~1 minute, under ~25 MB). - Place both files in the root directory and verify they are linked in the final presentation schedule.
What Will It Do?
Lamperto — The Smart Light Alarm is a self-fabricated smart nightstand lamp that supports healthier sleep–wake cycles by simulating a gradual sunset at bedtime and a natural sunrise at wake-up time. It is controlled through the Blynk IoT mobile app and a physical toggle switch mounted on the lamp body.
Core Function
At a scheduled bedtime, Lamperto smoothly dims its LED from full brightness to off over a set duration, signalling to the body that sleep is approaching. At a scheduled wake-up time, it gently brightens from off to full — replacing a jarring alarm with a gradual light-based signal that aligns with circadian biology.
Who Has Done What Beforehand?
Light-based alarm clocks ("sunrise alarms") are a commercial product category — popular examples include the Philips Wake-Up Light series and CASPER Glow. Lamperto differs from commercial products in that every component — PCB, enclosure, firmware — is custom-designed and fabricated, making it fully open and reproducible by anyone with access to a Fab Lab.
What Sources Will You Use?
- XIAO ESP32-S3 technical documentation and datasheets (Espressif / Seeed Studio)
- Blynk IoT platform documentation for ESP32 cloud connectivity
- KiCad documentation for schematic and PCB design
- Fusion 360 for 3D design visualization
- Claude for programming and system integration and page design enhancement
- Fab Academy course materials and Neil Gershenfeld's lectures on system integration
What Will You Design?
- Custom PCB — designed in KiCad featuring XIAO ESP32-S3, LED driver circuit, toggle switch input, and power management. Fabricated on DGShape by Roland CNC.
- 3D-printed enclosure — lamp base, lid, and shade designed in Fusion 360 and printed on a Bambu Lab A1.
- Arduino firmware — controls LED dimming curves, mode switching, and Blynk cloud schedule synchronisation.
- Blynk IoT interface — mobile app dashboard with time pickers, brightness sliders, and Smart/Manual mode toggle.
What Materials and Components Will Be Used?
- Seeed Studio XIAO ESP32-C3 microcontroller
- WS2812B addressable LED strip
- 200 Ω current-limiting resistor, 100 µF decoupling capacitor
- SMD tactile push button (toggle switch input)
- PLA filament for enclosure (Bambu Lab A1)
- Transparent acrylic sheet
- Metal rods and nuts
- USB-C cable
Where Will They Come From?
The XIAO ESP32-C3 and passive components were sourced from Seeed Studio and local electronics suppliers. FR1 PCB substrate and milling consumables are stocked at Vujade Fab Lab. PLA filament was available in the lab. All components are off-the-shelf and widely available globally.
How Much Will They Cost?
All components were sourced locally in Saudi Arabia (Alrish.sa) or via Amazon.sa. Total project cost: $65.00 USD.
| Item | Description | Qty | Price | Source |
|---|---|---|---|---|
| Acrylic enclosure | 2 mm acrylic sheet for laser-cut panels | 1 | $5.00 | alrish.sa |
| Locking nuts | (16) 6 mm + (8) 10 mm nuts for rod frame | 1 pack | $3.00 | Amazon.sa |
| Threaded rods | 6 mm & 10 mm diameter steel rods | 1 set | $10.00 | Local hardware |
| PLA filament | White & black PLA for enclosure, diffuser, frame mount | 2 spools | $15.00 | Amazon.sa |
| TPU filament | Black TPU for flexible leg protectors | 1 spool | $1.00 | Amazon.sa |
| Toggle switch | Heavy-duty electrical toggle switch (mode selector) | 1 | $1.80 | Amazon.sa |
| Type-C cable | USB-C power cable for the ESP32 | 1 | $9.30 | Amazon.sa |
| Screw terminals | 2-pin screw terminals (LED strip & toggle switch) | 2 | $0.50 | Amazon.sa |
| XIAO ESP32-C3 | Seeed Studio XIAO ESP32-C3 — Wi-Fi microcontroller | 1 | $14.00 | Amazon.sa |
| WS2812B LED strip | Addressable RGB LED strip — main light output | 1 | $5.00 | Amazon.sa |
| SMD resistor | 330 Ω — LED data signal protection | 1 | $0.20 | Amazon.sa |
| SMD capacitor | 1000 µF, 10 V electrolytic — power rail decoupling | 1 | $0.20 | Amazon.sa |
| Total Project Cost | $65.00 | |||
What Parts and Systems Will Be Made?
- Custom PCB (designed and milled in-lab)
- 3D-printed lamp enclosure, base, and shade
- Laser cut the lamp's cube
- Arduino firmware for dimming control and Blynk integration
- Blynk IoT app dashboard configuration
What Processes Will Be Used?
- Electronics design — KiCad schematic entry, PCB layout. → W06: Electronics Design
- PCB fabrication — CNC milling on Roland DGShape, soldering SMD and through-hole components. → W09: Input Devices, W10: Output Devices
- 3D printing — FDM printing on Bambu Lab A1 with PLA. → W05: 3D Scanning & Printing
- Embedded programming — Arduino IDE, ESP32, Wi-Fi, and Blynk library. → W04: Embedded Programming, W14: Interface & App Programming
- System integration — assembling all subsystems into a single functional enclosure
What Questions Need to Be Answered?
- What is the minimum lux level needed to effectively shift the circadian phase — does Lamperto's LED meet that threshold?
- How should the firmware handle schedule persistence after a Wi-Fi outage and reconnection?
- Can the Blynk cloud dependency be replaced with a local-only ESP32 web server in a future version?
How Will It Be Evaluated?
- Functional testing: sunset and sunrise simulations run reliably across multiple consecutive cycles
- Mode switching: toggle between Smart Mode and Manual Mode confirmed working
- Blynk connectivity: schedule changes from the app reflected on the lamp within seconds over home Wi-Fi
- Physical assembly: all components fit cleanly inside the printed enclosure with no loose parts
- User experience: the light transition feels gradual and non-disruptive during sleep and wake windows
Time Management & Planning
Running 18 weekly assignments alongside a final project requires planning from day one. I needed a way to see the entire semester at once — which weeks were heavy on fabrication, where the Lamperto milestones fit, and where I had breathing room. I built a Gantt chart in Excel to do exactly that.
What is a Gantt Chart?
A Gantt chart maps each task as a horizontal bar across a timeline — each row is a task, each column is a time unit (here, a week). It makes overlaps, dependencies, and free slots immediately visible without needing any special software. I chose Excel because it gave me full control over color-coding and layout with no subscription required.
Lamperto — 5-Phase Project Plan
From W01 I broke the project into five phases and mapped them across the 18 weeks, threading Lamperto work into the weeks where the assignment workload was lighter. The chart below shows how each phase was distributed.
| Phase | Weeks → | |||||||||||||||||
|---|---|---|---|---|---|---|---|---|---|---|---|---|---|---|---|---|---|---|
| 01 | 02 | 03 | 04 | 05 | 06 | 07 | 08 | 09 | 10 | 11 | 12 | 13 | 14 | 15 | 16 | 17 | 18 | |
| 1 · Concept & CAD Design | ✓ | ✓ | ||||||||||||||||
| 2 · Electronics Design & PCB | ✓ | ✓ | ✓ | ✓ | ||||||||||||||
| 3 · Embedded Programming & IoT | ✓ | ✓ | ||||||||||||||||
| 4 · Fabrication & Assembly | ✓ | ✓ | ✓ | ✓ | ✓ | ✓ | ||||||||||||
| 5 · Testing & Final Integration | ✓ | ✓ | ✓ | |||||||||||||||
How I Used It
I built this plan in Excel at the start of W01 and updated it throughout the semester. Each phase was assigned to the weekly assignments that naturally fed into Lamperto — electronics design during W06, fabrication during W03/W05/W07, integration in W15. This made it easy to spot when two phases were active at the same time (like Fabrication and Electronics in the mid-semester weeks) and plan my time accordingly.
The Gantt chart kept the five phases visible at all times, so Lamperto never felt like a separate project happening in parallel — it was woven into the weekly work from week one.
Presentation Slide & Video
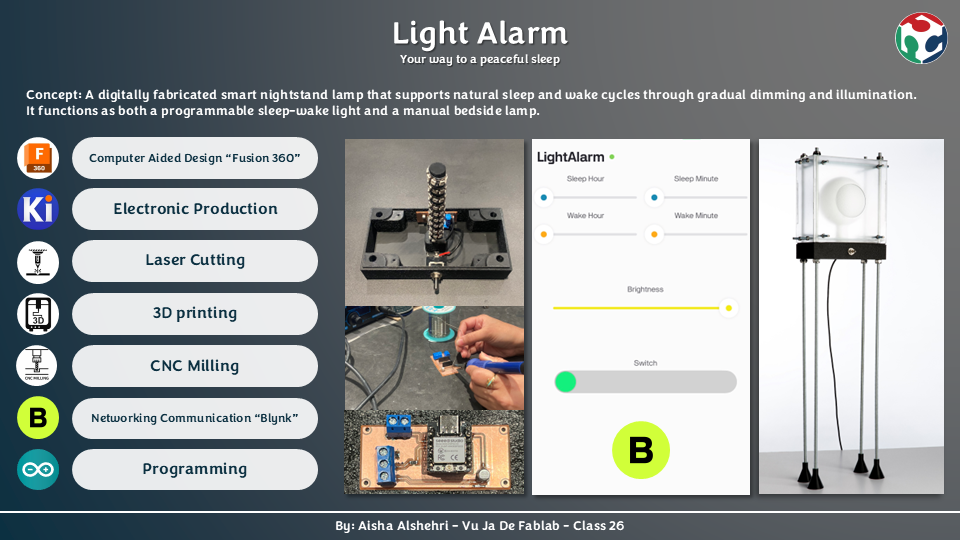
Following Fab Academy presentation requirements, I prepared a summary slide (1920×1080 px, PNG) and a short video clip (1080p MP4, under one minute) and placed them in the root directory of the repository as presentation.png and presentation.mp4.
The slide was designed in PowerPoint following the standard Fab Academy layout. The video was edited in CapCut and kept under the 25 MB file size limit. Both files have been verified and linked in the final presentation schedule.
Summary Slide
Video Clip
Download Presentation Files
Both the slide and video are available as a zip for download:
⬇ Download presentation.zip (slide + video)