Overview
This week's topic was Applications and Implications. The assignment was to plan a final project using several Fab Academy skills. This page explains Loco Pik's use case, fabrication process, cost, parts, and test plan.
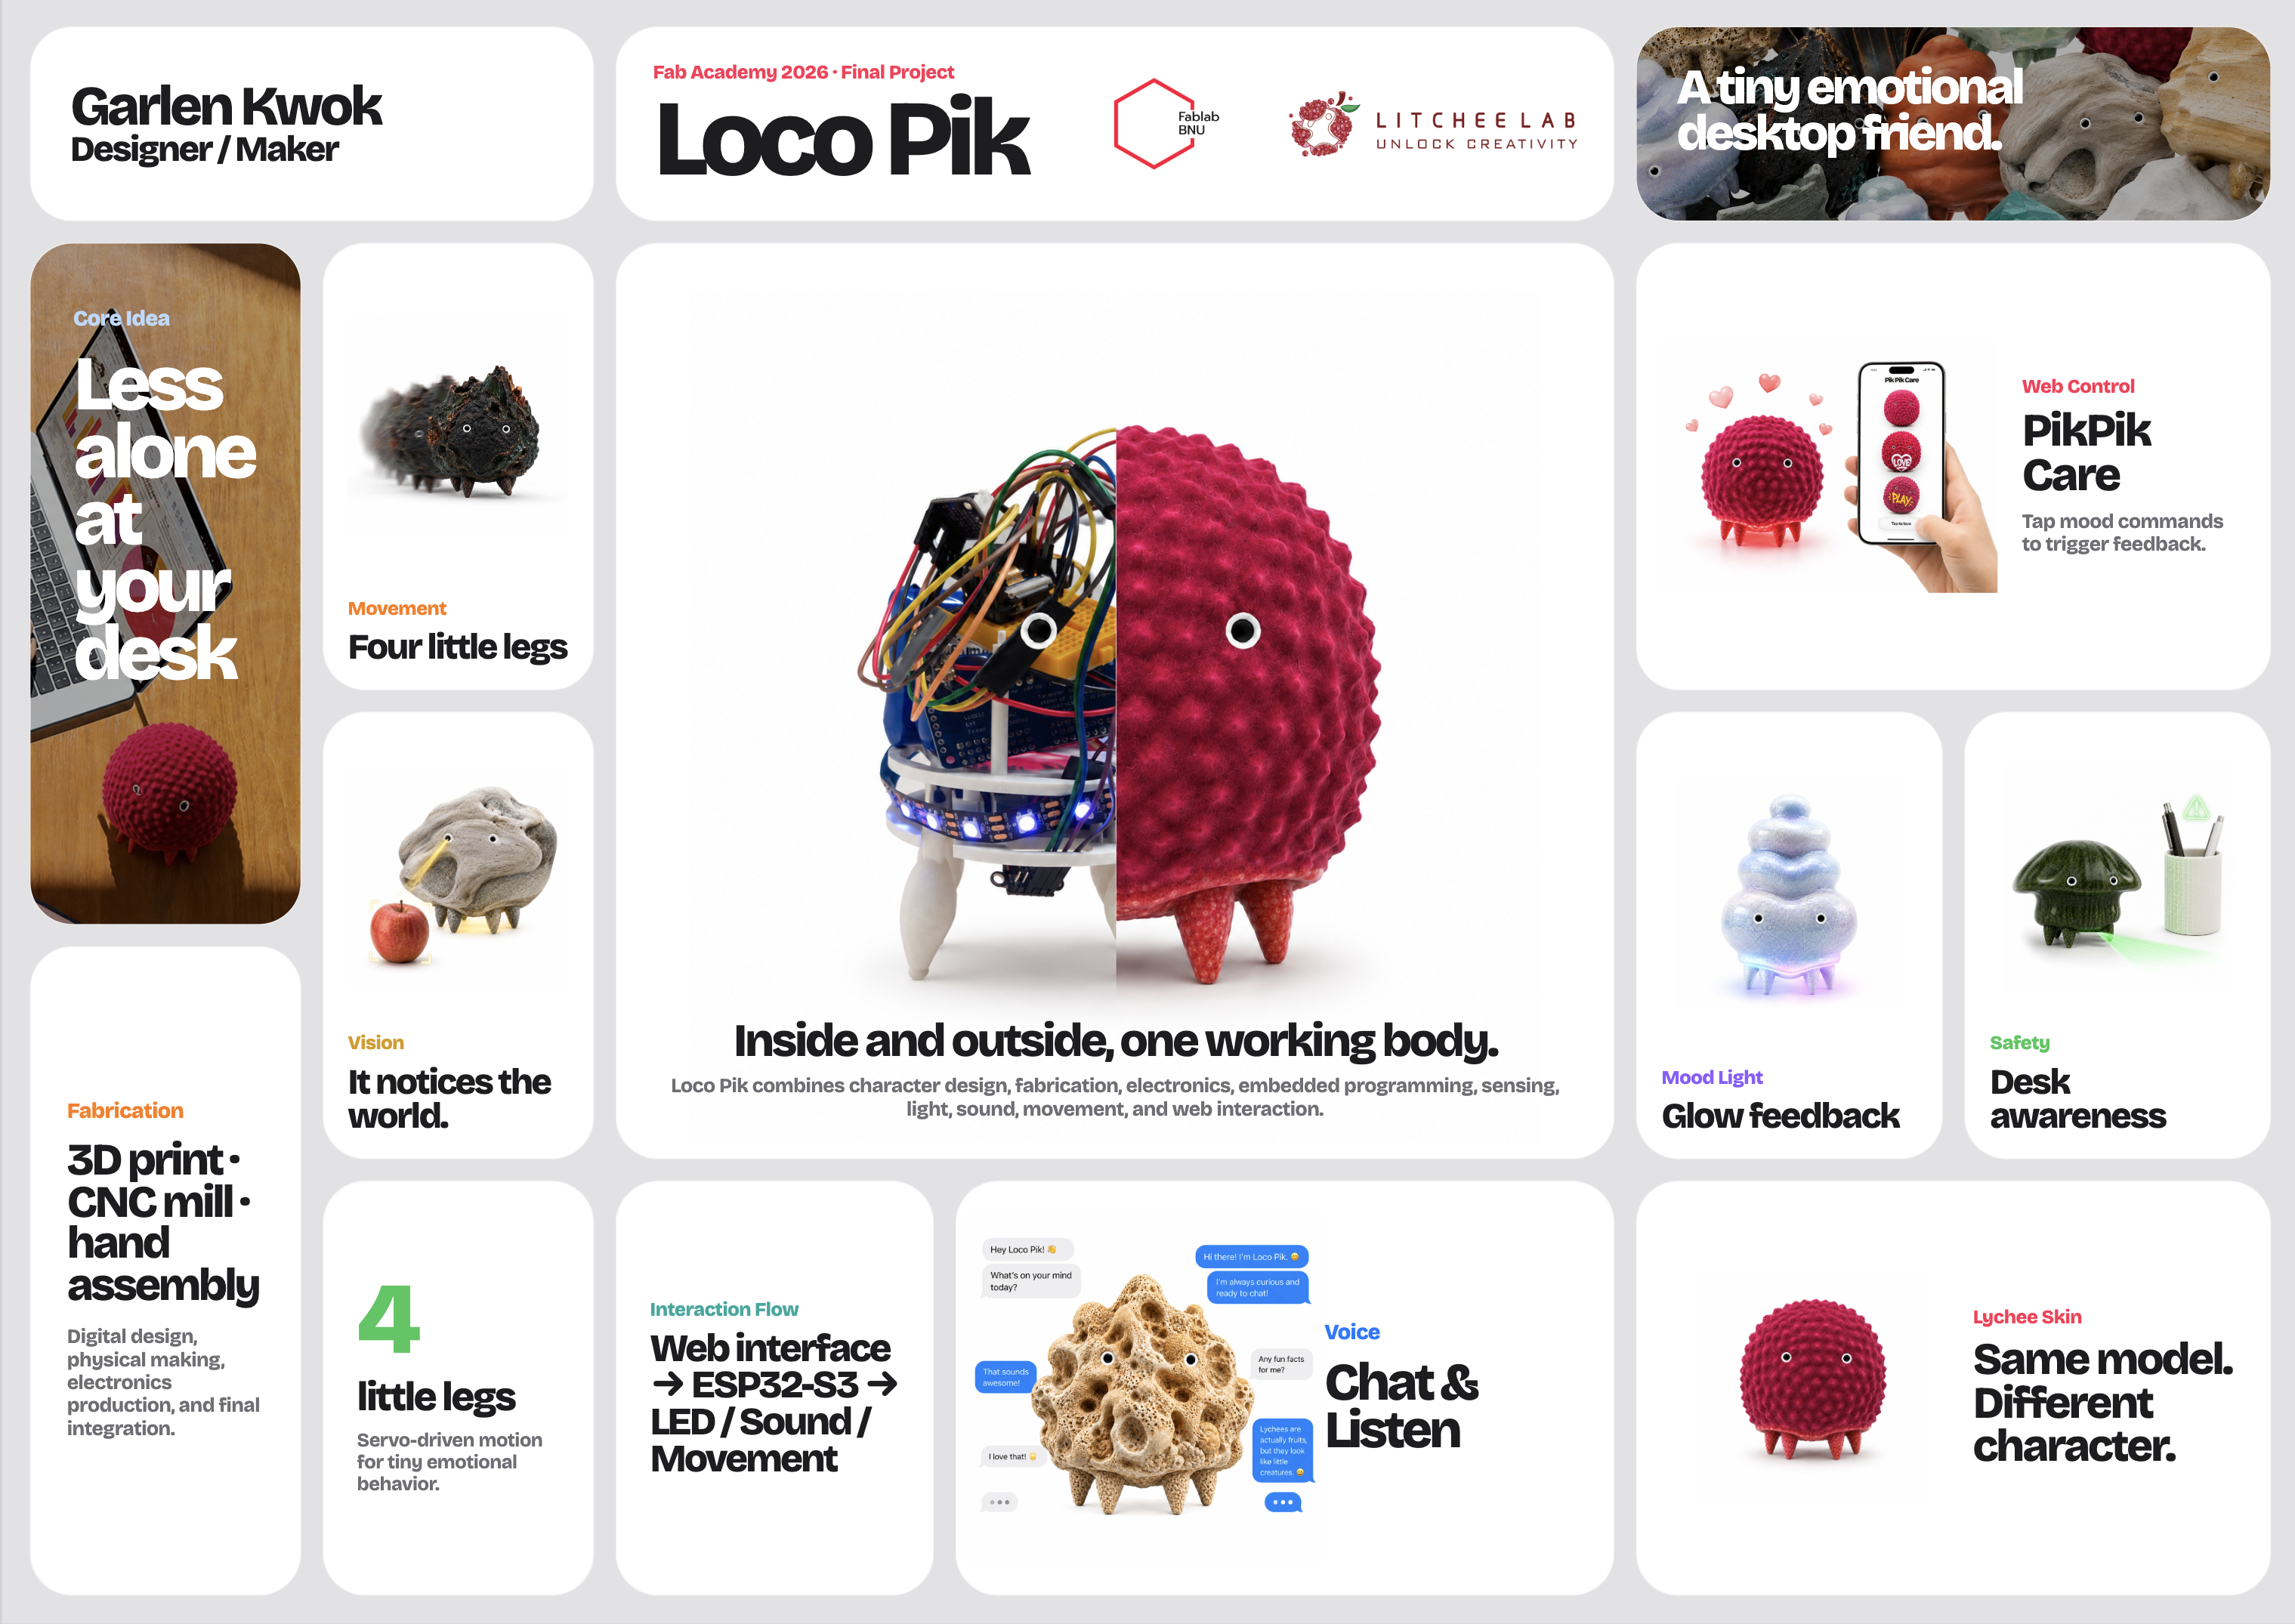
My final project is called Loco Pik. It is a small desktop emotional companion robot. It is designed for people who work or study alone. It does not use a screen face. Instead, it responds through light, sound, movement, and simple interaction.
Loco Pik is not an industrial robot or powerful machine. It is a small emotional object. The project uses digital fabrication, embedded electronics, a web interface, and system integration. These elements support a compact object that feels alive.
Final Presentation Files
Summary slide
Video clip
Assignment
The assignment was to plan the final project and answer these questions:
- What will it do?
- Who has done what beforehand?
- What sources will I use?
- What will I design?
- What materials and components will be used?
- Where will they come from?
- How much will they cost?
- What parts and systems will be made?
- What processes will be used?
- What questions need to be answered?
- How will it be evaluated?
The project should combine design, fabrication, electronics, programming, integration, and packaging. I should fabricate custom parts when possible. I should buy only standard components.
Project Position
Loco Pik is related to consumer electronics, robots, toys, art, and interaction design. It is a small companion object for a desk. The goal is not to build a general robot. Instead, Loco Pik provides gentle feedback and a modest sense of company.
| Area | Connection to Loco Pik |
|---|---|
| Consumer electronics | Loco Pik uses a microcontroller, Wi-Fi, audio output, LEDs, sensors, and battery power. |
| Robots | It has a body, moving legs, sensors, and programmed actions. |
| Toys | Its size, character style, and care actions are close to digital pets and character toys. |
| Art | It is also a character object and an emotional object. |
| Human-computer interaction | It explores how users read emotion through light, sound, movement, and body action. |
What will it do?
Loco Pik will be a small desktop emotional companion robot. It will stay on a desk. It will respond through light, sound, movement, voice, and a phone web interface.
The robot is designed for people who work or study alone. It will not display complex information. Instead, it will provide small emotional signals. It can glow, play short sounds, move its legs, and respond to webpage commands.
| Function | Behavior | Purpose |
|---|---|---|
| Emotional light | The bottom WS2812B LED shows different colors and effects. | It gives quick emotional feedback without a screen. |
| Sound feedback | A small speaker plays short sounds or voice feedback. | It makes the object feel more responsive. |
| Movement | Four small servo motors move the legs. | It gives the object a body and a character. |
| Web control | A phone webpage sends commands such as Love, Play, Feed, Sleep, and Unhappy. | It lets the user control Loco Pik through a designed interface. |
| Voice interaction | The ESP32-S3 voice system lets Loco Pik listen and respond. | It makes the companion experience more natural. |
Who has done what beforehand?
I reviewed companion robots, robot pets, desktop AI devices, and maker robot kits before planning Loco Pik. These examples informed my decisions about shape, movement, sound, touch, light, and voice.
I did not use these projects as models to copy. I used them as references. They showed existing approaches and clarified how my project should differ.
| Reference example | Link | What already exists | What I learned | How Loco Pik is different |
|---|---|---|---|---|
| LOVOT | lovot.life/en | LOVOT is a companion robot. It uses warmth, eye contact, touch, and daily interaction. | A robot does not always need a practical task. It can also create comfort and company. | Loco Pik is smaller and simpler. It uses bottom light, small leg movement, sound, and a handmade shell. |
| Sony aibo | us.aibo.com | aibo is a robot dog. It uses movement, sound, recognition, and repeated user interaction. | Pet-like movement can make a robot feel more alive. | Loco Pik does not imitate a real dog. It is an abstract desktop character with simple emotional actions. |
| Casio Moflin | casio.com/us/moflin | Moflin is a small emotional companion with a soft body and AI behavior. | A non-screen object can still feel emotionally responsive. | Loco Pik does not use a soft fur body. It uses a fabricated hard shell, light, sound, and movement. |
| Petoi Bittle | petoi.com/products/petoi-robot-dog-bittle-x-voice-controlled | Bittle is a small programmable robot dog kit with servo-based leg movement. | Small servos can be used to make a compact robot body. | Loco Pik is not a walking robot kit. It focuses on emotional expression, desk use, and character design. |
| xiaozhi-esp32 | github.com/78/xiaozhi-esp32 | xiaozhi-esp32 is an ESP32-based AI voice interaction project. | ESP32-S3 can be used for small AI voice interaction devices. | In Loco Pik, voice is only one component. The project also needs light, sound, movement, shell design, and packaging. |
What sources will I use?
I will use my Fab Academy weekly work as the main project source. Each week tested a different part of Loco Pik. These areas include PCB design, milling, sensors, servo movement, networking, interfaces, and system integration.
| Fab Academy source | Link | Use in Loco Pik |
|---|---|---|
| Week 06 — Electronics Design | Week 06 documentation | I designed a PCB during this week. This helped me plan a custom circuit board for the final project. |
| Week 08 — Electronics Production | Week 08 documentation | I used CNC milling to cut my PCB. This showed how to turn a digital board design into hardware. |
| Week 08 — Sensor Tests | Week 08 documentation | I tested different sensors during this week. These tests helped me select useful input devices for Loco Pik. |
| Week 10 — Line Finder and Servo Test | Week 10 documentation | I tested a line finder sensor with a servo motor. This showed how sensor input can trigger physical movement. |
| Week 11 — Networking and AI Test | Week 11 documentation | I tested network communication and an ESP32 local model setup. The setup detected an apple during testing. This informed network communication and simple visual detection. |
| Week 14 — Interface and Application Programming | Week 14 documentation | I made the PIKPIK CARE web interface. The webpage sends commands to the ESP32. This lets users control Loco Pik from a phone. |
| Week 15 — System Integration | Week 15 documentation | I planned Loco Pik's internal architecture and assembly structure. This clarified how the controller, sensors, LED, speaker, motors, battery, and shell fit together. |
Technical and component sources
I will also use official documents, open-source projects, and component guides. These sources support ESP32-S3 programming and connect the web interface to the robot.
| Source | Link | Use in Loco Pik |
|---|---|---|
| Final project page | Final Project | This page records the full development of Loco Pik. |
| xiaozhi-esp32 | github.com/78/xiaozhi-esp32 | I use this as a reference for AI voice interaction on ESP32. |
| ESP-IDF HTTP Server documentation | ESP-IDF HTTP Server | I use this to build the HTTP command link between the phone webpage and the ESP32-S3. |
| ESP-IDF I2S documentation | ESP-IDF I2S | I use this as a reference for audio output with the MAX98357A I2S amplifier. |
| Seeed XIAO ESP32-S3 Sense documentation | Seeed Studio XIAO ESP32-S3 Sense | I use this to check the board, camera, microphone, Wi-Fi, and pin information. |
| Adafruit PCA9685 guide | Adafruit 16-channel PWM Servo Driver | I use this as a reference for controlling several servo motors. |
| FastLED examples | FastLED GitHub | I use this as a reference for addressable RGB LED light effects. |
What will I design?
I will design the main shape, shell, internal structure, leg layout, electronics layout, interaction logic, and documentation. The design work includes both appearance and system behavior.
| Design area | What I will design |
|---|---|
| 2D design | Web interface, icons, interaction images, diagrams, and possible cutting files. |
| 3D design | Outer shell, bottom structure, leg holes, inside mounts, and packaging space. |
| Electronics design | A custom PCB for light, speaker, power, and control signals. |
| Programming | LED feedback, servo movement, HTTP commands, voice logic, and web interaction. |
| System integration | Shell, motors, sensors, light, sound, battery, and microcontroller in one working object. |
What materials and components will be used?
The main parts include the microcontroller, servo motors, servo driver, LED, audio amplifier, speaker, and distance sensor. They also include the battery, wires, connectors, and 3D printing material. I added Taobao links as purchase references.
| Part | Purpose | Estimated cost | Purchase reference |
|---|---|---|---|
| Seeed XIAO ESP32-S3 Sense | Main controller, Wi-Fi, camera, microphone, and voice functions | About 101 RMB | Taobao |
| MG90S servo motors × 4 | Leg movement and small body actions | About 2.6 RMB X 4 | Taobao |
| PCA9685 servo driver | Control four servo motors from the ESP32-S3 | About 25.8 RMB | Taobao |
| WS2812B LED ring or LED strip | Bottom emotional light feedback | About 8.4 RMB | Taobao |
| MAX98357A I2S amplifier | Audio output for the speaker | About 8.72 RMB | Taobao |
| WS2014B speaker | Sound and voice feedback | About 3.7 RMB | Taobao |
| VL53L0X or VL53L1X ToF distance sensor | Distance sensing and safety test | About 19.8 RMB | Taobao |
| OV2640 camera FPC extension cable | Move the camera from the board to the front shell hole | About 20 RMB | Taobao |
| 5V lithium battery | Power source for the final object | About 15 RMB | Taobao |
| PLA filament or resin printing material | Outer shell, inside structure, and test parts | About 62 RMB | Taobao |
The total cost will be about 274.82 RMB.
Where will they come from?
Most electronic parts will come from Taobao or FabLab stock. I will make the shell, internal structure, and custom PCB in the lab. Taobao search links clarify the purchase sources.
| Item | Source | Make or buy | Reference link |
|---|---|---|---|
| Outer shell | Designed by me and made in the lab | Make | Made in FabLab by 3D printing |
| Internal structure | Designed by me and made in the lab | Make | Made in FabLab by 3D printing |
| Custom PCB | Designed by me and CNC milled in the FabLab | Make | Made in FabLab by PCB milling |
| Web interface | Designed and coded by me | Make | Made with HTML, CSS, and JavaScript |
| Microcontroller | Taobao or Seeed Studio | Buy | XIAO ESP32-S3 Sense on Taobao |
| Servo motors | Taobao electronics supplier | Buy | MG90S servo on Taobao |
| Servo driver | Taobao electronics supplier | Buy | PCA9685 on Taobao |
| LED feedback module | Taobao electronics supplier | Buy | WS2812B LED on Taobao |
| Sound system | Taobao electronics supplier | Buy | MAX98357A and speaker on Taobao |
| Distance sensor | Taobao electronics supplier | Buy | ToF sensor on Taobao |
| Battery and power module | Taobao electronics supplier | Buy | Battery and charger on Taobao |
What parts and systems will be made?
Loco Pik will include several systems. I will test each system first. Then I will integrate them into the final body.
| System | Parts | Function |
|---|---|---|
| Body system | Outer shell, bottom structure, inside mounts, and leg holes | It holds the robot and gives Loco Pik its character shape. |
| Movement system | Four MG90S servos, leg parts, and PCA9685 driver | It creates small leg movements and body actions. |
| Light system | WS2812B LED and LED control code | It shows emotion with color and light effects. |
| Sound system | MAX98357A amplifier and small speaker | It plays voice or sound feedback. |
| Sensing system | Camera and ToF sensor | It gives basic sensing and safety feedback. |
| Control system | ESP32-S3, firmware, and communication code | It controls sensing, light, sound, Wi-Fi, and behavior. |
| Interface system | HTML, CSS, JavaScript, and HTTP commands | It lets the user send emotion commands from a phone webpage. |
| Packaging system | Inside layout, wiring, battery position, and final assembly | It integrates all parts into one stable object. |
System map
User
  ↓
Phone webpage interface
  ↓
HTML + CSS + JavaScript
  ↓
HTTP command over local Wi-Fi
  ↓
ESP32-S3
  ↓
Servo movement / LED light / sound output / sensor feedback
  ↓
Loco Pik physical emotional behavior
What processes will be used?
This project will use several digital fabrication and programming processes. I will connect them into one working system.
| Process | Use in Loco Pik |
|---|---|
| 2D design | Interface graphics, documentation diagrams, layout design, and possible cutting files. |
| 3D modeling | Main body, shell, leg positions, inside mounts, and packaging space. |
| 3D printing | Outer shell, test body, and inside parts. |
| CNC milling | Custom PCB and possible small finishing parts. |
| Electronics design | Board design and connection plan for power, LED, audio, and control signals. |
| Electronics production | PCB milling, soldering, testing, and debugging. |
| Embedded programming | ESP32-S3 code, LED feedback, servo control, HTTP server, and behavior logic. |
| Interface programming | Phone webpage made with HTML, CSS, and JavaScript. |
| System integration | Mechanical parts, electronics, code, and interaction in one final object. |
What questions need to be answered?
During final development, I need to answer these technical and design questions.
| Question | Why it matters | How I will test it |
|---|---|---|
| Can all electronic parts fit inside the small body? | The robot must be small, but it still needs space for wiring and repair. | I will test the inside layout with 3D models and physical assembly. |
| Can the servos move the legs without making the robot unstable? | Movement should make the object feel alive without making it fall. | I will test leg movement, balance, and repeated servo actions. |
| Can light, sound, and movement work together? | One emotion action should feel like one clear response. | I will trigger each emotion action and check the timing of all output parts. |
| Can the webpage send commands to the ESP32-S3? | The phone webpage is an important interaction part. | I will test HTTP commands on the same local Wi-Fi network. |
| Can voice interaction and physical feedback work together? | Loco Pik should not be only a webpage LED test. | I will test AI voice response with light and sound output. |
| How can the robot feel alive without a screen? | Loco Pik does not use a screen face, so the body feedback must be clear. | I will check if users can understand emotion from light, sound, and movement. |
How will it be evaluated?
I will evaluate the project technically and through user interaction. Each module should work alone. All modules should also work together in the final body.
| Evaluation type | Test method | Success criteria |
|---|---|---|
| Function test | Test LED, sound, movement, sensor, and webpage commands one by one. | Each module can respond correctly. |
| Integration test | Put the electronics and mechanical parts inside the shell. | The robot still works after final assembly. |
| Stability test | Test repeated movement, power connection, wiring, and body balance. | The robot can stand, react, and move without falling or breaking. |
| Interaction test | Ask users to trigger emotion actions and observe how they interpret them. | Users can understand the basic emotion feedback. |
| Presentation test | Show the project in a short final presentation. | The project clearly shows the idea, making process, and working result. |
Applications and Implications
Loco Pik can be used as a small desktop companion for people who study or work alone. It can provide small feedback during work time. This makes the desk feel less empty.
It can also serve as an educational example. It shows how interaction design, embedded systems, electronics, programming, and digital fabrication can work together.
The project also asks a design question: does emotional interaction always need a screen face or a human-like robot? Through Loco Pik, I test whether a small object can create presence through light, sound, and movement.
Individual Mastery
This project shows my work across several Fab Academy units. I will design the object, fabricate parts, build electronics, program the microcontroller, and create the interface. I will then integrate these systems into one independent final project.
| Fab Academy unit | Evidence in Loco Pik |
|---|---|
| Computer-aided design | 3D body model, shell design, and inside structure plan. |
| Computer-controlled cutting | Possible 2D parts, templates, or packaging parts. |
| 3D scanning and printing | 3D printed body, shell, legs, and inside supports. |
| Electronics production | Custom PCB made by CNC milling and soldering. |
| Electronics design | Board design and connection plan. |
| Embedded programming | ESP32-S3 firmware, LED feedback, motor control, and HTTP server. |
| Input devices | Camera and ToF sensor for simple sensing and safety test. |
| Output devices | Servo motors, WS2812B LED, speaker, and emotion feedback. |
| Interface programming | PIKPIK CARE phone webpage made with HTML, CSS, and JavaScript. |
| System integration | Final assembly of mechanics, electronics, firmware, interface, and packaging. |
AI Use Statement
I used ChatGPT to help organize, rewrite, and simplify this Week 17 documentation. It helped clarify the English and prepare the HTML structure.
The project idea, design decisions, parts, fabrication plan, and test plan are my own. I reviewed and edited the AI-assisted content before publishing it on my Fab Academy website.