Embedded programming
Group assignment:
- Demonstrate and compare the toolchains and development workflows for available embedded architectures
For this group project, we explored how textual source code is transformed into instructions executed by the hardware. This process depends entirely on the toolchain: the specific ecosystem of compilers, linkers, flashing software, and integrated development environments (IDEs).
To demonstrate and compare these workflows, we evaluated and contrasted two very popular architectures from different generations: the atMega (8-bit AVR) and the ESP32 (32-bit Xtensa/RISC-V).
What is a Toolchain?
An embedded toolchain is a collection of software utilities used to build an executable file for a target microcontroller. Because your computer's processor (usually x86 or ARM64) is different from your target's hardware architecture, we use cross-compilation to generate the binaries.
From source code to execution on the target microcontroller
Comparative Table of Evaluated Architectures
| Feature | Microchip ATmega (e.g., 328P) | Espressif ESP32 (e.g., WROOM) |
|---|---|---|
| Architecture | 8-bit Harvard RISC | 32-bit Xtensa (Single/Dual Core) or RISC-V |
| Clock Speed | Typically 16 MHz | 160 – 240 MHz |
| Connectivity | No native wireless connectivity (Serial, SPI, I²C only) |
Integrated Wi-Fi 2.4 GHz and Bluetooth (BLE) |
| Toolchain | avr-gcc + avrdude |
ESP-IDF (Compiler: xtensa-esp32-elf-gcc, Flash tool: esptool.py) |
| Development Environment (IDE) | Arduino IDE | VS Code + ESP-IDF Extension (or Arduino IDE) |
ATmega328P
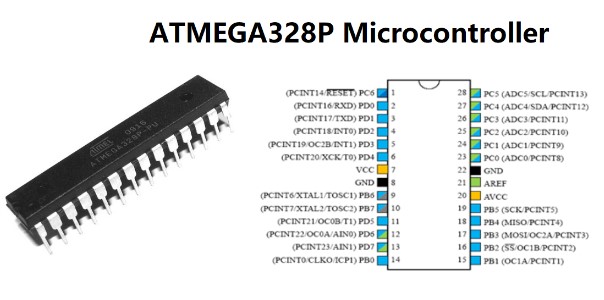
- Features
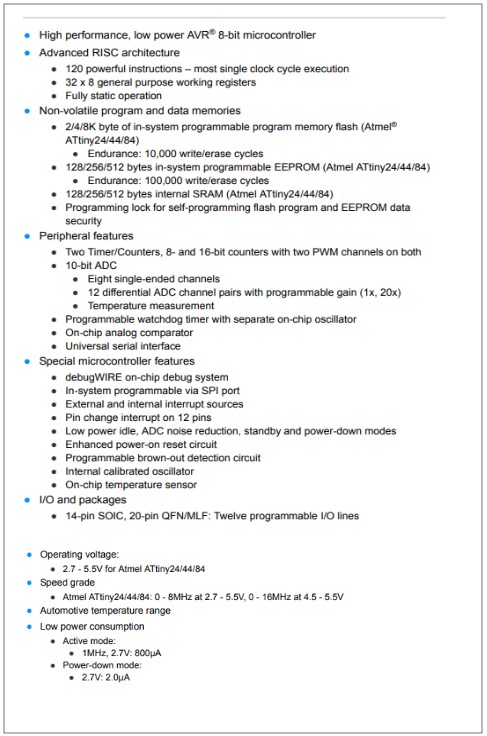
The atMega328P (which powers the Arduino Uno) represents the traditional approach to 8-bit embedded systems.
-
Compilation: The Arduino IDE uses the avr-gcc toolchain in the background. It compiles the C/C++ code (converting .ino files to standard .cpp) and outputs a .hex file.
-
Uploading: If the chip already contains the Arduino bootloader in its memory, the IDE communicates directly over the board's serial port. The avrdude software utility handles sending the .hex file line by line across the selected COM port.
-
Result: The workflow is entirely seamless for the user: a single click on "Upload" compiles and flashes the chip within seconds.
-
Programming an ATmega328P Using an Arduino Uno
Programming an ATmega328P microcontroller using an Arduino Uno is a straightforward process. Follow these steps:
-
Install the Arduino IDE
Download and install the official Arduino IDE from the Arduino website. -
Connect the Arduino Uno to the computer
Plug the board into your computer using a USB cable. -
Select board and port
In the IDE, go to Tools > Board and select Arduino Uno.
Then go to Tools > Port and choose the correct serial port. -
Program the microcontroller
Open or write your sketch, then choose:
Sketch > Upload Using Programmer to flash the ATmega328P. -
Example
// the setup function runs once when you press reset or power the board
void setup() {
  // initialize digital pin LED_BUILTIN as an output.
  pinMode(LED_BUILTIN, OUTPUT);
}

// the loop function runs over and over again forever
void loop() {
  digitalWrite(LED_BUILTIN, HIGH);  // change state of the LED by setting the pin to the HIGH voltage level
  delay(1000);                      // wait for a second
  digitalWrite(LED_BUILTIN, LOW);   // change state of the LED by setting the pin to the LOW voltage level
  delay(1000);                      // wait for a second
}
ESP32
- Feature
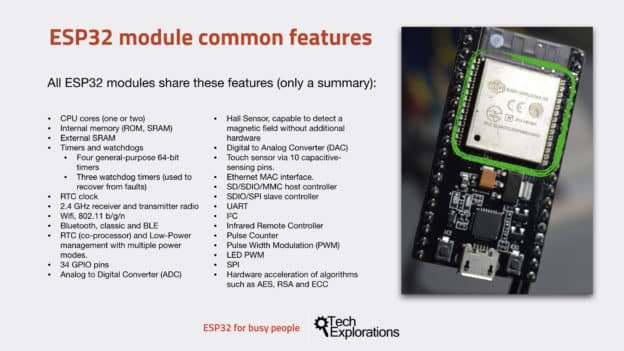
Source : (https://techexplorations.com/guides/esp32/begin/module/)
The ESP32 is a much heavier microcontroller designed for the Internet of Things (IoT), which inherently embeds a Real-Time Operating System (RTOS).
-
Compilation: Espressif's official toolchain (ESP-IDF) relies on CMake and Ninja build tools. The process is significantly more complex because it must compile the FreeRTOS kernel, the network stacks (Wi-Fi/Bluetooth), and finally the custom user code to generate a single .bin file.
-
Uploading: The command-line utility esptool.py opens a serial communication interface with the board's programming circuit. This hardware automatically pulls the ESP32's BOOT pin low during a hardware reset, allowing the tool to inject the binary file into the chip's external flash memory.
-
Result: The initial compilation time is noticeably longer than with an atMega, but this workflow yields total control over memory allocation, asynchronous tasks, and advanced power management.
-
Example
// the setup function runs once when you press reset or power the board
int LED_BUILTIN = 2;

void setup() {
  // initialize digital pin LED_BUILTIN as an output.
  pinMode(LED_BUILTIN, OUTPUT);
}

// the loop function runs over and over again forever
void loop() {
  digitalWrite(LED_BUILTIN, HIGH);  // change state of the LED by setting the pin to the HIGH voltage level
  delay(1000);                      // wait for a second
  digitalWrite(LED_BUILTIN, LOW);   // change state of the LED by setting the pin to the LOW voltage level
  delay(1000);                      // wait for a second
}