13. Moulding and Casting
In the group assignment, participants will review the safety data sheets for their molding and casting materials, followed by creating and comparing test casts with each material. They will also compare the processes of printing versus milling molds. On the other hand, for the individual task, each member will design a mold tailored to their chosen process, ensuring a smooth surface finish, and utilize it to cast parts.
Assigmnent checklist
| Item | Activity | Status |
|---|---|---|
| 1 | Linked to the group assignment page and reflected on your individual page what you have learned. | Done |
| 2 | Reviewed the safety data sheets for each of your molding and casting materials, then made and compared test casts with each of them. | Done |
| 3 | Documented how you designed and created your 3D mold, including machine settings. | Done |
| 4 | Shown how you safely made your mold and cast the parts. | Done |
| 5 | Described problems and how you fixed them. | Done |
| 6 | Included your design files and ‘hero shot’ of the mold and the final object. | Done |
Group Assigmnents
In this assignment, we will address the following tasks:
- Review the safety data sheets for each of your molding and casting materials.
- Make and compare test casts with each of them.
- Compare printing vs milling molds.
Materials
- Silicon RTV A-30
| NAME | DESCRIPTION | IMAGE |
|---|---|---|
| Silicon RTV A-30 | It’s our top-grade platinum silicone, specifically designed for producing highly tear-resistant molds. Contaminant-free and capable of withstanding temperatures up to 250°C, it’s available in both white and translucent varieties. Presentation options include 1 KG tubs and 20 KG boxes. | 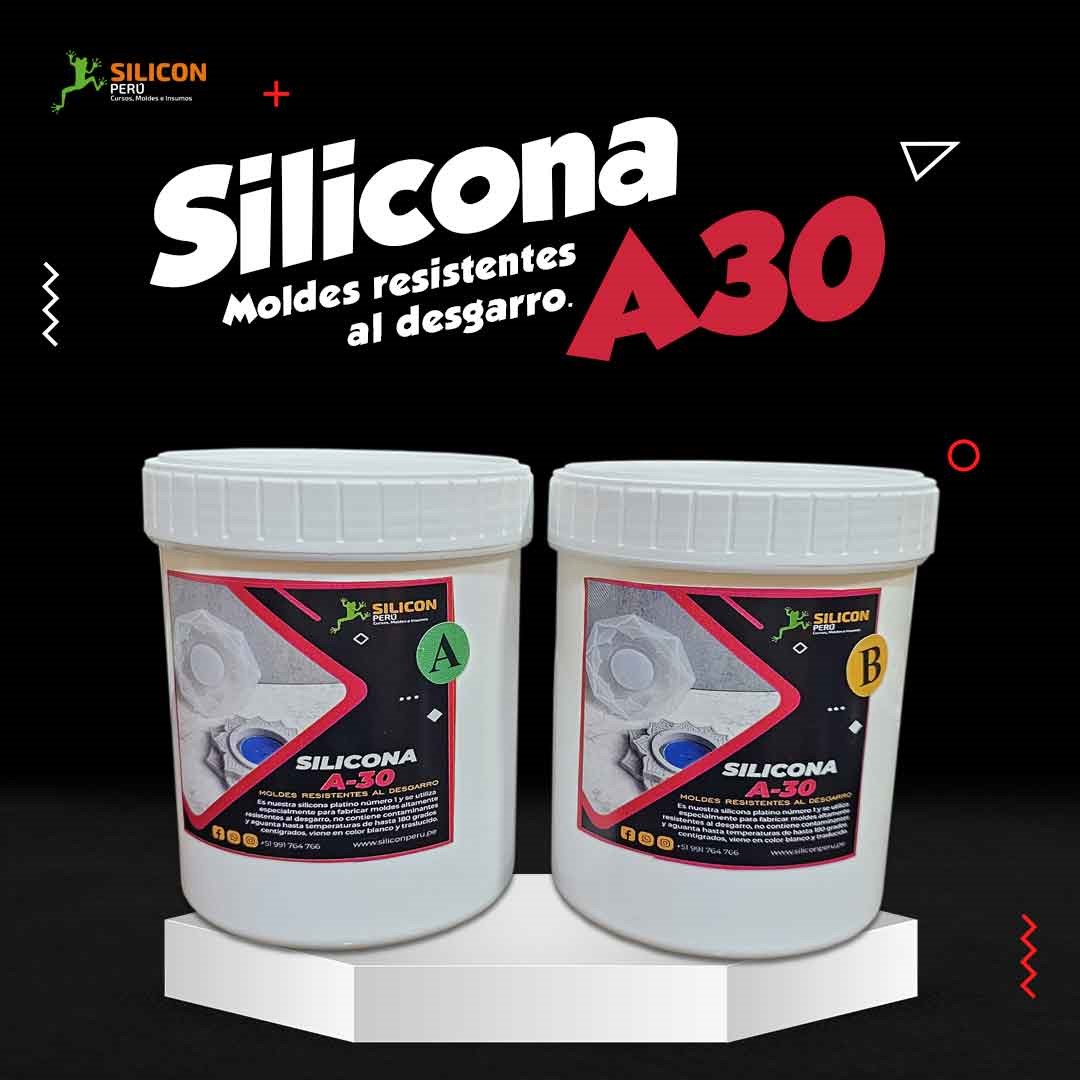 |
| File A Wax | Ferris File-A-Wax Blue is a flexible wax designed for intricate carving in jewelry and dental work. Its blue color aids precision, and low ash content suits it for investment casting. With a melting point of 226ºC and toughness rating of 52, it maintains detail well. Sized at 147x93x36mm and weighing 1 pound, it’s versatile for crafting. |  |
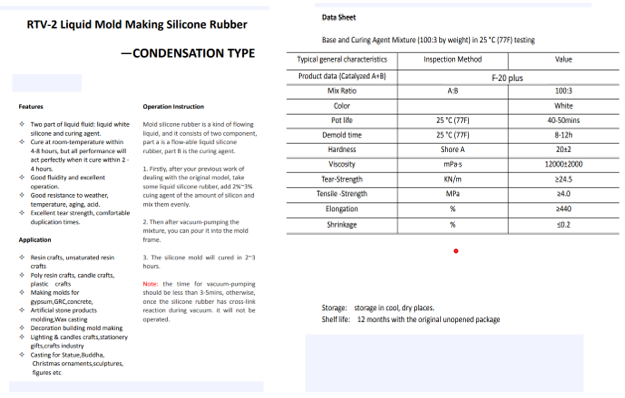
| RTV-2 Liquid Mold Making SiliconeRubber | This product, comprising liquid white silicone and a curing agent, offers versatile applications from resin crafts to candle making and mold making for various materials. Curing at room temperature within 2-4 hours, it demonstrates excellent fluidity and resistance to weather, temperature, aging, and acid, along with impressive tear strength and duplication times. To use, mix with 2-3% curing agent, vacuum-pump, and pour into the mold frame for curing within 2-3 hours, ensuring to limit vacuum-pumping time to prevent a cross-link reaction. |  |
| Sika form realese agent F | Sika® Release Agent F is a solvent-free mold release agent ready for use on concrete. It’s an emulsion based on refined mineral oil. Uses: Sika® Release Agent F can be applied to all types of concrete, whether on-site, pre-mixed, or precast. It’s particularly suitable for smooth, non-absorbent formwork, moderately absorbent formwork, and steam curing (up to 70°C). |  |
Sika Form Release Agent F Safety Data Sheet

Sika Form Release Agent F Safety Data Sheet
EXAMPLES
| 1 | 2 | 3 |
|---|---|---|
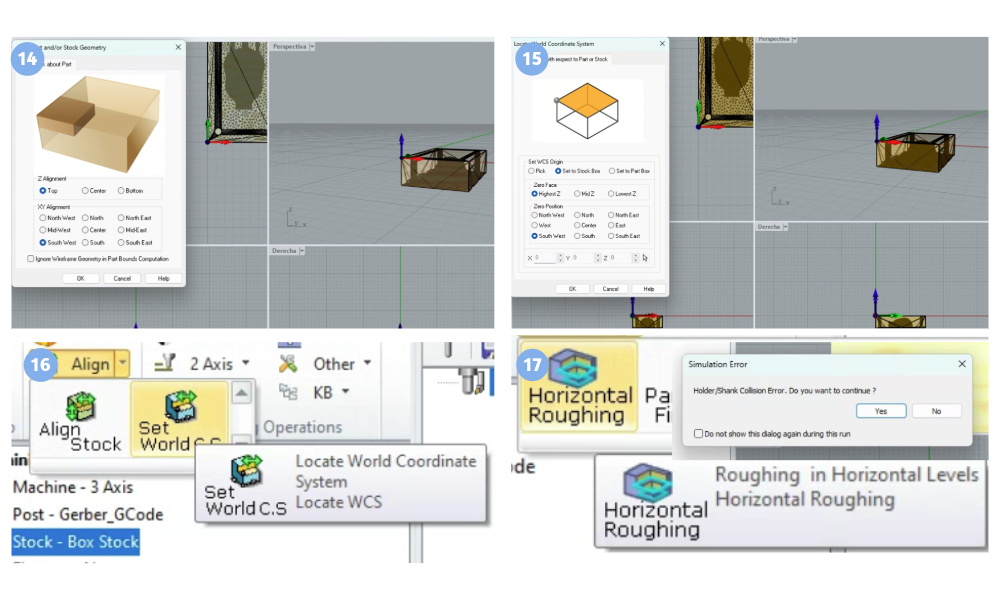
| In the following image, we see the nut design created by engineer Palomares. In this design, we can observe how the silicone mold can be obtained from the negative wax model. | In this second example, we’re making the mold for the casing of a part of the LernyBot project, using resin, resulting in a better finish. | In this last example, it’s already a test subject with greater depth. |
 |
 |
 |
Individual Assigmnents
In this assignment, we will address the following tasks:
- Design a mold around the process you’ll be using, produce it with a smooth surface finish, and use it to cast parts.
PROJECT
- The dimensions of the wax block along with the entry holes and vents.
- The joining of the wax block meshes with the design is shown in this case for Paquito (alpaca).
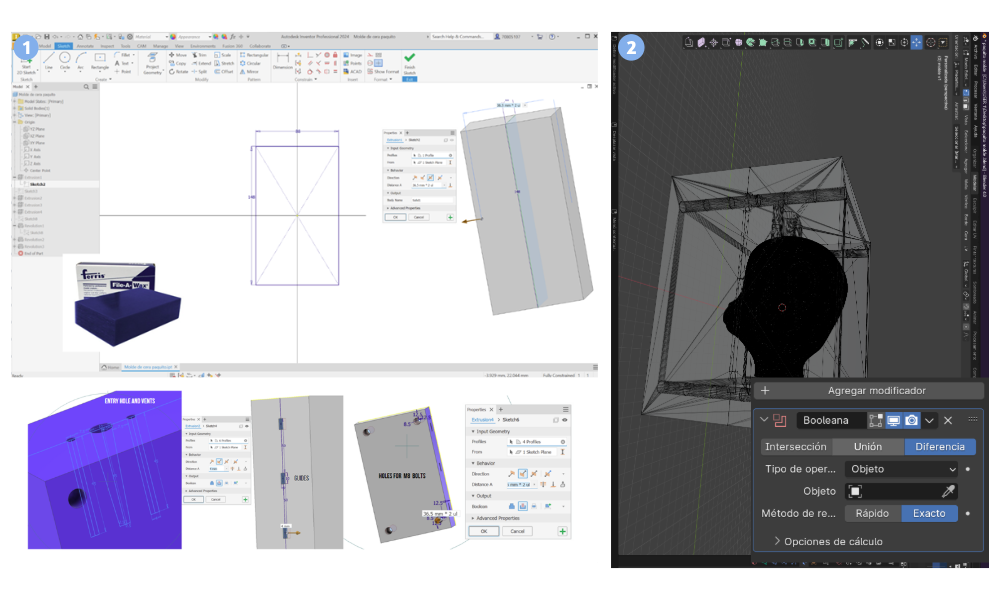
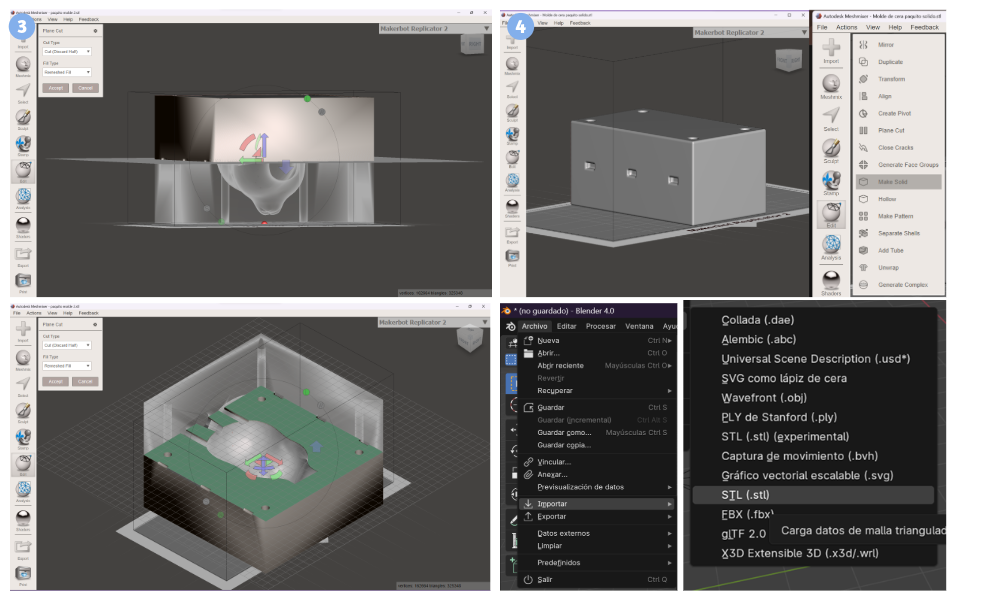
- We open our design in Autodesk Meshmixer to proceed with splitting the design into two equal parts.
- The dimensions of the wax block along with the entry holes and vents.
- The joining of the wax block meshes with the design is shown in this case for Paquito (alpaca)
- We open our design in Autodesk Meshmixer.
- We select “Edit” and then “Plane Cut”.
- We observe how our design has been divided into two sections.
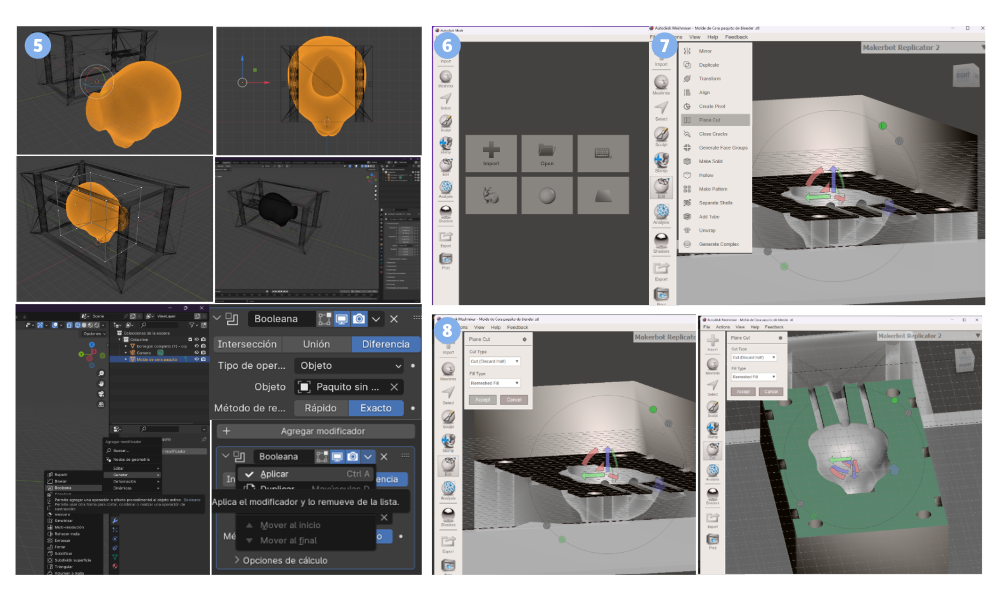
- We export the file in STL format.
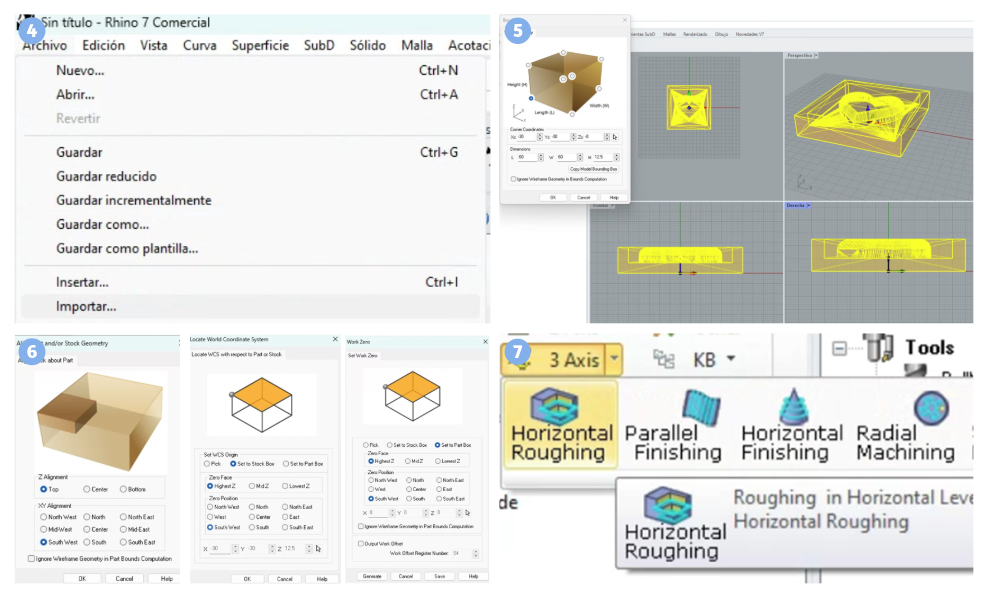
- We open the Rhinoceros program to import our file.
- Click on “STOCK” and then “BOX STOCK”.
- We select “Copy Model Bounding Box” and then click “OK”.
- Click on “ALIGN” and then “ALIGN STOCK”.
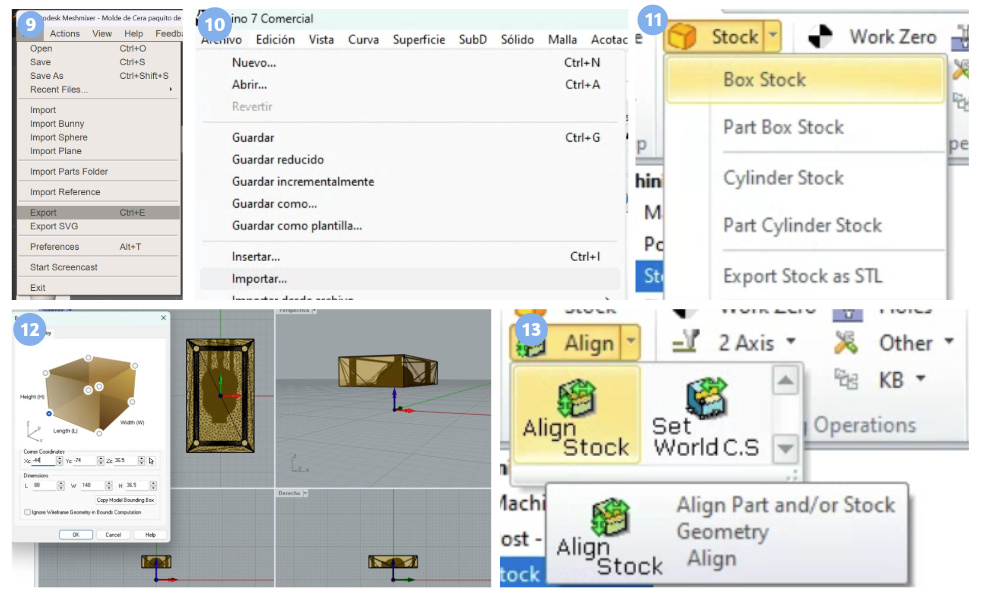
- We select Z Alignment: “TOP” and XY Alignment: “SOUTH WEST”, then click “OK” to finalize.
- Click on “ALIGN” and then “SET WORLD C.S”.
- Set XCS origin: “SET TO STOCK BOX” Zero face: “HIGHEST Z”. Zero position: “SOUTH WEST” Y “OK”.
- Select “3 AXIS” and “HORIZONTAL ROUGHING”.
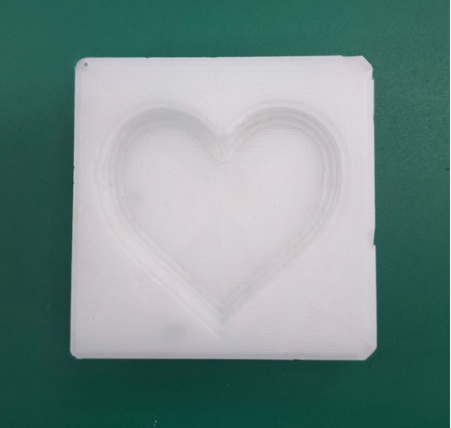
New project Heart Chocolate Silicone Mold
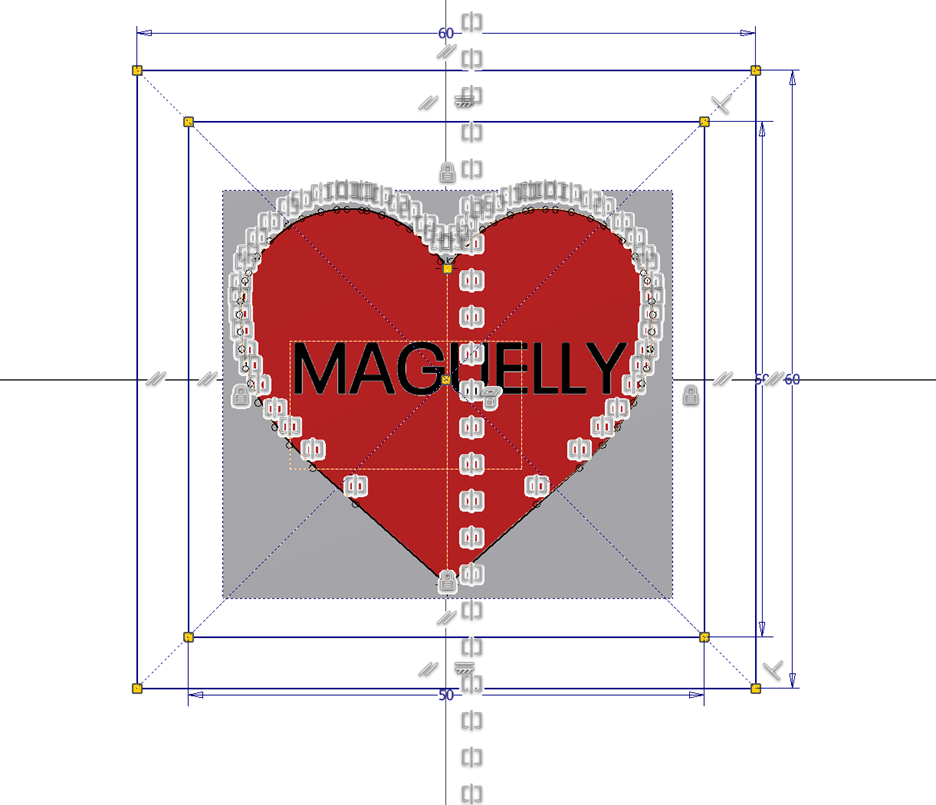
- To design this project, we used Autodesk Inventor.
- Finally, we have our heart mold project.
- We saved the project file.
- We imported the file into Rhinoceros.
- Click on “STOCK” and then “BOX STOCK”.
- We select Z Alignment: “TOP” and XY Alignment: “SOUTH WEST”, then click “OK” to finalize.Click on “ALIGN” and then “SET WORLD C.S”. Set XCS origin: “SET TO STOCK BOX” Zero face: “HIGHEST Z”.Zero position: “SOUTH WEST” Y “OK”. Select “3 AXIS” and “HORIZONTAL ROUGHING”.
- Select “3 AXIS” and “HORIZONTAL ROUGHING”.
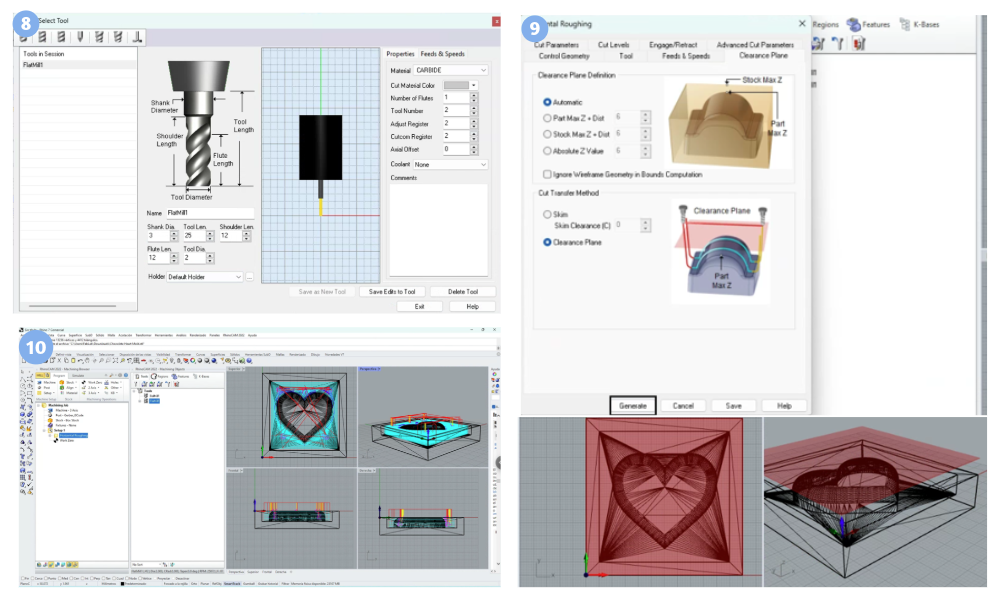
- We modify the diameter of the drill bit we will use for tapping.
- We set up the height from which it will start.
- We have the file ready to be executed on the CNC router.
Machining 3 Axis
- We place and adjust the drill bit on the CNC router.
- Ensuring that the drill bit is at the correct height and distance.
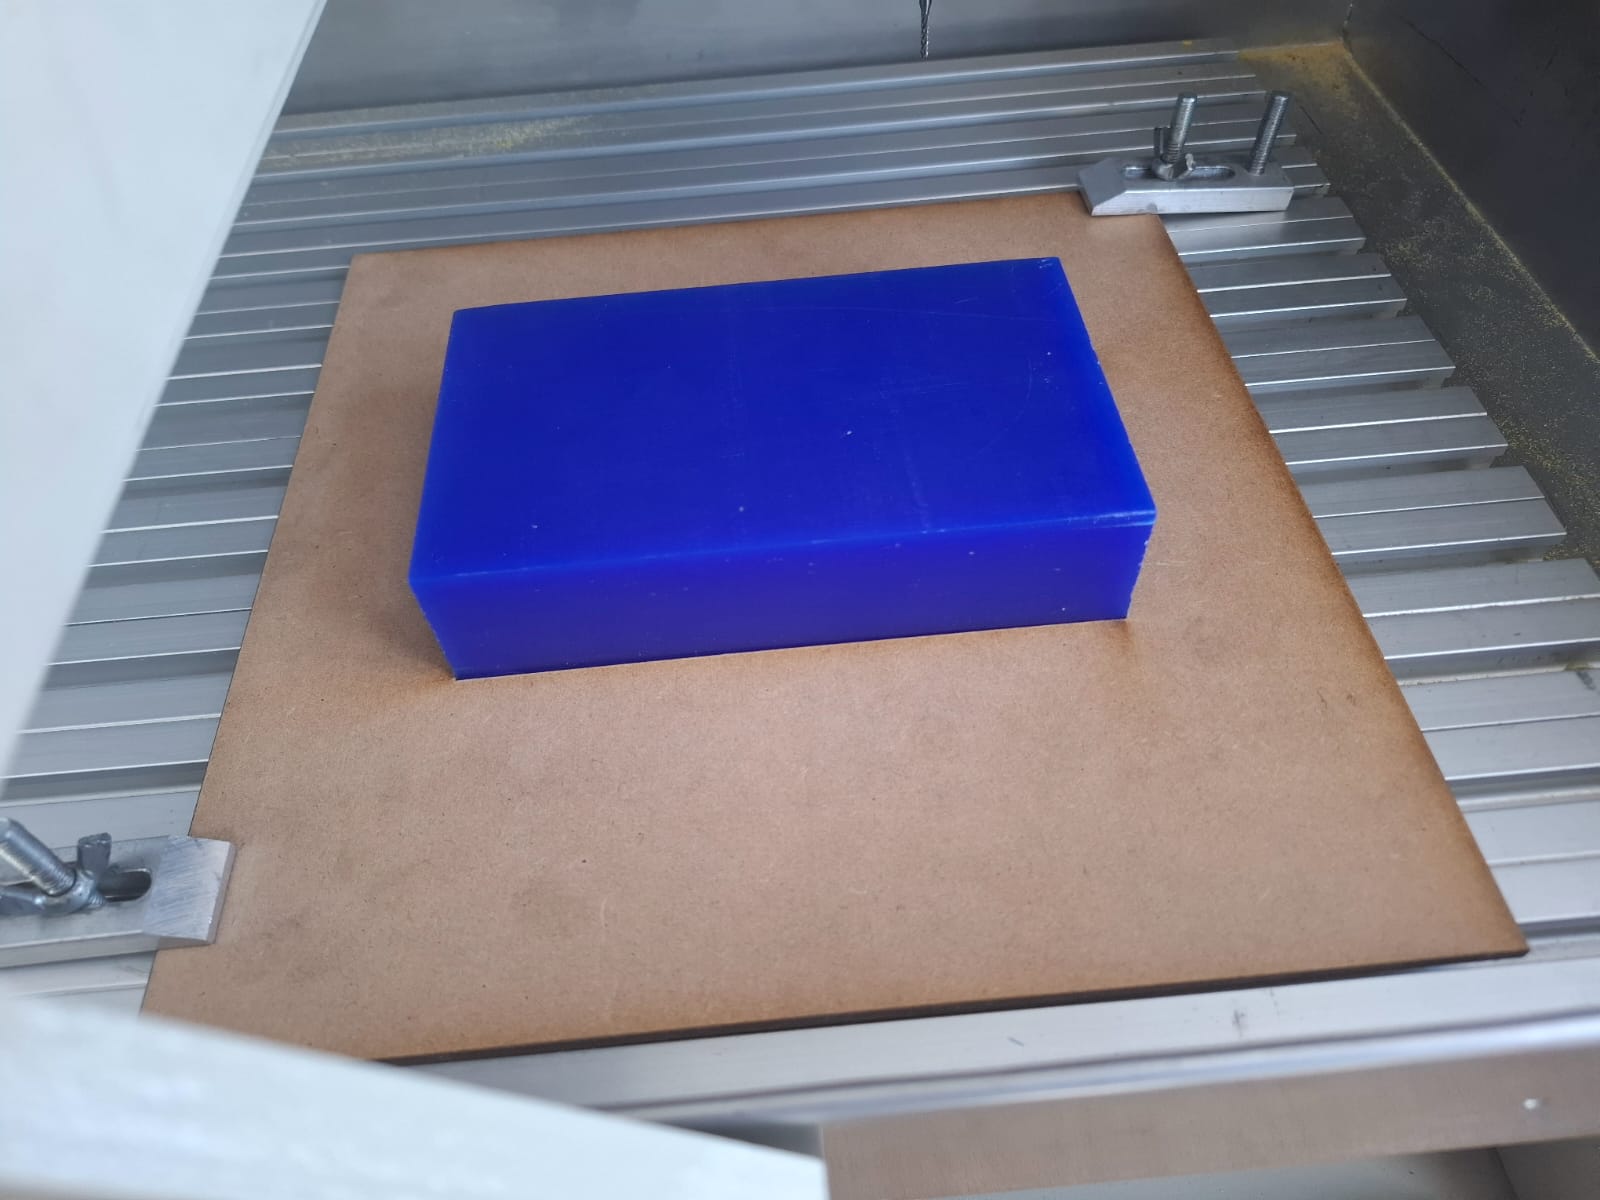
- We insert the wax block and secure it to prevent it from moving during the milling process.
- con una hoja bond verificamos que la distancia de la broca con la cera tengan la altura adecuada.
- With a bond paper, we verify that the distance between the drill bit and the wax is at the appropriate height.

- Elegimos la opcion “NOME AXIS HOME” and “OPEN OK”
- We set the X, Y, Z axes to zero coordinates and confirm with “OPEN OK”.
- To search for our file, click on “UDISCK FILE” and then “OPEN OK”.
- We select our file with “OPEN OK”.

VIDEO Our file is ready, the CNC router will now begin milling it.
Mold Preparation
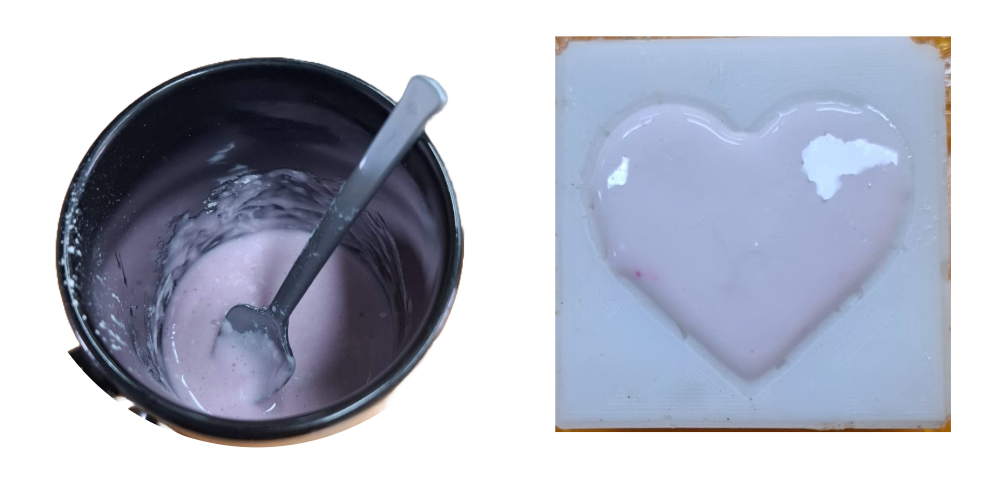
Silicona f- plus 1.5 to 2g of catalyst per 100 g of silicone container weight : 7g Silicone weight in the container: 3190-326=2856 g x= (2.2856)/100 x= 57.12 g of catalyst
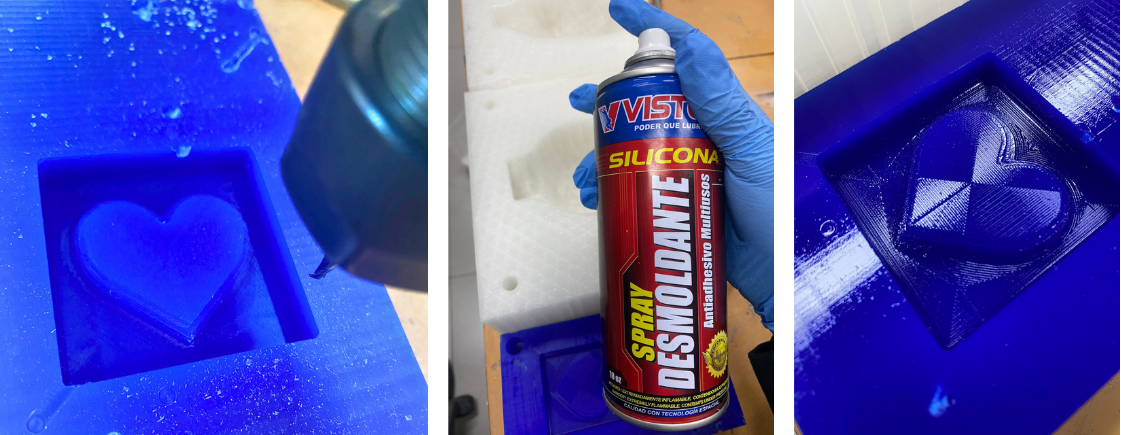
We apply the release spray to our wax mold.
- We place the container on our scale and select “TARE”.
- We pour exactly 57 grams of catalyst.
- We place another container and select “TARE”.
- We pour 3190 grams of silicone.
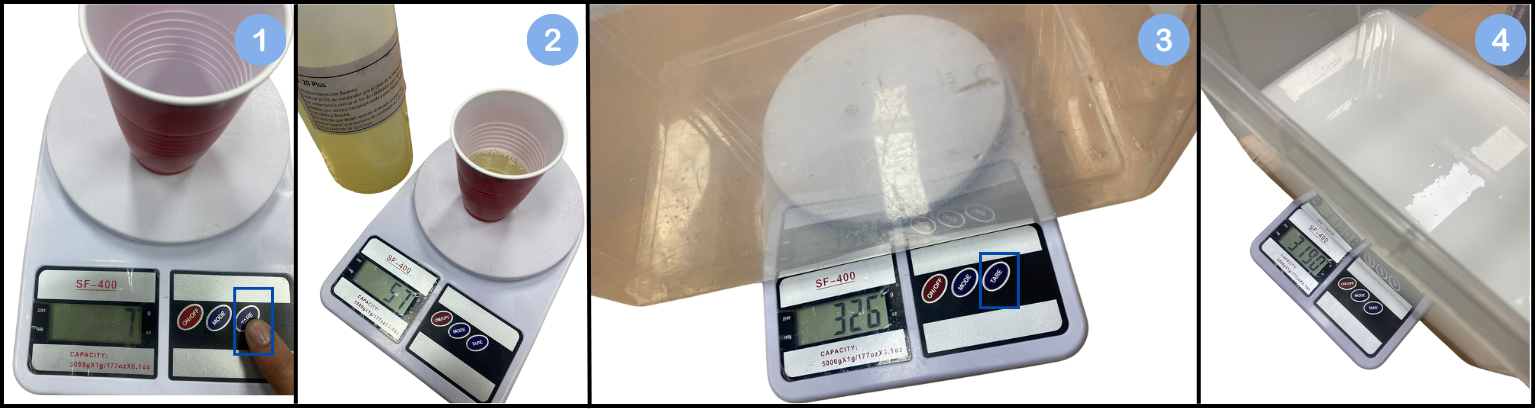
- In the container where the silicone is, we pour the catalyst.
- We stir well until the silicone and catalyst are completely incorporated.
- We pour our ready silicone into our molds.
- We secure our mold, in this case with bolts and nuts.
- Finally, we wait for 24 hours for our molds to dry.

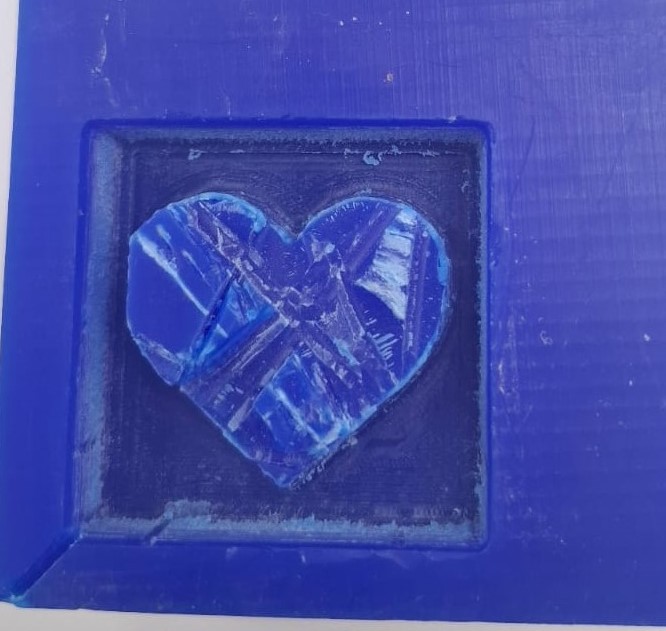
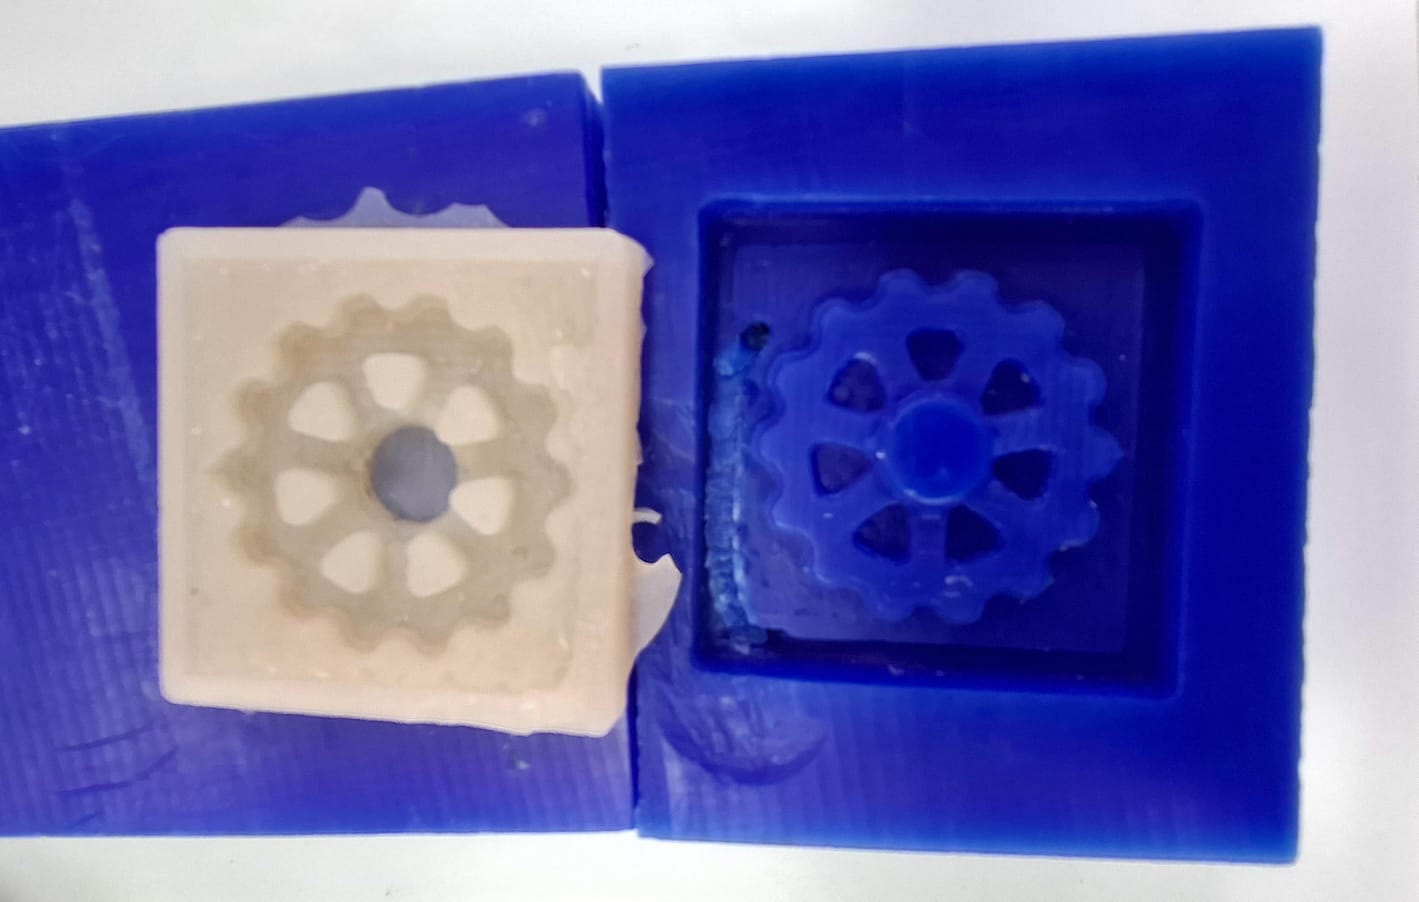
These are the results of our molds.


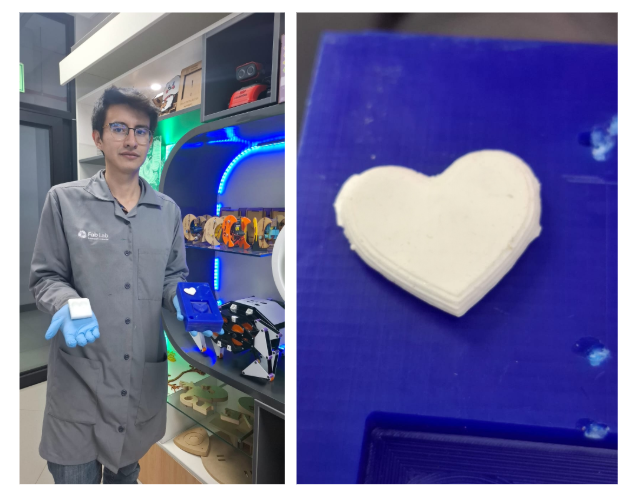
Mix the plaster homogeneously
We put in our machine for a fast drying time
Unmold and it’s ready !
Issues, musings, and learnings.
It is important to have a good fixing base since the milling cutter can move the block when machining causing the complete loss of the piece, for this reason we made a new MDF base with laser cut to hold the piece.