3. Computer controlled cutting
For the group assignment, thoroughly analyze and describe the focus, power, speed, rate, kerf, joint clearance, and various types of your lasercutter. Document your observations on the group’s collaborative platform and share personal reflections on your individual page regarding newfound insights. As for individual tasks, devise, lasercut, and document a versatile construction kit that adjusts for the lasercutter’s kerf, enabling diverse assembly options. Additionally, utilize the vinyl cutter to execute a project.
Assigmnent checklist
| Item | Activity | Status |
|---|---|---|
| 1 | Linked to the group assignment page. | Done |
| 2 | Explained how you created your parametric design. | Done |
| 3 | Documented how you made your press-fit construction kit. | Done |
| 4 | Documented how you made something with the vinyl cutter. | Done |
| 5 | Included your original design files. | Done |
| 6 | Included hero shots of your results. | Done |
Group Assigmnents
In this assignment, we will address the following tasks:
- Characterize your lasercutter’s focus, power, speed, rate, kerf, joint clearance and types.
- Document your work to the group work page and reflect on your individual page what you learned.
Individual Assigmnents
In this assignment, we will address the following tasks:
- Design, lasercut, and document a parametric construction kit, accounting for the lasercutter kerf, which can be assembled in multiple ways.
- Cut something on the vinyl cutter.
Machines
Laser cutting machine


Acrilic Cut
| THICKNESS | POWER | SPEED |
|---|---|---|
| 2 mm | 35 | 30 |
| 3 mm | 40 | 30 |
| 4 mm | 40 | 65 |
| 5 mm | 100 | 10 |
| 6 mm | 100 | 10 |
| 9 mm | 100 | 10 |
Acrilic Engraving
| THICKNESS | POWER | SPEED |
|---|---|---|
| 2 mm | 13 | 100 |
| 3 mm | 13 | 100 |
| 4 mm | 13 | 100 |
| 5 mm | 13 | 100 |
| 6 mm | 13 | 100 |
| 9 mm | 13 | 100 |
MDF Cut
| THICKNESS | POWER | SPEED |
|---|---|---|
| 2 mm | 35 | 30 |
| 3 mm | 40 | 30 |
| 4 mm | 55 | 30 |
| 6 mm | 60 | 70 |
| 9 mm | 70 | 30 |
MDF Engraving
| THICKNESS | POWER | SPEED |
|---|---|---|
| 2 mm | 14 | 100 |
| 3 mm | 14 | 100 |
| 4 mm | 14 | 100 |
| 6 mm | 14 | 100 |
| 9 mm | 14 | 100 |
Carton Cut
| THICKNESS | POWER | SPEED |
|---|---|---|
| 2 mm | 25 | 30 |
| 3 mm | 30 | 50 |
| 4 mm | 60 | 45 |
| 5 mm | 65 | 45 |
| 6 mm | 70 | 30 |
Carton Engraving
| THICKNESS | POWER | SPEED |
|---|---|---|
| 2 mm | 14 | 100 |
| 3 mm | 12 | 100 |
| 4 mm | 12 | 100 |
| 5 mm | 12 | 100 |
| 6 mm | 12 | 100 |
Cricut Maker 3

| Specification | Cricut Maker 3 |
|---|---|
| Maximum Material Width | 33 cm |
| Cutting Length | 3.6 m |
| Cutting Width with Mat | 30.5 cm |
| Cutting Depth | 2.4 mm |
| Compatible Tools (optional) | Fine Point Blade,Deep Cut Blade,Pens and Markers,Scoring Stylus, Foil Transfer Tool, Fabric Grip Tool, Rotary Blade, Knife Blade, Scoring Wheels (Single and Double), Debossing Tool, Engraving Tool, Wavy Blade, Perforation Blade |
| Compatible Materials | Paper ,Adhesive Paper, Photo Paper ,Cardstock, Transfer Vinyl,Iron-on Vinyl, Adhesive Vinyl, etc. |
| Speed (cm per second on one axis) | 20.32 cm/s |
| Dual Carriage | ✓ |
| Print and Cut (17cm x 23.5 cm) | ✓ |
| Roll Holder (optional) | ✓ |
| Connectivity | Bluetooth and USB |
| Software | Design Space |
| File Formats | svg, .dxf, .jpg, .png |
| Dimensions | 59 x 15.5 x 17.5 cm |
| Weight | 7.76 kg |
| Power | 220/110 V |
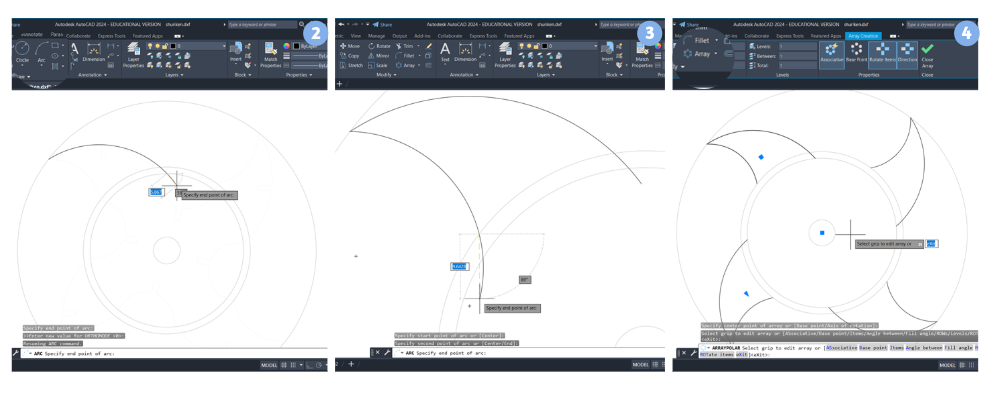
Rasen Shuriken
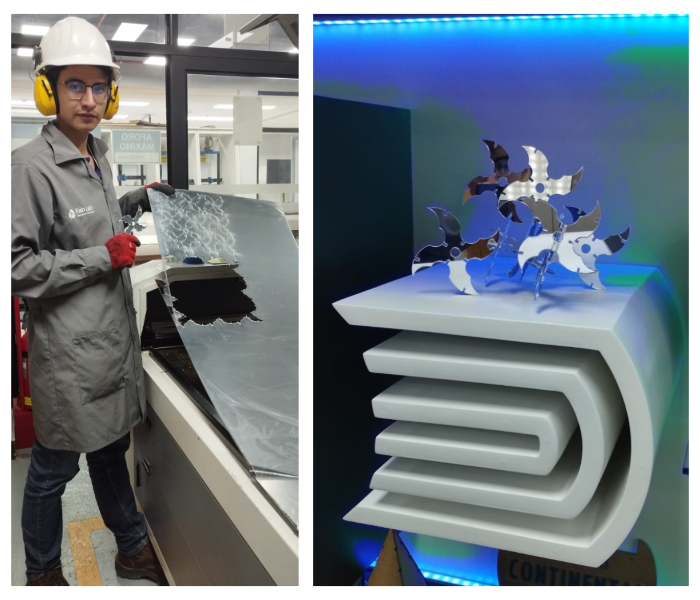
This image shows a design clearly inspired by the Rasenshuriken from the anime “Naruto”. The pieces in the image look like ninja stars or shurikens with sharp, pointed shapes, very similar to those of the Rasenshuriken. The design has been assembled using the press-fit assembly technique, which allows precise joints without the need for glue, using cuts made with a laser cutter. Thanks to this technique, the parts can be assembled in various shapes, offering great flexibility and creativity in design. The precision of the laser cutter ensures that each joint is perfect, resulting in a solid and visually appealing structure.
- First, we make the circles with their radii as shown in the images.

- With the ARC tool, we click on our largest circle. The second click is on the second circle, where we set an angle of 51°.
- We repeat the same step, but our reference is the third circle, with an angle of 89°.
- We select our two shapes created with the ARRAY tool, using the center of our first circle as a guide, and indicate to make 4 copies.
- With the same ARC tool, we select the two points as seen in the image and almost completely close the circumference.
- We delete the excess from the circle we previously made.
- We select and, using the ARRAY tool, make 4 copies.
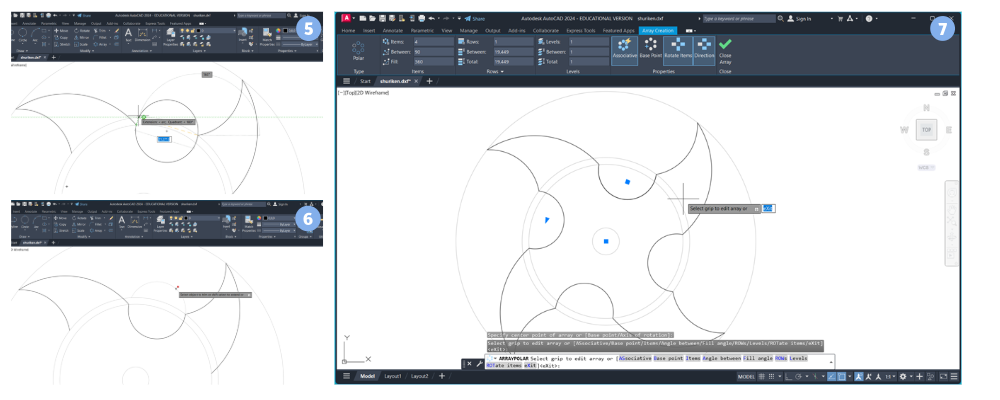
- Using the LINE tool, from the center of our first circle, we create a line at an angle of 73°.
- From the guideline we created with the OFFSET tool, we set a distance of 1.025 on both sides.
- With the ARRAY tool, we make four copies.
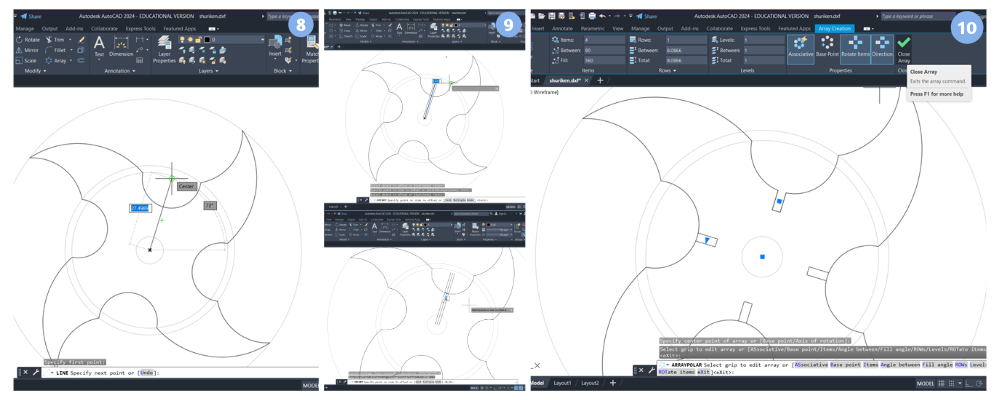
- We create a guideline using the LINE tool, and with the OFFSET tool, we set a distance of 1.025 on both sides.
- Starting from the beginning with a distance of 5, we create a horizontal line.
- We select and create four copies using the ARRAY tool.
- We click on the reference circles, excluding the first one, and delete them.
- There you go, our Shuriken design is now complete.
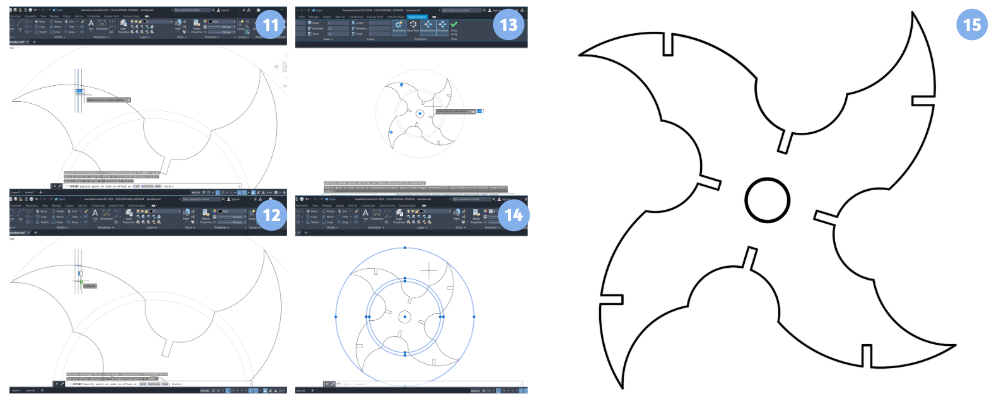
- We copy our design, this time 9 times.
- We proceed to save our file in DXF format.
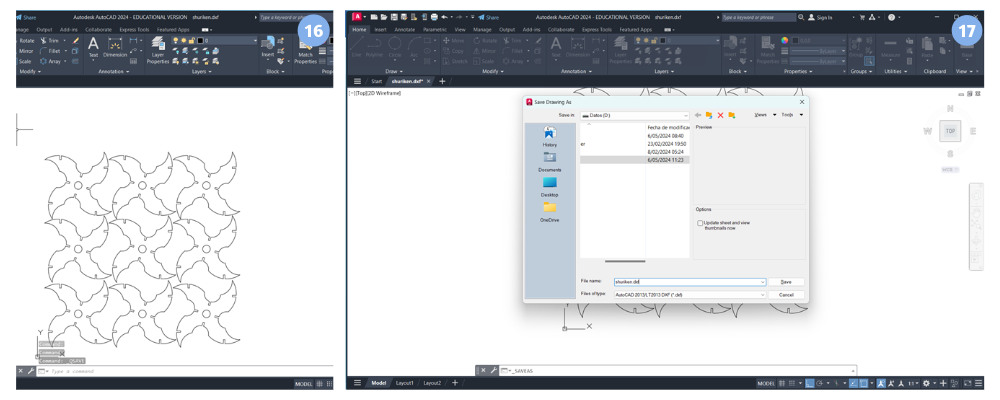
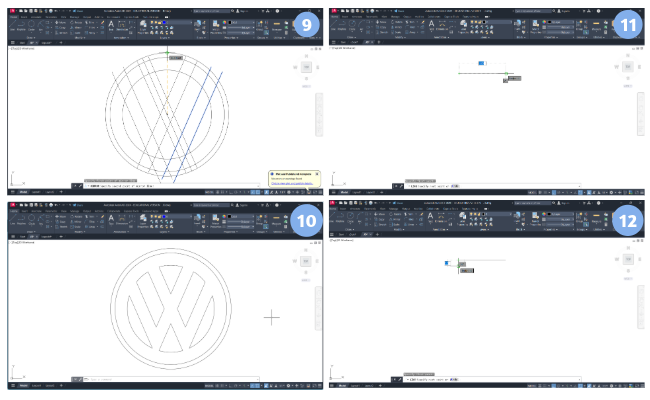
Logo and Labels
- We start by making a circle with a radius of 20.297.
- We draw a second circle with a smaller radius of 18.797.
- Now a final circle with a radius of 14.647.
- Now, using the LINE tool from the midpoint of our circumference, we draw a line at an angle of 114°.

- With the line created using the OFFSET tool, we create 2 lines with a distance of 2.
- Using the MIRROR tool with a midpoint at a 90° angle.
- Now we perform an OFFSET of 5 units of distance.
- Then another OFFSET with a distance of 4.
- We create a 90° angle using the MIRROR tool.
- Using the TRIM tool, we delete all overlapping lines.
- With the LINE tool, we draw a line with a distance of 11.5.
- Another line with a distance of 1.5 at a 90° angle.
- Draw a horizontal line with a length of 3.35.
- Draw another vertical line with a length of 18.75.
- Use the CIRCLE tool and select the two-point option to create a circle with a diameter of 6.22.
- Draw a vertical line upwards with a length of 3.75.
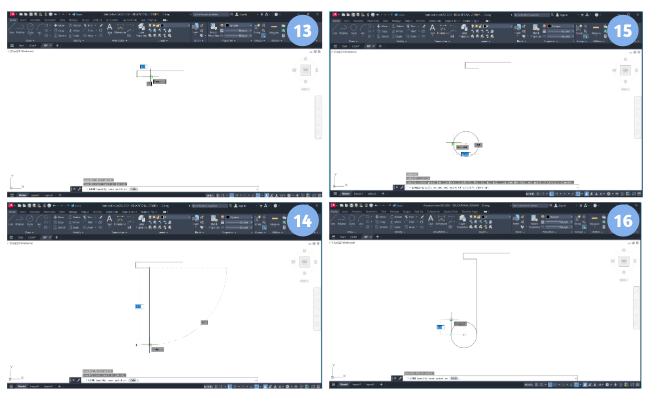
- Use the ARC tool with a radius of 4.75.
- Draw a horizontal line with a length of 8.
- Use the MIRROR tool to complete the other half of the letter, and finally, delete the extra lines.
- Use the FILLET tool to round all the corners with a radius of 0.5.
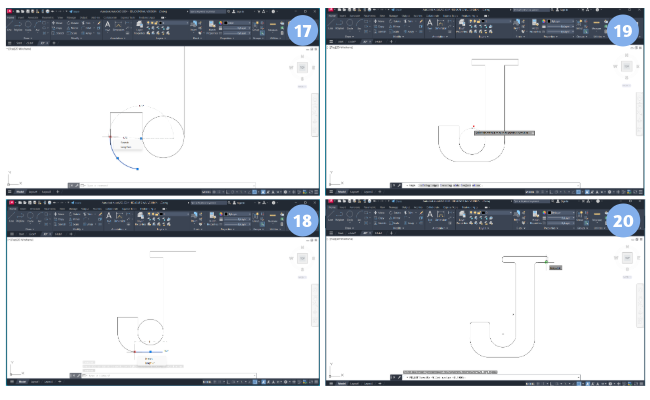
- Use the OFFSET tool on our letter with a distance of 0.6, then use the TRIM tool to remove overlapping lines.
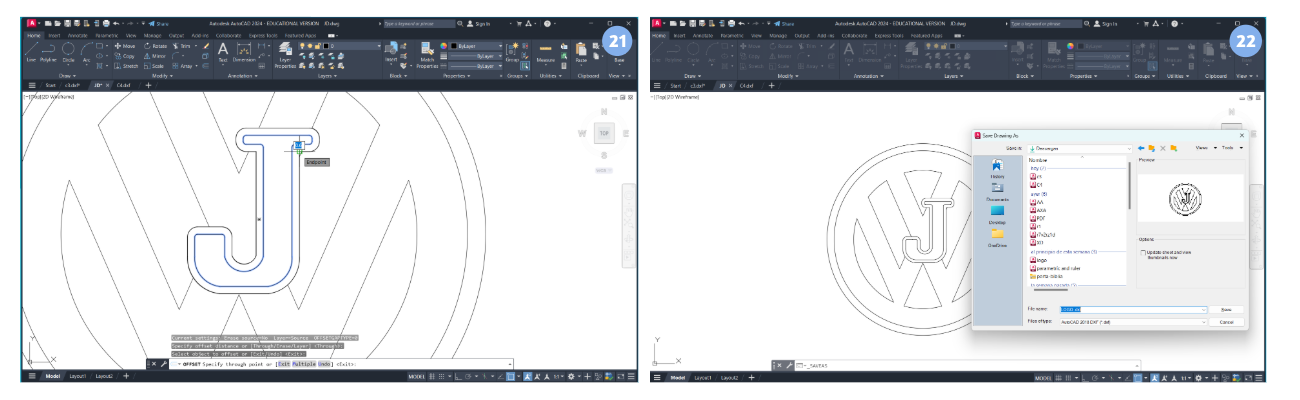
- Save our finished file in DXF format.
Cricut Design Space
- Click on the image to load
- Click on browse and look for our file and click on open.
- With our file already opened we click on CREATE
- We select the mat 30 cm x 30 cm and confirm
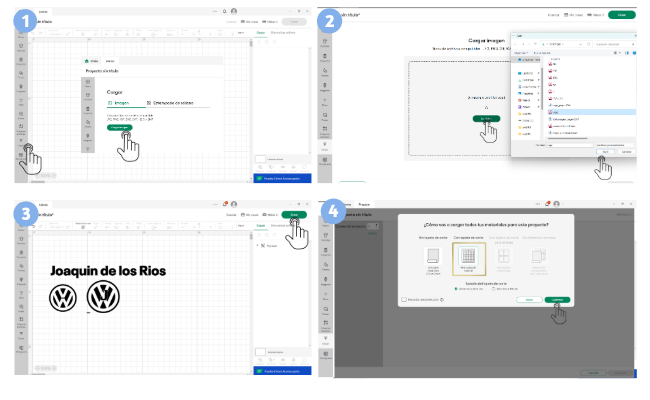
- Select the material which in this case is permanent vinyl.
- Click on confirm

- We observe that it starts to cut in our CRICUT machine.
- Ready it is cut, remove the excess vinyl and paste the transfer paper.
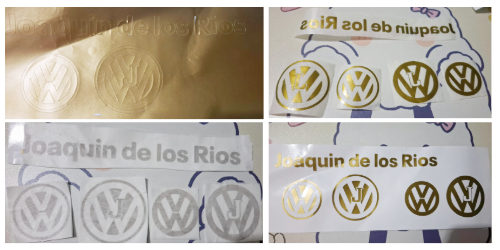
- We proceed to paste on the surface that we want

For the labels that we will put on our 3D printer farm with Neue Plack typography and perform the same steps to cut on our cricut.
We proceed to glue our labels with care and patience.
This is how the result ends up all our machines have their number.

Issues, musings, and learnings.
Wrong power and speed, because the acrylic is 2 mm thick, and we set it up as if it were microcorrugated cardboard.