Machine Building Project
Members: Hajime Itoh / Koji Yamada

Project Output
Group Assignment Overview
This is the group assignment of the week.
  - Design a machine that includes mechanism+actuation+automation+application;
  - Build the mechanical parts and operate it manually;
  - Document the group project and your individual contribution;

  - Actuate and automate your machine;
  - Document the group project and your individual contribution
1. Machine to Make: Fishing Game Machine
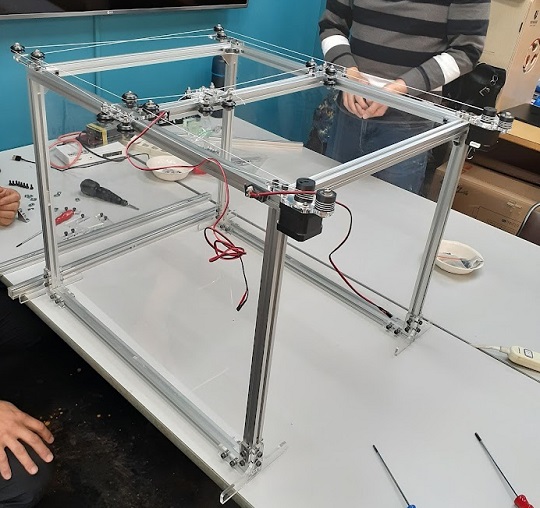
For our group assignment, we have decided to make a fishing game machine. Building on the CoreXY module, we add the mechanism to lift up/down the fishing line to catch a fish.
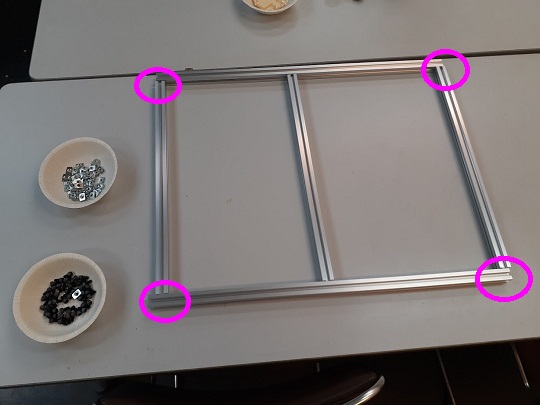
Mechanism: We make a box structure with T-slotted aluminum flaming rails and place the CoreXY module on the box. We place a stepper motor on the X-axis carriage so that the capstan pulley attached to the stepper motor could reel up the fishing line. We put a magnet on the tip end of the thread. Meanwhile, we spread out the fishes and other sea animals on the bottom of the acquarium. They are made of the cardboard and cut out by the lasercutter. We put a clip or a bolt on the game.
-
Starting from the XYZ origin, the users move the carriage to the XY position where they want to put down the fishing line to the bottom of the acquarium.
-
Once the carriage reaches the target XY position, they stop moving the carriage and start putting down the fishing line. After a few seconds, the stepper motor starts moving to the opposit direction and lifts up the line.
-
Once the float is lifted up enough to touch the fishing rod, the stepper motor stops.
-
Then the users move the carriage to the XYZ origin to release the fish.
This kind of game machines could attract kids when we display them in an event such as Maker Faires. Also, if we have enough time, we could convert it to a claw clane, replacing the magnet with two or three fingers to pick up stuffed toys or snacks. We did consider that possibilities. But due to the time constraint, we decided to go for a simple magnet.
2. Fundamental Module: CoreXY
CoreXY is the foundation on which we thought over about the expansion of the fabrication tools in the rectangular cartesian coordinate system. It has two stepper motors which move in a syncronized manner so that the carriage moves from one XY coordinate to another.
2-1. Purchasable Components
CoreXY module alone consists of many parts. Some of them are purchased in the local hardware shops or the e-commerce platforms. Others should be designed according to our requirements and made locally. The following tables are the list of the parts we prepared for assembling the CoreXY module alone.
(1) Flame
| SN | Item | Details | Qty | Remarks |
|---|---|---|---|---|
| 1 | 2020Aluminum Extrusion(Y) | ex.400mm | 2P | |
| 2 | 2020Aluminum Extrusion(X) | ex.300mm | 2P | 3mm Acrylic spacer will be added |
| 3 | 2020Aluminum Extrusion(X) | ex.300mm | 1P | |
| 4 | Delta Socket | 4P | ||
| 5 | Socket Head Screws | M5x8mm | 8P | |
| 6 | T-Slot | M5 | 8P | |
| 7 | Non-stretch fishing line |
(2) Y-axis Pulley *2 units required for both sides.
| SN | Item | Details | Qty | Remarks |
|---|---|---|---|---|
| 8 | Socket Head Screws | M5x30mm | 1P | Inner wheels |
| 9 | V-slot Wheel | 1P | Inner wheels | |
| 10 | Spring Washer | M5 | 1P | Inner wheels |
| 11 | Washer | M5 | 1P | Inner wheels |
| 12 | Nut | M5 | 1P | Inner wheels |
| 13 | Socket Head Screws | M5x30mm | 1P | Outer wheels |
| 14 | V-Slot Wheel | 1P | Outer wheels | |
| 15 | Spring Washer | M5 | 1P | Outer wheels |
| 16 | Acrylic Spacer | 5mm | 1P | Outer wheels |
| 17 | Washer | M5 | 1P | Outer wheels |
| 18 | Nut | M5 | 1P | Outer wheels |
| 19 | Socket Head Screws | M5x8mm | 2P | |
| 20 | T-Slot | M5 | 2P |
(3) Y-axis Carriage *2 units required for both sides.
| SN | Item | Details | Qty | Remarks |
|---|---|---|---|---|
| 21 | Socket Head Screws | M5x40mm | 1P | Inner wheels |
| 22 | V-Slot Wheel | 1P | Inner wheels | |
| 23 | Spring Washer | M5 | 1P | Inner wheels |
| 24 | V-Slot Wheel | 1P | Inner wheels | |
| 25 | Spring Washer | M5 | 1P | Inner wheels |
| 26 | Nut | M5 | 1P | Inner wheels |
| 27 | Socket Head Screws | M5x30mm | 1P | Outer wheels |
| 28 | V-Slot Wheel | 1P | Outer wheels | |
| 29 | Nut | M5 | 1P | Outer wheels |
| 30 | Socket Head Screws | M5x8mm | 2P | |
| 31 | T-Slot | M5 | 2P |
(4) Y-axis Motor *2 units required for both sides.
| SN | Item | Details | Qty | Remarks |
|---|---|---|---|---|
| 32 | Stepper Motor | NEMA17 17HS4401 1.5A 42x42x38mm | 1P | Motor |
| 33 | Socket Head Screws | M3x8mm | 4P | Motor |
| 34 | Socket Head Screws | M5x30mm | 1P | Pulley |
| 35 | Bearing | D16xd5xH5 | 2P | Pulley |
| 36 | Spring Washer | M5 | 1P | Pulley |
| 37 | Washer | M5 | 1P | Pulley |
| 38 | Spring Washer | M5 | 1P | Pulley |
| 39 | Nut | M5 | 1P | Pulley |
| 40 | Socket Head Screws | M5x8mm | 2P | |
| 41 | T-Slot | M5 | 2P |
(5) X-axis Carriage
| SN | Item | Details | Qty | Remarks |
|---|---|---|---|---|
| 42 | Socket Head Screws | M5x30mm | 4P | |
| 43 | V-Slot Wheel | 4P | ||
| 44 | Nut | M5 | 1P | |
| 45 | Socket Head Screws | M3x15mm | 2P | Non-stretch fishing line holder |
| 46 | Washer | M3 | 2P | ditto. |
| 47 | Nut | M3 | 2P | ditto. |
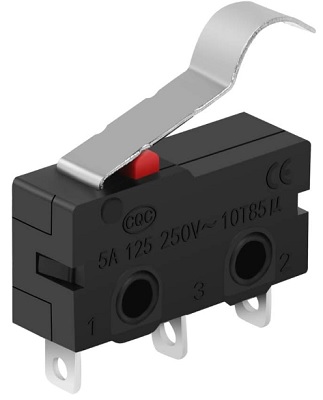
(6) Limit Switch *2 units required for both X and Y axes.
| SN | Item | Details | Qty | Remarks |
|---|---|---|---|---|
| 48 | Limit Switch | 1P | ||
| 49 | Screw | M2x12mm | 2P | |
| 50 | Nut | M2 | 2P | |
| 51 | Socket Head Screws | M5x8mm | 1P | |
| 52 | T-Slot | M5 | 1P |
2-2. Local-Made Components
Also, we designed some parts and either 3D-printed or laser-cut them. Some of them were downloaded from Quentin Bolsee’s Machine Workshop at FAB23 and others were slightly modified from the original on the same site.
| SN | Item | Image | Purpose | Data | QTY |
|---|---|---|---|---|---|
| 53 | Capstan Motor | 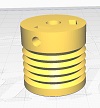 |
For stepper motor | STL | 2P |
| 54 | Capstan Pulley |  |
For stepper motor | STL | 2P |
| 55 | Stud 4pcs | 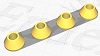 |
For rolling pulley smoothly | STL | 5P |
| 56 | X-axis Carriage | 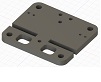 |
For mounting X-carriage | STL | 2P |
| 57 | X-axis Carriage | 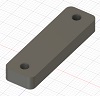 |
For holding strings | STL | 1P |
| 58 | Y-axis Pulley | 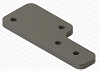 |
For mounting pulleys on Y-axis | STL | 2P |
| 59 | Y-axis Carriage | 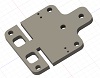 |
For mounting Y-carriage | F3Z | 2P |
| 60 | Y-axis Motor | 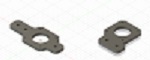 |
For mounting stepper motor | F3D | 2P |
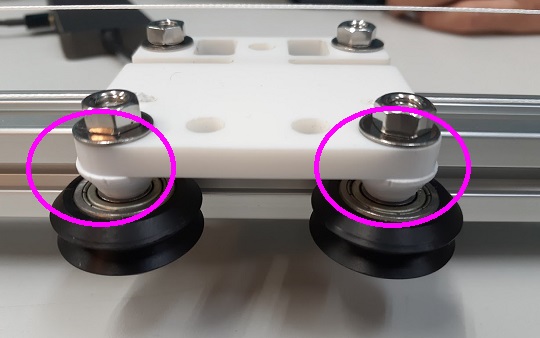
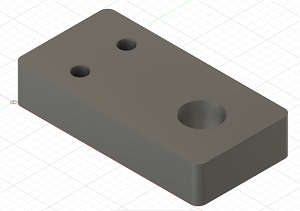
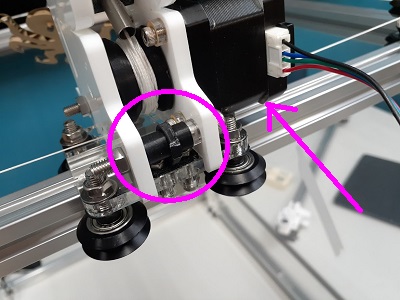
We did all the preparations based on the past model made by our instructor. He shared one issue he faced after making his own prototype: Diameter of the stud was larger than the corner radius of the pulley holders (See the photo below). We had two options: size reduction of the stud, or enlargement of the carriage. After a little trial for the first, we have decided to go for the second option. Therefore, both the X-axis Carriage (SN56) and the Y-axix Carriage (SN59) were remodelled from the oridinal design downloaded.
In addition to the above open-source data, we had to design a couple of customized components.
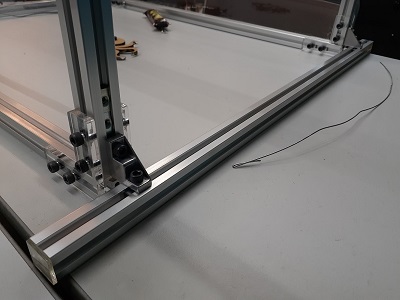
- Spacer: Although we used three 30mm flaming rails for horizontal connection, one in the middle had to be a little shorter than the other two, in order to ensure the smooth movement of the Y-carriages. We had two options: cutting a little shorter the one in the middle, or adding a spacer to one of the edges of the other two rails. We decided to prepare a 3mm spacer by laser-cutting the acrylic board, and place it between the 30mm rail and the 40mm rail.
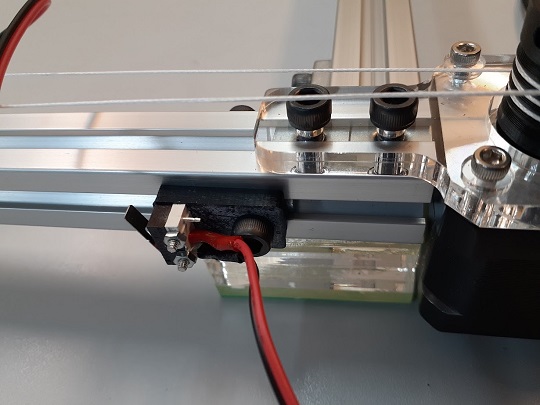
- Limit Switch: In order to avoid the overrun of the X and Y carriages, we had to place two limit switches. The switch has two screwholes and three legs. Therefore, taking all the measurements, we designed a small block to mount the switch and attach to the flaming rail.
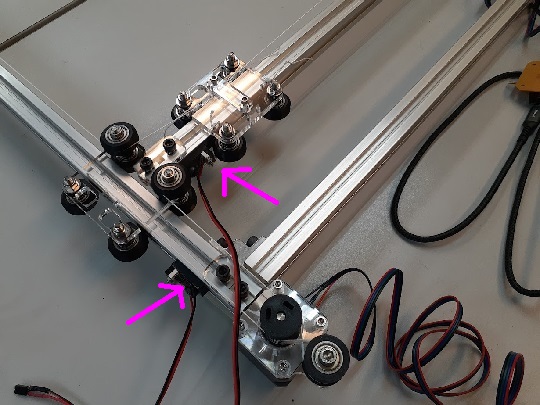
Please check here for the process of assembling the CoreXY module.
3. Additional Structure
It was only after we set up the CoreXY module when we came to a conclusion that we would make the fishing game machine.
3-1. Aquarium
There were extra sets of flaming rails and other parts, which we should purchase but were already in stock in our lab. Therefore, we decided to make use of the in-stock parts as much as possible.
| SN | Item | Details | Qty | Remarks |
|---|---|---|---|---|
| 61 | 2020Aluminum Extrusion(Y) | ex.400mm | 4P | 2 rails are used for horizontal connection on the bottom |
| 62 | 2020Aluminum Extrusion(X) | ex.300mm | 4P | |
| 63 | Delta Socket | 8P | ||
| 64 | Socket Head Screws | M5x8mm | 16P | |
| 65 | T-Slot | M5 | 16P |
Besides the above parts, we found that there were acrylic surface brackets already laser-cut.
| SN | Item | Details | Qty | Remarks |
|---|---|---|---|---|
| 66 | L-brackets | laser-cut acrylic | 8P | 2P for each corner of the bottom, 4 screw holes |
| 69 | Socket Head Screws | M5x8mm | 32P | |
| 70 | T-Slot | M5 | 32P |
Making full use of the existing parts, we could assemble the acquarium structure. We could have cut the 40mm flaming rails by 10mm to use as a flame that would connect the longer sides on the bottom. But we didn’t do it and decided to use them as they were.
3-2. Fisherman Module
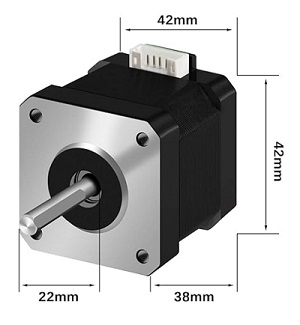
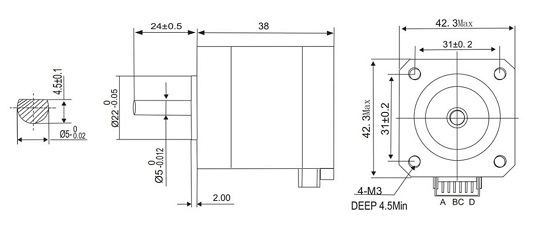
We first looked at the size of the stepper motor (SN32). When we looked at the Amazon website of the Nema 17 Stepper Motor, 17HS4401, we could find the specifications of the stepper motor.
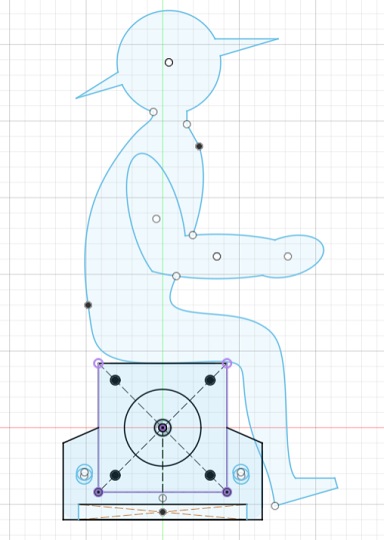
Based on the above information, we started designing the fisherman image cutout. We planned to prepare two image cutout and put the motor shaft through. The minimum distance of the two cutouts is defined by the width of the string stopper of the X-axis Carriage (SN57) and it’s 11mm.
| SN | Item | Image | Data | QTY | Remarks |
|---|---|---|---|---|---|
| 71 | Fisherman Image Cutout | 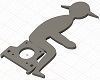 |
SVG1/SVG2 | 2P | One should only have one hole for motor shaft and two screw holes for Socket Head Screws |
| 72 | Capstan | 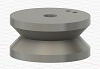 |
STL | 1P | Height: 1.50mm |
| 73 | Aluminum Pipe | 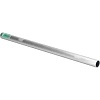 |
1P | For fishing rod | |
| 74 | Non-stretch fishing line | ||||
| 75 | Fishing Rod Holder |  |
STL | 2P | For holding the fishing rod. Innder diameter: 0.64mm, Width: 1.70mm |
| 76 | Spacer Pipe | 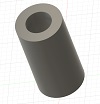 |
STL | 2P | For holdign the socket head screws. Inner diameter: 0.51mm |
| 77 | Socket Head Screws | 2P | M5x8mm | ||
| 78 | Nut | 2P | M5 | ||
| 79 | Magnet with a Hole |  |
3P | ||
| 80 | Spacer Pipe Holder | 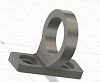 |
STL | 1P | For holding the module attached to the X-carriage |
| 81 | Screws | 2P | M2x12mm | ||
| 82 | Nut | 2P | M2 |
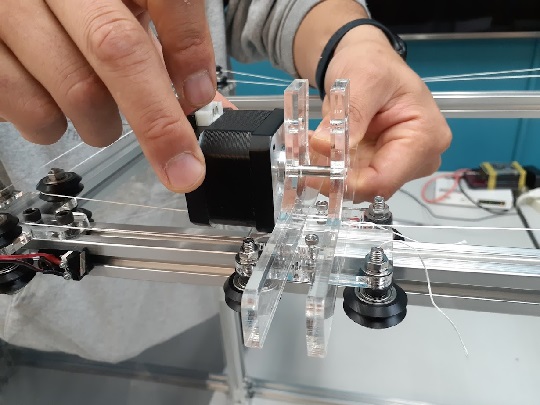
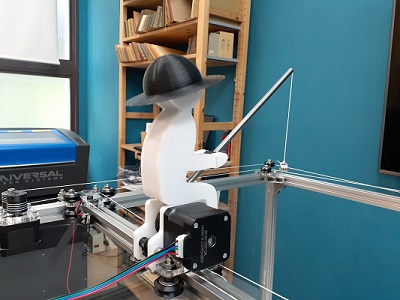
After the assemble of all the above-listed items, the fisherman module looked like the following photo.
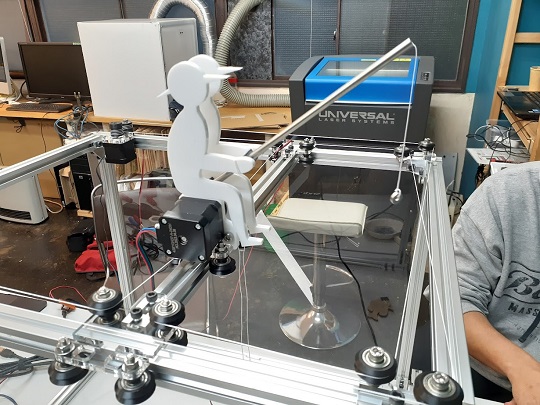
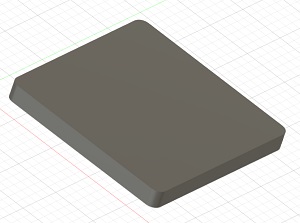
We first made the module and just placed it on the X-axis Carriage. Since the stepper motor is attached to one side, the center of gravity is also inclined to the stepper motor side. The instability of the module remained as an issue.
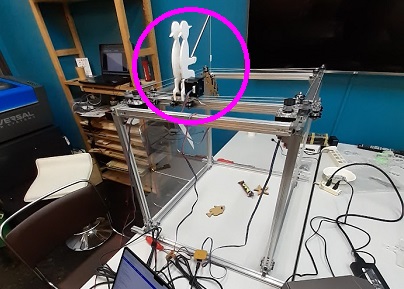

Therefore, we decided to prepare a 20mm x 20mm x 4mm spacer under the stepper motor and the Spacer Pipe Holder (SN80) that connects the X-axis Carriage and the Spacer Pipe. Since we only had M2x12mm screws for the 2mm holes of the X-axis Carriage, we prepared another 2mm acrylic spacer pipes for the screws. With these two measures, the fisherman module was stably held on the X-axis Carriage.
Next we worked on the decoration of the fisherman. Originally it consisted of the two acrylic boards but looked a bit ugly. Therefore, we designed a straw hat as well as the spacers that would connect the two fisherman shapes. Now it looks like one single body.
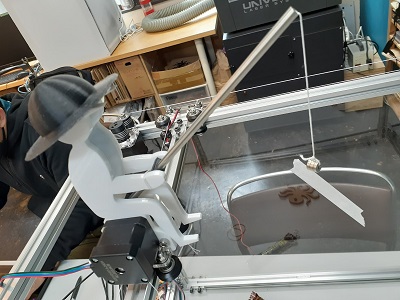
Note: At a later stage of programming, we faced a problem of inconsistent reeling down of the fishing hook (magnet, in our case). Sometimes it reached the bottom of the aquarium but sometimes it stopped a few centimeters above the bed. One possibility of this problem is that the shape of the capstan we designed. Originally we designed it so that it had V-shaped groove. But with this, depending on the point the fishing line is reeled up, the travel distance of the fishing line may vary with one round of the stepper motor. We should have tried other shapes, such as the one with a flat bottom. After discussion, we decided to include this inconsistency could be integrated as part of the game and go with the original capstan design.

4. Game Design
The design principle of the game is as follows:
(1) Operations are made by a laptop attached to the machine.
(2) Once the operator press the START button in the program app, the Fisherman first goes to the Home position (X, Y = 0, 0).
(3) The operator moves the Fisherman to the XY cordinates he/she wants. He/She has to move to the XY coordinates by clicking the X/Y buttons in the program app a few times.
(4) Once the Fisherman reaches the target XY coordinates, the operator starts reeling down the magnet. Then the magnet goes down to the aquarium bed.
(5) After a few seconds, say 1 second, the stepper motor starts moving upward automatically, no matter if the magnet could catch a fish or not.
(6) The Fisherman moves back to the Home position.
(7) The operator releases the fish.
5. Stepper Motor Board
5-1. Board Design
The controller board design is based on our instructor’s experience in the 2024 Fab Instructors’ Bootcamp, where they worked on prototyping of the Modular Things Core-XY. It was designed with Fusion Electronics and the design data were created in terms of PNG files.
https://academany.fabcloud.io/fabacademy/2024/bootcamp-instructors/workshops/modular-things-coreXY/#board
5-2. Firmware
For the firmware we used, please refer to the instruction page of the FabLab Kannai-Fab Academy 2024 site.
Arduino Library
We imported the Arduino-OSAP (Open Systems Assembly Protocol) libraries. First, we downloaded the Zip file from the OSAP-Arduino GitHub. Next we opend the Arduino IDE and then went to “Sketch” >> “Include Library” >> “Add Zip Libary…” and upload the Zip file.
Simple-Stepper Sample Sketch
We downloaded the Zip file for simple-stepper Arduino sketch for Xiao board in the FabLab Kannai Fab Academy 2024 Tips site.
5-3. BOM
For the BOM, please go to the Modular-Things CoreXY page of the Fab Academy Instructor Bootcamp 2024.
6. Equipment Required for Wiring
| SN | Item | Image | Data | QTY | Remarks |
|---|---|---|---|---|---|
| 83 | USB 3.0 Hub |  |
https://www.amazon.co.jp/dp/B0797NWDCB?th=1 | 1 | 60W 12V/5A (HB-B7C3) |
| 84 | USB Type C cable |  |
https://www.amazon.co.jp/dp/B09B1S259F?th=1 | 3 | USB-C & USB-A 3.0 |
| 85 | Less-/Non-stretch fishing line |  |
https://www.amazon.co.jp/dp/B07GF7M38R?th=1 | 1 | 130LB/58.96KG 150M |
7. Program

・The task of stabilizing the movement of stepper motors, such as making them wind up the same length of fishing line that has been let out.
・If the script contains an error, the screen turns blank.
It took a considerable amount of time to solve these issues, and as a result, We had to give up on adding features to improve operability or keyboard-based controls.
But getting to work with JavaScript for the first time was a very good experience.
//Code_yuichi4
// warning: without a powered usb-hub, currentScale > 0.5 are likely to fail
//
//Open browsers DevTools console with
// cmd + shift + j (Linux)
// ctrl + shift + j (win)
// command + option + j (mac)
//<button id="Start" style="background-color:yellow;"> Start</button>
//https://fabacademy.org/2024/labs/kannai/Instruction/tips/machine_building/
//<img src="https://fabacademy.org/2024/labs/kannai/images/logo2022-yoko-w_transp.png" alt="FabLab Kannai" width="200">
//<audio id="audio" src="https://fabacademy.org/2024/labs/kannai/Machine_Building_Project_JPN/code/baby-shark.mp3" preload="auto"></audio>
// <img id="countdownImage" src="https://fabacademy.org/2024/labs/kannai/Machine_Building_Project_JPN/code/3.png" alt="Countdown Image" width="70">
// UI in View tab
const el = document.createElement("div");
el.style = `
padding: 10px;
`
el.innerHTML = `
<audio id="audio" src="https://fabacademy.org/2024/labs/kannai/Machine_Building_Project_JPN/code/baby-shark.mp3" preload="auto"></audio>
<h2><font color="#5B9BAF">FabAcademy2024</font></h2>
<h3><font color="#5B9BAF">Machine Building GroupJP</font></h3>
<font color="#5B9BAF">Modular Things Core XY</font>
<br>
<img src="https://fabacademy.org/2024/labs/kannai/Machine_Building_Project_JPN/code/greatwave.png" alt="FabLab Kannai" width="100">
<br>
<p>
<hr>
<table>
<tbody>
<tr>
<td></td>
<td><button id="yPlus"> <img src="https://fabacademy.org/2024/labs/kannai/Machine_Building_Project_JPN/code/up.jpg" width="50" /></button></td>
<td></td>
<td> </td><!-- space in 3rd column-->
<td><button id="Up"> Z+ </button></td>
</tr>
<tr>
<td><button id="xMinus"> <img src="https://fabacademy.org/2024/labs/kannai/Machine_Building_Project_JPN/code/left.jpg" width="50" /> </button></td>
<td></td>
<td><button id="xPlus"> <img src="https://fabacademy.org/2024/labs/kannai/Machine_Building_Project_JPN/code/right.jpg" width="50" /> </button></td>
<td></td>
<td></td>
</tr>
<tr>
<td></td>
<td><button id="yMinus"> <img src="https://fabacademy.org/2024/labs/kannai/Machine_Building_Project_JPN/code/down.jpg"width="50" /> </button></td>
<td></td>
<td></td>
<td><button id="Down"> Z- </button></td>
</tr>
</tbody>
</table>
<hr>
<p>
<button id="Fishing" style="background-color:cyan;"> Go Fishing!!</button>
                
<button id="up"> ↑</button>
<button id="down"> ↓</button><p>
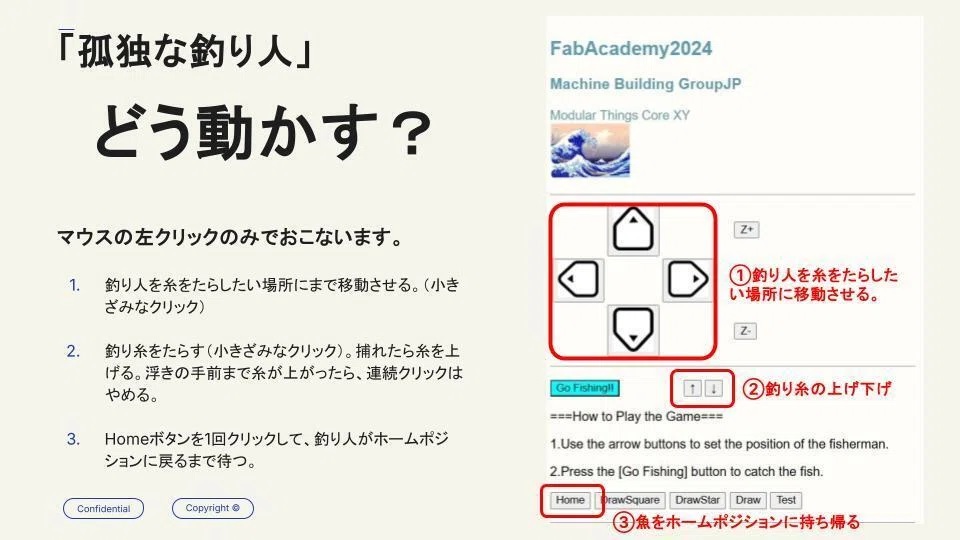
===How to Play the Game===<p>
1.Use the arrow buttons to set the position of the fisherman.<p>
2.Press the [Go Fishing] button to catch the fish.<p>
<p>
<button id="Home"> Home</button>
<button id="DrawSquare"> DrawSquare</button>
<button id="DrawStar"> DrawStar</button>
<button id="Draw"> Draw</button>
<button id="Test"> Test</button>
<hr>
<p>
Open browsers DevTools console with<br>
cmd + shift + j (Linux)<br>
ctrl + shift + j (win)<br>
command + option + j (mac)
</p>
`
//test button
//================================
el
.querySelector("#Test")
.addEventListener("click", () => {
delay(100);
test();
//drawPolugon();
})
function test() {
machine.setPosition([0, 0]);
goTo(10,10 );
}
//================================
//Synchronizer of two motors
const machine = createSynchronizer([motorA, motorB]);
//Definition of CoreXY Motion
async function goTo(x,y){
console.log(`Moving to (${x}, ${y})`);
await machine.absolute([1*(x+y),1*(x-y)]); // The reason why "-1" is multiplied may be due to the wiring and origin position.
}
// Set button ID and click_event
el
.querySelector("#xPlus")
.addEventListener("click", () => {
xPlus();
})
el
.querySelector("#xMinus")
.addEventListener("click", () => {
xMinus();
})
el
.querySelector("#yPlus")
.addEventListener("click", () => {
yPlus();
})
el
.querySelector("#yMinus")
.addEventListener("click", () => {
yMinus();
})
el
.querySelector("#Fishing")
.addEventListener("click", () => {
Fishing();
})
el
.querySelector("#up")
.addEventListener("click", () => {
up();
})
el
.querySelector("#down")
.addEventListener("click", () => {
down();
})
el
.querySelector("#Home")
.addEventListener("click", () => {
goToHome();
})
el
.querySelector("#DrawSquare")
.addEventListener("click", () => {
delay(100);
drawSquare();
})
el
.querySelector("#DrawStar")
.addEventListener("click", () => {
delay(100);
drawStar();
})
el
.querySelector("#Draw")
.addEventListener("click", () => {
delay(100);
draw();
})
render(el);
// When you start running this javascript code, the machine runs from here
//motor setting
motorA.setCurrent(1);
motorA.setStepsPerUnit(5);
motorA.setAccel(20);
motorB.setCurrent(1);
motorB.setStepsPerUnit(5);
motorB.setAccel(20);
machine.setPosition([0, 0]);// set present position as (X0,Y0)
//machine.setPosition(0, 0);// CHECK this syntax works or not
motorC.setCurrent(0.8);
motorC.setStepsPerUnit(5);
//motorC.setAccel(50);
//const isAtEndStopX = false;
//console.log(isAtEndStopX);
async function Fishing(){
playAudio(); //Play Audio
// motorC.absolute(1000);
motorC.relative(1150);
console.log('down');
await delay(15000);
// motorC.absolute(0);
motorC.relative(-1150);
console.log('up');
await delay(15000);
console.log('mute');
muteAudio();//Mute Audio and
goToHome();
}
async function up(){
motorC.relative(-100);
await delay(1000);
}
async function down(){
motorC.relative(100);
await delay(1000);
}
// Function definition
async function goToHome(){
while(await motorB.getLimitState()){ // Limit switch at X- as Normally-Open
motorA.velocity(-10);//move motorA CW -> CCW
motorB.velocity(-10); //move motorB CW -> CCW
}
while(await motorA.getLimitState()){ // Limit switch at Y- as Normally-Open
motorA.velocity(-10); //positive value means CW -> CCW
motorB.velocity(10);//negative value means CCW -> CW
}
motorA.velocity(0);
motorB.velocity(0);
machine.setPosition([0, 0]);
await delay(1000);
goTo(10,10 );
// machine.setPosition([0, 0]);
await delay(1000);
}//end of goToHome
function xPlus() {
//zUp();
machine.setPosition([0, 0]);
for ( i = 0; i<10; i++){
goTo(i,0 );
}
}
function xMinus() {
//zUp();
machine.setPosition([0, 0]);
for ( i = 0; i<10; i++){
goTo(-i,0 );
delay(200);
}
}
function yPlus() {
//zUp();
machine.setPosition([0, 0]);
for ( i = 0; i<10; i++){
goTo(0,i );
}
}
function yMinus() {
//zUp();
machine.setPosition([0, 0]);
for ( i = 0; i<10; i++){
goTo(0,-i );
}
}
async function drawSquare(){
//down();
for (let i = 0; i < ptsSquare.length; i++){
await goTo(ptsSquare[i][0], ptsSquare[i][1]);
await delay(200);
}
//zUp();
}
async function drawStar(){
//down();
for (let i = 0; i < ptsStar.length; i++){
await goTo(ptsStar[i][0], ptsStar[i][1]);
await delay(200);
}
//zUp();
}
async function draw(){
//down();
for (let i = 0; i < pts.length; i++){
await goTo(pts[i][0], pts[i][1]);
await delay(200);
}
//zUp();
}
// Array of [x,y] positions of drawing design
//Square
var ptsSquare = [[50,0],[50,50],[0,50],[0,0]];
//Star
var ptsStar = [[20,10],[30,50],[40,10],[10,40],[50,40],[20,10]];
//TestDraw
var pts = [[62.2, 26.2], [29.7, 26.2], [29.7, 49], [61, 49], [61, 62.5], [29.7, 62.5], [29.7, 92.7], [29.7, 107.9], [29.7, 130.7], [60.5, 98.5],
[69.9, 107.9], [42.6, 135.8], [85, 187.9], [66.1, 187.9], [32.6, 145.6], [29.7, 148.5], [29.7, 174.4], [15.6, 174.4], [15.6, 107.9],
[15.6, 92.7], [15.6, 12.7], [62.2, 12.7], [62.2, 26.2]];
//SVG -> ChatGPT -> vertex coordinates of the shape//This is NOT tested yet
var polygon1 = [[10,10],[10,20],[20,20],[20,10],[10,10]];
var polygon2 = [[30,30],[30,40],[40,40],[40,30],[30,30]];
async function drawPolugon() {
machine.setPosition([0, 0]);// set present position as (X0,Y0)
//zUp();
//about polygon1
await goTo(polygon1[0][0], polygon1[0][1]);//move to first position of polygon1
//zDown();
for (let i = 1; i < polygon1.length; i++){
await goTo(polygon1[i][0], polygon1[i][1]);//finish drawing polygon1
await delay(200);
}
//zUp();
//about polygon2
await goTo(polygon2[0][0], polygon2[0][1]);//move to first position of polygon2
//zDown();
for (let i = 1; i < polygon2.length; i++){
await goTo(polygon1[i][0], polygon1[i][1]);//finish drawing polygon2
await delay(200);
}
//zUp();
//finished drawing all polygons
goTo(0,0);//move back to (X0,Y0)
}
function playAudio() {
// var audio = document.getElementById("audio");
// audio.addEventListener('ended', function() {
// audio.currentTime = 0;
audio.play();
// }, false);
}
function muteAudio() {
// var audio = document.getElementById("audio");
audio.pause(); // Pause playback
//audio.currentTime = 0; // Return playback position to beginning
}
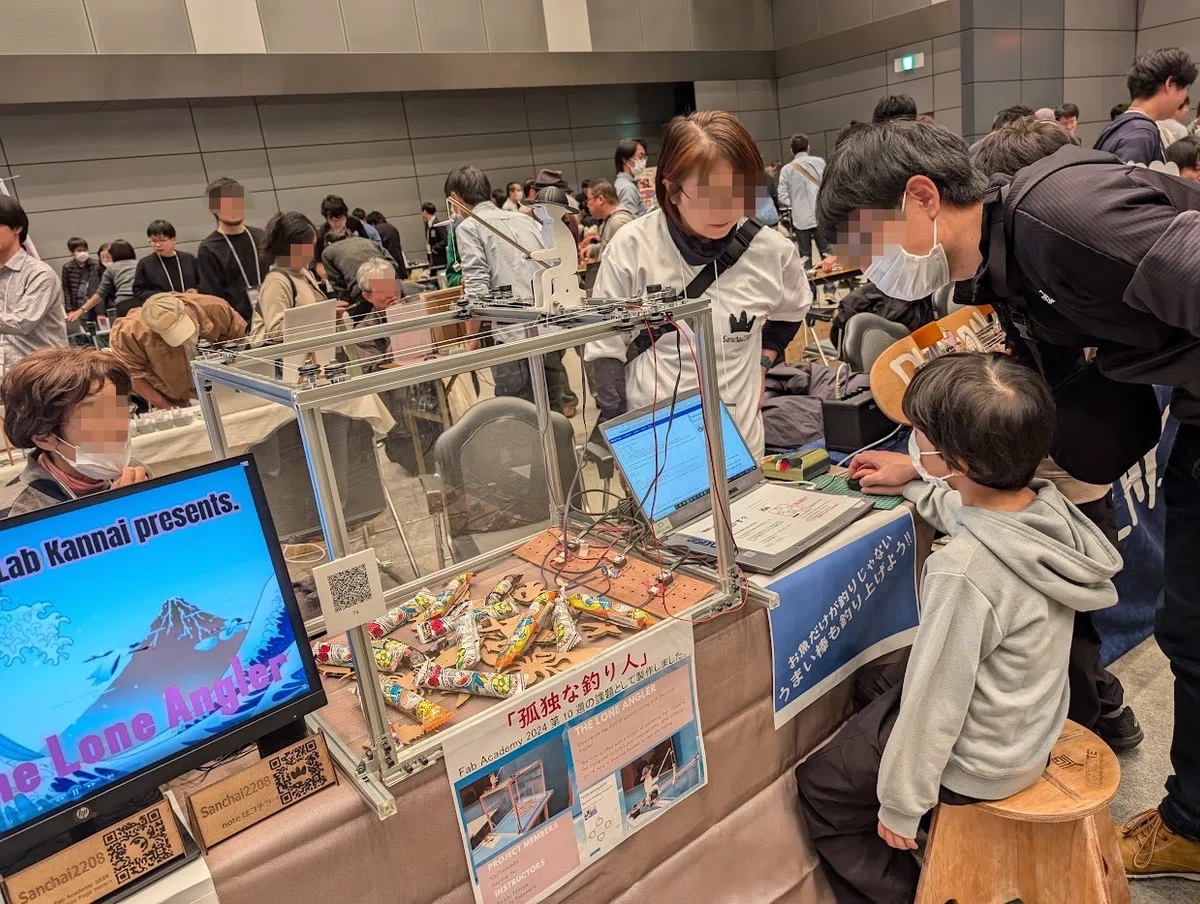
Implementation 1: Exhibition at Ogaki Mini Maker Faire 2024
On November 23-24, 2024, one of the team members took the Lone Angler out for the exhibition at the Ogaki Mini Maker Faire 2024, held at the Softopia Japan Center in Ogaki City, Gifu prefecture. Due to the limited time for preparation, we exhibited it as it was made in the Fab Academy local session except for the following instruction sheet.
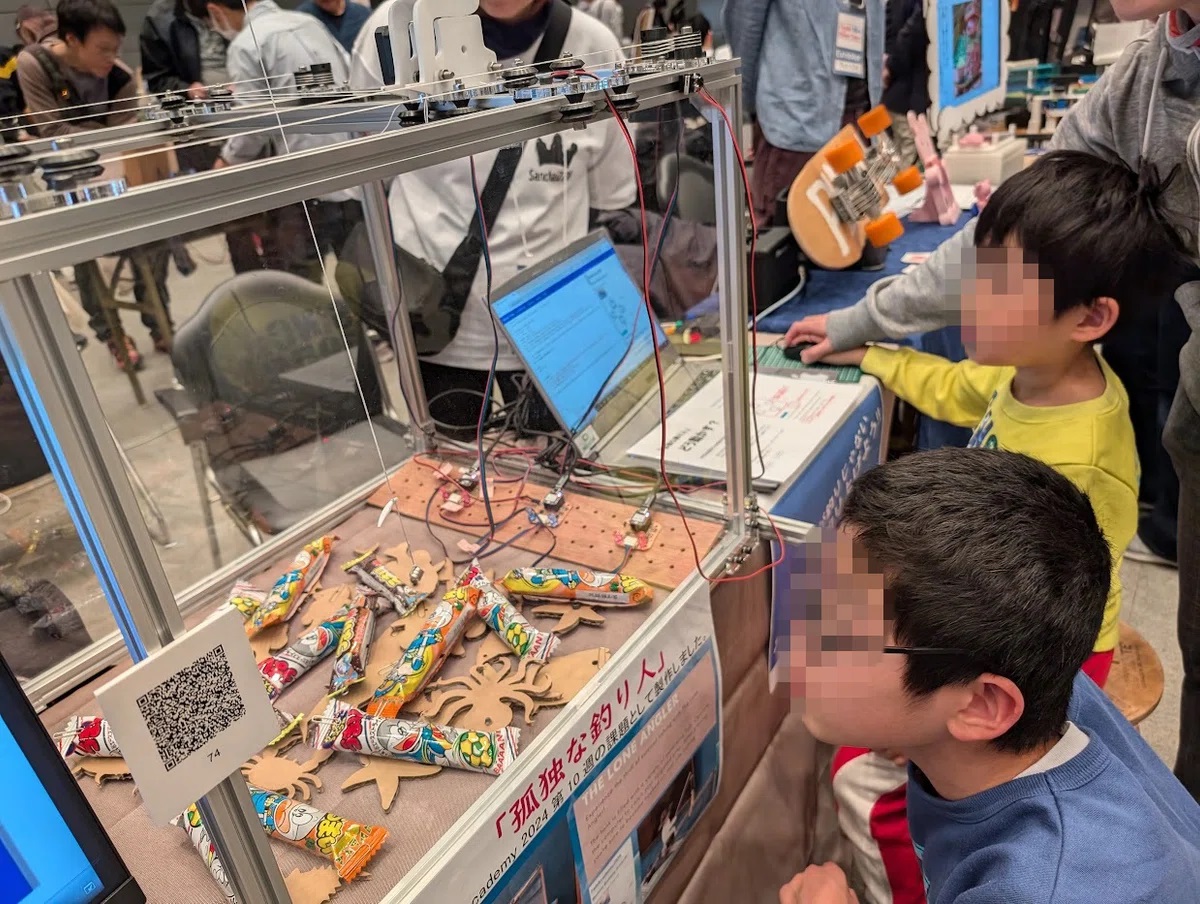
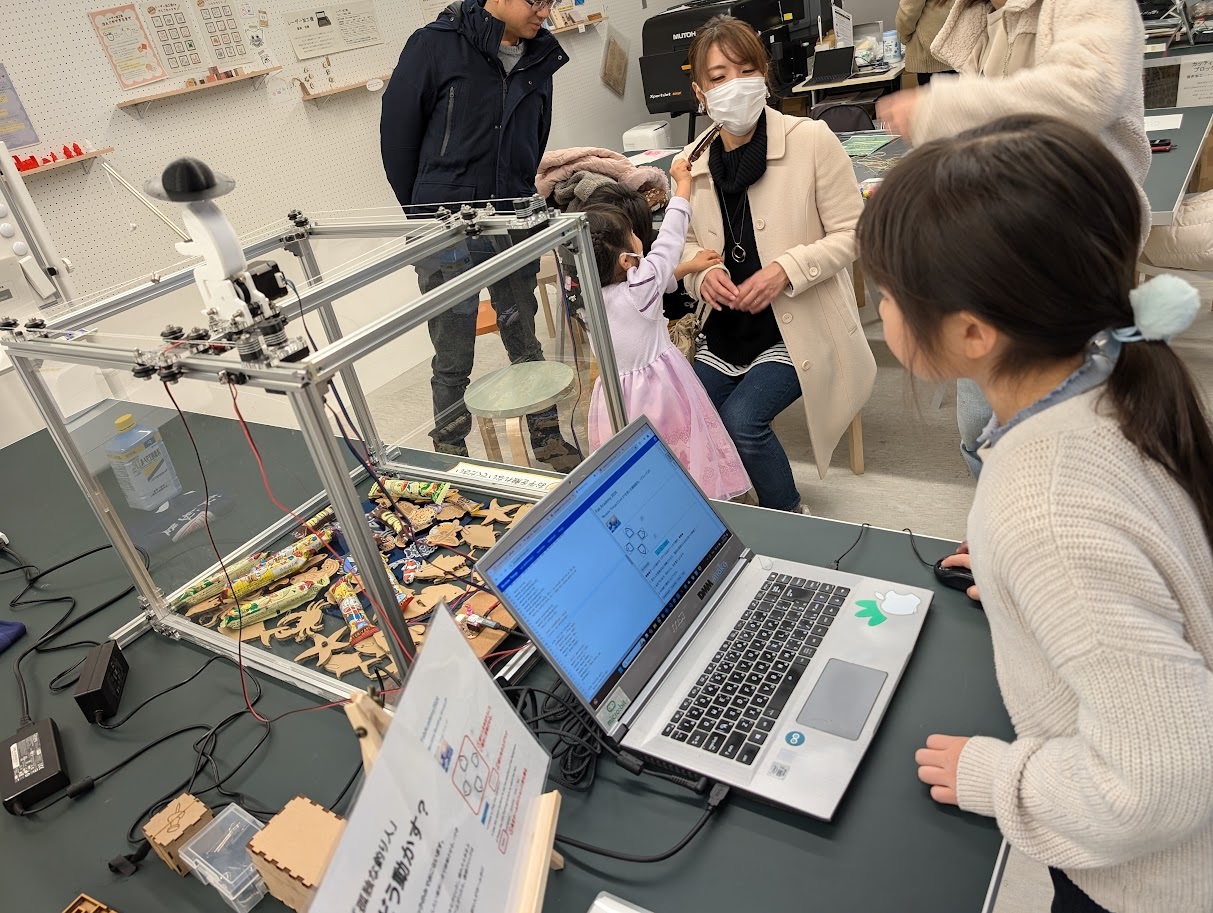
Although all the instructions on the Modular Things display were written in English, the visitors enjoyed playing the game after our little guidance. In addition to the lasercut cardboard fishes, we placed snack bars to attract kids and the youths. In two days, approximately 150 visitors enjoyed fishing.
As a matter of course, parents and the makers advised us to prepare the UI in Japanese language. Also, some pointed out that the kids in Japan are already used to tablet PCs and not familiar with the mouse operations. They suggested we should develop another interface.
Another issue we faced was that the kids tried to move the fisherman to the left or backward from the zero XY origin so that they could catch the target. We learned that we should make clear the range that the fisherman could move by placing all the fishes and snack bars within the reacheable area.
Implementation 2: Exhibition at Fab Space Hontoka
Immediately after the OMMF2024, one of our team members contacted another fab space in Ojiya City, Niigata prefecture, and got a permission to exhibit there on December 15, 2024. Fab Space Hontoka was launched in late September as part of the brand-new Ojiya City Public Library and had been making efforts to attract local kids and citizens as it loyal users. They kindly agreed to let us set up one table when they hosted a workshop for the kids to make original Chrismas stickers.
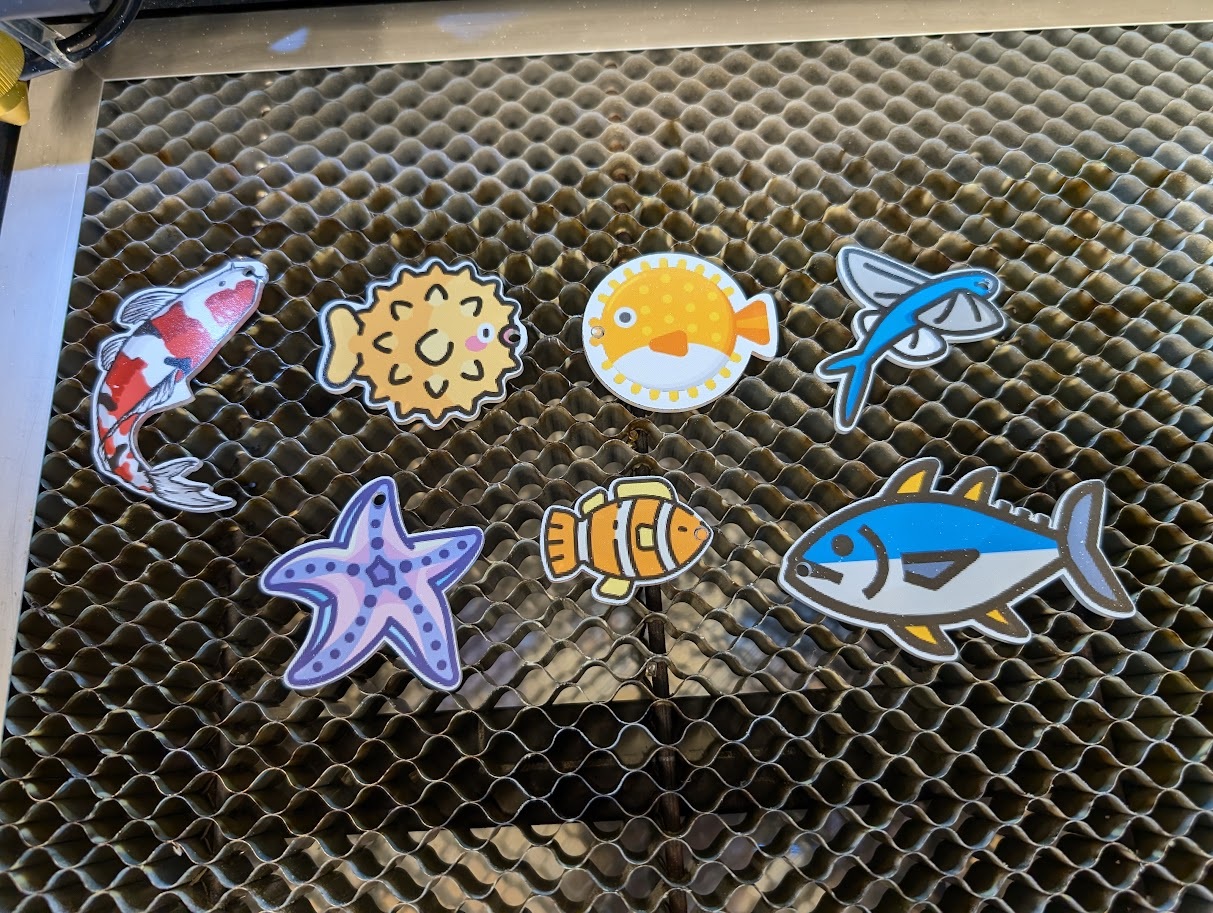
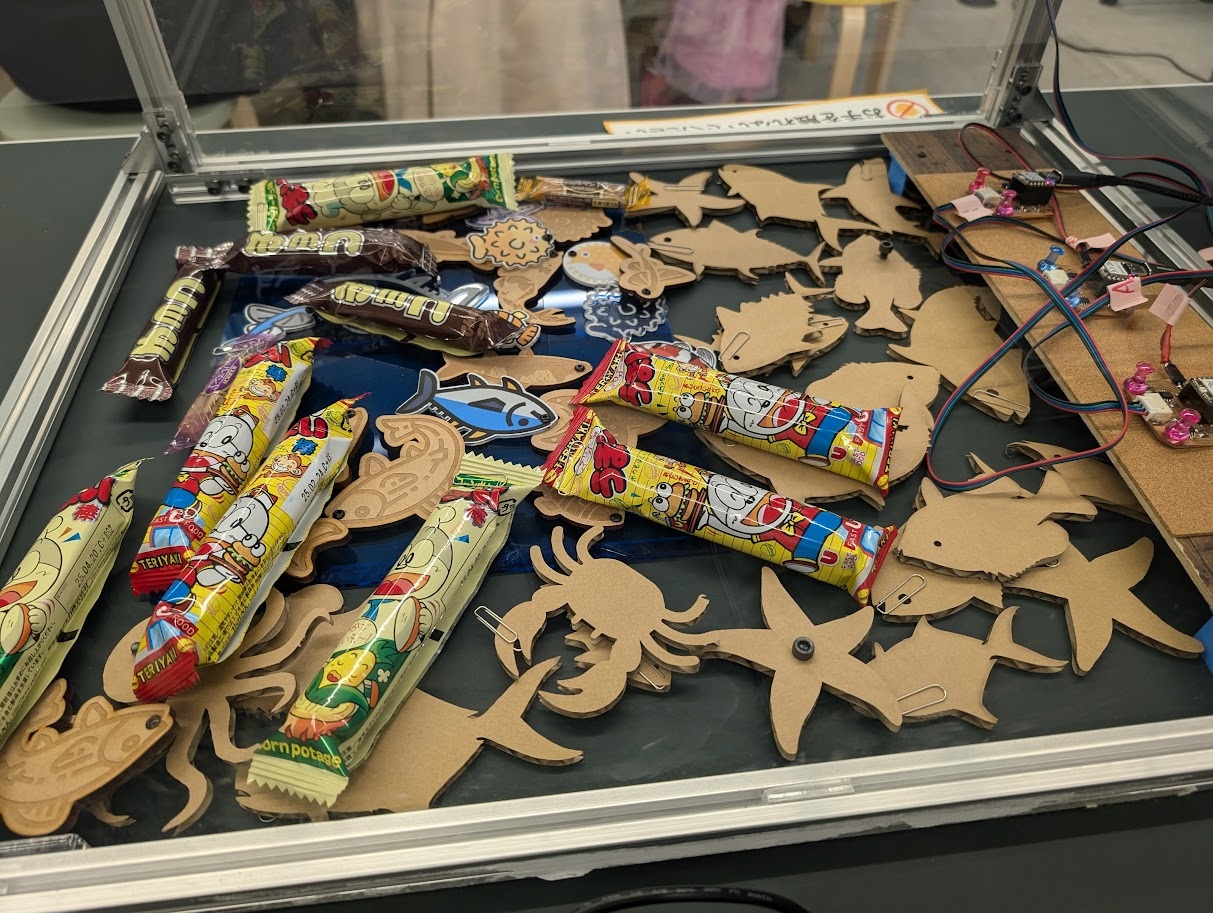
Fab Space Hontoka was equipped with a UV printer. Therefore, in order to show what could be made there, we made colored fishes with their UV printer and lasercutter.
Secondly, we made a slight revision on our control display on Modular Things so that the user could read the instruction in Japanese language.
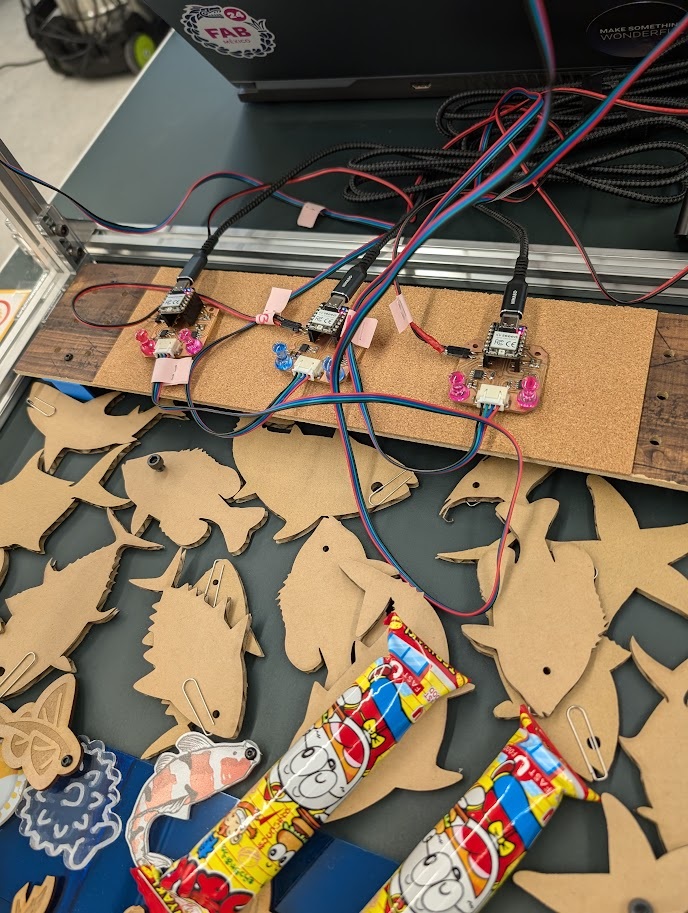
Thirdly, we prepared a table to mount the three control boards with a piece of plywood and four 3D-printed legs. With push pins, we could keep the three boards on the table with the cork sheet pasted on the top of the plywood board.
Also, in order to show the range where the players could catch fishes and snack bars, we prepared a lasercut clear blue acrylic board and tryied to place all the targets within the border.
Although there were fewer audience than OMMF2024, more than 20 kids and their family members enjoyed fishing.
It was a great opportunity for the new fab space to show what could be done with the machines equipped in the facility. However, we learned following two lessons.
-
PC Display: We placed the laptop right next to the fishing game. That helped the operators to understand the directions they should move the fisherman. However, that made it difficult for small kids to see the location of the magnet and the targets. The wide display of the laptop hid the movement of the fisherman and the rod.
-
Unnecessary Buttons: We left a few buttons in the UI which were designed when we worked on the Week10 group assignment. The adult users could read what those buttons meant and clicked them before we asked them not to. That affected the movement of the machine. It seemed necessary to delete unnecessary buttons for future use.