Week 01. Principles & Practices, Project Management
Assignments for the Week:
- Work through a git tutorial.
- Build a personal website describing you.
- Plan and sketch a potential final project.
Disclaimer: All the Assignments and Documentations are done and written by me, however after writing it myself, some I pass it through chatGPT to fix my language and grammar.
As a student, creating a timetable is the foundational step toward effective time management and academic success. The Weekly schedule can be found below:
| Day | Wednesday | Thursday | Saturday | Monday | Tuesday |
|---|---|---|---|---|---|
| Time | 9am-12pm Boston time (8pm-11pm Bhutan Time) | 10 am Bhutan Time | 10am Boston Time (9pm Bhutan Time) | 9am-10am Boston Time (8pm-9pm Bhutan Time) | 12:00 or 21:00 JST |
| Activity | Weekly Lecture with Prof. Neil | Local Review | Global Open Time | Recitation with a champion of the topic | Asia Review |
Git Overview:
Git is a distributed version control system that enables developers to track changes in their code, collaborate with others, and manage project versions effectively. Created by Linus Torvalds, Git has become the standard for source code management in software development.
Through this tutorial, I have acquired a foundational understanding of Git’s essential concepts and commands.
Key Concepts:
- Start by
git initcommand to Initializes a new Git repository. - After you make changes to your code, use the “commit” operation to save these changes.
git add .to Stages all changes in the working directory for the next commit andgit commit -m "Your commit message here"to commits the staged changes. - Use the
"git status"operation to check the current state of your working directory. - When ready, use the
git pushoperation to upload local changes to a remote repository. - The
git pullcommand is used to fetch and download content from a remote repository. - Use the
git mergeoperation to incorporate changes from one branch into another.
Setting up Git
- Download Git
- Run the Installer
- Check Your Git Version
-
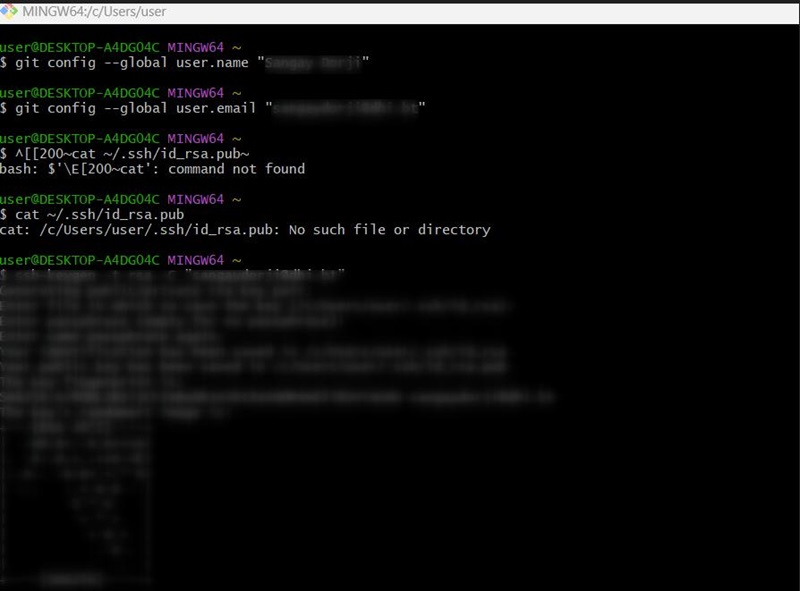
Configure the Environment: Open Git Bash and Set your username and email and also SSH-Key.
-
Type git config –-global user .name “your_username” and press enter and then type git config -–global user.email “your_email” and press enter again.
-
Check if I have any SSH-Key created. Type cat ~/.ssh/id_rsa.pub (If you see a long string starting with ssh-rsa that means that you already have a key so you can skip the next step).
-
To generate SSH-Key: Type ssh-keygen -t rsa -C “your_email”.
-
To see our public key. Type cat ~/.ssh/id_rsa.pub and that huge string is our key.
-
Copy content of id_rsa.pub and go to git and add key
Cloning from the Cloud: Bringing Your Repository to Local
-
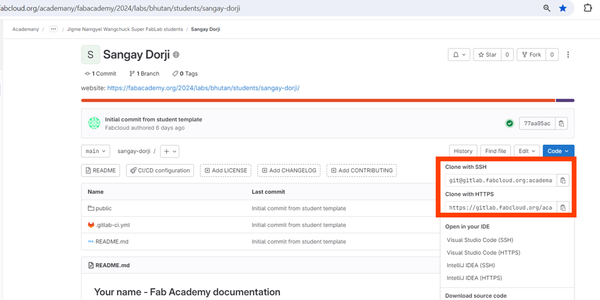
Get the Repository URL:go to cloud repository (GitLab) and find the “Clone” or “Code” button, and copy the repository URL.
-
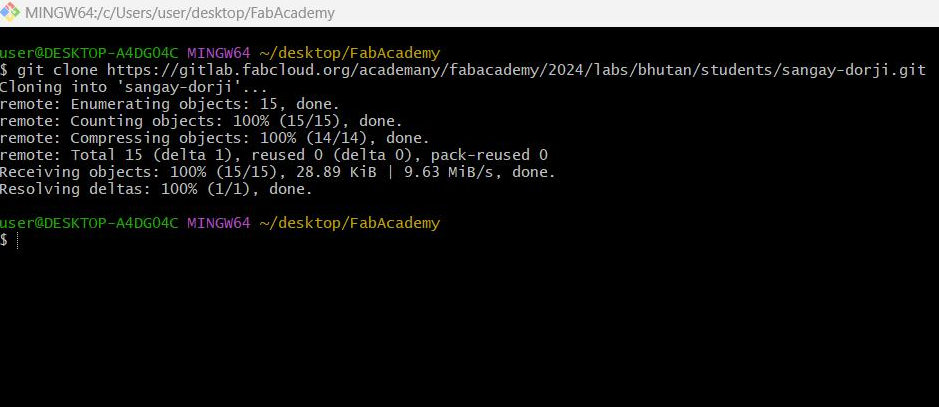
Open Git Bash or Terminal and navigate to Your Desired Local Directory
-
Use the cd command to navigate to the directory where you want to store the cloned repository.
-
Clone the Repository: Use the git clone command followed by the repository URL.
Website Building
Markdown
For website building, we were all given a html template for this cycle. since I am more comfortable using markdown over html. I downloaded the fab template from Julian’s Student template MKdocs Repo and recreated my entire website.
I cleared out all the old html and .yml files and replaced them with new ones from the template. This included adding the requirments.txt, mkdocs.yml .gitlab-ci.ymlfor the website.
Recreating Website with Julian’s Markdown Template
Steps:
-
Delete Public HTML Folder
-
Update CI Configuration (ci.yml):
- Open the
ci.ymlfile from MkDocs template. - Copy its content.
- Replace the content of the existing
ci.yml.
- Open the
-
Update Requirements.txt:
- Open the
requirements.txtfile from MkDocs template and - Copy its content.
- Paste the copied content into your existing
requirements.txtfile.
- Open the
-
Update MkDocs Configuration (mkdocs.yml):
- Open the
mkdocs.ymlfile from your MkDocs template. - Copy its content.
- Paste the copied content into your
mkdocs.ymlfile. - Verify and update the site URL if needed.
- Open the
-
Create docs Folder: In your project’s root directory, create a new folder named
docs.- Inside the newly created docs folder, create a file named
index.mdand copy content from the template.
- Inside the newly created docs folder, create a file named
-
Review and Test: Test the website locally to ensure everything is working as expected.
-
Commit and Push: Once satisfied with the changes, commit the updated files and push the changes to your repository. 🤞 for a bug-free journey!
Note: Always have a backup of your existing website before making major changes.
Understanding What is Markdown
Markdown is a markup language that uses plain text formatting syntax that allows to write using an easy-to-read, easy-to-write plain text format which is converted into HTML.
Here are some basic examples of Markdown syntax:
# This is a Heading 1
## This is a Heading 2
### This is a Heading 3
- Unordered Item 1
- Unordered Item 2
1. Ordered Item 1
2. Ordered Item 2
[Link Text](http://example.com)
*italic* or _italic_
**bold** or __bold__

To learn more about Markdown, following are the lists that I went through.
Creating Markdown Documents
-
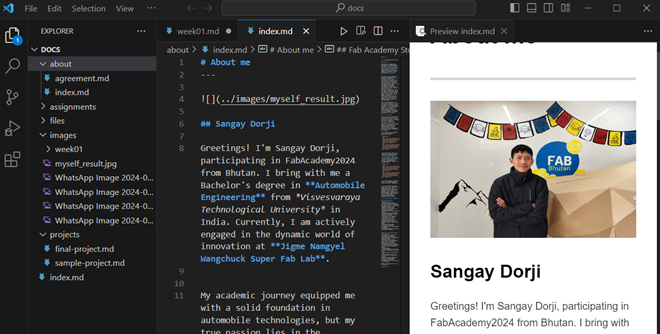
Create a new directory somewhere on your computer. Then create a new file into it with the extension
.md. -
I am calling the file index.md because usually it is the first file your web browser is looking for when you open a website.
-
By using your text editor, add the content to the
index.mdfile and save it. I am using Visual Studio Code to edit files.
Understanding What is HTML
HTML is a markup language initiated by Tim Berners-Lee. The initial purpose of HTML was to improve the way documents would be shared between CERN scientists.
HTML document is a plain text file, usually with an extension .html. In order to edit a HTML document you will need a text editor such as one of the following.
A Simple HTML Document example:
<!DOCTYPE html>
<html>
<head>
<title>Page Title</title>
</head>
<body>
<h1>My First Heading</h1>
<p>My first paragraph.</p>
</body>
</html>
Some basic HTML tags along with their explanations:
<!DOCTYPE html>: Defines the document type and version of HTML being used. It should be the very first line in an HTML document.<html>: The root element ofHTML page. It wraps all the content on the page.<head>: Contains meta-information about the HTML document, such as title, character set, and linked stylesheets.<title>: Sets the title of the HTML document, which is displayed on the browser tab.<body>: Contains the content of the HTML document, such as text, images, links, etc.<h1> to <h6>: Heading tags.<h1>is the largest and<h6>is the smallest. They are used to define headings and subheadings.<p>: Defines a paragraph.<a>: Defines a hyperlink. It’s used to create links to other web pages or resources.<img>: Embeds an image in the HTML document.<ul> and <ol>:<ul>is an unordered list (bulleted list), and<ol>is an ordered list (numbered list). They contain list items defined by<li>.<li>: Defines a list item within<ul>(unordered list) or<ol>(ordered list).<br>: Represents a line break. It’s used to break the current line and start a new line.<hr>: Represents a horizontal rule, creating a visible break or division between content<strong> and <em>:<strong>is used to indicate strong importance or emphasis (typically displayed as bold), and<em>is used for emphasized text (typically displayed as italic).<div>: Defines a division or a section in an HTML document. It is often used to group and style content.
VS Code-My Source-code editor
Visual Studio Code (VS Code) is source code editor developed by Microsoft. As recommended by my instructor Thinley, I am using VS Code to edit files and push to cloud Repo.
VS Code Workflow:
- First needs to start by opening the entire project folder in Visual Studio Code.
- Open and make changes to the specific file you want to edit.
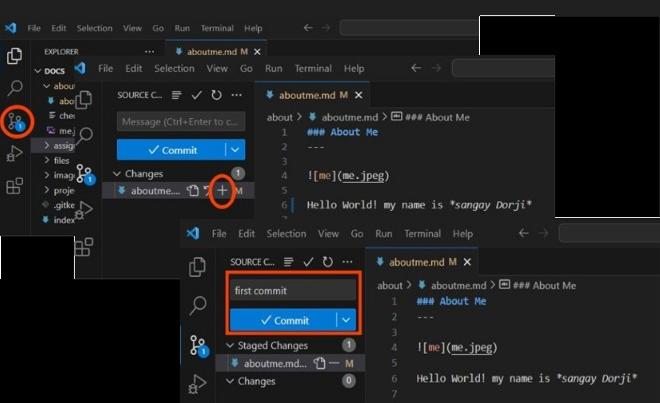
- VS Code will notify pending changes in the source control system, indicating that you’ve modified files.
- To prepare your changes for committing, click the “+” icon next to the modified file.
- Enter message about your changes, then, click the commit button.
- And finally, to update your cloud repository, sync your changes by selecting the “Sync” option. This action pushes your committed changes to the cloud.
Final Project Idea
VisionTouch DoorWatch
“VisionTouch DoorWatch” is my final project idea that blends the concepts of vision, touchless interaction, and surveillance for a doorbell system.

My proposed project involves implementing a system where sensors detect individuals near a door, blynk App should receive notifiaction alert and at the same time an ESP32 camera module captures images and are then transmitted to a App.
While similar systems like Ring cameras are there in developed countries, where as, in Bhutan, such systems are not common. So for that, my project could provide a solution for individuals and communities looking to improve door security.
In summary, the system aims to enhance door security system by alerting users when someone is near the door, providing a visual through captured image from the mobile app.
Thank you for reading! Your time is valued