The goal to this networking and communication week is to make two sendor node communicate each other. for this purpose i want to use two esp32 MCU communicate and exhange data via wifi network protocol over esp-now data protocol.
Esp32 has built in bluetooth and wifi chip so it is easier to use builtin wifi for this week.
Here are the common communication protocols for sensor node to communicate and exchange data
| Protocol | Speed | Range | Working Principle | Online Reference |
|---|---|---|---|---|
| I2C | 100 Kbps - 3.4 Mbps | Up to a few meters | A two-wire interface that uses a clock and a data line to exchange data between microcontrollers. Devices are identified by unique addresses, and data can be transferred in either direction. | https://en.wikipedia.org/wiki/I%C2%B2C |
| SPI | Up to 10 Mbps | Up to several meters | A four-wire interface that uses a master-slave architecture. The master generates a clock signal and selects which slave device to communicate with. Data is exchanged using a full-duplex synchronous serial communication. | https://en.wikipedia.org/wiki/Serial_Peripheral_Interface |
| UART | Up to several Mbps | Up to several kilometers | A serial communication protocol that uses two data lines to exchange data between devices. One line is used for transmitting data, and the other for receiving. Data is sent in bytes, and a start and stop bit are used to delimit each byte. | https://en.wikipedia.org/wiki/Universal_asynchronous_receiver-transmitter |
| CAN | Up to 1 Mbps | Up to several kilometers | A serial communication protocol commonly used in automotive and industrial applications. It uses a differential two-wire interface and supports multiple nodes connected to the same bus. Each node can both send and receive messages, and message priority is determined by the identifier. | https://en.wikipedia.org/wiki/CAN_bus |
| USB | Up to 5 Gbps | Up to 5 meters | A standard for communication between devices that was developed primarily for connecting computers to peripherals. It uses a host-device architecture and supports a wide range of data transfer modes, including bulk, interrupt, and isochronous. | https://en.wikipedia.org/wiki/USB |
| Ethernet | Up to 10 Gbps | Up to 100 meters | A widely used standard for wired networking that uses a physical layer based on twisted-pair cables. It supports a range of data transfer modes and network topologies, including point-to-point and broadcast. | https://www.networkworld.com/article/3657734/what-is-ethernet.html |
| WiFi | Up to 10 Gbps | Up to 100 meters | A wireless networking standard that uses radio waves to exchange data between devices. It uses a range of frequency bands and modulation schemes to achieve high data rates over relatively short distances. | wifi.org |
| Bluetooth | Up to 24 Mbps | Up to 100 meters | A wireless communication protocol that uses short-range radio waves to exchange data between devices. It supports multiple data transfer modes and profiles, including audio streaming and file transfer. | https://en.wikipedia.org/wiki/Bluetooth |
| ESP-NOW | Up to 2.4 Mbps | Up to 1 km | A protocol developed by Espressif Systems for low-power, low-latency communication between ESP8266 and ESP32 devices. It uses a simple peer-to-peer architecture and supports data encryption and integrity checking. | https://docs.espressif.com/projects/esp-idf/en/latest/esp32/api-reference/network/esp_now.html |
My objective is two make two sensor node with esp32. the communication is through wifi. one sensor node is working as sender and other one as a receiver over esp-now protocol .
ESP-NOW is a proprietary communication protocol developed by Espressif, the company that manufactures the ESP8266 and ESP32 microcontrollers. It allows for communication between two or more ESP devices without the need for a Wi-Fi network. This protocol operates on the 2.4GHz frequency and uses the same radio as Wi-Fi, but it has a different protocol stack that makes it more efficient for communication over short distances. ESP-NOW has a low latency and can support both unicast and multicast communication, making it ideal for applications that require real-time data transmission, such as home automation, industrial control systems, and remote sensors.
ESP-NOW uses a simple and lightweight message format that consists of a header and a payload. The header includes the sender and receiver MAC addresses and a message type field, while the payload can be up to 250 bytes. The protocol uses a one-to-many communication model, where a sender can broadcast a message to multiple receivers in a single transmission. ESP-NOW also provides strong security features, including message encryption and authentication, to protect against unauthorized access and tampering. Overall, ESP-NOW is a reliable and easy-to-use protocol for building low-power, wireless networks with ESP devices.
The ESP32 is a powerful microcontroller that has built-in WiFi capabilities, which makes it an excellent choice for IoT projects that require wireless connectivity. In client-server mode, one ESP32 board acts as a server and the other as a client. The server ESP32 creates a wireless network and waits for incoming connections from the client.
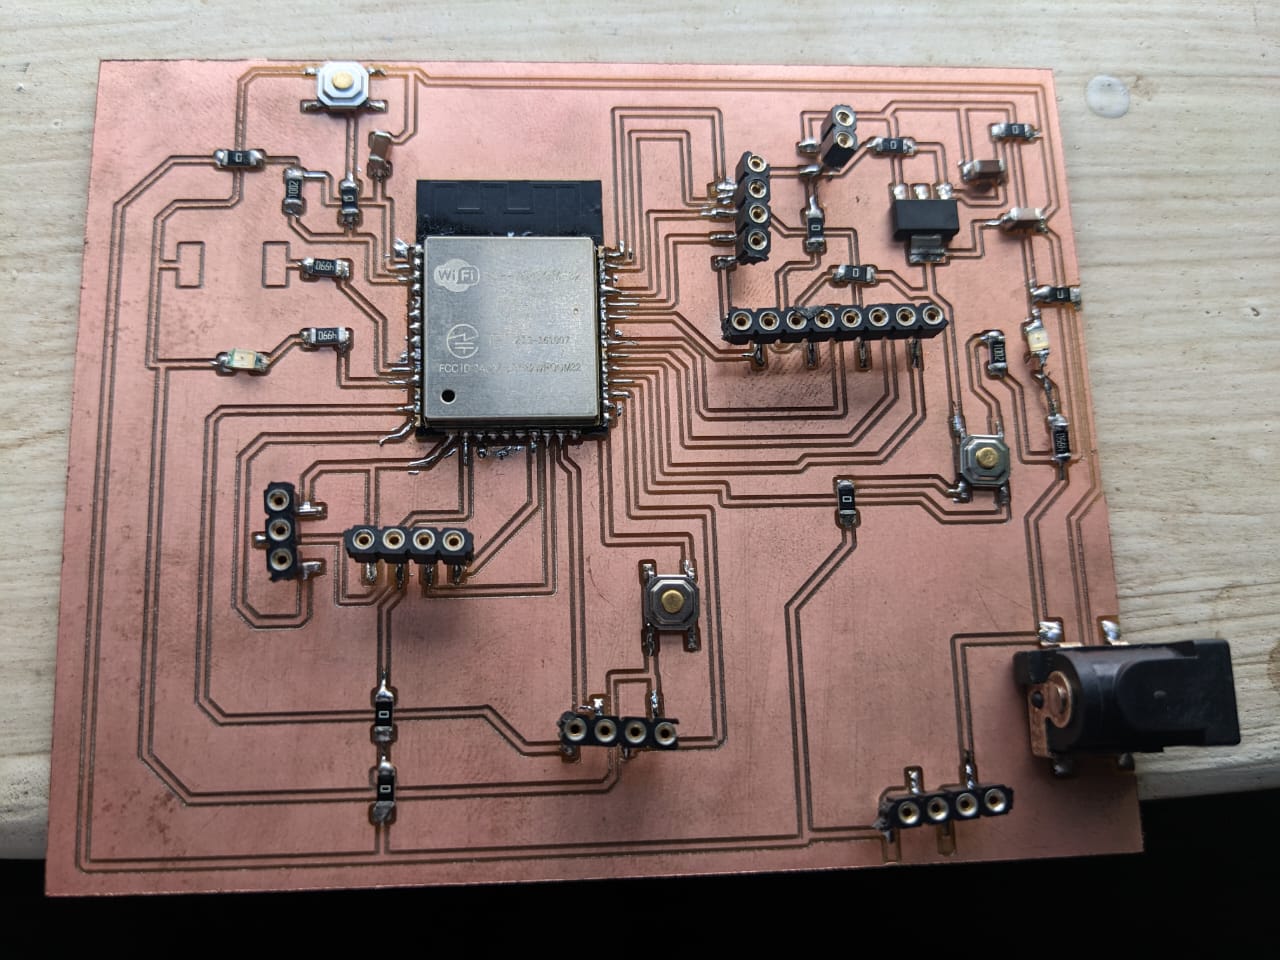
I have already designed the board with ESP-WROM-32 in the week of output devices and it is what i am going to use in this week as server and i use a custom esp32 devkit v1 as client for this assignment
In the working principle of ESP-NOW, one device acts as a sender and the other as a receiver. The sender encrypts the data and sends it to the receiver, which then decrypts it and performs the desired action. ESP-NOW uses a handshake mechanism to ensure that both devices have agreed on the encryption and decryption keys before exchanging any data. The protocol provides reliable and secure communication with minimal latency, making it ideal for use in applications such as wireless sensor networks and home automation systems.

As you can view in the picture above, one ESP32 board act as the sender and the other board receives the data and hence acts as the receiver. Uses: Sending sensor data, controlling ESP outputs including LEDs, relays, buzzers, etc.
Firstly i have connected the mlx90614 sensor to the esp-32 pcb i designed here called a sender and be able to read the temperature successfully and be ready to send the temperature to another esp32 baord
        To send data to the reciever , you have to check the receiver mac address in . copy and paste the following
          code in arduino IDE and upload in ESP32 and open the serial monitor and the MAC ADDRESS Will be dipslayed on serial monitror
          and then paste that mac adress in the Transmitter code


            #include "WiFi.h"

          void setup(){
          Serial.begin(115200);
          WiFi.mode(WIFI_MODE_STA);
          Serial.println(WiFi.macAddress());
        }

        void loop(){

        }


        Afte getting receiver mac adress, uplaod the following code in sender esp32 to send mlx90614 temperature to the
          receiver board.

        The Transmitter code


              #include < esp_now.h >
              #include < WiFi.h >
              #include < Adafruit_MLX90614.h >

              // replace with your receiver MAC address
              uint8_t receiver_mac[] = {0x7C, 0x9E, 0xBD, 0x49, 0x4E, 0x28};

              // create an instance of the MLX90614 sensor
              Adafruit_MLX90614 mlx = Adafruit_MLX90614();

              void setup() {
                Serial.begin(115200);

                // initialize WiFi and ESP-NOW
                WiFi.mode(WIFI_STA);
                if (esp_now_init() != ESP_OK) {
                  Serial.println("ESP-NOW initialization failed");
                  return;
                }

                // add the receiver MAC address
                esp_now_peer_info_t peerInfo;
                memcpy(peerInfo.peer_addr, receiver_mac, 6);
                peerInfo.channel = 0;
                peerInfo.encrypt = false;
                if (esp_now_add_peer(&peerInfo) != ESP_OK) {
                  Serial.println("Failed to add peer");
                  return;
                }

                // initialize the MLX90614 sensor
                mlx.begin();
              }

              void loop() {
                // read the temperature from the sensor
                float temp = mlx.readObjectTempC();

                // send the temperature data to the receiver
                if (esp_now_send(receiver_mac, (uint8_t *)&temp, sizeof(temp)) != ESP_OK) {
                  Serial.println("Failed to send data");
                }
                Serial.print("Temperature data sent successfully.");
                Serial.print("  Temperature sent:");
                Serial.print(temp);
                Serial.println(" C");
                delay(2000);
              }


        the receiver code
        you have also to include the sender mac adress and you have to use the code provided above


            #include < esp_now.h >
            #include < WiFi.h >

              // replace with your sender MAC address
              uint8_t sender_mac[] = {0x94, 0xE6, 0x86, 0x05, 0x0D, 0x9C};

              // callback function for ESP-NOW messages
              void OnDataReceived(const uint8_t *mac_addr, const uint8_t *data, int len) {
                // check if the data came from the expected sender
                if (memcmp(mac_addr, sender_mac, 6) == 0) {
                  // convert the data buffer to a temperature value
                  float temp;
                  memcpy(&temp, data, sizeof(temp));

                  // print the temperature on the serial monitor
                  Serial.print("Received temperature: ");
                  Serial.print(temp);
                  Serial.println(" C");
                }
              }

              void setup() {
                Serial.begin(115200);

                // initialize WiFi and ESP-NOW
                WiFi.mode(WIFI_STA);
                if (esp_now_init() != ESP_OK) {
                  Serial.println("ESP-NOW initialization failed");
                  return;
                }

                // register the callback function for ESP-NOW messages
                esp_now_register_recv_cb(OnDataReceived);

                // add the sender MAC address
                esp_now_peer_info_t peerInfo;
                memcpy(peerInfo.peer_addr, sender_mac, 6);
                peerInfo.channel = 0;
                peerInfo.encrypt = false;
                if (esp_now_add_peer(&peerInfo) != ESP_OK) {
                  Serial.println("Failed to add peer");
                  return;
                }
              }

              void loop() {
                // nothing to do here
              }


        Output

        This the output on the transmitter side when transmitting the data


          Result on arduino serial monitor for successfully transmission


        the receiver is one meter away on the other pc and it is successfully receiving the
          transmitted data.


          Receiver board

        Received Data


          Received data
This video shows all details of the working scenario
the ESP-NOWDocumentation says that the range is about 200 meters in open space but the range can vary according to the area , walls and other obstacles can reduce the range
in my test , i never tested in open space but the device was able to send in 7 meters within the house with walls