WEEK 13
NETWORKING AND COMMUNICATION
Group assignment
-
Send a message between two projects
-
Document your work to the group work page and reflect on your individual page what you learned
link to our group assignment
Individual assignment
- design, build, and connect wired or wireless node(s) with network or bus addresses
Learning outcomes
-
Demonstrate workflows used in network design
-
Implement and interpret networking protocols and/or communication protocols
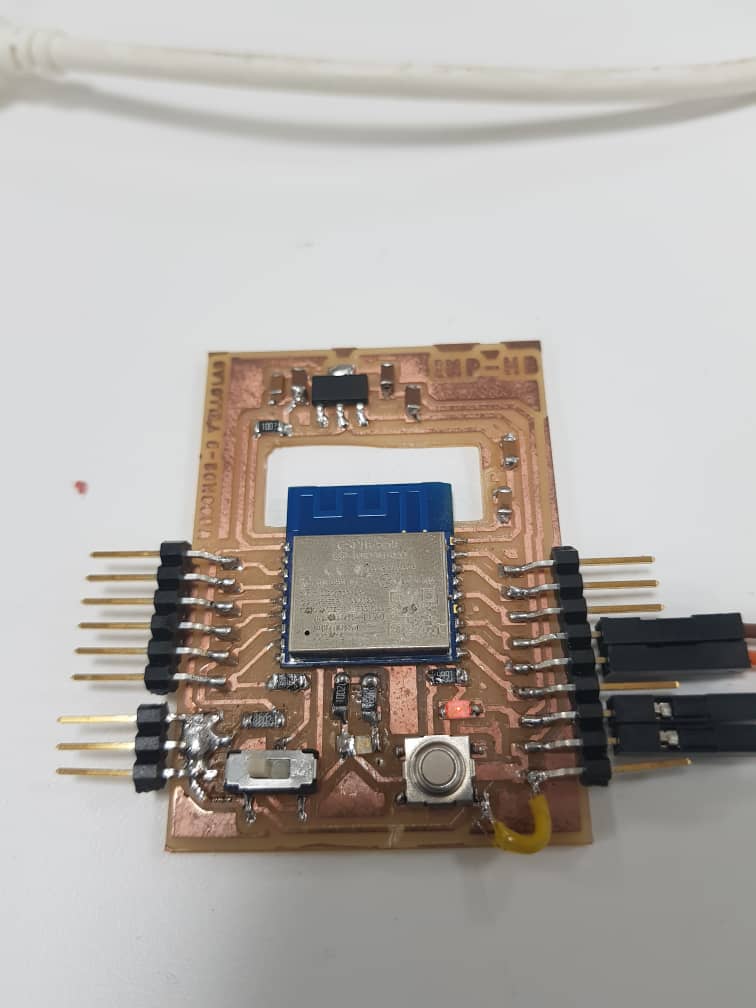
For this week I established communication between two boards we made in our lab and this work can covered the group work. My friend Williams helps me to do this assignment because I needed help to make communicate the two boards.
useful link here to know more about wi-fi.
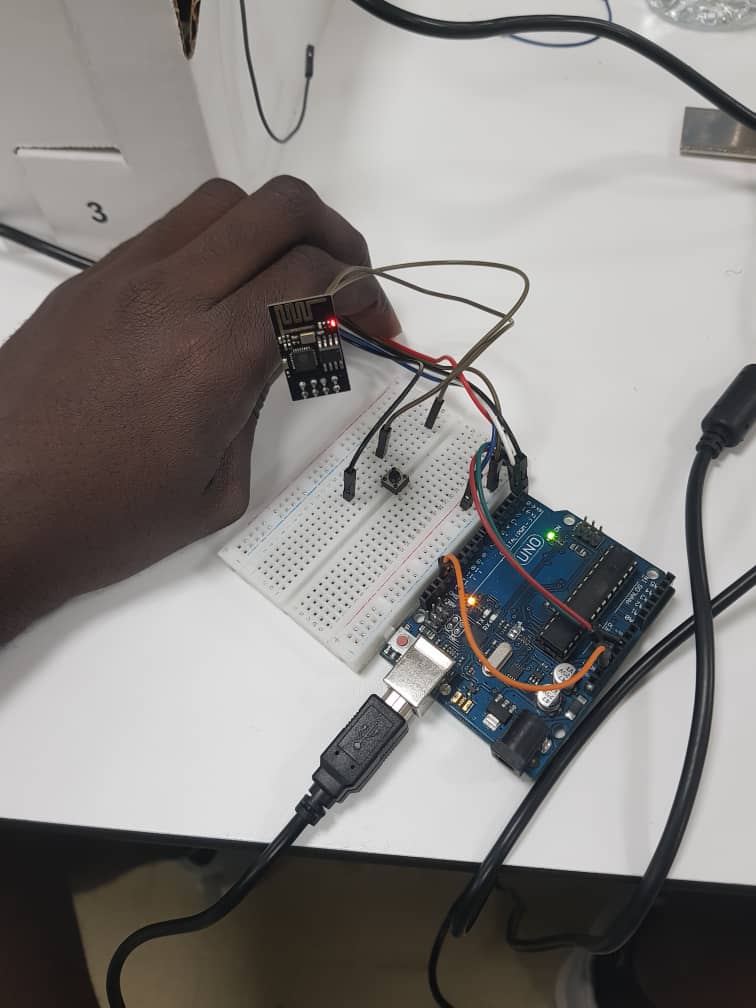
After we must upload the code for the receiver
At the begining I tried to make communicate my esp-board I call stimy, and the board made by my friends Amany which is based on Xiao esp32C3 chip but I didn’t be able to establish communication. The protocol we used is TCP protocol via WiFi connection and we found documentation at this link.
Even though This experience doesn’t work I got at the link page some interresting infrmations those help me to conitnue my work until complete it. So what I found so useful at this link ?
** Communication between two esp via Ethernet/WiFi **
-
Two Esp in the same LAN network can communicate without needing of internet connection.
-
Two Esp in the different LAN networks need internet connection to communicate together
There are two ways that two ESP32 communicate to each other.
-
Direct communication
-
Self-defined protocol over raw TCP (directly)
- Modbus TCP (directly)
- HTTP (directly)
- Telnet (directly)
-
SSH (directly)
-
Indirect communication
-
MQTT (indirectly via a server)
So from these informations I decide to try WiFi communication using different protocols until I succes to establish communication between the two usb.
Consequently, I opted for the HTTP protocol, and during my research, I came across a project that demonstrated successful results. I decided to leverage this existing project and carefully examined the code, making necessary modifications to understand its functionality. You can find the project at this link.
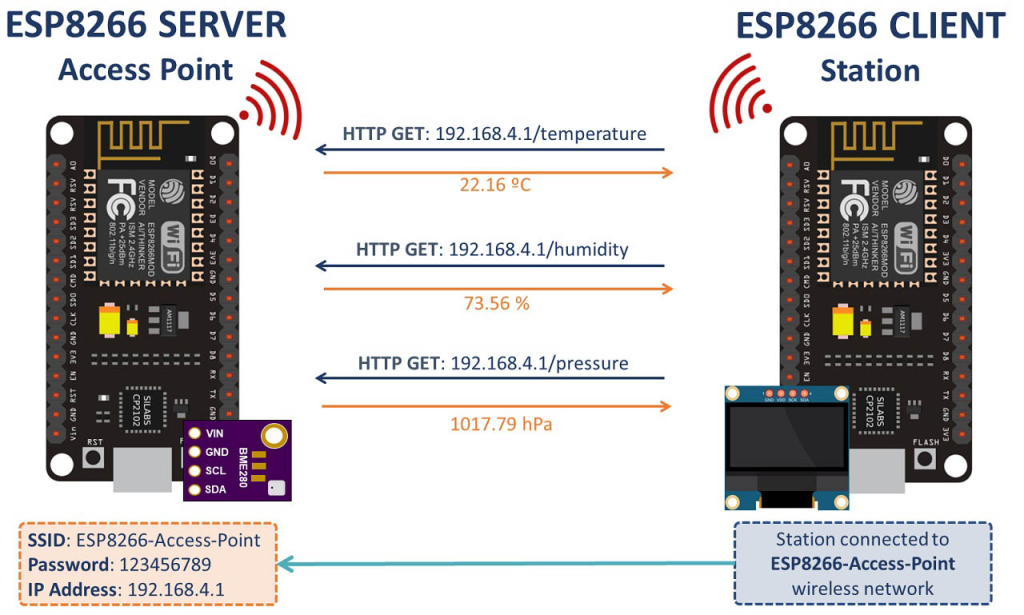
The communication principle
The communication is based on Wi-Fi connectivity we configure one of our esp as acces point and the other as station.
Important
When Acces point is created that allow WiFi devices to be connect to a Wi-Fi network what enable us to make communicate many esp to each over.
Here, communication is achieved through HTTP requests. This process involves sending a URL to the server (access point) located at its IP address. Once the server receives this request, it responds by sending the designated message that we want to transmit.
As you can see at the picture above found at the same link provided for the code I used, the way of communication is perfectly illustrated.
Programing
In the programing I reused code of this web page.
I modified the server code by remove all parts about the sensor and all other component I did’nt used. the code obtained is following
// Import required libraries
#include <ESP8266WiFi.h>
#include "ESPAsyncWebServer.h"


// Set your access point network credentials
const char* ssid = "moulo-esp";
const char* password = "123456789";


// Create AsyncWebServer object on port 80
AsyncWebServer server(80);


String sendmesage(){
  return String("I'm communicating with my esp board from an esp01 via http protocol");
}

void setup(){
  // Serial port for debugging purposes
  Serial.begin(115200);
  Serial.println();

  // Setting the ESP as an access point
  Serial.print("Setting AP (Access Point)…");
  // Remove the password parameter, if you want the AP (Access Point) to be open
  WiFi.softAP(ssid, password);

  IPAddress IP = WiFi.softAPIP();
  Serial.print("AP IP address: ");
  Serial.println(IP);

  server.on("/sensorstate", HTTP_GET, [](AsyncWebServerRequest *request){
    request->send_P(200, "text/plain", sendmessage().c_str());
  });


  // Start server
  server.begin();
}

void loop(){

}
Explain server code
// Import required libraries
#include <ESP8266WiFi.h>
#include "ESPAsyncWebServer.h"


// Set your access point network credentials
const char* ssid = "moulo-esp";
const char* password = "123456789";


// Create AsyncWebServer object on port 80
AsyncWebServer server(80);


String sendmesage(){
  return String("I'm communicating with my esp board from an esp01 via http protocol");
}
First part of the code is to include different libraries, set all the settings of our acces point : its ssid and the password, the port. that’s all!
We also defined a function sendmessage that contain the message we want to send.
In the setup part we initialize the serial port and start the wifi mode of the ESP as access point:
WiFi.softAP(ssid, password);

  IPAddress IP = WiFi.softAPIP();
  Serial.print("AP IP address: ");
  Serial.println(IP);
Then we open the server for http communication where the url can be opened. when the url is opened we send our message contained in our function sendmessage
server.on("/sensorstate", HTTP_GET, [](AsyncWebServerRequest *request){
    request->send_P(200, "text/plain", sendmessage().c_str());
  });


  // Start server
  server.begin();
Then we proceed to the client code :
#include <ESP8266WiFi.h>
#include <ESP8266HTTPClient.h>
#include <WiFiClient.h>

#include <ESP8266WiFiMulti.h>
ESP8266WiFiMulti WiFiMulti;

const char* ssid = "moulo-esp";
const char* password = "123456789";

//Your IP address or domain name with URL path
const char* serverName = "http://192.168.4.1/sensorstate";

String message;

unsigned long previousMillis = 0;
const long interval = 5000;

void setup() {
  Serial.begin(115200);
  Serial.println();

  Serial.print("Connecting to ");
  Serial.println(ssid);
  WiFi.begin(ssid, password);
  while (WiFi.status() != WL_CONNECTED) {
    delay(500);
    Serial.print(".");
  }
  Serial.println("");
  Serial.println("Connected to WiFi");
}

void loop() {
  unsigned long currentMillis = millis();

  if(currentMillis - previousMillis >= interval) {
     // Check WiFi connection status
    if ((WiFiMulti.run() == WL_CONNECTED)) {
      message = httpGETRequest(serverName);
      Serial.println("Message : " + message);

      // save the last HTTP GET Request
      previousMillis = currentMillis;
    }
    else {
      Serial.println("WiFi Disconnected");
    }
  }
}

String httpGETRequest(const char* serverName) {

  HTTPClient http;

  http.begin(serverName);

  // Send HTTP POST request
  int httpResponseCode = http.GET();

  String payload = "--";

  if (httpResponseCode>0) {
    Serial.print("HTTP Response code: ");
    Serial.println(httpResponseCode);
    payload = http.getString();
  }
  else {
    Serial.print("Error code: ");
    Serial.println(httpResponseCode);
  }
  // Free resources
  http.end();

  return payload;
}
Explain client code
The main parts of the client code are :
//Your IP address or domain name with URL path
const char* serverName = "http://192.168.4.1/sensorstate";
Here we defined variable which contains the url for request. I wrote sensorstate because I will continue this work for my final project where I want to do an automatic scoring for my scoreboard display
then We have the setup() function
WiFi.begin(ssid, password);
  while (WiFi.status() != WL_CONNECTED) {
    delay(500);
    Serial.print(".");
  }
  Serial.println("");
  Serial.println("Connected to WiFi");
We have started the Wi-Fi connection and we print on the serial monitor if the wifi is connected that the connection is succed.
Now we have the loop() function
void loop() {
  unsigned long currentMillis = millis();

  if(currentMillis - previousMillis >= interval) {
     // Check WiFi connection status
    if ((WiFiMulti.run() == WL_CONNECTED)) {
      message = httpGETRequest(serverName);
      Serial.println("Message : " + message);

      // save the last HTTP GET Request
      previousMillis = currentMillis;
    }
    else {
      Serial.println("WiFi Disconnected");
    }
  }
}
The request is refreshed each 5 seconds via this instruction :
if(currentMillis - previousMillis >= interval) {
     // Check WiFi connection status
    if ((WiFiMulti.run() == WL_CONNECTED)) {
      message = httpGETRequest(serverName);
      Serial.println("Message : " + message);

      // save the last HTTP GET Request
      previousMillis = currentMillis;
    }
    else {
      Serial.println("WiFi Disconnected");
    }
We can notice in the loop() the httpGETRequest(serverName) that is function containing a parameter.
This function is written at the end of the code and contain the instruction to make our request via the url contain in the serverName variable.
We define our http client then we start the http communication with the url :
HTTPClient http;

  http.begin(serverName);
We sent our request
// Send HTTP POST request
  int httpResponseCode = http.GET();

  String payload = "--";

  if (httpResponseCode>0) {
    Serial.print("HTTP Response code: ");
    Serial.println(httpResponseCode);
    payload = http.getString();
  }
  else {
    Serial.print("Error code: ");
    Serial.println(httpResponseCode);
  }
And we store the message received in the String payload that we return from the function httpGETRequest(serverName) then it is displayed on the Serial monitor.
Result
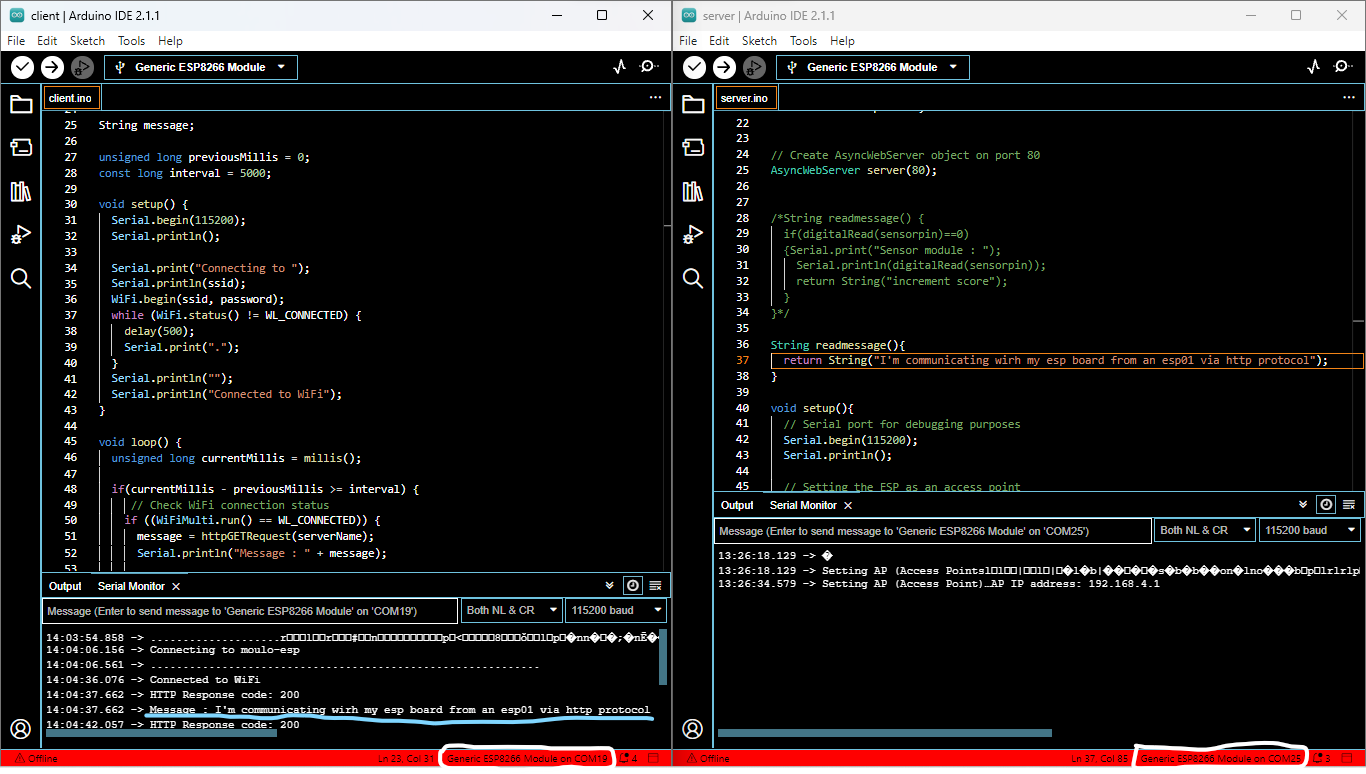
On the Image above I highlighted in white the different port use for each window to demonstrate the effective communication
Then we can notice on one side corresponding to server(ESP01) code at the right, that the IP address is printed in the Serial monitor.
Then on the other side at the left corresponding to the client(stimy board) it’s printed in the Serial monitor I’m communicating wirh my esp board from an esp01 via http protocol With a slighting error 😑 wirh in my message.
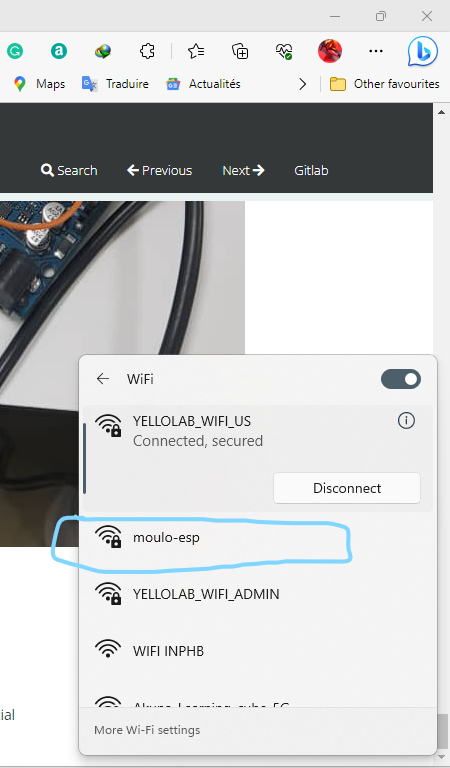
Also as you can see below my wifi I created appear i the list of available wifi on my laptop
Hero shot