2. Project management
Our Homework this week
This week’s assignment is to:
- Build a personal site describing you and your final project.  - Upload it to the class archive.
- Work through a git tutorial.
- Upload it to the class archive.
- Work through a git tutorial.
Learning Outomces Include:
- Explore and use website development tool(s)
- Identify and utilise version control protocol(s)
Have You Answered these Questions?
- Made a website and described how you did it
- Created a section about yourself on that website
- Added a page with a sketch and description of your final project idea(s)
- Documented steps for creating your Git repository and adding files to it
- Pushed to the class GitLab
- Signed and uploaded Student Agreement
This week, our assignment was to begin to familiarize ourselves with git by working through a git tutorial and to build a personal site in the class archive describing ourselves and our final project. This week’s assignment also provides an opportunity to become familiar with the command line and with a variety of tools (like Image Magick) that can help facilitate our workflow, manage our content, and keep our image files to a reasonable size for web viewing.
Overview
In this assignment I cover: - Preface: a bit of background re OS compatibility issues - Prerequisites: getting set up with a package manager like Homebrew - A bit about Git, how to install it, and how to clone your repo, update it locally, and push updates to the cloud - Troubleshooting MkDocs installation - Markdown vs. HTML - Compressing your images with ImageMagick
Preface
Before I dig into the assignment itself, I will start with a cautionary tale. I am on a 2017 MacBook Pro that, until about right before Fab Academy, was running Mojave. I have always been slow to update my OS because so much seems to break with large MacOS updates. However, it seems I waited too long to update this time. I ran into several issues installing some software for the first week’s assignment. In particular, when I tried to use Homebrew to brew install mkdocs, my terminal complained to me:
Warning: A newer Command Line Tools release is available.
Update them from Software Update in System Preferences or run:
  softwareupdate --all --install --force

If that doesn't show you any updates, run:
  sudo rm -rf /Library/Developer/CommandLineTools
  sudo xcode-select --install

Alternatively, manually download them from:
  https://developer.apple.com/download/all/.
You should download the Command Line Tools for Xcode 11.3.1.
When I tried to install the command line tools, I was told that my OS was too old, that Homebrew and Apple do not support my OS, and that I should not post any issues on their issue tracker while I am running such an ancient OS.
Having been thoroughly shamed about my OS, starting on 1/23/22, I began the process of making a local backup of my computer to facilitate an upgrade to Big Sur. This took a very long time because I was starting from scratch. I have my machine backed up to the cloud but I did not want to rely on a remote backup if something had gone wrong when I updated to Big Sur.

So, I am already learning some important lessons about discipline from Fab Academy that I hope to take to heart sooner than later. I need to set up a system to ensure that I make regular local backups of my system so that I don’t have to start from scratch the next time I want to update my OS. (I should be doing this anyway so that I have a local backup should my computer unexpectedly fail.) and, whether we are talking about image compression, documenting as you go, supply-based time management, or, in this case, completing basic updates, consistent diligence will me save time and headache down the road.
The irony of this all is that in the end, as you will read further down, I had to uninstall MkDocs in order to pip install it for compatibility issues with the Materials theme. I go into more details below but I am mentioning this now just for future students: do not brew install Mkdocs.
Initial Set Up / Prerequisites
Now that I have aired my dirty laundry, let’s dig into some prerequisites. We already established that for those of us on MacOS, Mojave is apparently no longer in vogue. So, go install Catalina or Big Sur, or throw caution to the wind and install Monterey. (You won’t catch me on Monterey this year, though, that is for sure.)
Before you can dig in too deep with the first week’s assignment, you are going to need a package manager. This will help you install some of the different command line software packages you will be using (like ImageMagick) on your computer using terminal. If you haven’t used terminal before, (or if you have used it intermittently, like me) get ready for some fun times :).
For MacOS, I am using Homebrew for most things, with some important exceptions. Navigate to the Homebrew website, and copy their script to your clipboard, open terminal, paste the script, and hit return.
Or copy the same script below:
/bin/bash -c "$(curl -fsSL https://raw.githubusercontent.com/Homebrew/install/HEAD/install.sh)"
If all goes smoothly, congratulations! You have successfully installed Homebrew. If not, don’t panic (yet)! Read the print out in your terminal to figure out what is wrong. If you are stuck, copy and paste the error messages into google and you may find a solution.
The last thing you should know before you dive into the assignment are some basic terminal commands. You only need a few to get started, but the more you use terminal, the more you might start to enjoy it. I found this cheat sheet to be very comprehensive. While I have the basics down, I suspect it will take awhile to become more fluent with the broader vocabulary.
Getting set up with git
I first started looking into this assignment before our student GitHub accounts were set up and before I could clone the demo student website. Initially, I was using the Atlassian git tutorial, which I found very helpful.
The tutorial covers important background information and also provides some assistance with setting up your own test repo. I’ll summarize some key points here:
What is version control?
Basically, version control allows development teams to work on the same software concurrently from different locations. It provides tools to track what changes have been made and why, to have a complete history of a project from its initial development, and to create branches that can subsequently be merged with the main project.
Source Code Management
As far as I can tell from this description, source code management (in its best form) seems to be the implementation of version control in a team development process. While there are other ways in which teams may manage their source code, version control allows them to track all changes in an organized manner and to avoid worst-case scenarios with code breaking due to incompatible updates.
What is Git?
Git is an open source version control project developed in 2005 by Linus Torvalds. More specifically, it is an example of a Distributed Version Control System, meaning that there isn’t one primary repository – everyone working on the project has a complete repository with the history of all the changes. Git has some features that make it popular, like checking a file’s contents rather than its name for tracking purposes. And the distributed nature of the software means you can edit files offline and push them to the cloud subsequently. The tutorial also describes strengths in security and flexibility, and the broad community support it has as an open source project, all of which helps to explain its place as an industry standard. The main criticism of git they share is that it can be difficult to learn and is perhaps counterintuitive for those coming from different modes of version control.
Installing Git
This portion of the tutorial walks you through some basic steps to get yourself set up with git. Following the instructions provided, I used git –version to check what version I had running on my machine:
git --version
git version 2.34.1
I wasn’t sure if this was the most current version, so I decided to update my version using brew install git.
brew install git
Homebrew saw that I already had git installed it updated the current version (2.35.2). I admit I was confused momentarily, because I thought the tutorial I was following had an even more up-to-date version of git (2.9.2) but I soon realized that 35 is larger than 9.
Git SSH Part 1
Setting up the SSH key was arguably the most confusing part of the process, and it is something that I actually ended up having to do twice, since the first key didn’t seem to work. I first attempted creating an SSH key several months ago when I discovered I was accepted into Fab Academy. I did not yet have access to my repo but I took some notes on this initial process which I am copying below, based on this tutorial I was following back in November:
On running the terminal command below as described in the Atlassian SSH tutorial (and other variations I have tried, pointing to the location of the saved keys) I am getting the error that no such file or directory exists. I don’t fully understand what the command is supposed to do so am not sure how to solve this.
ssh-add -K /Users/aaresty/.ssh/id_rsa
After some googling, I realized I should have named my private key id_rsa. I also had moved it from where it was originally saved (I assume the .ssh folder), which is why I was getting this error. I found this stack overflow exchange helpful in sorting things out:
Git SSH Part 2
That was pretty much where I left off in November, since I did not yet have access to the Fab Academy repo. I know I could have made my own repo for testing purposes, but the end of our semester caught up with me and I did not circle back on this particular assignment until mid-January during the Fab Academy bootcamp.
Since it had been awhile since I generated my key, I had to track it down. I did so using this ssh tutorial on checking for existing keys.
Here is the relevant command to check for existing keys:
ls -al ~/.ssh
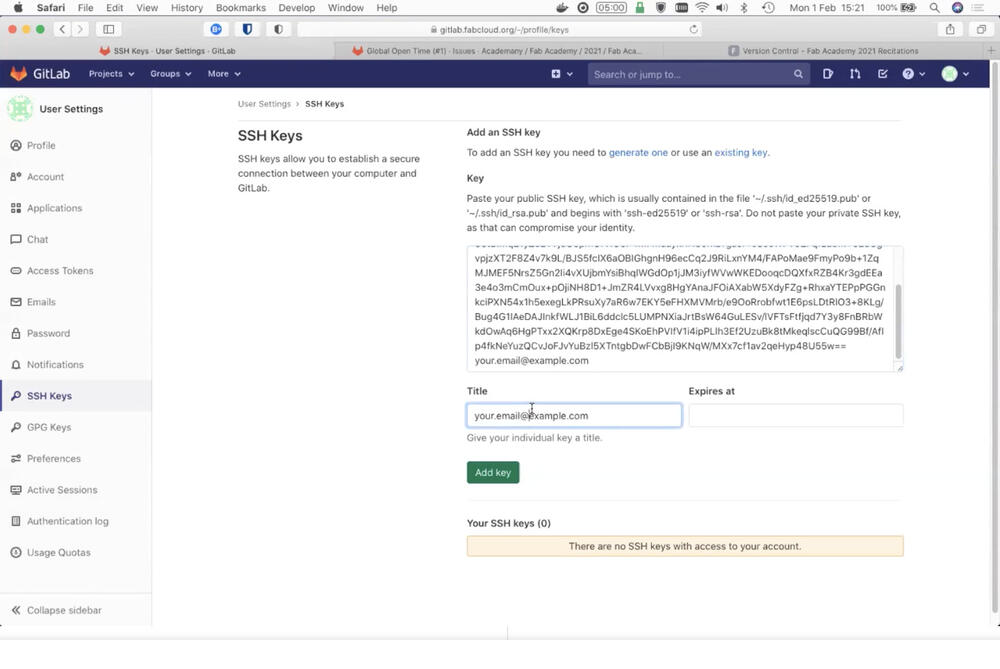
With this, I was able to confirm the existence of my previous key and followed the instructions from the 2021 version control recitation to copy and paste my public SSH key to the relevant gitlab user settings.
It all seemed to be going remarkably smoothly until I tried to clone the site and received the following error:
git clone git@gitlab.fabcloud.org:academany/fabacademy/2022/labs/lccc/students/abby-aresty.git
Cloning into 'abby-aresty'...
git@gitlab.fabcloud.org: Permission denied (publickey).
fatal: Could not read from remote repository.
I wasn’t quite sure what was wrong, but I decided to start over and generate a new key since it had been awhile and I figured that maybe I had done something wrong. This time, I followed along with two tutorials:
Side note: over my winter break, I watched all the videos from 2021 (at 2x speed), and that is how I came across Nadieh’s site in particular. Nadieh, if you are reading: your documentation and work is absolutely stunning and so helpful! Thank you!!
Anyway, to generate my new key, I went back and forth between the two tutorials above which are closely linked, and followed the steps they outline, copied below for easy access:
This time, instead of using RSA encryption, I used ed25519, which I gather is more secure. I pasted the text below into terminal:
$ ssh-keygen -t ed25519 -C "your_email@example.com"
And when prompted to enter a file, as below, hit return to accept the default location.
Enter a file in which to save the key (/Users/you/.ssh/id_algorithm):
I chose not to use a pass phrase since Julian did not in the version control recitation:
> Enter passphrase (empty for no passphrase): [Type a passphrase]
> Enter same passphrase again: [Type passphrase again]
I then followed the steps to add my SSH key to the ssh-agent.
I started the ssh agent:
$ eval "$(ssh-agent -s)"
> Agent pid 59566
And modified my config file to load my keys to the ssh agent. (I have no pass phrase so these are not added to the keychain.)
I had to create the .ssh/config file:
$ touch ~/.ssh/config
Then I updated the file contents to include:
Host *
  AddKeysToAgent yes
  IdentityFile ~/.ssh/id_ed25519
At this point I switched over to following Nadieh’s instructions and copied my public key:
$ pbcopy < ~/.ssh/id_ed25519_gitlab.pub
Edited to add: in 2023, I was struggling to get the public key set up on my new computer. I ended up asking chatgpt and it suggested:
$ cat ~/.ssh/id_ed25519.pub
This worked and I was able to find my new public key working.
Next, sign into gitlab.fabcloud.org and click on your user icon. Go to ‘edit profile’ and then look in the menu on the left for the spot to add the public SSH key. This time, thankfully, when I tried to clone my site using the git clone command in terminal I was successful! It showed up on my desktop as a folder called abby-aresty.
git clone git@gitlab.fabcloud.org:academany/fabacademy/2022/labs/lccc/students/abby-aresty.git
I then followed the steps outlined in the 2021 version control recitation to try to update my site.
-I opened the about me page in my local repo and added some new text. -I opened terminal and navigated to my repo using cd -I checked the status of my repo using git status -I checked staged the relevant files using git add -I made a note of what I was about to commit using commit -m “this is what I did” -And finally I pushed the updates!
You will note that I did not first pull changes from the site. Thus far, I have only been editing my repo locally. I do need to get in the habit of pulling changes before pushing!
Installing MKDocs: the saga that finally came to an end
Installing MkDocs has been way more complex than I could have imagined. I already described some of the OS errors I initially ran into when trying to brew install mkdocs. After a slightly rocky road to updating to Big Sur, I was finally able install MkDocs. Of course, I was at the LCCC Fab Lab when this happened and was slightly distracted and neglected to take a screen shot of the thrilling moment, so you will have to take my word for it. I thought I would be all set at this point, but as I started to work through the Fab Academy MkDocs tutorial, I discovered I needed Python and Pip. I checked the version for both:
Python --version
Pip --version
…and discovered that my Python is out of date and I do not have pip. The Fab Academy tutorial says to follow the MkDocs tutorial to install Python and Pip if you don’t have them. The relevant tutorial is located here: installation tutorial.
2023 edit: After installing Python 3 I kept getting an error that no such command was found. I asked ChatGPT why I might be getting the error and one of the suggestions was that I needed to use the command Python3 instead of just Python. It worked!
Back to the original 2022 version:
I navigated to the Python site to download and install the latest version. It uses a standard GUI-based installer.
The site suggests that if you are running a current version of Python you should have pip by default, but that does not seem to be the case for me. It has a link to download if you are installing Pip for the first time and the link goes to a page with a bunch of Python…to download it, I just right-clicked and chose ‘save as’ to save it to my downloads folder.
Then I navigated to my downloads folder in terminal and ran this code:
python get-pip.py
And got an error that this command would not work with Python 2.7. (Note: I just installed Python 3!)
What I learned from a quick google search is that it is not wise to uninstall Python 2.7 on a Mac…apparently the MacOS has some Python 2.7 dependencies? I was not completely clear about this. If you want to read the thread I followed yourself, you can find it here. But in any case, there is a simple way to use the python version of your choice for specific tasks. Just indicate the number version of the software when you use a command:
python3 get-pip.py
I ran:
mkdocs --version
…to check that everything installed properly…and, success!!
mkdocs --version
mkdocs, version 1.2.3 from /usr/local/Cellar/mkdocs/1.2.3/libexec/lib/python3.10/site-packages/mkdocs (Python 3.10)
Due to the OS issues I was having, this process by itself took basically a week. Thankfully I started early. At this point I did a happy dance because I thought I was all set up with MkDocs. However, I discovered this was not the case when I tried to edit my site.
Editing Your Site
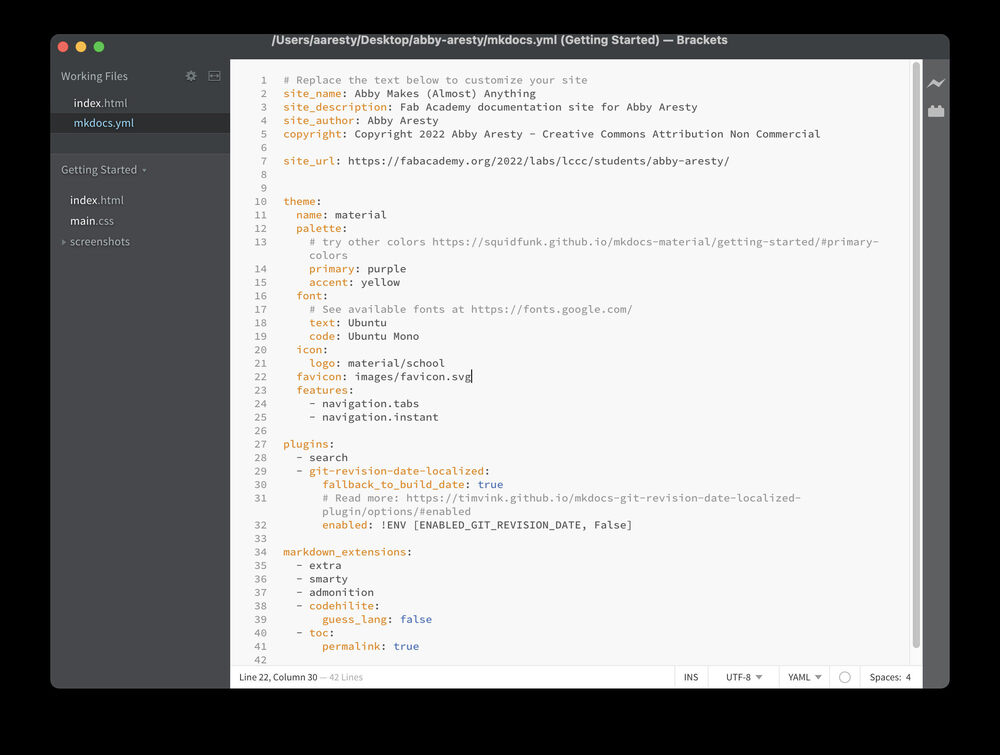
Your site has several components. It has markdown documents (the .md files) where you will add all of the content for your site. It also has a folder for all of the media you are hosting on your site. And, it has a .yaml file which is where you can experiment with changing the theme, color scheme, font, or layout of your site.
To edit your site, you will want to use some sort of text editor. As I mentioned, for the first week or so that I have been experimenting with editing my site, I used text edit. That said, for the purpose of editing the look of my site, I decided to use Brackets.io, which I had installed previously at the suggestion of my instructor.
The MkDocs Drama Continues…
I added my name to my site and tried changing the colors from primary: deep, accent: indigo, to primary: purple, accent: yellow. From talking to my instructor Scott, I had understood that one of the main benefits of MkDocs is to be able to easily run a test server so that I could see what my website would look like without having to push changes to my repo. I was excited to come across the instructions to run the test server in the tutorial so I navigated to my local repo and ran the mkdocs serve command. Alas…errors:
cd desktop
cd abby-aresty
mkdocs serve
INFO     -  Building documentation...
ERROR    -  Config value: 'theme'. Error: Unrecognised theme name: 'material'.
            The available installed themes are: readthedocs, mkdocs
ERROR    -  Config value: 'plugins'. Error: The "git-revision-date-localized"
            plugin is not installed
Aborted with 2 Configuration Errors!
So, it seems I need to install the relevant theme and plugins. I tried:
pip install Material
Collecting Material
  Downloading material-0.1.tar.gz (1.2 kB)
  Preparing metadata (setup.py) ... done
Building wheels for collected packages: Material
  Building wheel for Material (setup.py) ... done
  Created wheel for Material: filename=material-0.1-py3-none-any.whl size=1802 sha256=cbd407e1f6942f529e1a97fa8c02568fcfa6168dfad2d08502328fe13e15ab17
  Stored in directory: /Users/aaresty/Library/Caches/pip/wheels/7f/5e/6a/32844415a597854131a7fa2898f452f74f5fc2ff00b938bb96
Successfully built Material
Installing collected packages: Material
Successfully installed Material-0.1
Unfortunately, by itself, this did not seem to solve the problem. A bit more googling led me to this tutorial on setting up the material theme.
I ran
pip install mkdocs-material
Unfortunately, I was still receiving errors that the material theme was not installed. After even more googling, I came across a thread that I explained what happened. Basically, I had installed MkDocs using brew install and not pip install and this caused all sorts of configuration issues.
So, ironically, after all that…I needed to uninstall MkDocs. I ran the following commands successively:
brew uninstall --force mkdocs
pip uninstall mkdocs
pip install mkdocs
And successfully installed mkdocs-1.2.3 (again)!
After reinstalling Mkdocs I got into a weird loop for awhile where depending on where I navigated within terminal, I would get different error messages. In a new window, when I tried to run mkdocs serve, it could not find the relevant .yml file, but in my other terminal window, where I was already in the correct directory, when I ran mkdocs serve, it said ‘no such file or directory’. I spent a good chunk of time googling but didn’t find any good solutions. Eventually, I just opened a new terminal window and checked the Mkdocs version just to make sure it was working. Then, I navigated to the desktop and checked the MkDocs version again (mkdocs –version) to see if it was still accessing it properly. It worked. Then I navigated to the repo and ran it again and it worked!
Well, sort of. I still had one more error to solve:
ERROR    -  Config value: 'plugins'. Error: The "git-revision-date-localized"
            plugin is not installed
I googled the error message, came up with this site and tried this code:
pip install mkdocs-git-revision-date-localized-plugin
AND IT WORKED!!! HALLELUJAH. So, finally, I am able to experiment with my site and check it out before I push things to the the web. Next up:
Markdown vs. HTML
The first several edits I made to my website were in HTML. I’ve worked a bit with HTML and I figured it would just be easier to continue working with something I knew. But then my image paths were failing and I wasn’t sure why. I used the developer tools to check the code on the page and clicked on the image links which all took me to different 404 not found pages. When I looked at the URL for the missing image, I realized that my syntax must have been off because the page was looking for the image in the wrong folder. I then used the Markdown syntax provided in the example code and it worked just fine.
As much as I would love to have a beautiful website, I am prioritizing work on my final project. So, I am going to stick with the original template and use Markdown. It seems like a pretty handy tool and there are great online resources to learn more.
Image Management with Image Magick
I brew installed ImageMagick way back when in November and was immediately mesmerized. It felt extraordinarily powerful to be able to shrink down my images in terminal. I confess that I have been a bit haphazard in my use of the tool, however, basically editing one image at a time and tweaking images back and forth until they are passable in terms of both quality and size.
These are some of the commands I tried initially:
convert sensorboard.HEIC sensorboard.jpg
convert sensorboard.jpg -resize 1350 -quality 80 sensorboardsmall.jpg
After spending some time experimenting on my own, though, I decided to read up a bit more to see what commands others have successfully used. I explored the tutorials below.
- Smashing Magazine Tutorial
- Adrian Bracq’s Fab Academy site
- Nadieh’s Fab Academy site
- Antonio Anaya’s Fab Academy site
The general magazine tutorial is very comprehensive and detailed, but I didn’t really have a lot of success with the commands as written. I am looking for quick and simple solutions to help me move forward in my documentation. I think this tutorial might be useful to revisit after I have a bit more experience with image magic.
I batch convert PNGs to JPGs from this thread:
mogrify -format jpg *.png
This command from Adrian seems useful. It worked right off the bat. Lately, I have been resizing to 1000x1000 and 60% quality.
find . -name '*.jpg' -exec mogrify -quality 80% -resize 1600x1600\> {} +
So instead I use this:
find . -name '*.jpg' -exec mogrify -quality 60% -resize 1000x1000\> {} +
This command from Nadieh quickly shrunk down a bunch of png files. They still seem a bit large, but it is a good start.
mogrify -resize 1600\> -quality 65 *.png
I noticed that many of my jpgs that were formally pngs have a black border. I found this code to fix it:
magick mogrify -fuzz 2% -define trim:percent-background=0% -trim +repage -format jpg *.jpg
It will trim jpgs without a black border, so be careful! It also seemed to remove all content from a couple of images that had a black border. I made a copy of the entire image folder I was editing just to avoid losing content.
I discovered by accident that if I take a screenshot of the full screen instead of the window, it does not try to add transparency, so I don’t get the black border when I convert the pngs to jpgs. If I have the relevant program in full screen, this should be a good compromise and allow me to skip an extra image optimization step.
I have also been experimenting with automating the paths in word using find and replace. It is not 100% perfect, but I will add more documentation here as I improve this process.
I hope to improve my image compression and editing process over the course of the semester and to get started with ffmpeg as well. Some issues I had included forgetting to add the closing parantheses and also ending up with an extra . in the file extension.
FFMPEG
I am a bit late to the game with FFMPEG – I am circling back now to include some information where I know I can quickly access it. I installed FFMPEG using:
brew install ffmpeg
And then I had to Google around a bit because I always have trouble tracking down the FFMPEG tips on the class website. Here they are for future reference. Thanks to Tatsuro Homma for sharing the link on their page!
I also found some relevant syntax for ffmpeg from the Aalto Lab tutorial (thanks Kris!). I am copying it here for quick access:
ffmpeg -i filename -vf scale=1280x720 video-resized.mp4
The -i stands for input. Put the filename and extension after the -i. -vf stands for video filter. We want to use the scale filter to shrink the video down in size. Lastly, put the name of the file you want to output.
I tried this with my own video as follows:
ffmpeg -i fab22in1loomvideo.mov -vf scale=1280x720 fab22in1loomvideo-resized.mp4
It took a long time to process this, frame by frame, and I realized it would have been much smarter to adjust the size of the video while compressing so that it did not have to run through the whole file. Even so, this initial code scaled the video down from over 250 MB to just 8 MB.
ffmpeg -i filename -ss 4 -t 5 -vf scale=1280x720 video-resized.mp4
The code above does the same scaling as before, but now it starts the video 4 seconds in and only plays it for five seconds.
Here it is for the code for the file in question:
ffmpeg -i fab22in1loomvideo-resized.mp4 -ss 2 -t 20 -vf scale=1280x720 fab22in1loomvideo-resized-short.mp4
The resized video was just over 600 kb.
The last step is to embed the video on the site. The syntax on the Aalto lab video did not work for me but I found this site that shared the syntax below. And I finally was able to post my first video!
<video width="400"  controls>
  <source src="../../images/w02/fab22in1loomvideo-resized-short.mp4" type="video/mp4">
</video>
Just for Fun
I noticed that some folks use check marks on their sites to indicate that they have completed an item, and I have seen other emojis scattered throughout. I was wondering how to do this and it turns out you just have to add an extension to your .yml page and then you can use any of the Markdown emojis described here.
Thanks for reading!
A few more notes from 2023:
I got a new computer in late December 2023. So, in getting set up for this spring’s Fab Academy, I had the chance to follow my own documentation. I definitely found a few holes! I’ve added a couple of notes above, interspersed, and also wanted to update my process below in installing MkDocs.
The first set of errors I received after following the instructions above were:
Error: MkDocs encountered an error parsing the configuration file: while constructing a Python object
cannot find module 'materialx.emoji' (No module named 'materialx')
My new favorite first troubleshooting step is asking ChatGPT for help. I’ve discovered that it doesn’t always get the exact syntax correct in its suggested solutions, but it usually helps me narrow down my search. It responded to my query:
The error message "Error: MkDocs encountered an error parsing the configuration file: while constructing a Python object cannot find module 'materialx.emoji' (No module named 'materialx')" indicates that the MkDocs tool is unable to find the "materialx.emoji" module, which it needs to build the documentation.
To solve this issue, you need to install the "materialx" package in your Python environment. You can do this by running the following command in your terminal:
pip install materialx
This syntax wasn’t quite right, because I got the error:
I tried this and got: ERROR: Could not find a version that satisfies the requirement materialx (from versions: none)
ERROR: No matching distribution found for materialx
I returned to my old friend google and came across a site with useful information.
I ran:
pip install mkdocs-material
And also:
pip install mkdocs-material-extensions
Then I received another error:
ERROR    -  Config value 'plugins': The "git-revision-date-localized" plugin is
            not installed
Aborted with 1 Configuration Errors!
I followed the instructions on this site and ran:
pip3 install mkdocs-git-revision-date-localized-plugin
And success! I still have a ways to go before I have everything set up on the new machine, but at least I am one step further along the path!